

Many organizations use admin dashboards to track business-critical data and provide insight into impactful decision-making. Strong dashboards and enhanced data visibility allow organizations to accurately track their data and ensure operations are running smoothly in real-time. While there are several dashboard solutions on the market, a commonly used one is AdminLTE. AdminLTE is an admin dashboard solution that can be used to increase visibility into sales, e-commerce, order listings, task management, and more. Learning to effectively use AdminLTE can save engineers valuable time and resources by eliminating the need to manually build admin dashboards from scratch for different business needs.
In this article, we'll create an interactive AdminLTE dashboard that displays sales data stored in an SQLite database. We'll walk through how to create a server using Node.js, fetch data from the database, and return it to the frontend, where it will be displayed using the AdminLTE dashboard. AdminLTE can be implemented in various frameworks, but we will focus on React implementation.
What Is AdminLTE?
AdminLTE is an open-source admin dashboard and control panel theme that provides a range of popular and reusable web components. AdminLTE is built on top of Bootstrap and has an active community of users and developers. It's fast and lightweight and provides a wide range of features. These features include verified HTML5 and CSS3 syntax by W3C services, mobile-first responsive design that fits many resolution types, and over 1,000 Font Awesome icons, Ionicons, and Glyphicons.
AdminLTE is also compatible with all major browsers and works well with frameworks such as Laravel, Angular, React, Bootstrap, and Vue.js.
Let's dive into building the AdminLTE dashboard.
Building an interactive dashboard using AdminLTE
To follow this guide, ensure you have the following:
- Node.js and Yarn installed on your local machine
- A code editor and a browser installed on your local machine
You can access the complete code for the application in this GitHub repo.
To get started, let's create the database needed to pull the sales data.
Creating a database
First, create a folder named AdminLTE. Inside this folder, create two subfolders named client and server. Open the server folder in the code editor. Then run the following commands in the integrated terminal to initialize a Node.js project and install the backend dependencies:
In terms of the dependencies, we will be using the following:
- sqlite3 will be used for the database
- node-fetch@2 will be used to fetch data for seeding the database
- Express will be used to create the server and an API endpoint
- CORS will be used to allow communication with the frontend
Open the package.json file and add the following code for the scripts below the "license": "MIT" key-value pair:
With the dependencies installed, create a file called db/salesData.db inside the server folder. This will be used as the database file. Create a new file called seeddb.js in the server folder and paste the code below. This file will be used to seed the database:
The above code connects to the provided database file with read and write permissions and logs a message to the console upon successful connection. It fetches dummy sales data from the provided URL and converts the response to JSON. The code then creates a table inside the database with specified fields, loops through the data, and inserts it into the database. Lastly, it reads the data from the database and displays it in the terminal.
Next, run the following command in the terminal to seed the database:
Creating an API to get sales data
After creating a database, let's create an API that will get sales data for our dashboard.
In the server folder, create an index.js file and paste the following code:
The code above imports all the required dependencies, creates an instance of the server, allows CORS requests, and specifies the port on which the server will run. It then creates a route on the server that allows the GET HTTP method. When this route is invoked, a connection to the database is established, where all the data is then fetched from and returned to the frontend. The database connection is then closed.
To start the server, run the following command inside the terminal:
Reading and displaying data using AdminLTE
Next, let's set up AdminLTE to read and display the sales data.
To read and display data in the frontend, navigate to the client folder created earlier and run the following command in the terminal to create a React app in the same folder:
Once the React app is created, run the following command in the terminal to install AdminLTE as a dependency:
AdminLTE has three dashboard versions that we can use. We'll focus on Dashboard v1. The dashboard will contain a main header, a sidebar, and a content area. The content area will contain groups of cards to display the data from the database.
Navigate to this page, which contains the dashboard version we will use, then right-click on the page and select View page source or press Ctrl+U on the keyboard.
From the page markup, copy the elements between the closing <title> tag and opening <body> tag and paste them into the <head> section of the client/public/index.html file:
Next, scroll to the bottom of the source page, copy the <script> tags, and paste them into the <body> section of the client/public/index.html file:
Your client/public/index.html file should now look like this:
Next, open client/node_modules/admin-lte, locate the dist and plugins folders, and copy and paste them into the client/public folder.
The above steps provide the CSS and JavaScript files that the application needs in order to style and control the behavior of the dashboard.
Fetching data from the backend and creating components
Next, let's create the components displayed on the dashboard. We'll also implement the data fetching logic to retrieve the sales data from the backend using the useEffect hook and store it in a variable so that it can be accessed by the components.
To start, open the src/App.js file and replace the existing code with the following:
In the above code, we import the necessary components that will be created in the next step. We also import the useEffect hook to fetch the data from the server, as well as the useState hook to store the fetched data.
The useEffect hook fetches the data on the initial page load from the URL where the server is running, converts the data to JSON, and stores it in salesData. The salesData variable is later passed on to the Content component as a prop.
To create the components, make a new components folder inside the src directory and create the following three files inside: Content.jsx, Header.jsx, and Sidebar.jsx.
Creating the main header component
Let's now create the main header component. This will contain a dummy navigation bar for the dashboard.
Open Header.jsx and paste in the following code:
The above code creates the dashboard's main header with hard-coded data.
Once complete, let's create the main sidebar component.
Creating the main sidebar component
To create the main sidebar component, open Sidebar.jsx and paste the following code:
The above code creates a dummy main sidebar component that contains hard-coded information, such as user details. In a real-world project, this information, such as user profile picture and username, would be fetched from the database upon successful login.
Once the main sidebar component has been created, we'll build the main content component.
Creating the main content component
The main content component will be used to display data from the backend. To create this component, open Content.jsx and paste the following code:
In the code above, the necessary components are imported, and the props passed from the src/App.js file are destructured and passed into all the components.
To create the imported content components, create a folder titled src/components/content and create the following two files inside that folder: Overview.jsx and Regional.jsx.
Once these two files are created, let's walk through adding the overview component using the Overview.jsx file.
The overview component
This component will show the overview of the data from the backend, including the total sales amount, units sold, regions, managers, and salesmen.
Open the Overview.jsx file and paste in the following code:
This component receives data passed as props from the Content.jsx file. Using the code above, we create an array for all the data that will be displayed. These arrays are then populated by looping through data using a forEach loop.
To get the total sales amount and the total units sold, we use the reduce method to retrieve the sum of all the units in the array. To get the total managers, regions, and salesmen, we use the Set object to get the unique values only, push them into an array, and find the length of the array.
The regional component
Let's now create the regional component using the Regional.jsx file. The regional component will show the total sales amount and units for a certain region.
Open Regional.jsx and paste in the code below:
Using the code above, we create an array for each region, loop through the data, and push every sale entry into its corresponding region array. To get the total sales per region, we use the map method to loop through the array, which returns an array of sales amounts. We then use the reduce method to get the sum of all the elements in the array. The same concept is used for the total units per region.
Running the application
Once we have built all of the necessary components, it's time to run the application.
To confirm that the application is running, open AdminLTE/server and run the following command:
Then, open AdminLTE/client and run the following command:
Navigate to http://localhost:3000/ in your browser. You should see the following sales dashboard with the corresponding components created:
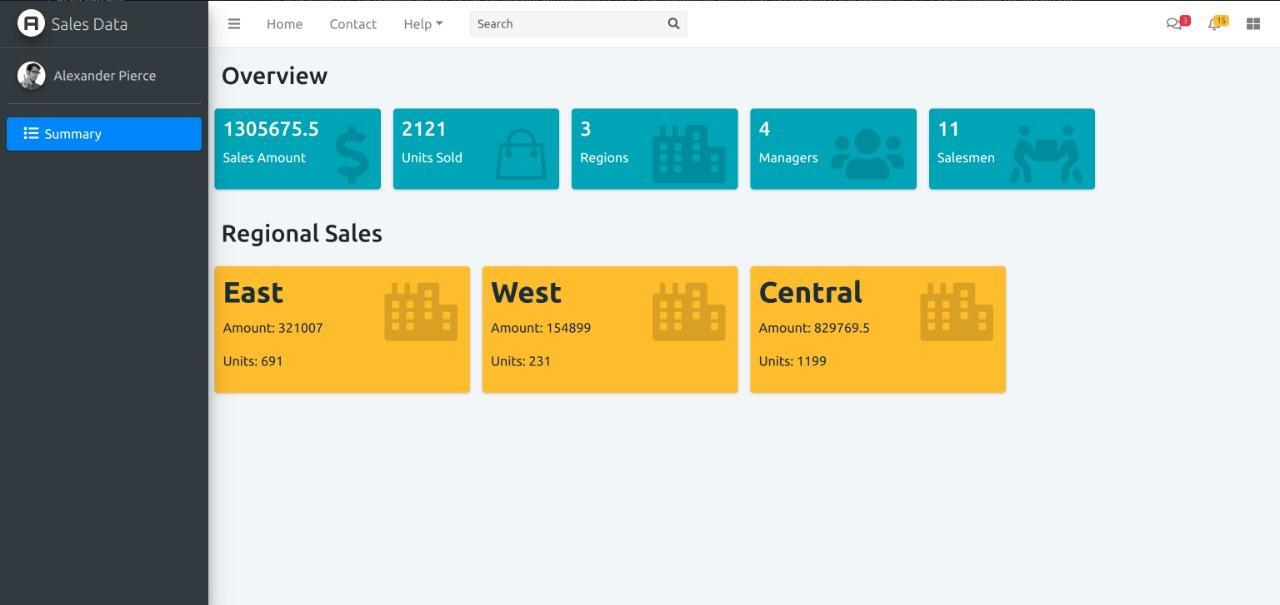
And that's how you build a sales dashboard using AdminLTE!
Although AdminLTE is a popular platform used to build admin dashboards, it is limiting for enterprise-grade dashboards. AdminLTE does not allow users to build custom components and implementing it using React can be difficult since users must change the HTML code into JSX for components. Users also must implement their own data-fetching logic and state management system, and AdminLTE does not offer a streamlined way to populate its components. This can make building dashboards using AdminLTE challenging for users. Luckily, there is a streamlined and robust alternative that offers a quick and easy way to build and customize internal dashboards.
Airplane as a better alternative to AdminLTE
Airplane is an internal tooling platform that allows users to build enterprise-grade tasks and dashboards in minutes using queries, APIs, and more. The platform offers Airplane Views to easily build custom dashboards and UIs in under 15 minutes.
Unlike AdminLTE, Airplane Views offers data-fetching logic, component state management, and permissions management systems to streamline the dashboard creation process without compromising security. Building a View in Airplane is easy through its extensive pre-built component and template libraries. In addition to pre-built items, Airplane also makes it easy for users to create custom components using standard React patterns.
In addition to Views, Airplane offers Tasks, which are powerful single-operation or multi-step functions that anyone on your team can execute, task scheduling, which replaces cron by running tasks automatically at certain time intervals, and more.
Airplane allows users to quickly build powerful, custom dashboards to fit their organizations' unique needs. If you're looking for a robust platform with strong defaults and customization capabilities, then Airplane is a great fit for you. To learn more about admin dashboards, check out our blog for content on building a Python admin dashboard, getting started with Active Admin, Django admin crash course, and more.
To try out Airplane and build your first admin dashboard in minutes, sign up for a free account or reach out to [email protected]!
Author: Kevin Kimani
Kevin Kimani is a FullStack Web Developer and Technical Writer who enjoys teaching complicated concepts in simple ways. He enjoys creating websites, writing technical articles, and collaborating on open-source projects.


