Django is a hugely popular web framework for Python known for enabling rapid development and getting things done. Django admin is a web interface that provides a rich environment for adding content to your site.
In this article, we’ll first explore how to create a Django admin panel with basic functionality. Then, we’ll demonstrate some intermediate and advanced concepts — including how to customize your admin panels to manage product inventory and generate reports. We'll also introduce Airplane as an alternative to Django admin. Airplane is developer platform for rapidly building powerful UIs and workflows. Using Airplane, you can transform scripts, APIs, and queries into applications in minutes.
Requirements
Before you begin this tutorial, you'll want the following installed on your system:
Let's start off by creating the basic Python app.
Use case: Django admin project for Kitchen Shop
For the purposes of this article, we'll build a minimal, real-world Django admin project for a fictional company named “Kitchen Shop.” Kitchen Shop sells kitchen utensils such as forks, knives, and pans.
We'll assume Kitchen Shop has another web app for their e-commerce website, which we will not cover in the article. However, we'll use Django admin to provide data management and reporting for some of the entities related to Kitchen Shop's business: products, product categories, and inventories.
By the end of the article, Kitchen Shop will be able to leverage Django admin's tools for administrative work and save work hours website development.
Building a basic admin panel with Django
Python comes with the venv module, which supports the creation of lightweight “virtual environments” with their own site directories. Let’s create a new virtual environment in our project root directory:
python -m venv .venv
Now the virtual environment must be “activated” using a script in its directory. In Linux, use:
source .venv/bin/activate
Or, in Windows:
.venv/Scripts/activate
We can now run the following command to install Django:
python -m pip install django
Let’s use the django-admin command to create a Django project directory structure for the KitchenShop project:
django-admin startproject KitchenShop
To change to the /KitchenShop directory, type the following:
cd KitchenShop
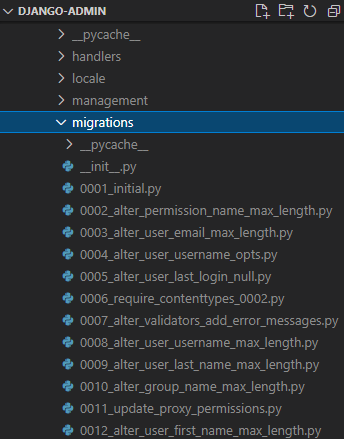
By default, Django uses a lightweight, compact database called SQLite. When you create a Django admin project, your code comes with instructions for creating administrative users and groups in your database. These instructions are called migrations. As you add or change your models (adding a field, deleting a model, etc.), migrations propagate those changes into your database schema.
If you open the migrations folder at .venv/Lib/site-packages/django/contrib/auth/migrations, you’ll see some migrations ready to be applied:
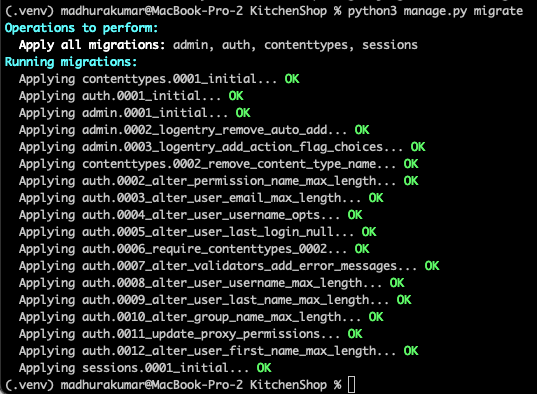
Let's execute the following command line to migrate users and groups tables in your SQLite database:
python manage.py migrate
As a result, you’ll get the following output:
Django comes with an administrative panel out of the box, which saves you from providing a separate Admin page with an authentication mechanism. Since this feature is protected against unauthorized access, you must provide Django with a superuser to manage the admin panel.
Create a superuser
To create a superuser, go to the KitchenShop directory where the manage.py file is and run the following command with the respective parameters:
python manage.py createsuperuser

Run our application
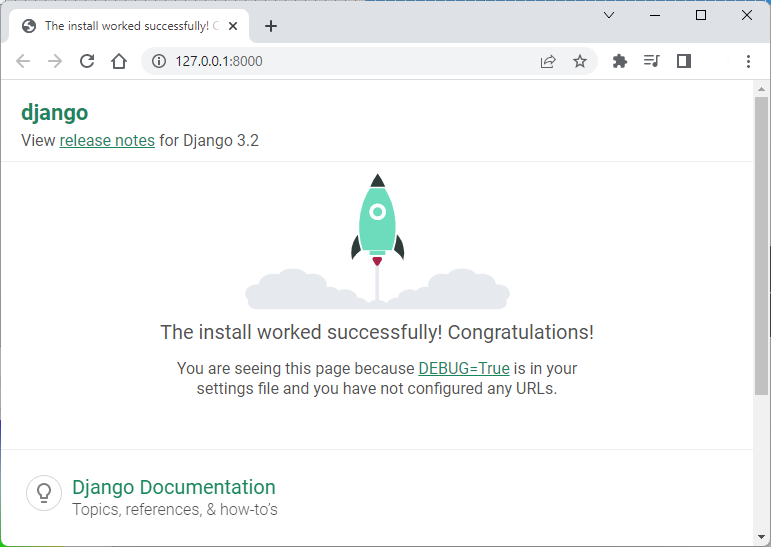
To run our application, type the runserver command to start the development server on the internal IP at port 8000:
python manage.py runserver

Once the server is running, you can view the site by navigating to http://127.0.0.1:8000/ in your local web browser:
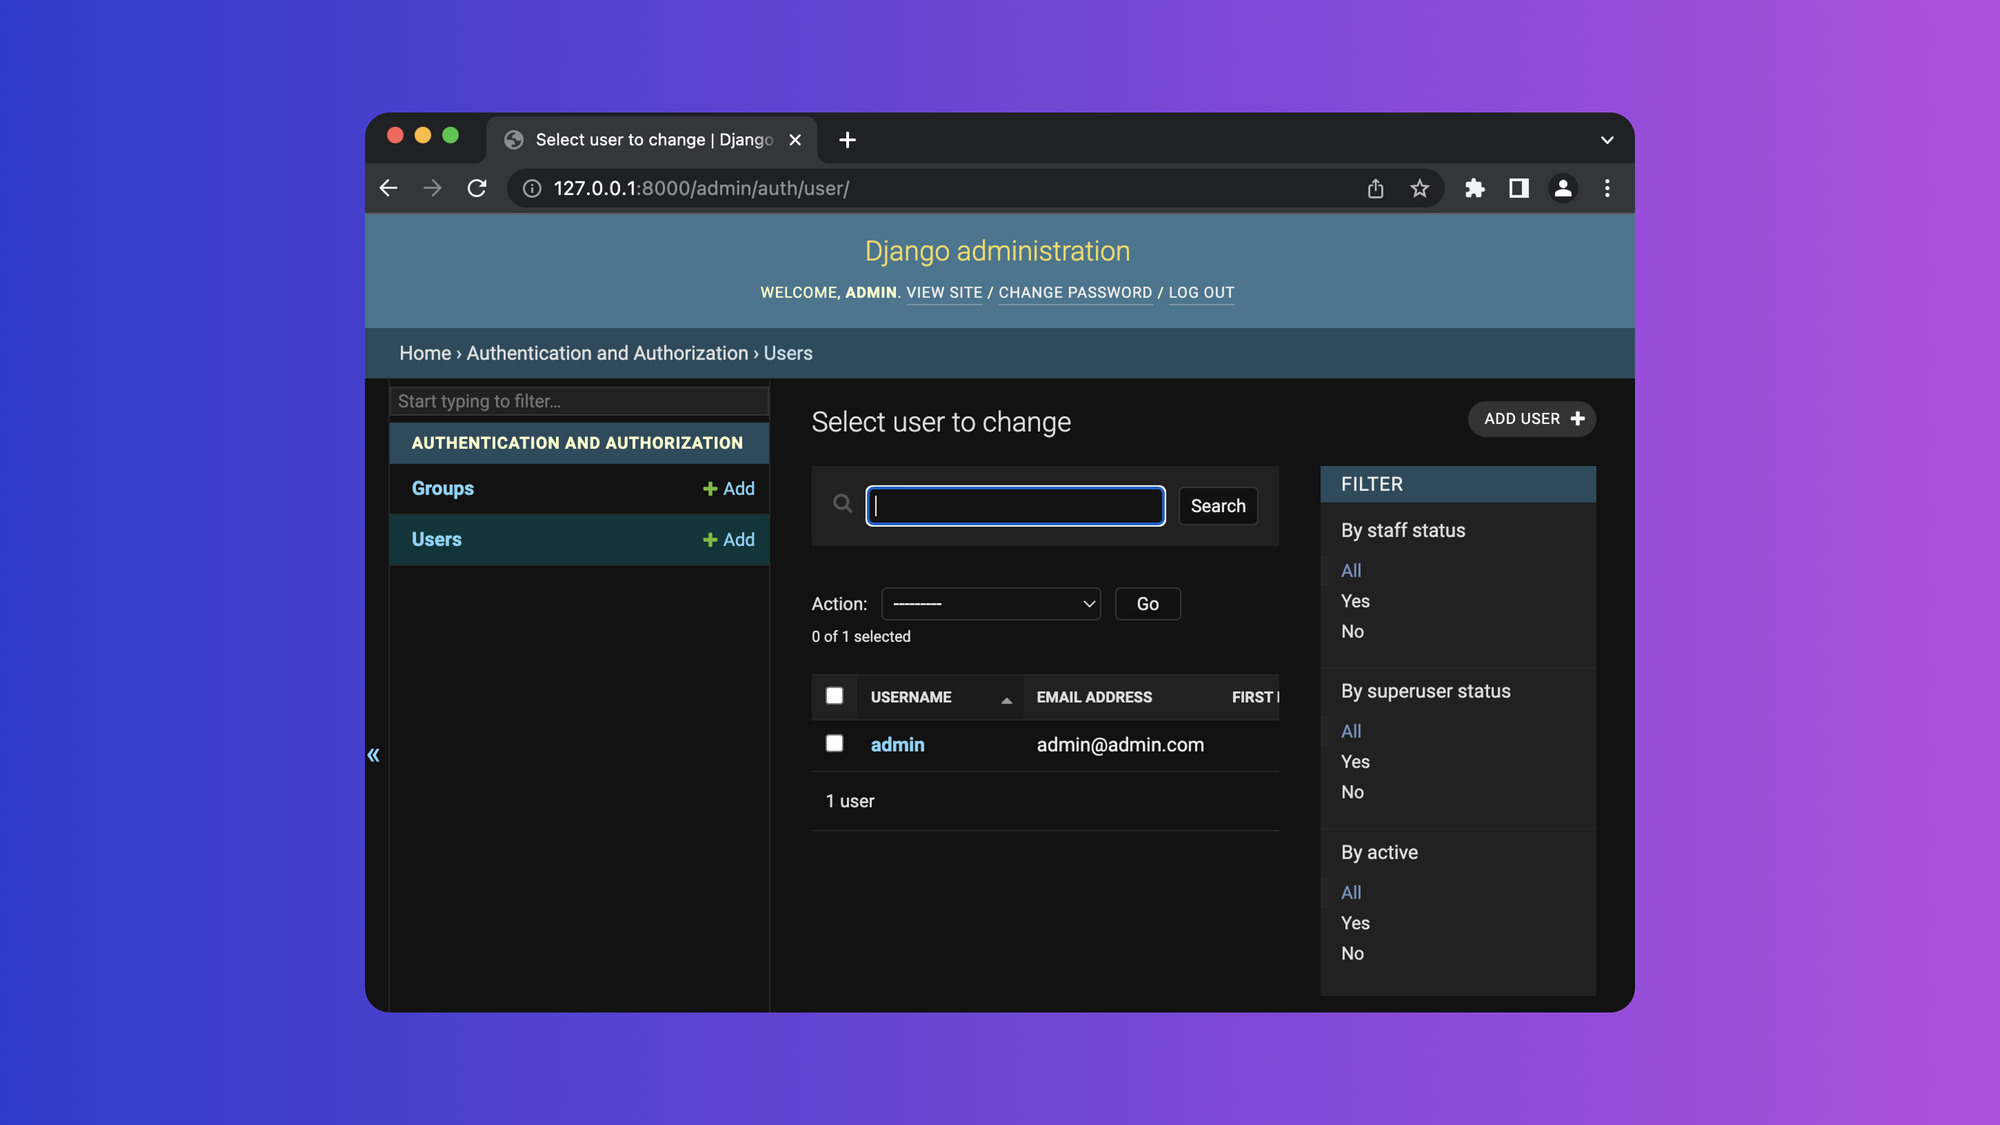
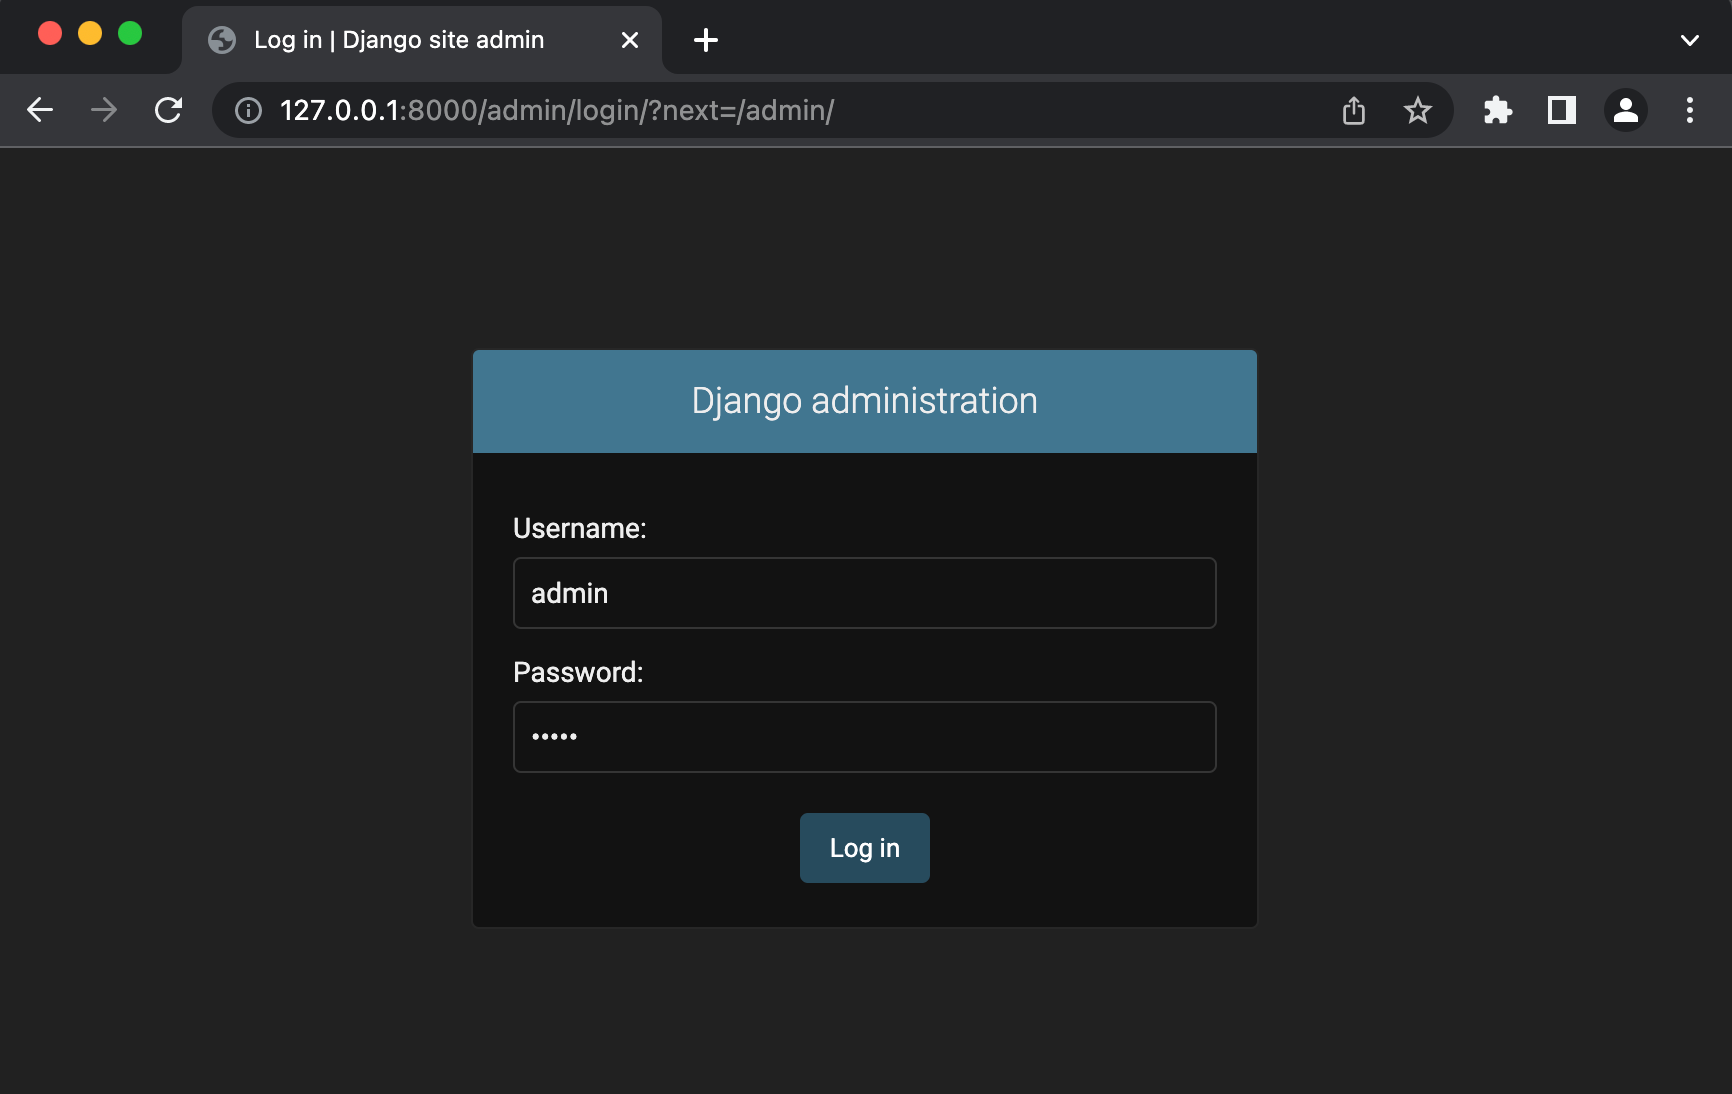
Navigate to the admin site in your local web browser (http://127.0.0.1:8000/admin/). Then log in to the site using the credentials for your superuser account:
http://127.0.0.1:8000/admin/
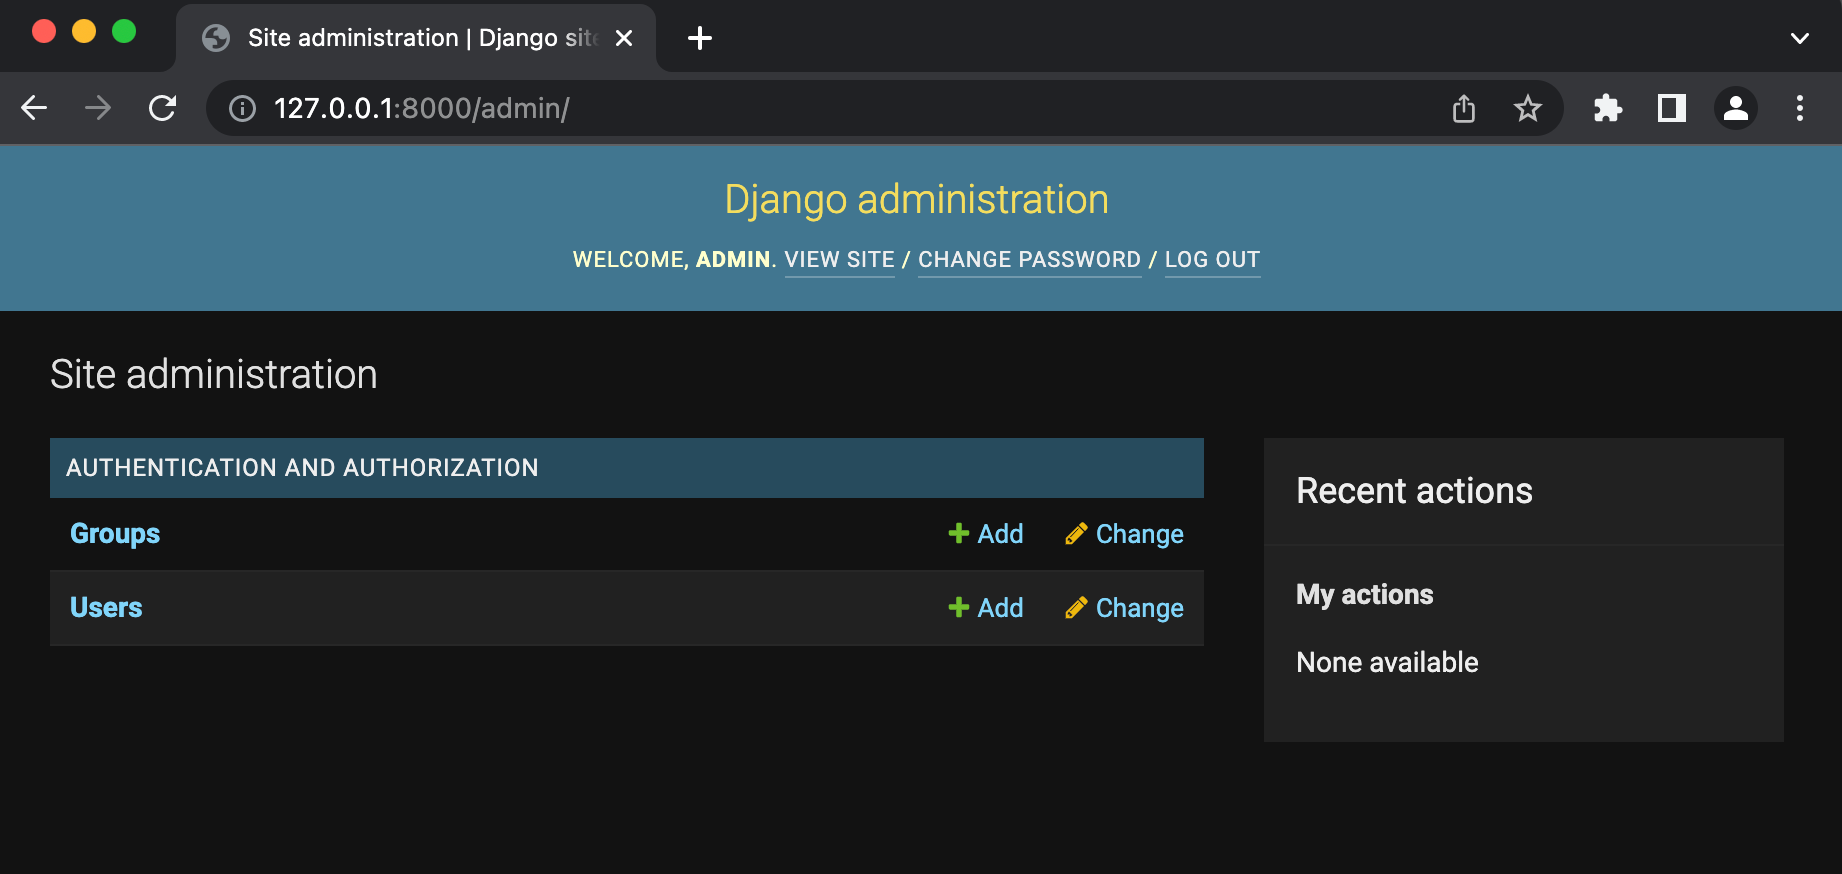
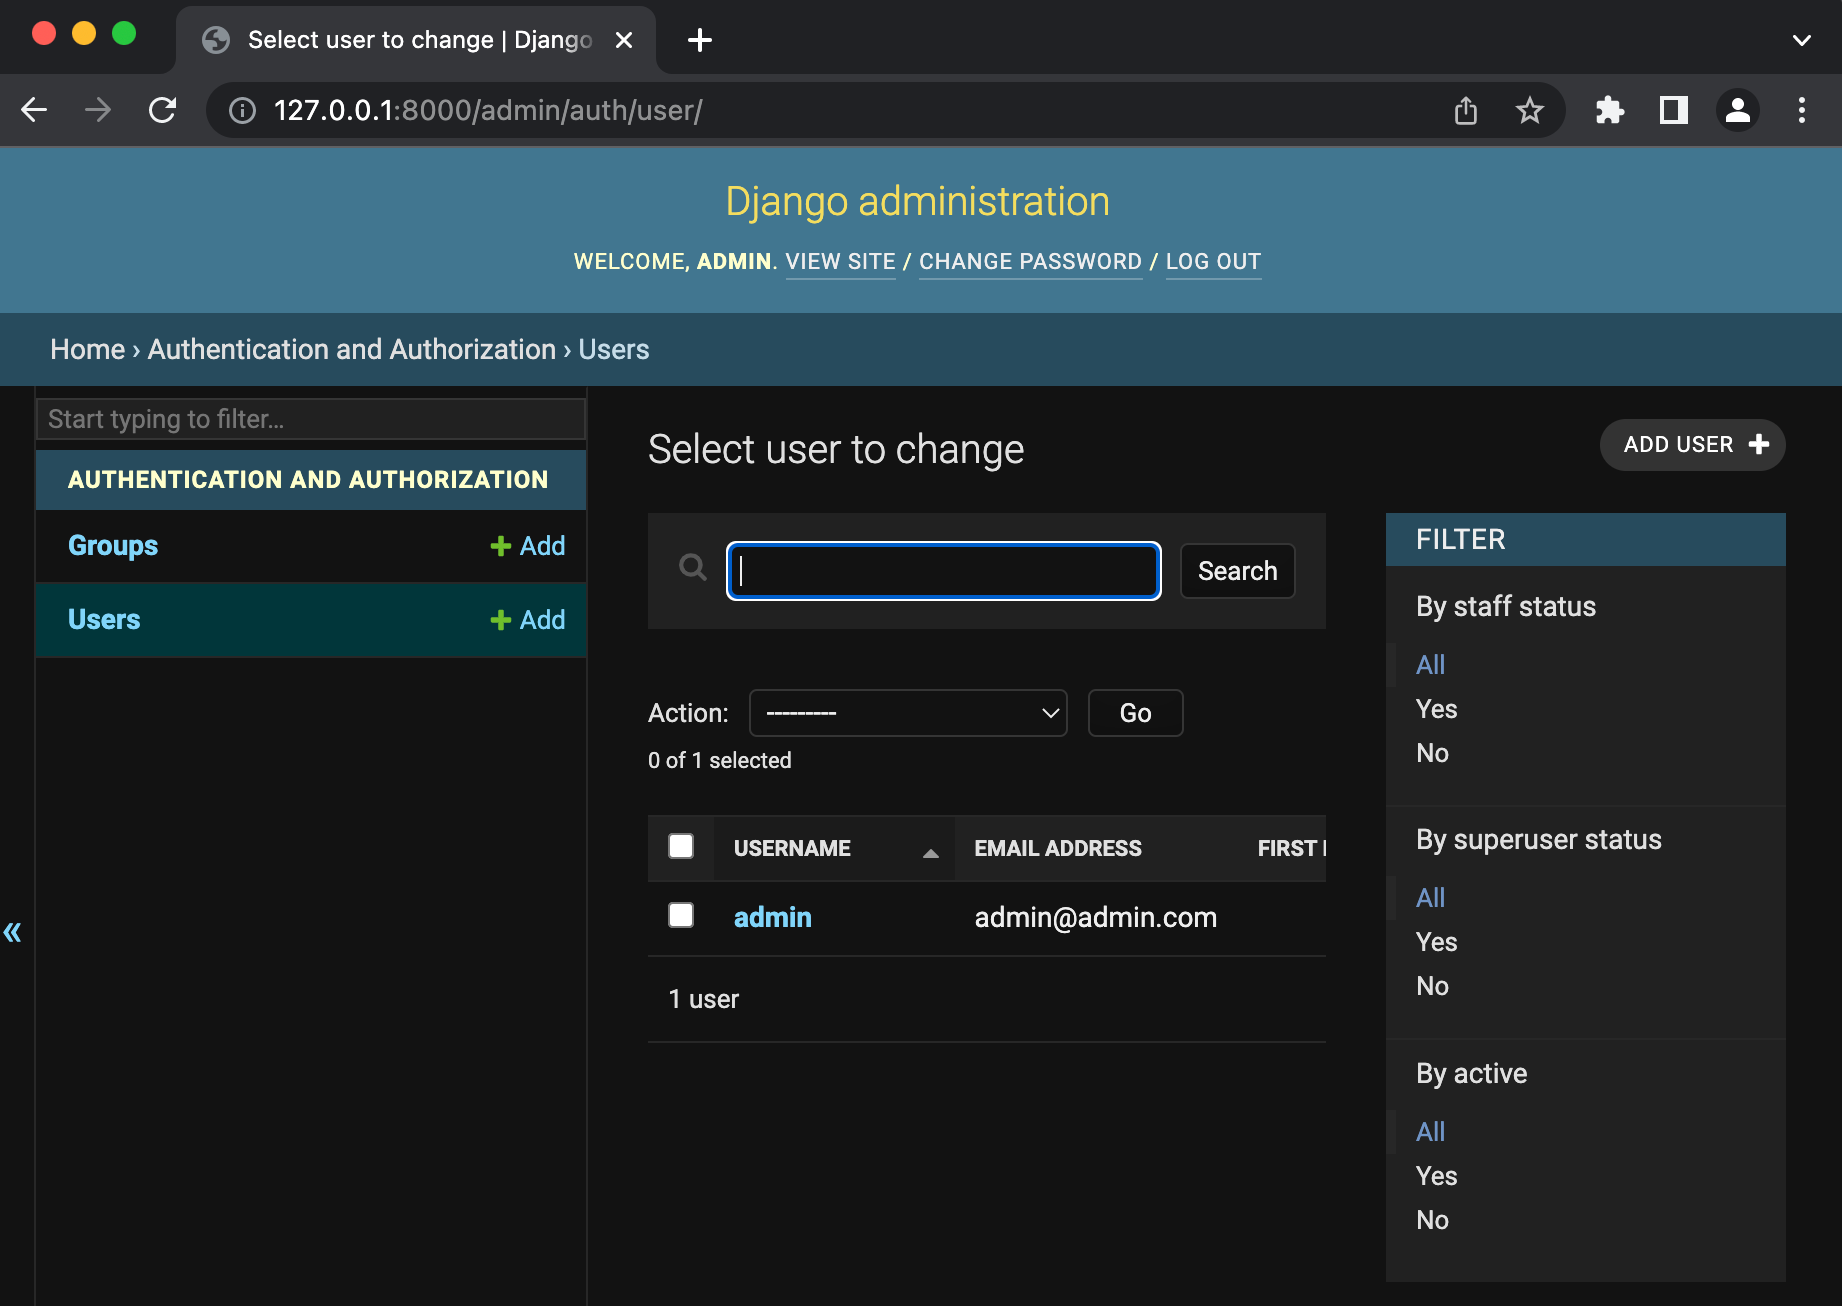
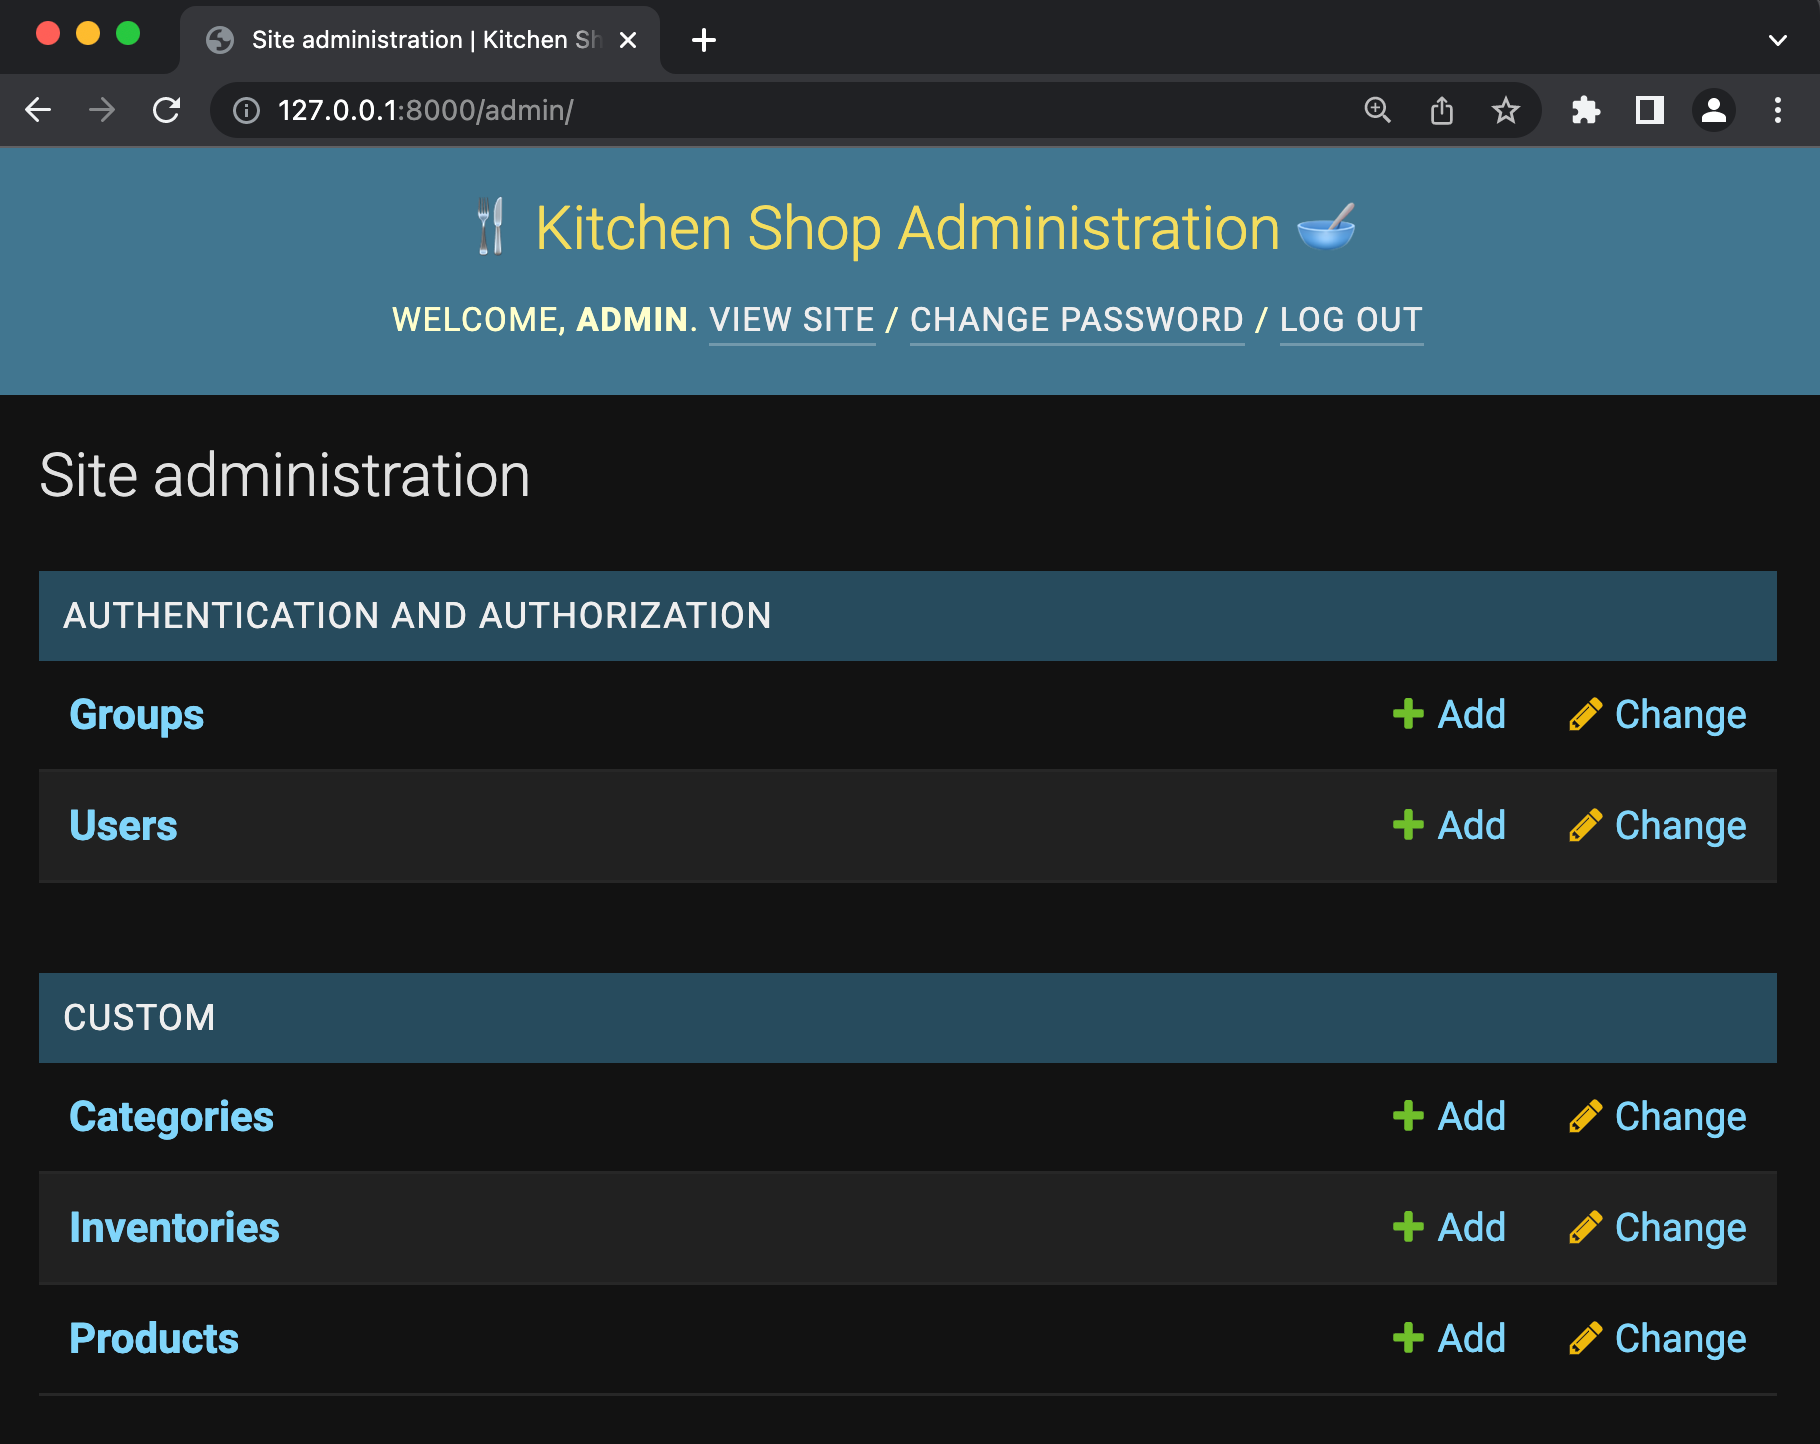
The top level of the Admin site displays all of your models, sorted by “Django application.” You can click the Users or Groups links from the Authentication and Authorization section to see their existing records.
Click the Users entity to see your superuser record:
Creating a custom Python app
With the project created, our next step is to create the app. Django is divided into several apps in the same project. This facilitates code reuse and helps with the organization of the project.
What’s the difference between a project and an app?
A project is a collection of apps needed for a website to run. A project can contain multiple apps and an app can be in multiple projects. An app is a web application with a specific set of features, such as a blog, an issue tracker, or an inventory. In this article, we’ll work with a Django app named “custom” to manage product inventory data.
Create your custom app
To create your custom app, make sure you’re in the same directory as the manage.py file and type this command:
python manage.py startapp custom
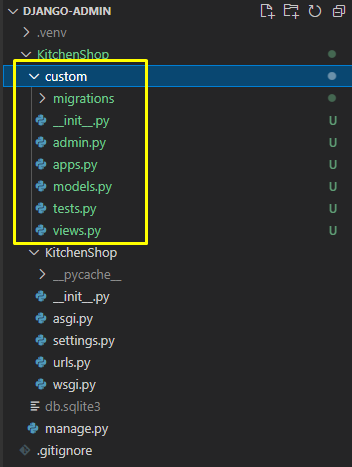
This will create a new subdirectory called custom containing the admin.py, models.py, tests.py, views.py files, and the migrations folder. This structure will hold our new custom app within our project.
We still need to enable our newly created custom app in our Django project configuration. We can do this by opening the settings.py file in the KitchenShop directory and adding our app name (custom) to the INSTALLED_APPS list:
Remember when we accessed the Groups and Users lists in the Django admin panel? That was possible because Django registers those entities out of the box. Now imagine you want to create a new, simple model class named Category, representing the product category within your Kitchen Shop project.
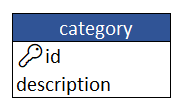
To manage Category model objects on your Django admin panel, you first must declare the Category class. Let's open the KitchenShop/custom/models.py file and add the following code:
In the above code, the Category class must inherit the models as a Django class.Model base class. We only needed to declare the description field because the id field is inherited via the models.Model class.
Once we’ve declared the Category model class, the next step is to register it so that Django can represent it in the admin interface. We do this in the KitchenShop/custom/admin.py file where models are registered:
Now let's open the KitchenShop/KitchenShop/urls.py file and change the site_header and site_title variables to customize the header and title of your site in the admin panel:
The last time we applied migrations, our Django project still didn’t have the Categories model — but it must be included in our application. Fortunately, instead of forcing you to define and register all the models from the start, Django migrations let us evolve our models in incremental steps.
The makemigrations command tells Django to calculate the differences between your current database models (stored in SQLite database) and the Python model classes living in your project at this moment.
Run the following makemigrations command:
python manage.py makemigrations
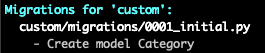
The image above shows how the makemigrations command instructed Django to create the 0001_initial.py file containing incremental patches inside the /migrations folder.
Now let's execute the following migrate command to migrate the category table in the SQLite database:
python manage.py migrate

After you’ve created and applied your first custom migration, the SQLite database will already have the Category schema, but not the category data. Let’s load a sample data file into the database.
Create a new file named sample_categories.json at the KitchenShop/custom/ folder with the following content, representing categories of products:
Loading data is simple. Each time you run loaddata, the data will be read from the fixture (sample_categories.json) and re-loaded into the database:
python manage.py loaddata custom/sample_categories.json
Now execute the runserver command to run the application again:
python manage.py runserver
Then navigate to the admin site at http://127.0.0.1:8000/admin/ to see how Django applied your last changes:
http://127.0.0.1:8000/admin/

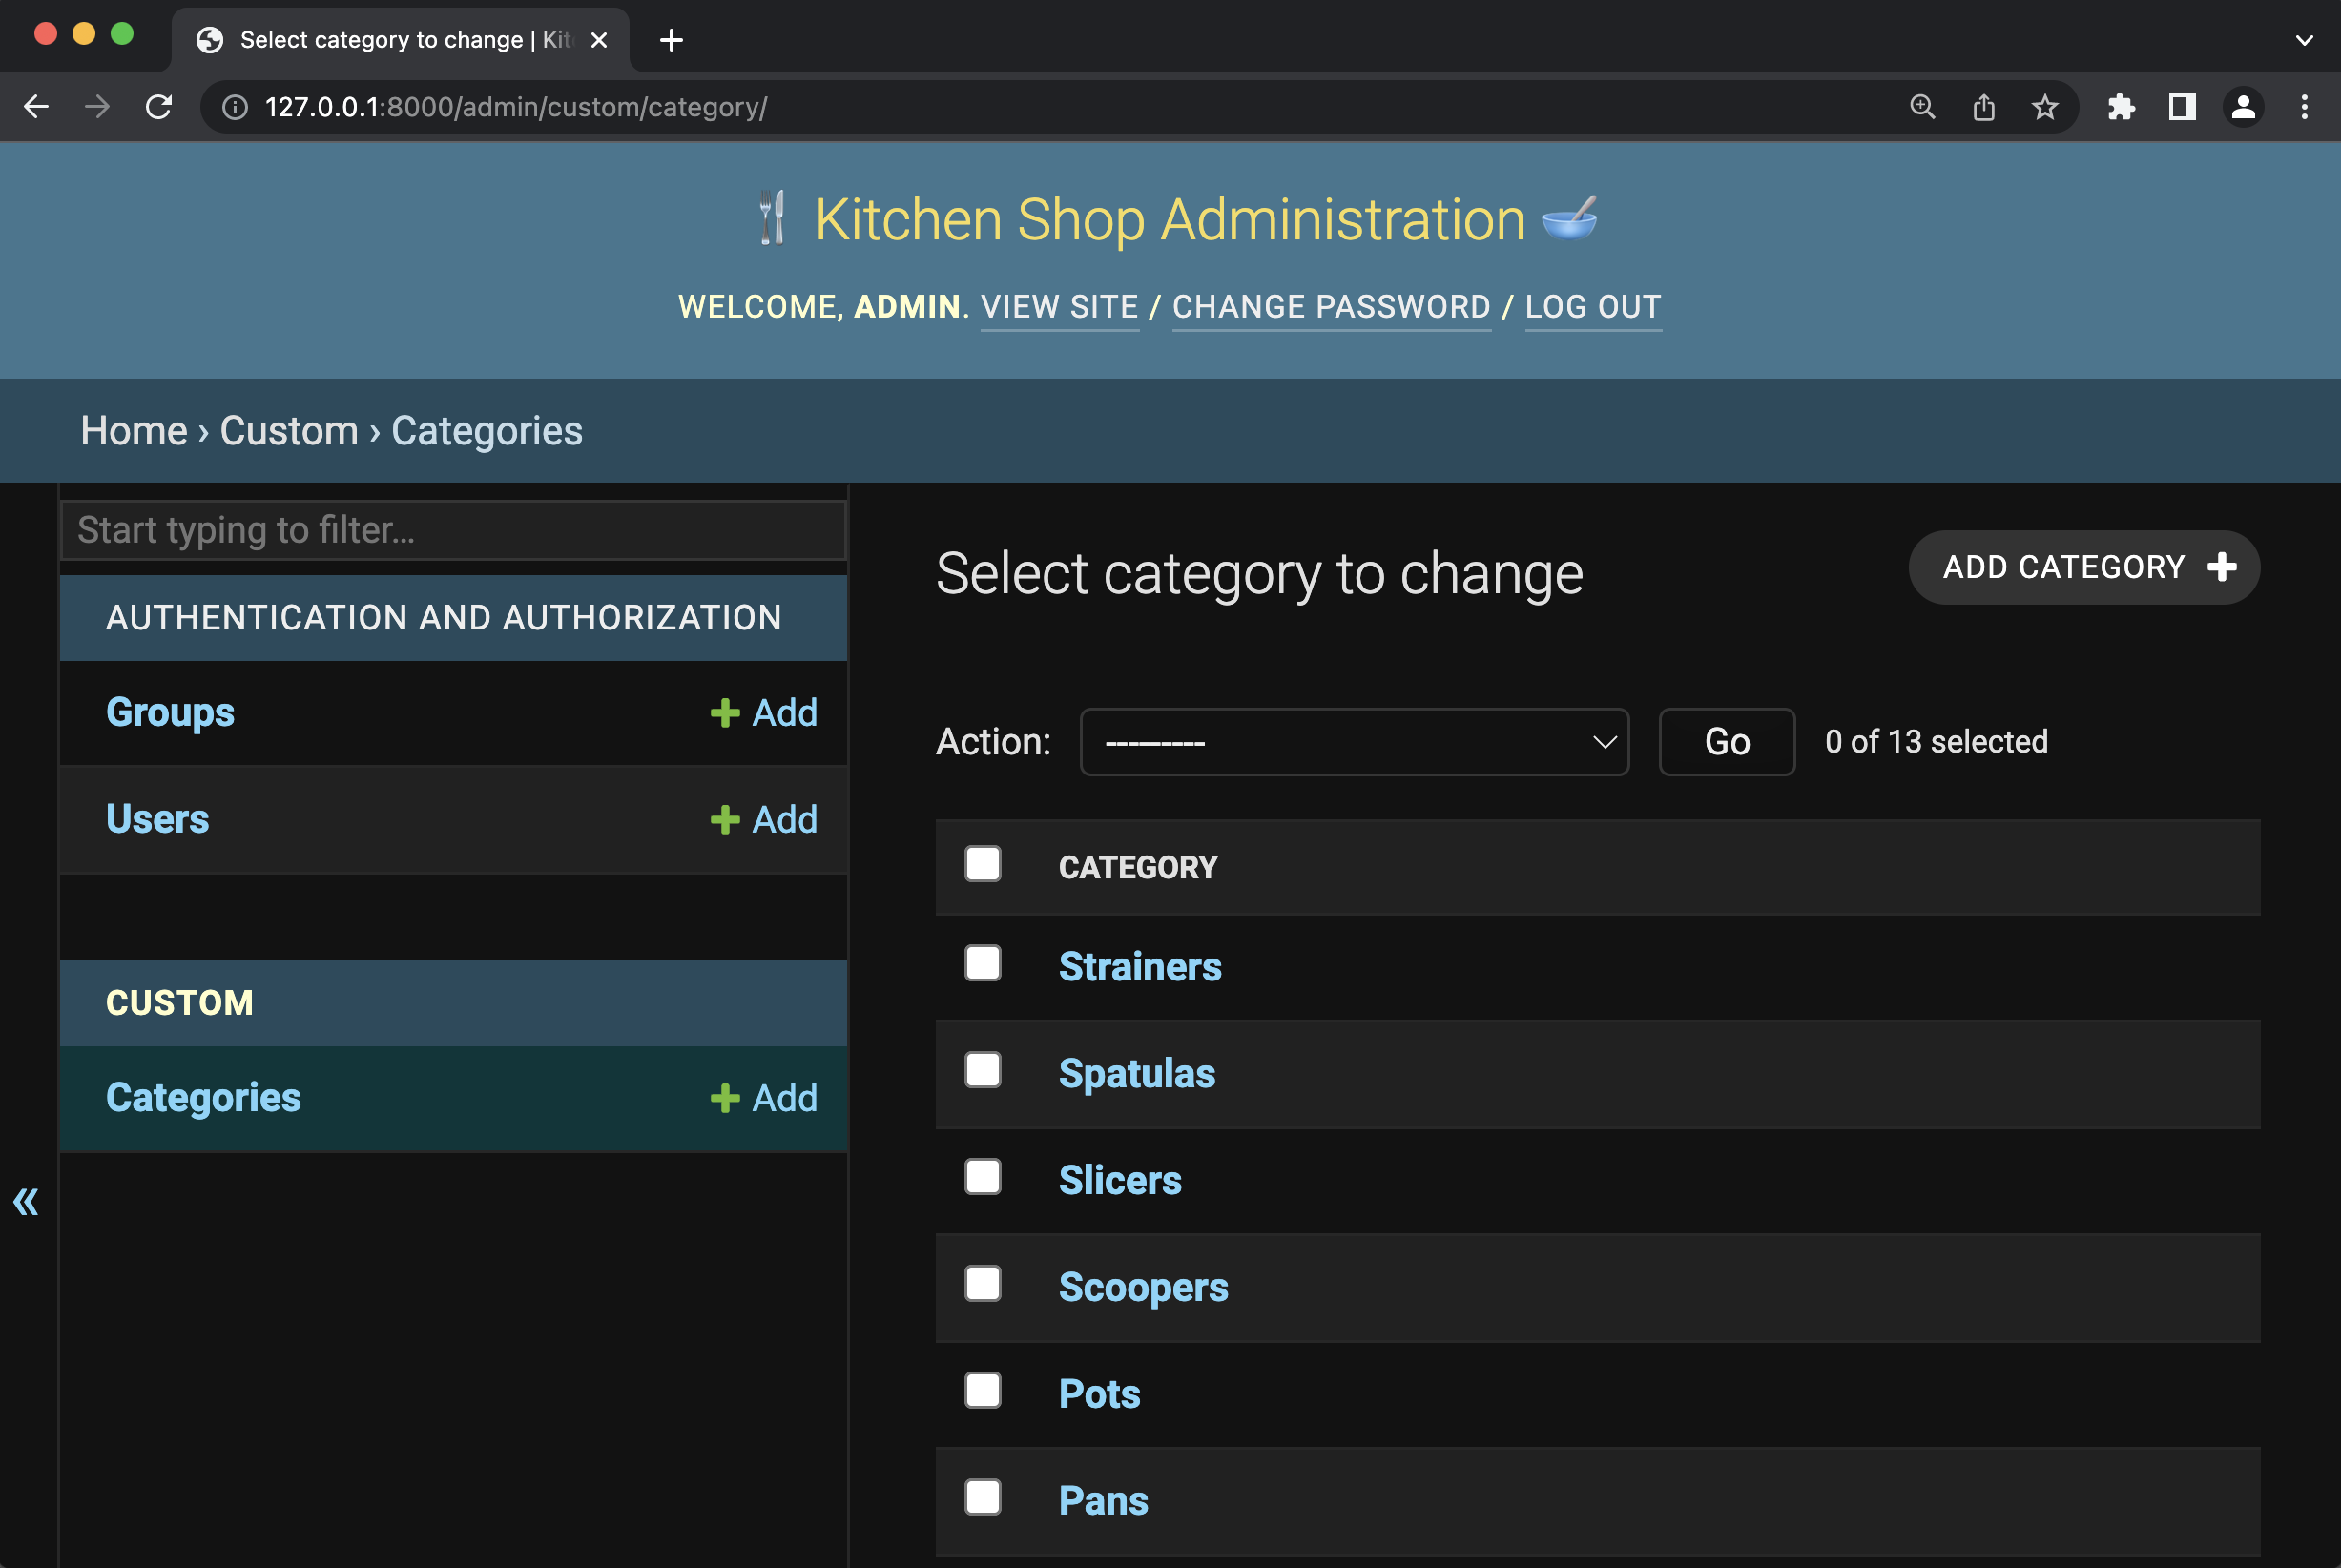
Since the Category model class has been properly registered in Django, our admin panel now automatically offers category management!
To view the list of categories that we import through the manage.py loaddata command, click Categorys below the Custom section:
But wait — you may notice a couple strange things about this panel.
- First, by default Django pluralizes the model name by simply adding the letter "s" to the end of "Category." That's why this says Categorys instead of Categories.
- Second, Django lists each category with a generic "Category object" text plus the object ID.
Let's go back to the KitchenShop/custom/models.py file and modify the model code:
What have we just done?
- The
verbose_name_pluralmetadata option lets you tell Django how your model will be displayed when referred to in the plural. - The
__str__method tells Django how to use the description to print each category in the Django admin panel. For example, instead of an obscure text such as “Category object (17),” you want Django to display categories as “Knives,” “Pots,” “Mixers,” etc.
After saving changes, the custom admin panel now looks like this:
Django also lets you visualize, create, edit, and delete each record in your database model. Each field can be edited in the same view as where the object is visualized:
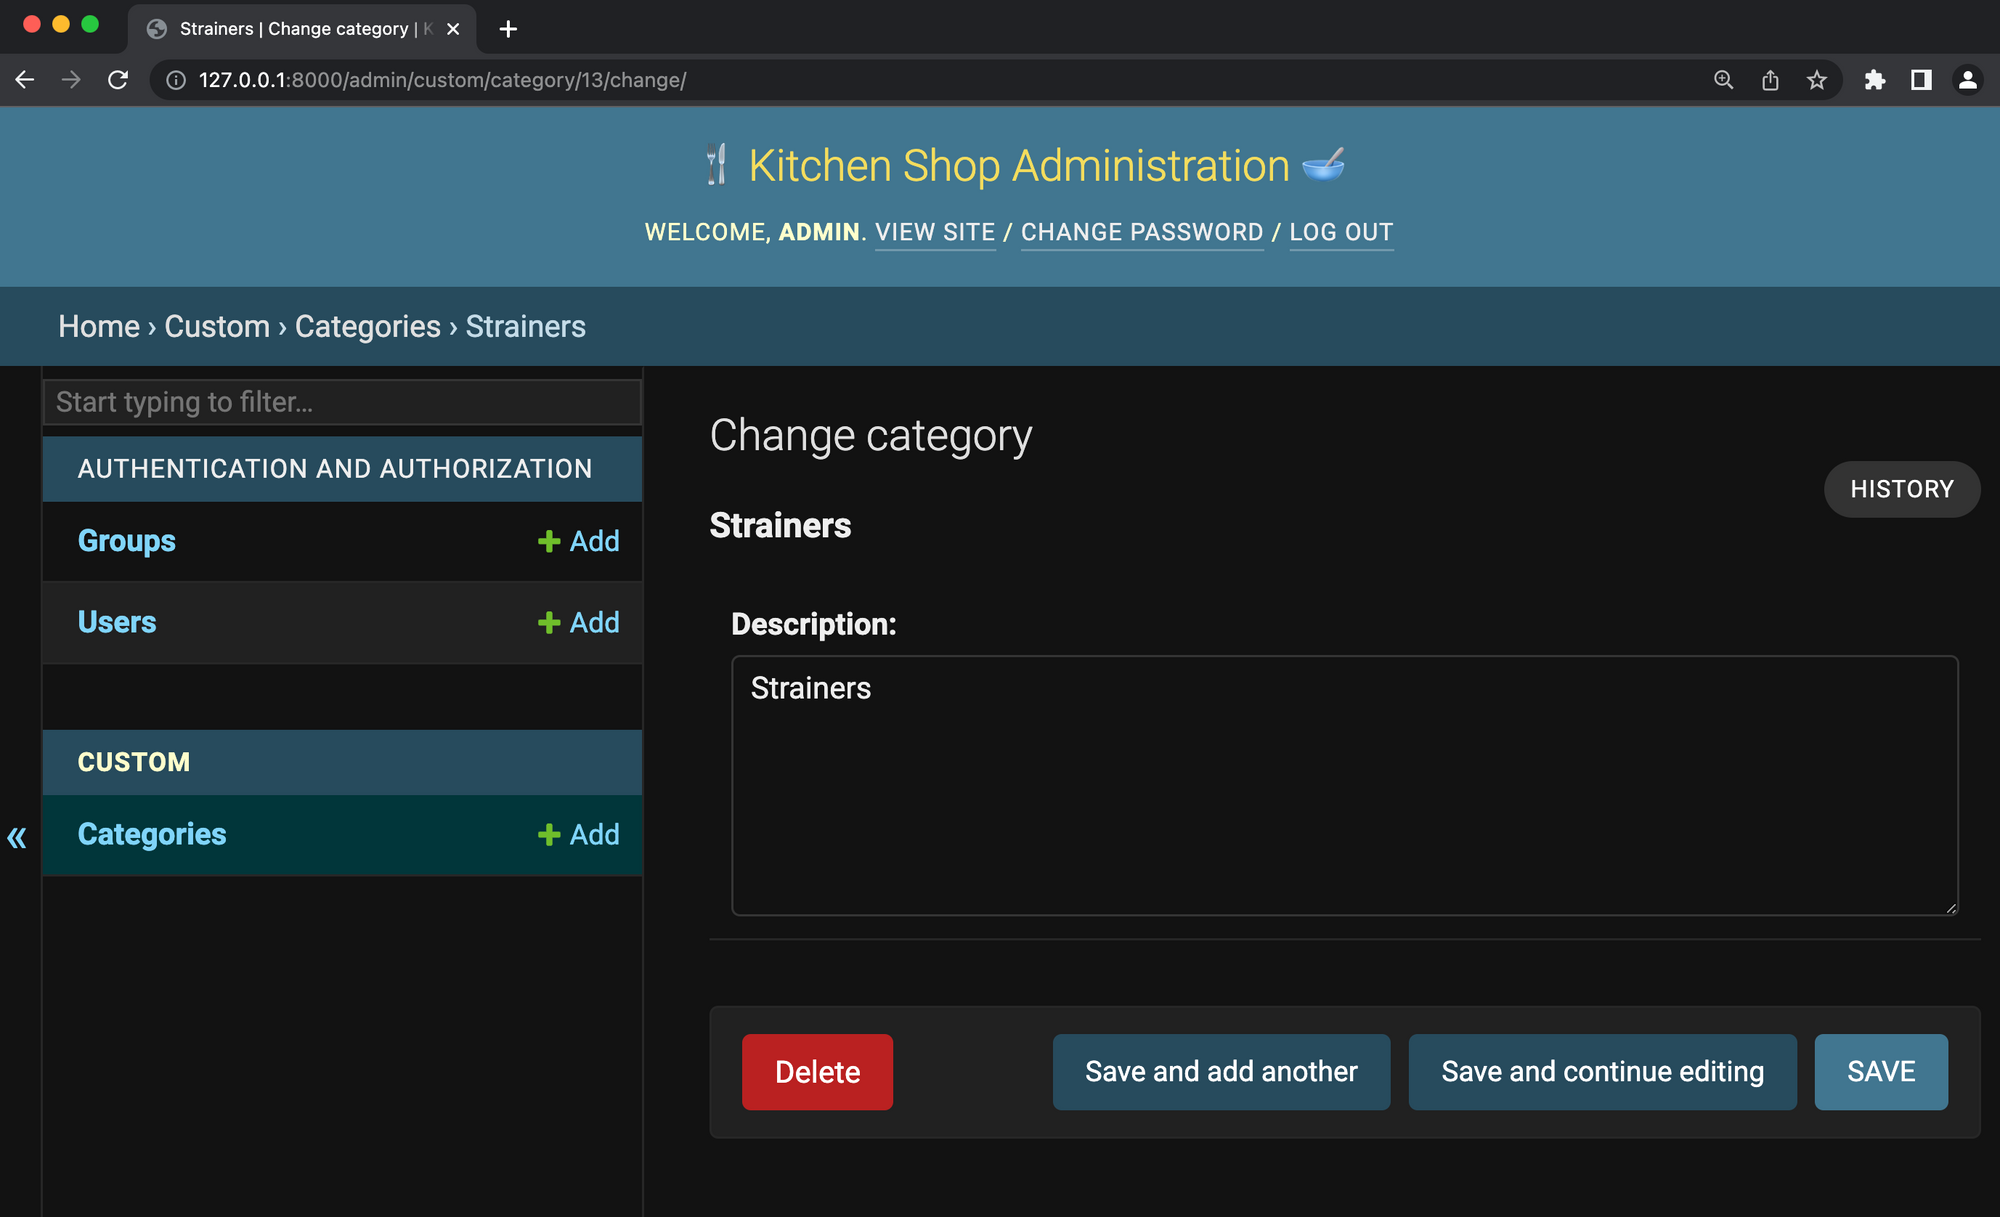
Any changes you made are automatically persisted to your project’s underlying SQLite database.
Creating a product category report
Now let’s do something more interesting with the category data we're managing. Instead of seeing the Django admin panel as an end goal, we can approach it as a useful tool that’s integrated with other functionalities in our project.
Let's start by writing a simple report in Python to list the product categories of our Kitchen Shop.
To create a report, we first have to understand the view concept.
A view function is a Python function that takes a web request and returns a web response. In our case, the response will be the HTML of our report web page.
As a web framework, Django generates HTML dynamically using HTML templates. A template contains the static HTML and some specific syntax describing how dynamic content will be inserted. Django comes with a proprietary template system — Django Template Language (DTL) — that we'll use in this article.
Let’s create the /KitchenShop/custom/templates folder. Then create a base.html file inside the /KitchenShop/custom/templates/ folder with the following content:
Notice how the code above defines the {% block content %} and {% endblock %} special tags that must be filled by the inherited template.
Now, create a report.html file inside the /KitchenShop/custom/templates/ folder with the following content to override the base template:
Before we move on, let’s explain some of the special tags used in the report.html file:
{% extends “base.html” %}— This tag tells the template engine that this template “extends” the base.html template. It must be rendered within the context of the base.html template.{% block title %}— This tag overrides the default page title.{% block content %}— This tag overrides the main content block.{% for category in Categories %}— This tag loops over each item in the Categories array to display a list of categories.
Outside of the template, we still have to define a view. By convention, views are defined in the views.py file in your project or application directory. Add the following code to the views.py file in the KitchenShop/KitchenShop/custom/ folder:
You can access your SQLite database (or any other database configured in your Django project) by using the QuerySet API. A QuerySet is a logical representation of a query expression that you can build using Python language to execute later against a database. QuerySets are powerful and can satisfy simple and complex scenarios. You use the order_by function to order the resulting queryset from the Category objects.
The get_template function loads the template file with the report.html name and returns a Template object. You don’t need to mention the base.html template because it loads automatically.
Next, you must enable your Django website to find your report when the user navigates to the http://127.0.0.1:8000/custom/report/ URL. Let’s modify the KitchenShop/custom/urls.py file in our custom app to map the /report URL path (if the KitchenShop/custom/urls.py file does not exist, you will need to create it):
Then modify the KitchenShop/KitchenShop/urls.py file in our custom app to map the /custom url path:
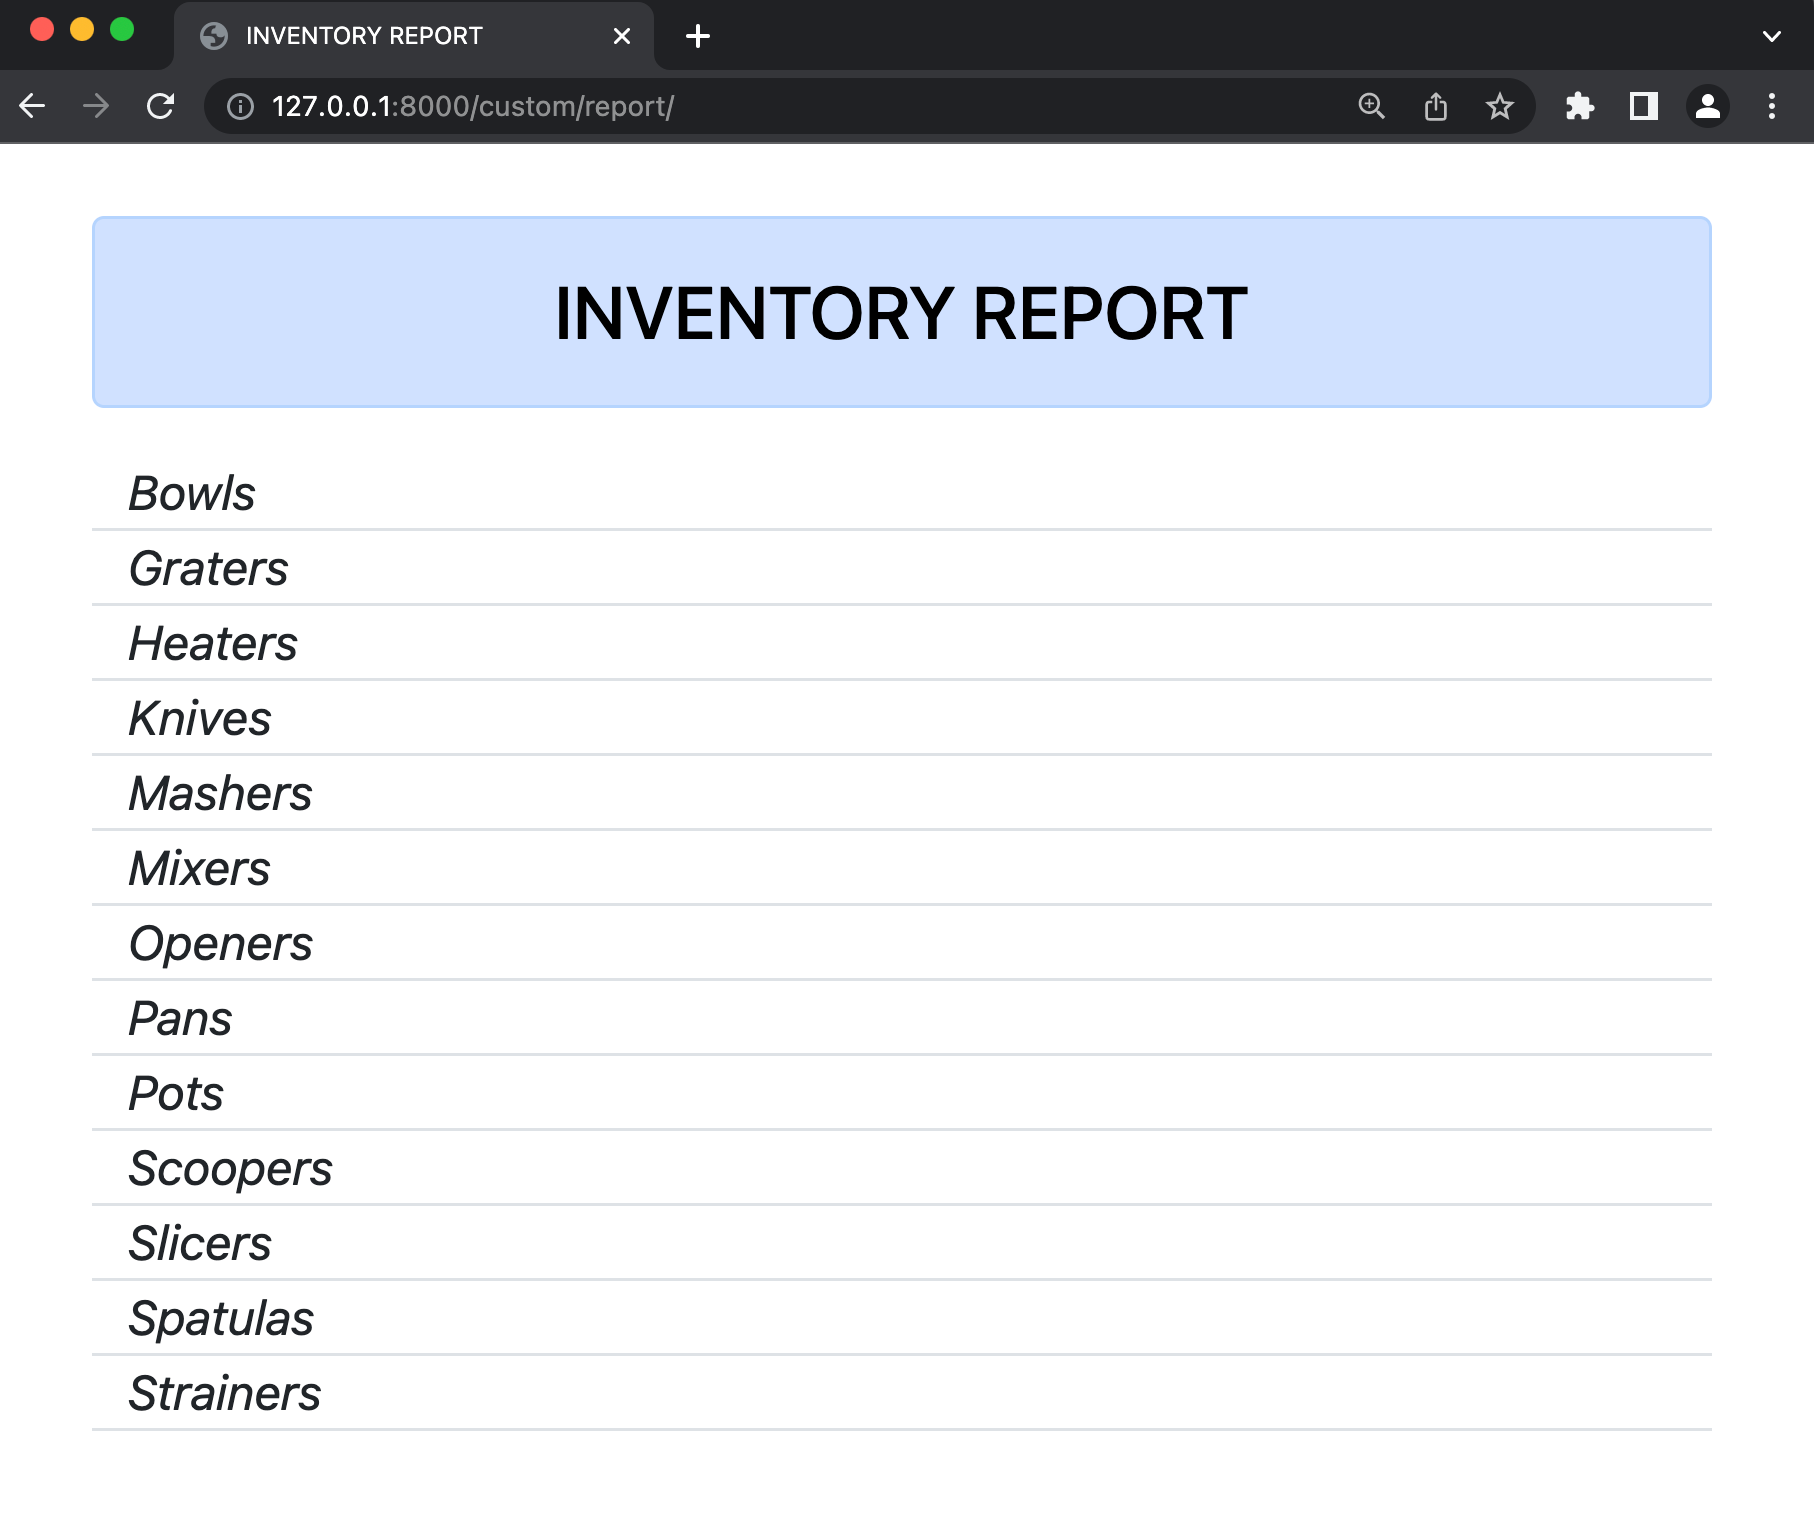
Now run the app once more and navigate to the report URL (http://127.0.0.1:8000/custom/report/):
Intermediate to advanced Django admin elements: Adding products and inventories to the model
Now let's start making our Django admin application more advanced. Instead of working with just one model class, we’ll introduce products and inventories related to the Category model. Here’s a diagram of the models we’re trying to build:
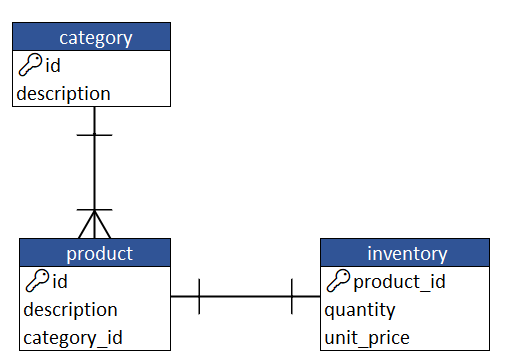
The relationship between categories and products fits the one-to-many pattern, while inventories and products fit the one-to-one pattern. This means that multiple products can be in the same category, while a product can have only one inventory.
To translate this new reality to our project, let's modify the file KitchenShop/custom/models.py and register the new Product and Inventory model classes:
Some aspects of the new code are worth noting:
- The
ForeignKeyfunction provides a many-to-one relation. It defines a foreign key where the category_id attribute references the id attribute of the Category model class. - The
OneToOneFieldfunction works similarly to a ForeignKey, except it always carries a unique constraint — the reverse relation always returns the object pointed to rather than a list. - The
DecimalFieldand thePositiveSmallIntegerFielddeclare theunit_priceand thequantityfields. They also define their type, size, number of decimal places, and valid value ranges.
To register the new model classes, open the KitchenShop/custom/admin.py file and use the same method as we used for the Category class as an example:
Now let's create two new files named sample_products.json and sample_inventories.json in KitchenShop/custom/. Give them the following content, representing product categories:
KitchenShop/custom/sample_products.json
KitchenShop/custom/sample_inventories.json
Then run the makemigrations command to calculate the differences between your current database models and include the Product and Inventory models:
python manage.py makemigrations
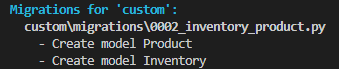
Now let's execute the following command line to migrate the Product and Inventory tables in your SQLite database:
python manage.py migrate

Now that our database is prepared, we can run the loaddata command to read data from the fixture sample_products.json and sample_inventories.json and import them into the database:
python manage.py loaddata custom/sample_products.json
Installed 19 object(s) from 1 fixture(s)
python manage.py loaddata custom/sample_inventories.json
Installed 19 object(s) from 1 fixture(s)
Finally, let's rerun the Django project. Note how Django can manage the new Product and Inventory models:
python manage.py runserver
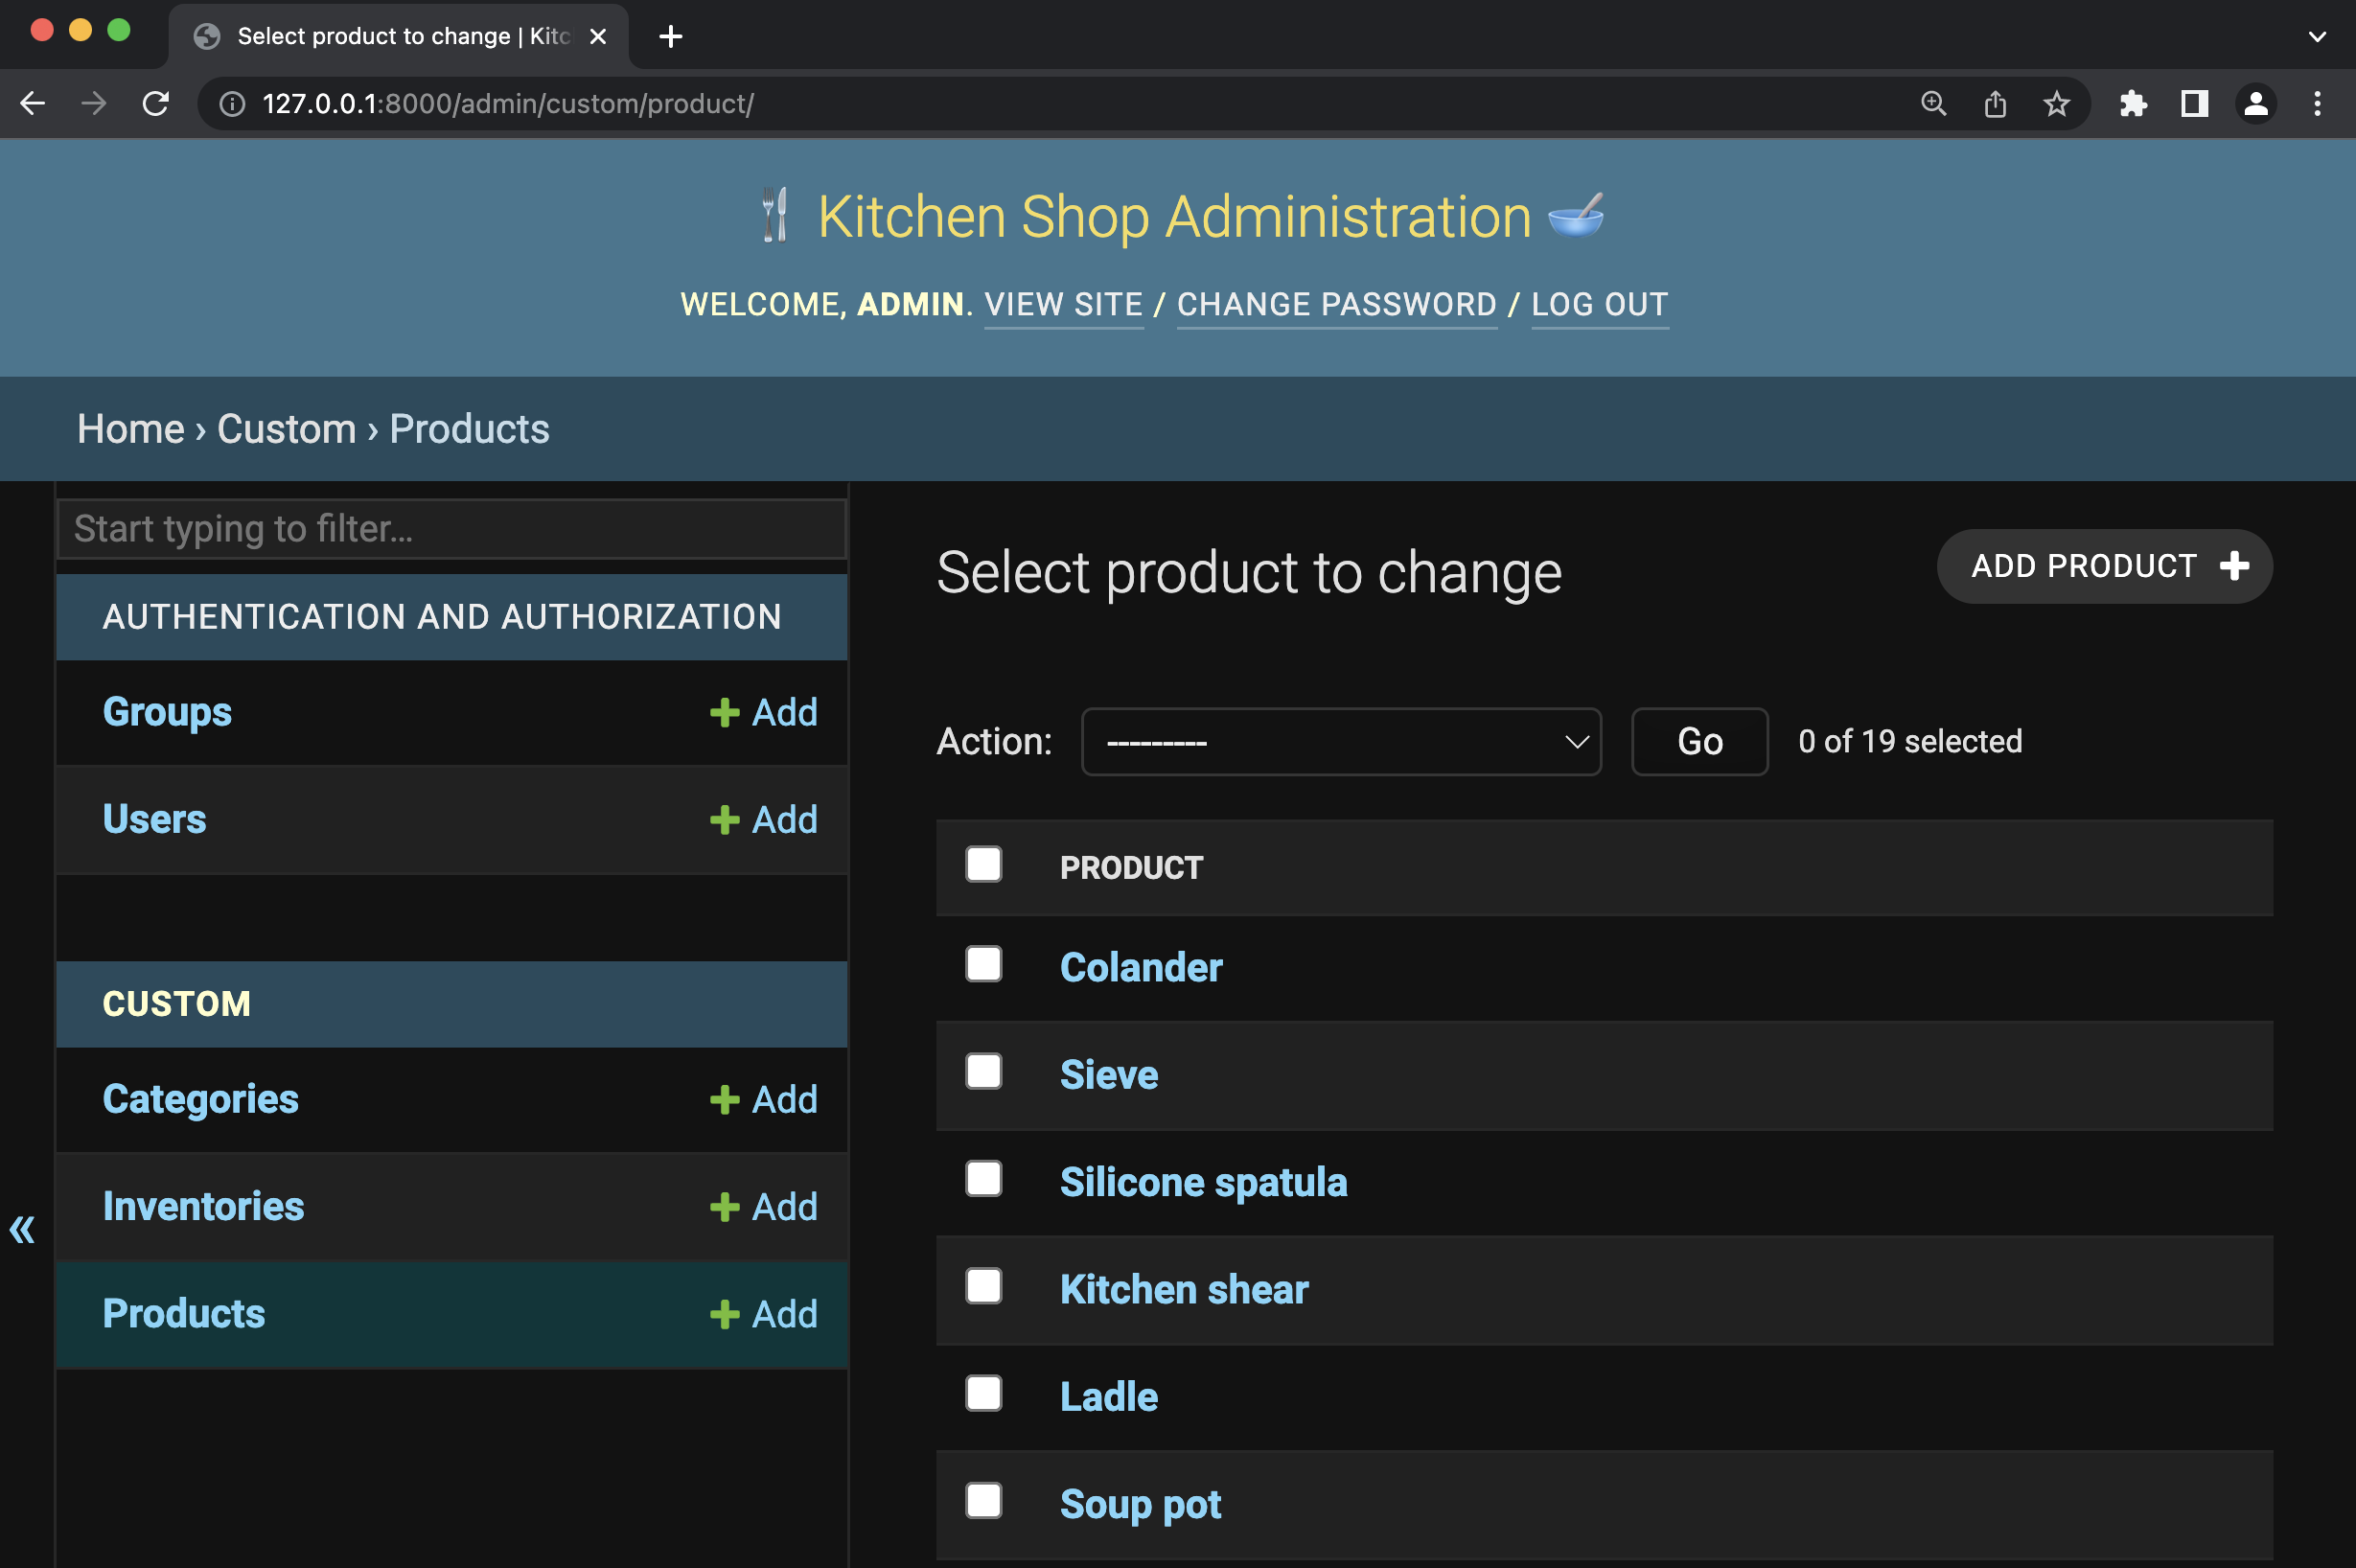
Click Products to see a list of your products:
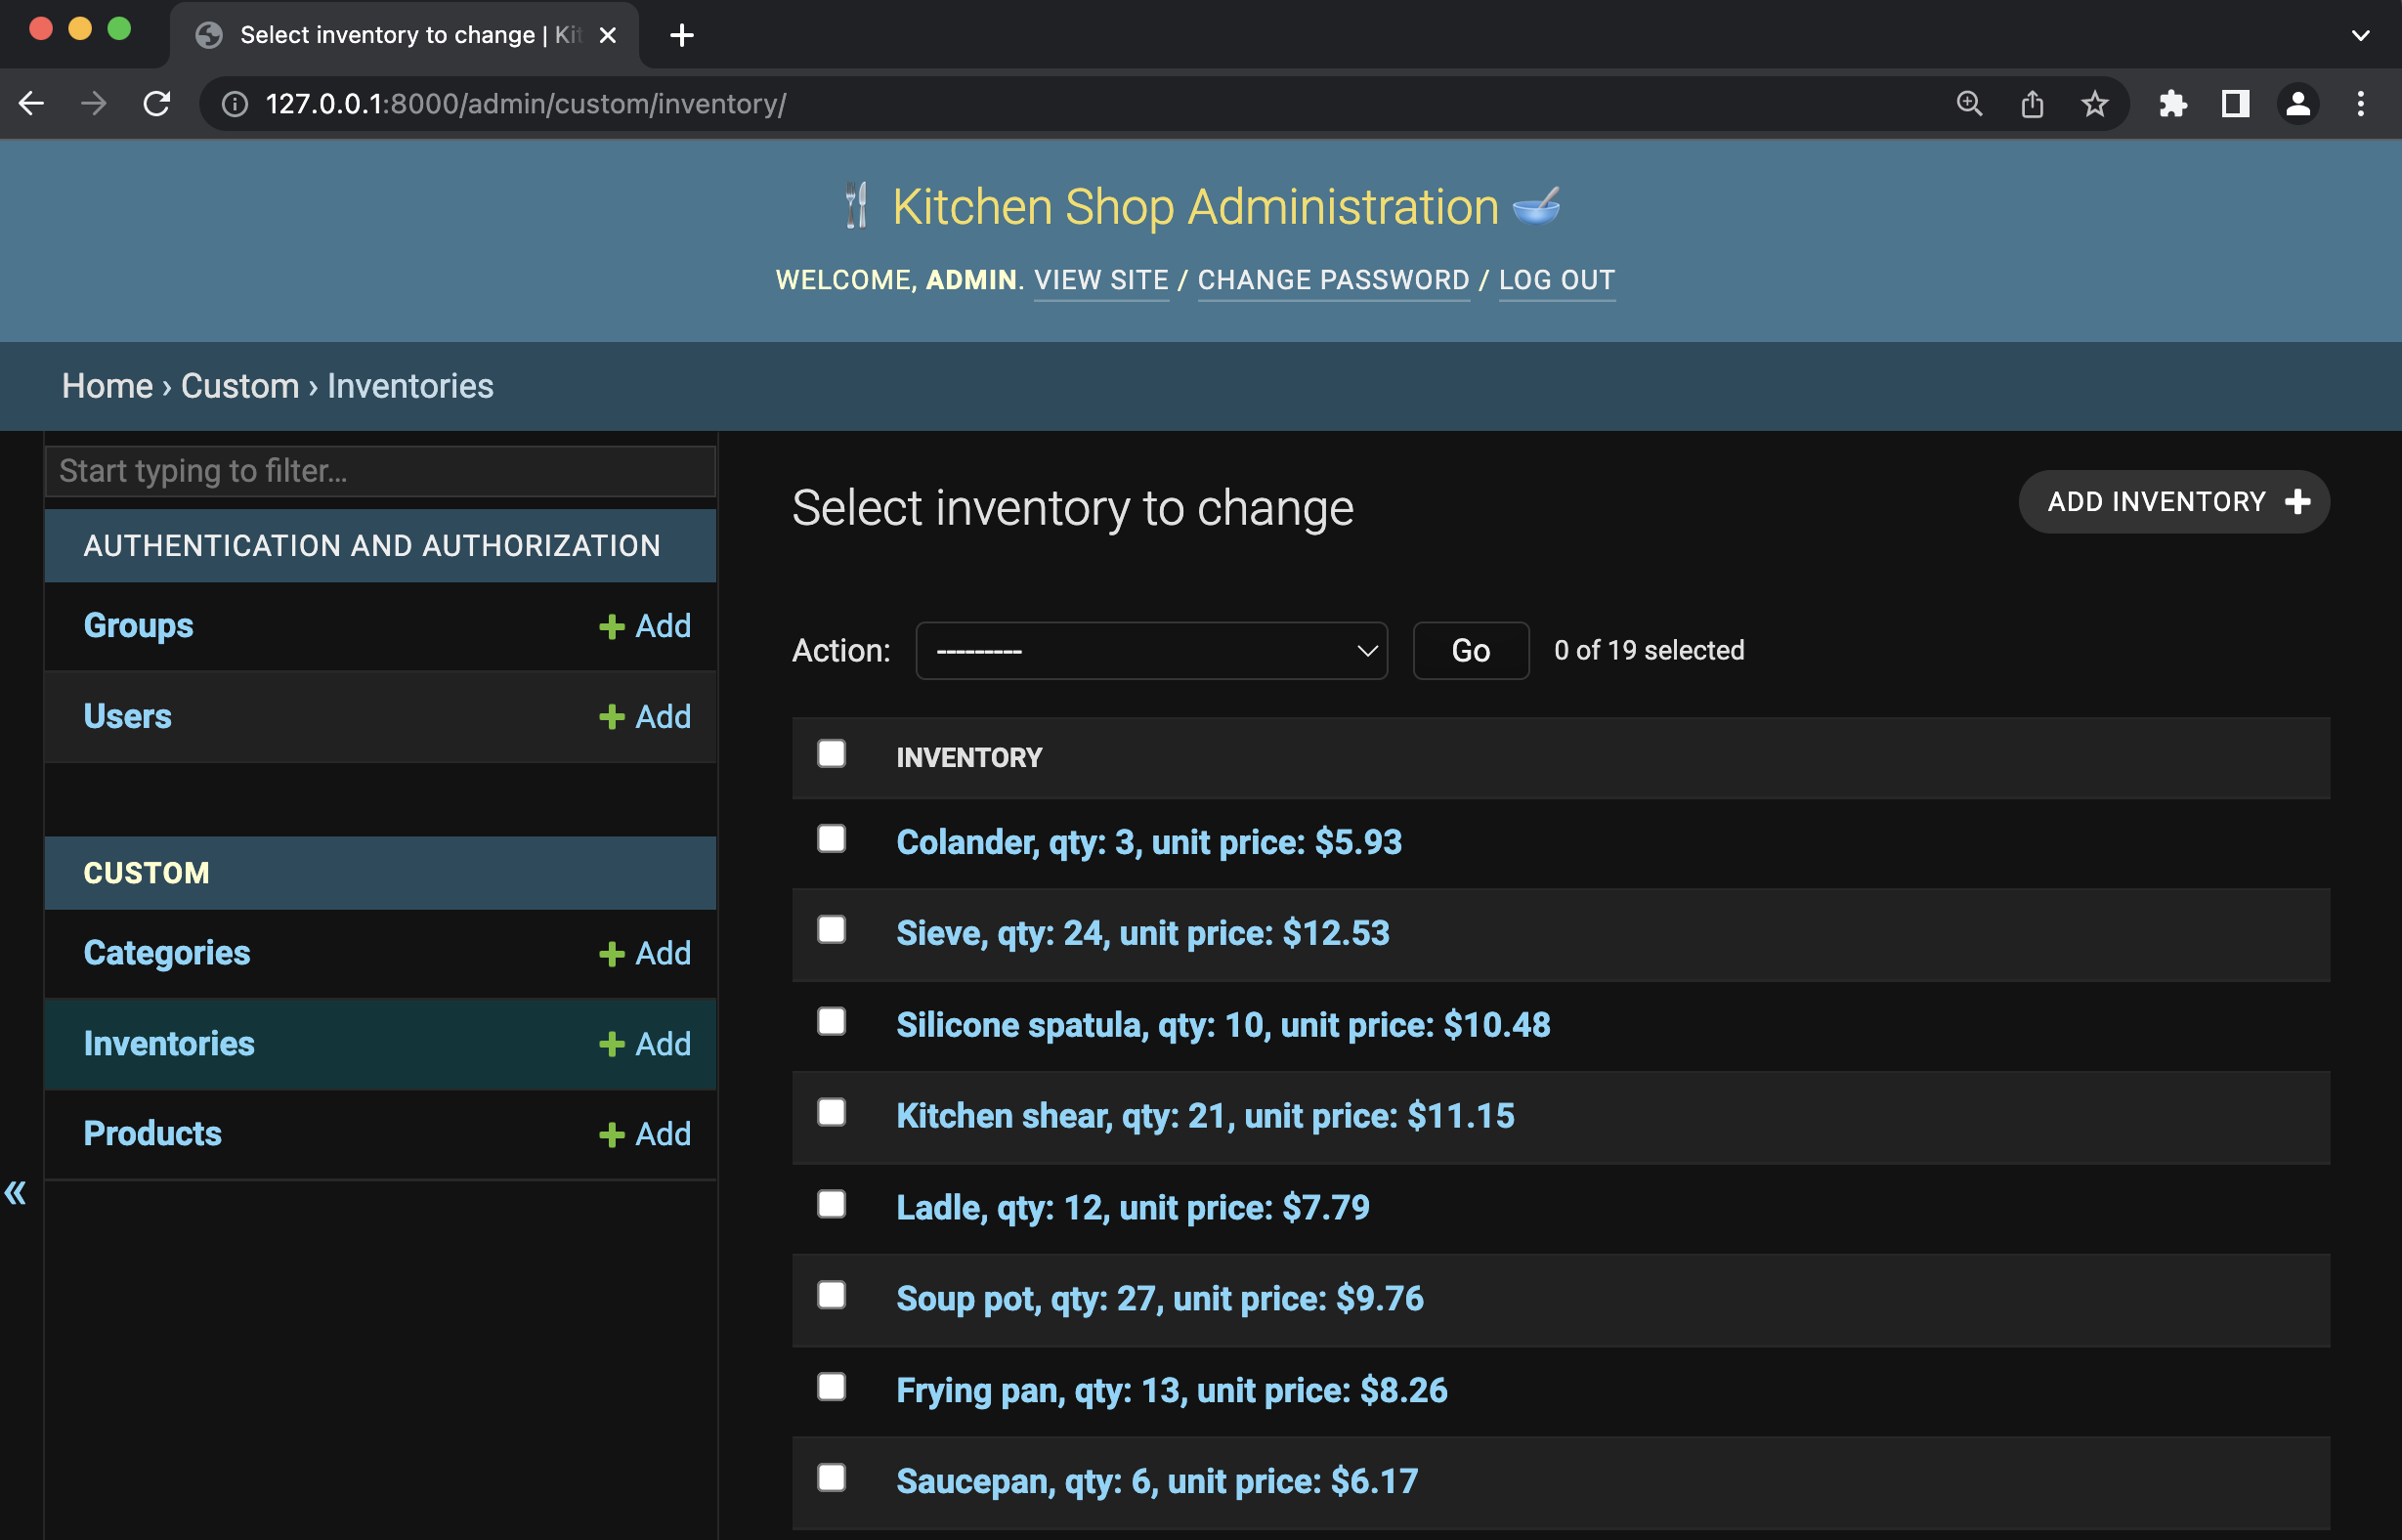
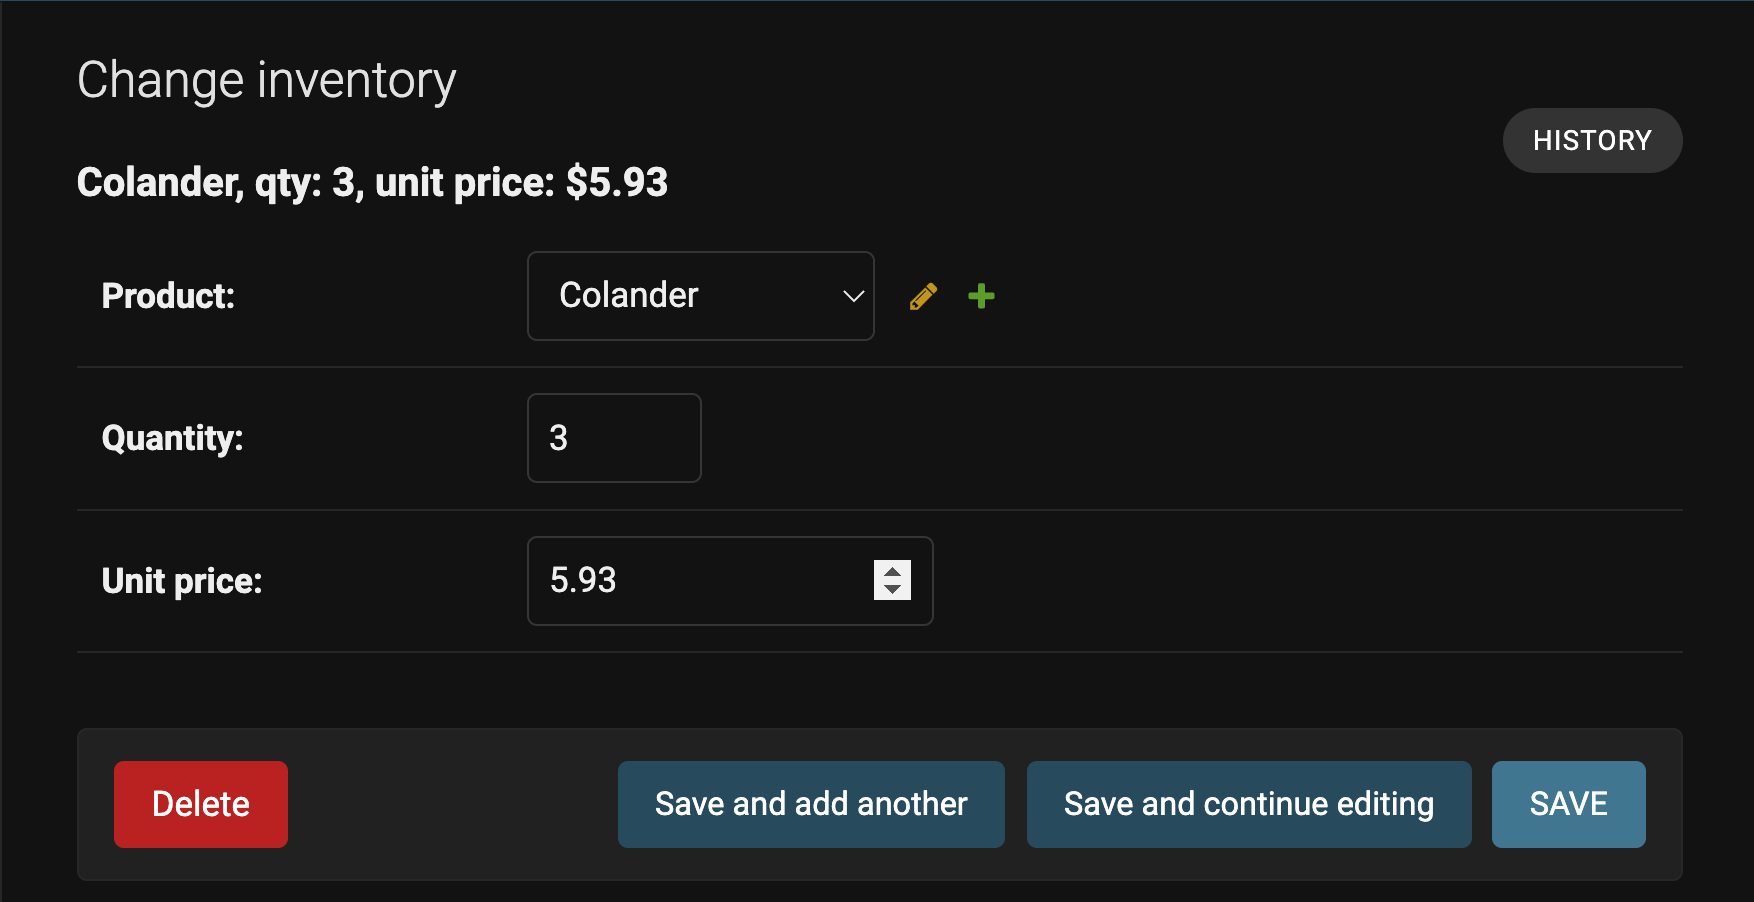
When you click Inventories, you can see how each inventory is displayed using the product name, unit price, and quantity, as defined in the __str__ function in the Inventory model class:
When you click one of the inventories, Django will display the product’s description, quantity, and unit_price fields. Note how Django admin recognizes the Product as a field with a one-to-one relationship, referencing the Product model. Instead of a plain text box, Django displays a drop-down list where you can pick one of the products to create the relationship:
Finishing the inventory report
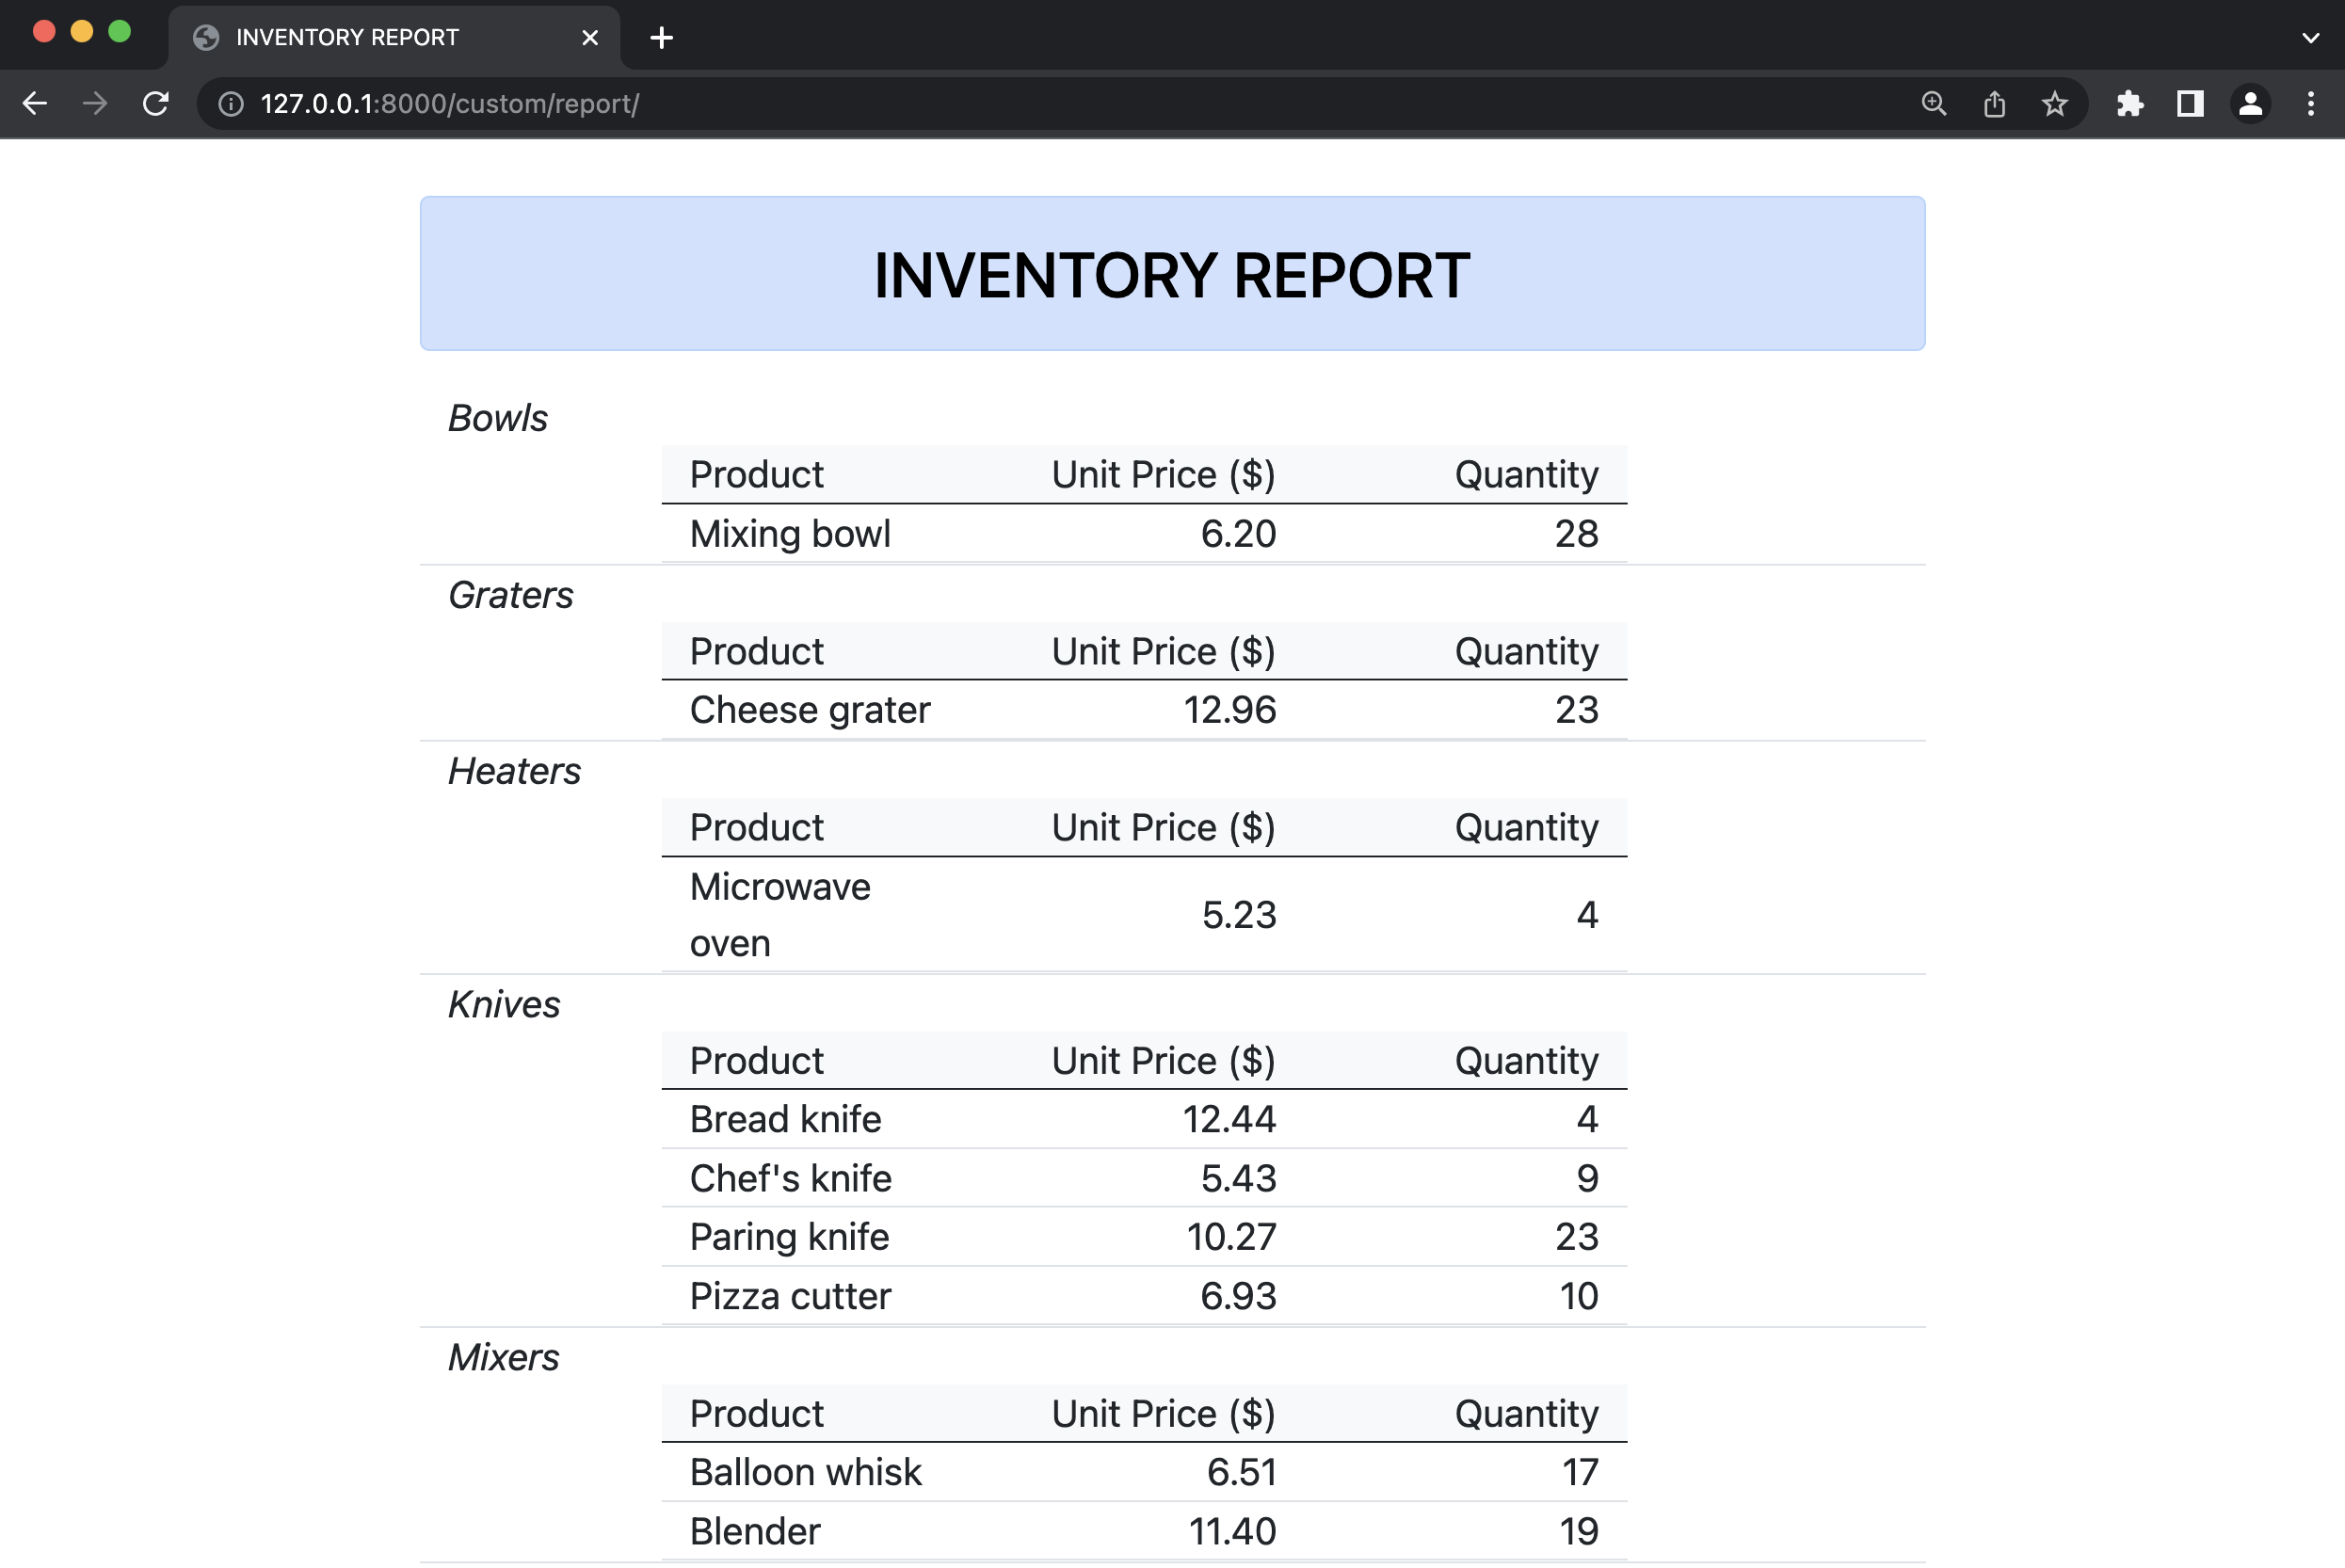
Let's get back to our report. The first time around, we took the report data directly from the Category table. This time, let's take it from the Inventory table.
First, modify the KitchenShop/KitchenShop/custom/views.py file with these changes:
Note how select_related returns a QuerySet that will follow the foreign-key relationship between inventories and products, selecting additional related-object data when it executes the query.
Now, let’s modify the report.html report template file so that the data for categories, products, and inventories is structured in this order:
Now run the Django project again to see your beautiful inventory report 😍
python manage.py runserver
http://127.0.0.1:8000/custom/report/
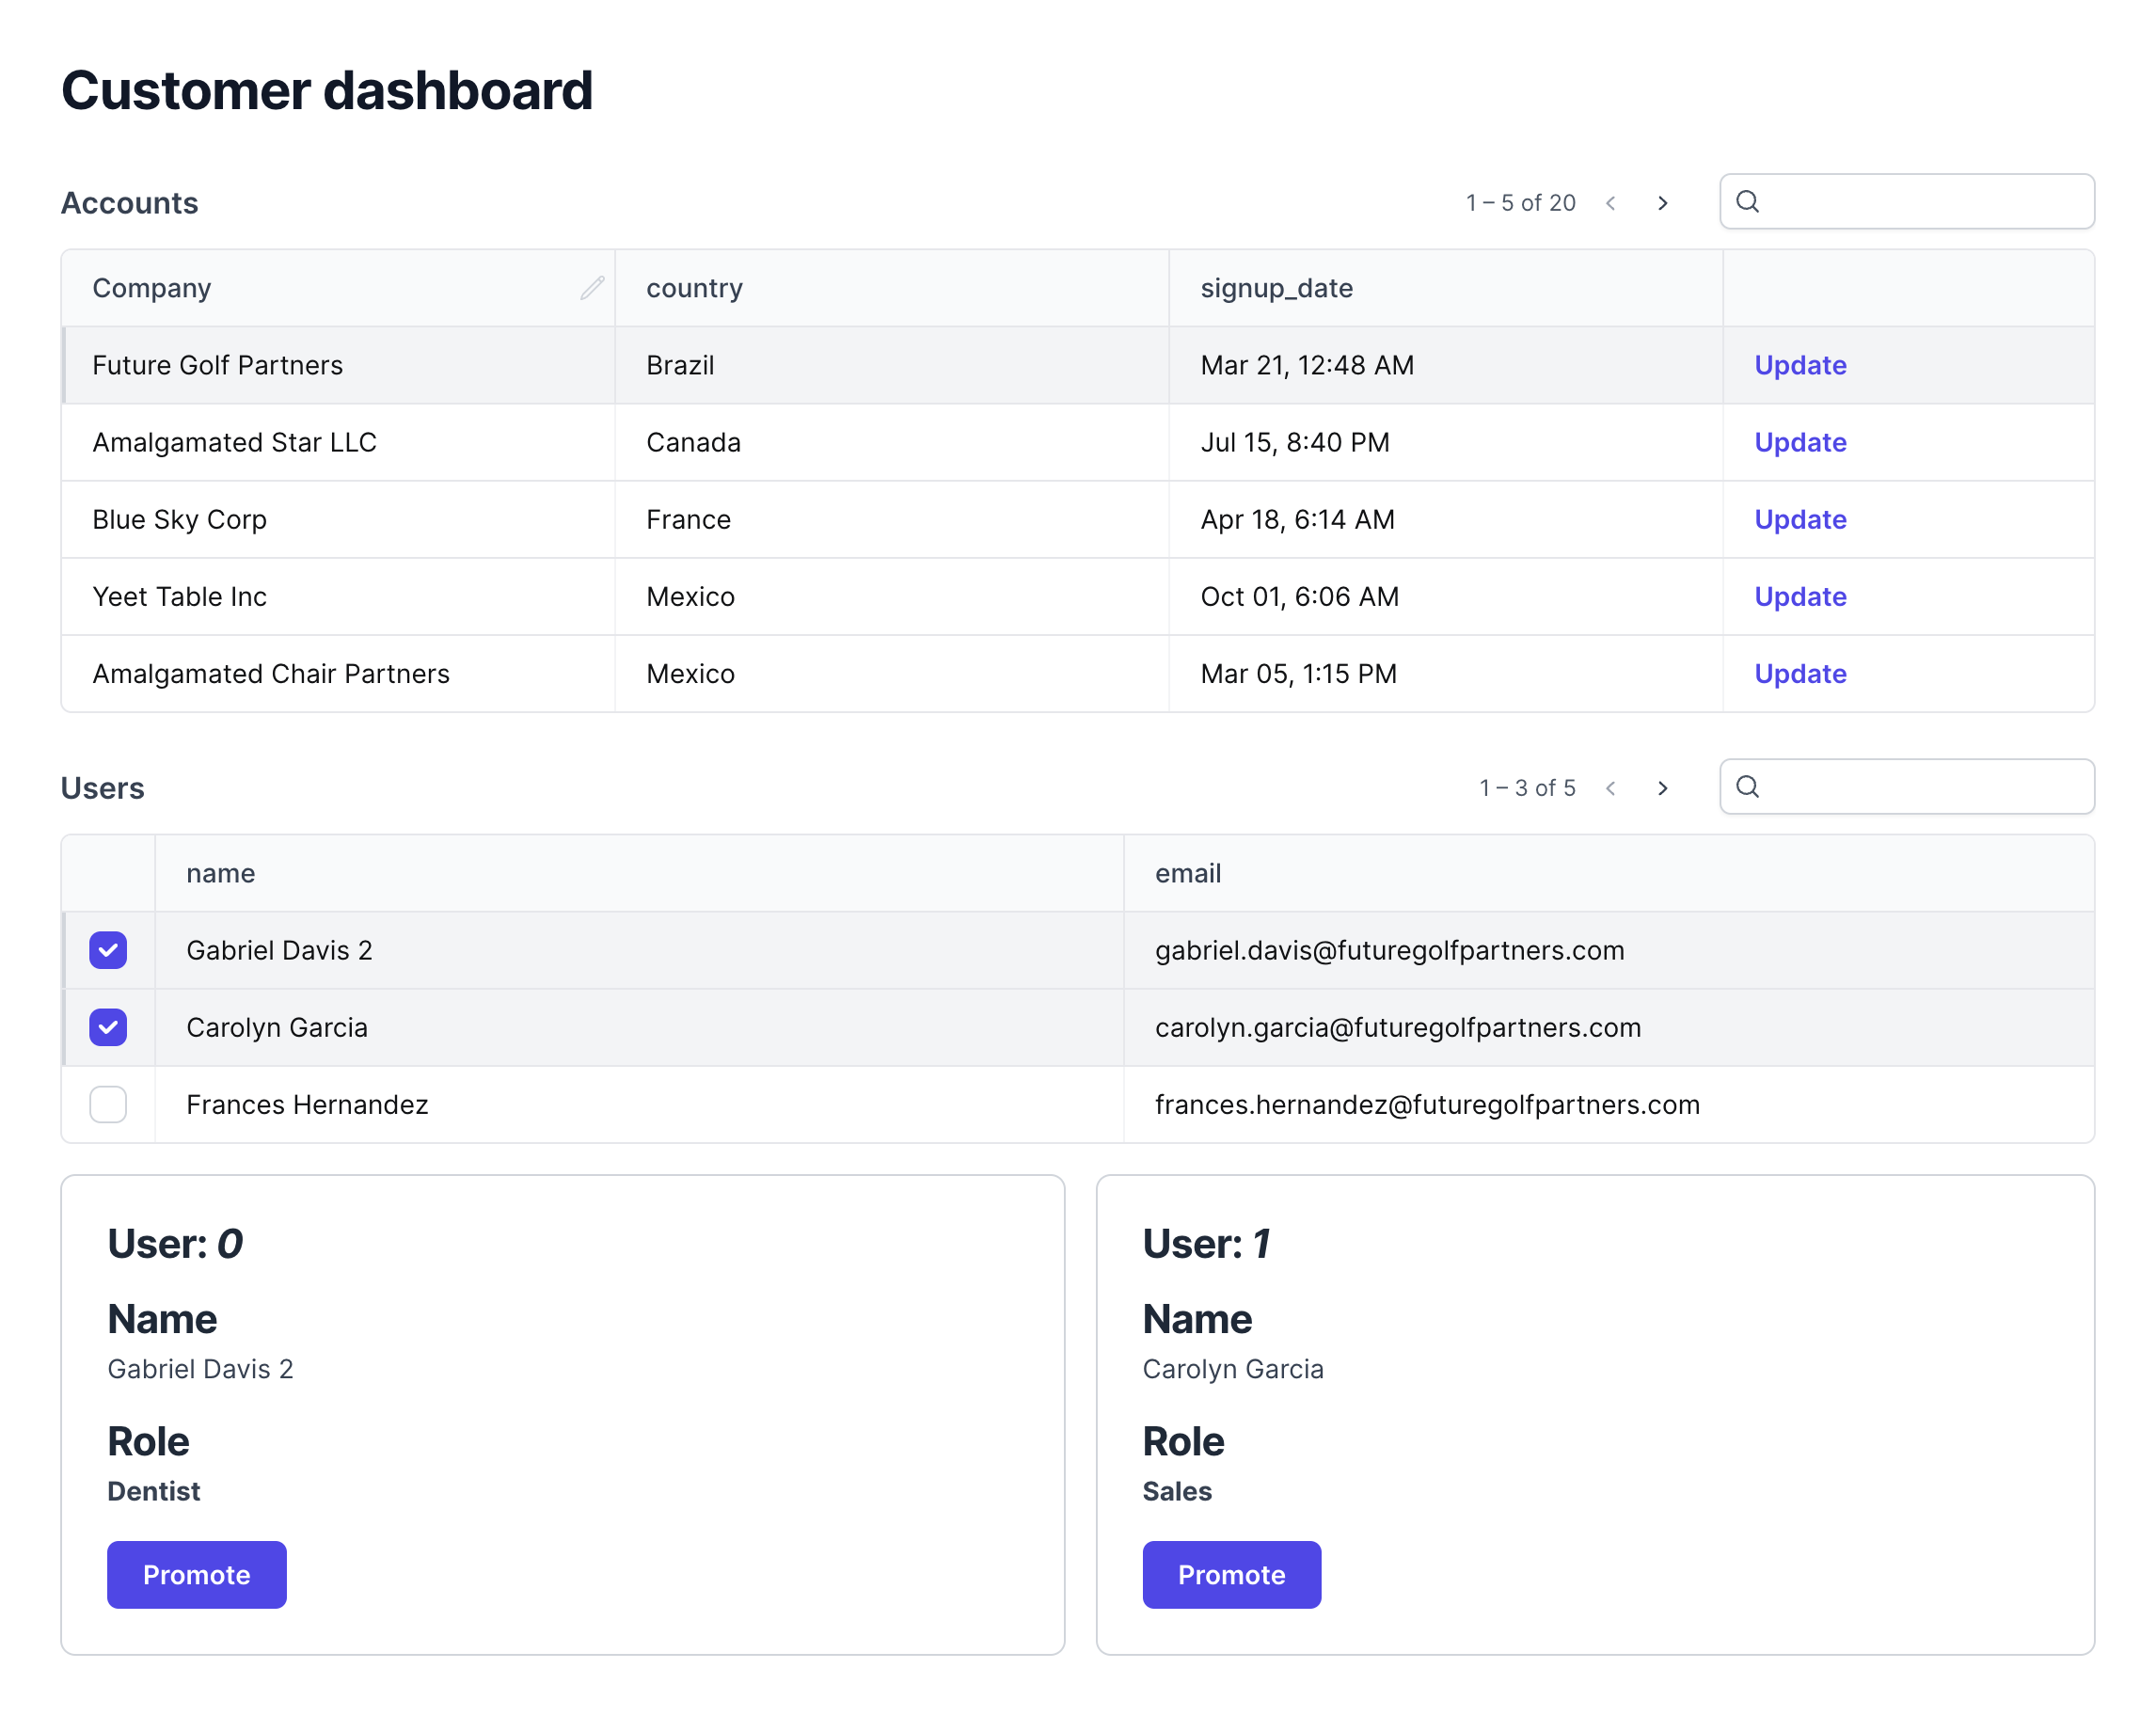
That's how you can build a simple admin panel using Django admin! While Django is a popular choice for building simple models, building out some of the more complex functionalities can be arduous. Django admin lacks sufficient permission management and is challenging to use when it comes to creating complicated fieldsets. If you're looking to spin up a simple admin site, Django admin could be a great fit for your use case. You can also check out other internal tooling platforms like Airplane and Active Admin for building admin dashboards.
Build admin panels quickly with Airplane
Airplane is a developer platform for quickly building internal tools where you can transform scripts and queries into applications in minutes. With Airplane you can build tasks and automate runbooks for simple operations as well as for complex, multi-step workflows. These can be things like restarting microservices, user management workflows, customer onboarding, admin operations, and on-call support. You can find more examples here.
The primary features in Airplane are Airplane Tasks, which are functions that anyone on your team can execute, and Airplane Views, which allows users to quickly build powerful custom UIs such as admin panels and other internal dashboards. There are several benefits to using Airplane Views to build custom UIs. These include access to a rich component library, an extensive template library to help get started quickly, and first-class security.
Airplane also provides permissions, audit logs, approval flows, schedules, and more out of the box so all you have to focus on is writing the business logic for your tasks.
If anything in this post caught your interest, you can check out other guides on the Airplane blog including how to build an admin panel in under 10 minutes and how to make and schedule API requests in three steps.
Sign up for a free Airplane account to get started!