Active Admin is a Ruby on Rails plug-in used to create simple dashboards and administrative interfaces. It provides a convenient way to structure and present internal data, and it's packaged as a Ruby gem that may be downloaded for use in Rails applications.
In this article, we'll walk through how to get started with Active Admin by building a simple dashboard. We'll also show you how to carry out basic tasks like seeding the database, connecting a model, editing the UI, setting up CRUD operations, and exporting internal data to an external file in CSV format.
At the end, we'll discuss some pros and cons of Active Admin and introduce Airplane, a developer platform for rapidly building internal UIs and Workflows, as an alternative solution for developing custom interfaces.
What is Active Admin?
Active Admin is popular in the Rails community because it provides a convenient way to structure and present information. Developers use it to quickly set up data in their applications or to allow other team members to view application data. You can then analyze the data to reveal relationships between attributes of the underlying model or between models of the schema. You can also enforce access controls at various levels and grant users permission to view or alter certain information.
Active Admin is useful because it also has built-in functionality for authentication as well as for searching and filtering data. It also grants the user the ability to export data in CSV, XML, and JSON format.
Build a dashboard using Ruby's Active Admin
In this tutorial, we'll walk through how to build a dashboard using Active Admin. In order to simplify the process, we break it down into the following steps:
- Create a new Rails application
- Generate a model
- Add gems
- Install Active Admin and Devise
- Connect Active Admin to the model
- Set up CRUD operations and strong parameters
- Add dummy data
- Edit the UI
Prerequisites
Before getting started with this tutorial, please ensure you have the following prerequisites:
This demo app is built using Ruby 3.1.2 and Rails 7.0.4.
It also uses the following gems:
- activeadmin version 2.13.1
- devise version 4.8 (later versions should also work)
- faker version 2.23.0
- sassc-rails version 2.1 (later versions should also work)
Step 1: Create a new Rails app
To get started, create a new application using the rails new command:
In the above code, PostgreSQL is specified as the database (you can also use SQLite, which comes bundled with Rails). Next, the code switches to the newly created directory and runs bin/setup, which is a convenient way to create, migrate, and seed the database with one command. Finally, we start the server.
If you navigate to localhost:3000 in your browser after running the code, you should see a new Rails application.
Step 2: Generate a model
The next step is to generate a model for your data using the following:
Here we're assigning the name Client to the model. We're also giving the model name, address, company, and phone_number attributes and migrating the database.
Step 3: Add gems
Next, we need to add the gems required to build the application.
The command bundle add adds a specified gem to the gem file and installs it in one step:
We need these gems for the following reasons:
- The
activeadmingem is required to build your dashboards, and it usesdevisefor authentication and authorization. - The Active Admin UI is built with Sass, so the
saasc-railsgem is required to provide integration with your Rails app. - Finally, the
fakergem is useful for providing dummy entries for your database.
Step 4: Install Active Admin and Devise
With the gems now available, we'll need to install Active Admin and Devise.
Run the command below to start the installation:
After you run the command, Rails will generate a couple of JavaScript, stylesheet, and config folders, as well as an app/admin folder that contains the dashboard.rb file. This last file maps to the default interface of your application. Later, we'll create our own dashboard after linking our model to Active Admin.
Next, we'll migrate and seed the database and then spin up a server:
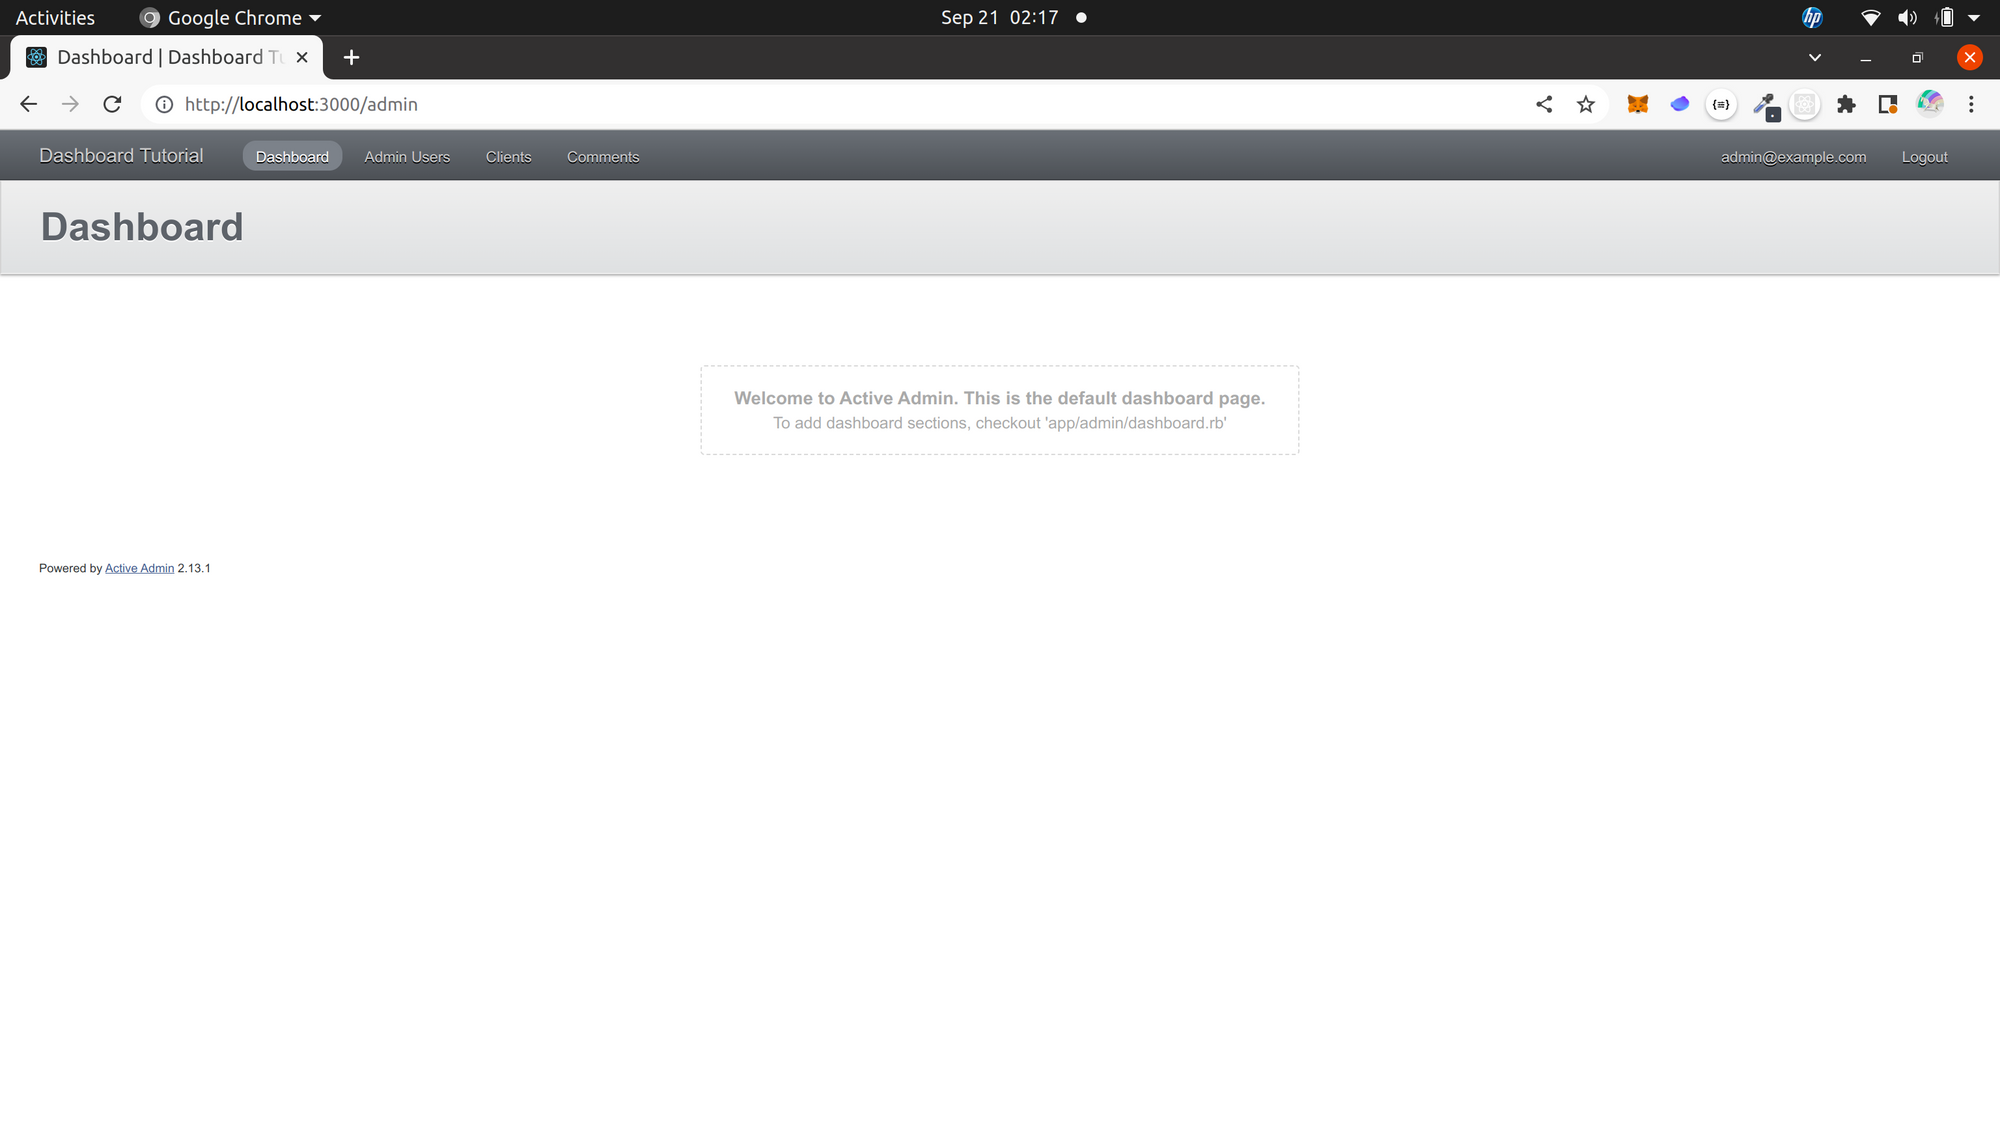
At this stage, you can navigate to localhost:3000/admin and log in as a default admin user using the email [email protected] and password password. The email and password were automatically created by Active Admin and are stored in the db/seeds.rb file. They can be changed by the user.
If you've logged in successfully, the dashboard should look like the following:

Step 5: Connect Active Admin to the model
We now need to let Active Admin know about the model we created. We can do this by registering the model as a resource:
This command generates a clients.rb file in the app/admin folder. This file is very important, as most of the logic you write for the Client resource will live in it.
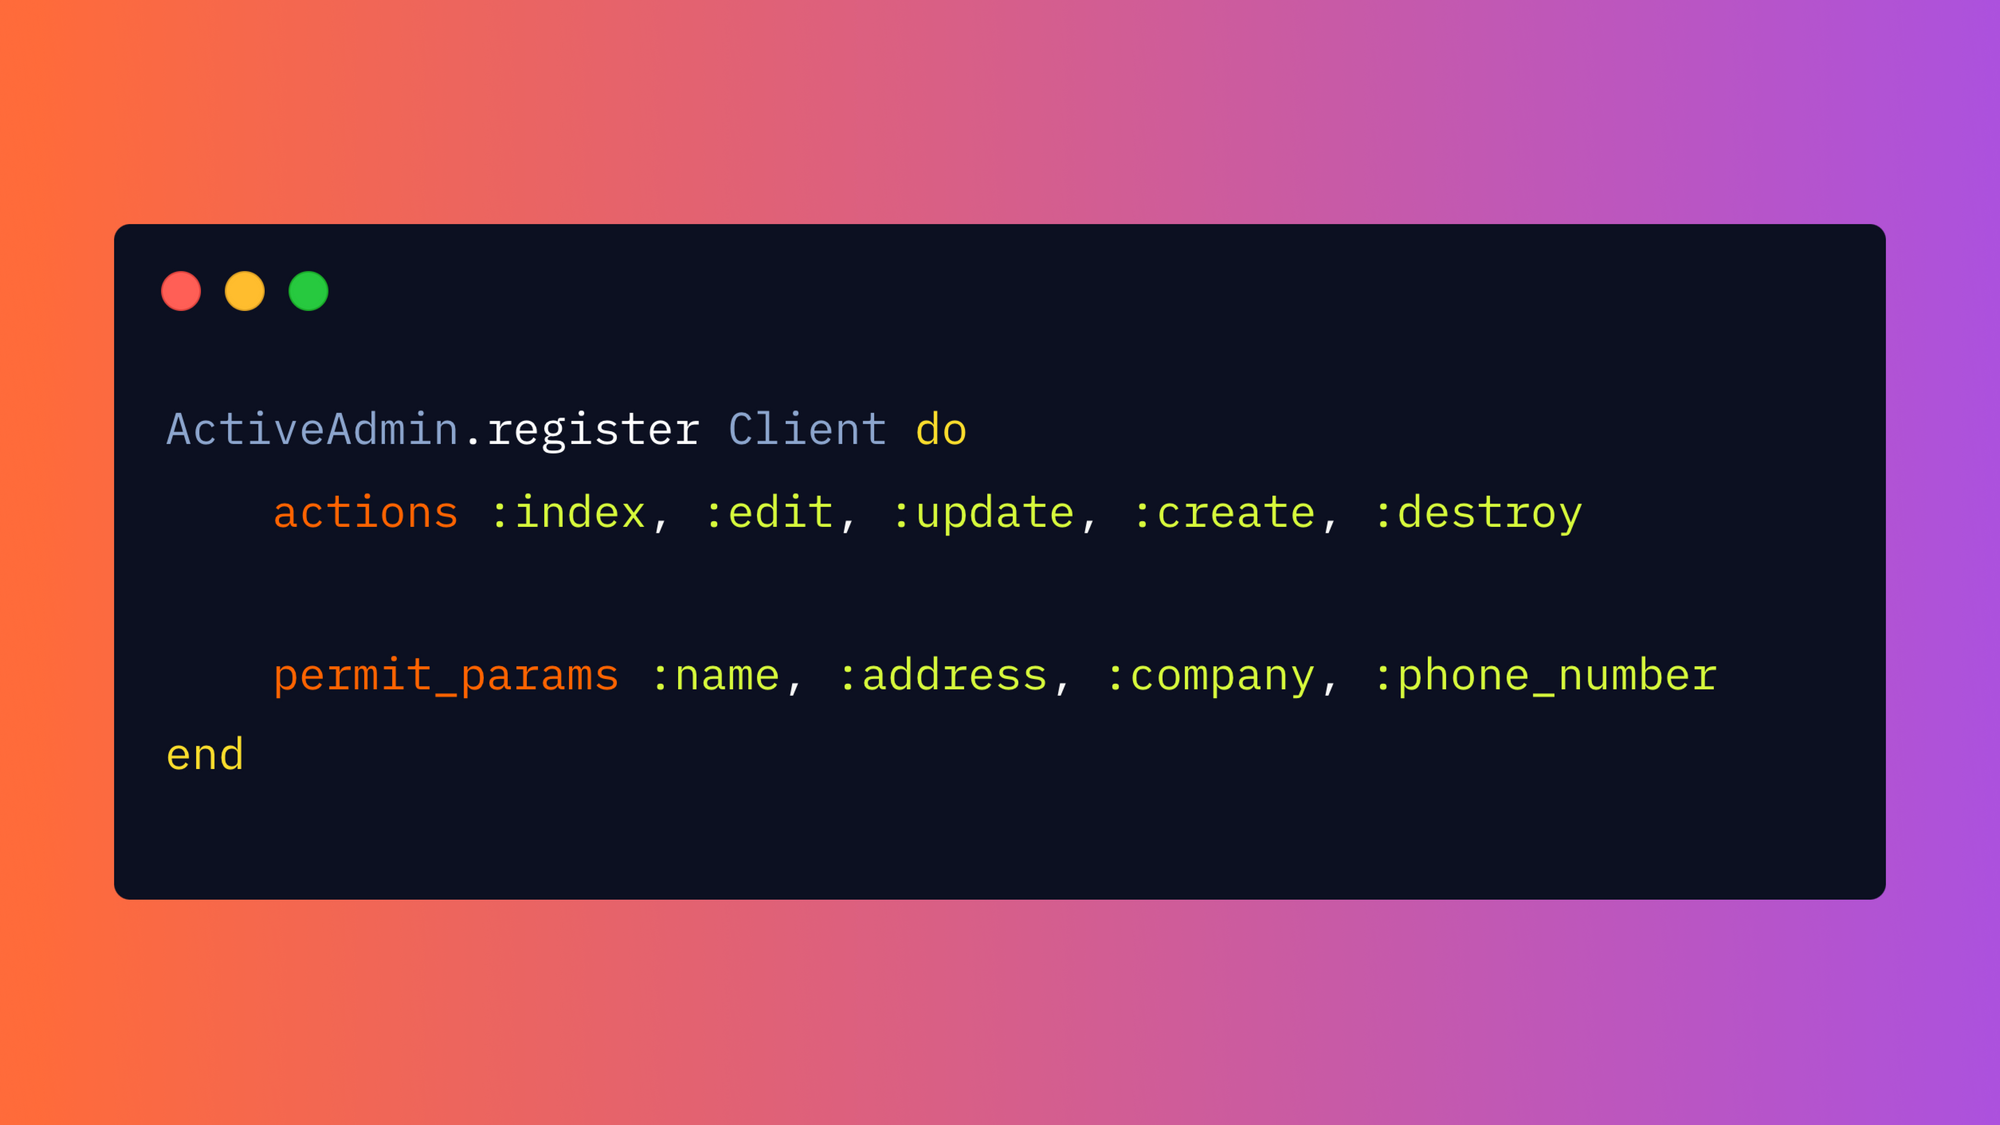
Step 6: Set up CRUD operations and strong parameters
In the clients.rb file, you can set up CRUD actions for a given resource. You can also define strong parameters that determine which attributes of the resource can be modified by the user:
You've now successfully set up Active Admin in a Ruby on Rails application! If you navigate to localhost:3000/admin, your dashboard should look similar to the following screenshot:
The main dashboard should now have a new Clients tab that was created by Active Admin after you registered the Client model as a resource. Clicking this tab opens a separate dashboard. The Comments menu item is also important, as it lets users add more information to an object (in this case, a client) and is useful for adding descriptions, tracking issues, and so on.
Step 7: Add dummy data
Next, let's add some data since our application is up and running without data.
To do this, we'll use the Faker gem. Faker is a library for generating random data and is much more convenient than writing everything manually.
We'll create a list of clients for this application that mirrors the model generated earlier. Each individual on our client list works for a company and has a name, address, and phone number. For simplicity, we'll restrict the number of entries on the list to ten.
Enter the following code into the seeds.rb file to generate the data:
The above code uses the create! method, which throws an error if the operation fails. We call Client.destroy_all at the beginning to ensure that old entries in the database are deleted and recreated each time the database is dropped. Note that the destroy_all method is dangerous, and you should be careful when using it on a production database (we're just using this for our sample dashboard). There are also simple status messages at the beginning and end of the operation to help the user track.
Once you've entered this code, run rails db: reset, then rails db:seed, restart the server, and navigate to the admin page at localhost:3000/admin.
Note: It's good practice to occasionally call rails db:reset before db:seed. The rails db:reset command combines db:drop, db:create, and db:migrate and is a useful method for cleaning up the database.
Our dashboard with the data seeded from the Faker gem should look like this:

Step 8: Edit the UI
Now that we have a dashboard, let's look at how to edit the UI. Our dashboard interface looks a bit cluttered and has a lot of information, some of which we don't need readily available. We can use the following code in clients.rb to clean and tailor it to our needs:
The above first creates a new menu tab and names it VIP Clients. Next, we exclude the columns that represent timestamps.
Since we rarely conduct searches using phone numbers and addresses, we omit filters for those from the right-hand panel, and only filters for the client's name and company are included. Finally, users are prevented from deleting records from the list by permitting all CRUD controller actions except destroy.
The final result is a cleaner UI with our chosen filters.
Run rails db:reset, restart the server, and navigate to the client page to see the improved UI:
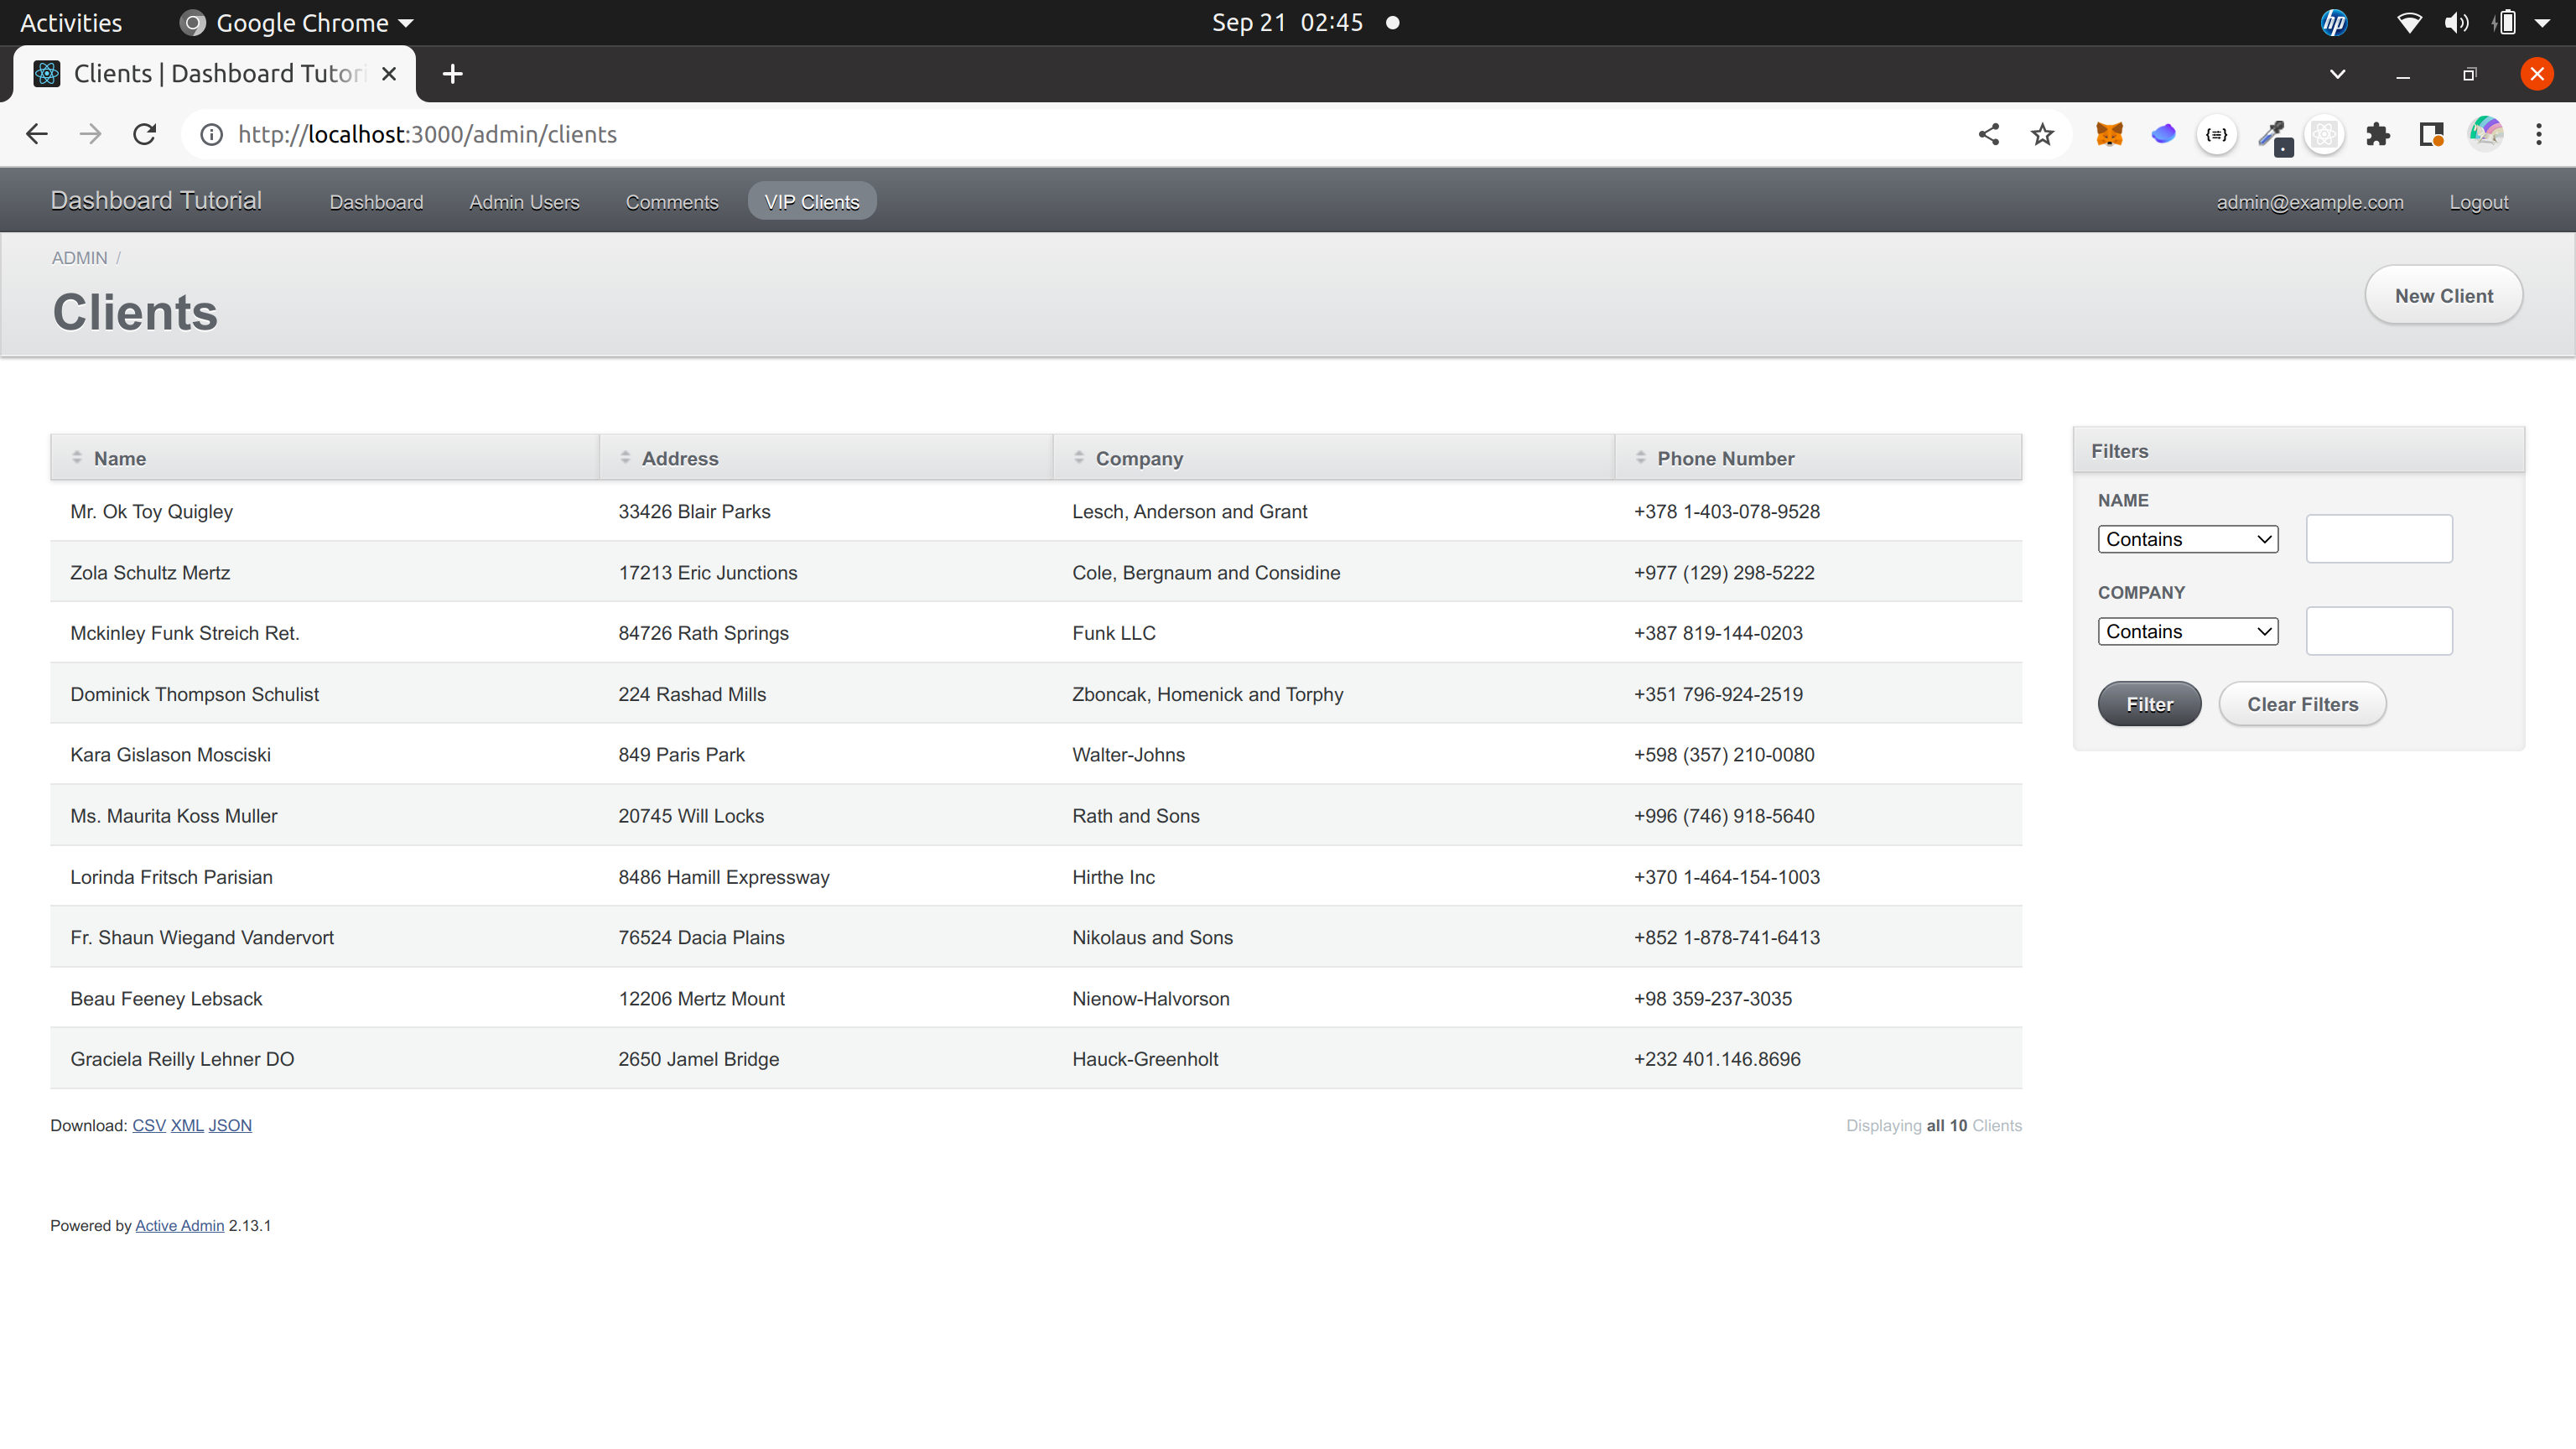
In the bottom left-hand corner, just under the table, there are clickable elements that allow you to export the data to CSV, XML, and JSON format.
Congratulations! You've just used Active Admin to build a working admin UI complete with dummy data and a search function. You can do a lot more with Active Admin beyond the simple application demonstrated here. It can handle models that have one-to-one or one-to-many associations, and it can be combined with a library like Chartkick to create charts and visualizations. You can also add scopes, customize forms, and perform various configurations. Check out the Active Admin documentation to learn more.
While Active Admin is fantastic for creating simple interfaces, it can be limited. In the next sections, we'll discuss some of the limitations of Active Admin and introduce you to Airplane, a better alternative for building custom UIs and Workflows with a generous free plan.
Active Admin limitations
While Active Admin is a useful tool for building dashboards and user interfaces, it does suffer from some drawbacks. For example, it can only be used for Rails apps, and it has a fairly complicated domain-specific language (DSL) that must be mastered in order to use the library effectively. We encountered examples of the DSL in this tutorial, such as ActiveAdmin.register, menu label:, and filter in the clients.rb file. Active Admin also combines models, controllers, and views into one file. This can be good for rapid prototyping for small applications, but when the codebase grows large enough, this becomes difficult to scale.
Using Airplane to create custom UIs
Airplane allows engineers to rapidly build UIs for internal tools and solves many of the challenges associated with Active Admin.
When it comes to building custom UIs, Airplane's Views feature supports a rich component library out of the box, so you can build UIs without worrying about maintaining design and other best practices. Unlike Active Admin, which is restricted to Rails applications, Airplane is flexible and can be used to deploy applications from scripts (JavaScript and Python), queries, and APIs, making it easy to build applications to fit the unique needs of your business.
Airplane's code-first approach also allows you to seamlessly integrate with databases, APIs, and messaging systems. You can use the REST API resource to allow your tasks to connect to an HTTP service. You can also use Airplane's code-based tasks like Python or Node to write a script that calls whatever API you're looking for. Airplane also integrates with all the popular databases like MySQL, Postgres, MongoDB, SQL Server, BigQuery, and Redshift. You can read more about supported resources in the documentation.
Airplane also supports a number of other functionalities – the platform layers on a web UI, notifications, input validation, role-based access controls (RBAC), approval flows, audit logs, schedules, templates, and more to rapidly build enterprise-grade applications that can be shared safely.
Get started
We hope this tutorial helped get you set up with Active Admin, which is a great option for building custom UIs. If you're looking for a more full-featured platform that can help with all of your internal tooling needs, Airplane could be a great fit for you.
Airplane's goal is to empower engineers to rapidly build custom applications that can be shared safely. With a massive feature set including approval flows, RBAC, schedules, alerting, integrations, and more out-of-the-box, Airplane can transform your internal operations, remove engineering bottlenecks, and help your organization put security first.
If you'd like to try it out, you can sign up for a free account or say hello at [email protected] 👋.
Author: Jude Ero
Jude Ero is a doctor, software developer, and entrepreneur who has years of experience with Ruby, Rails, Python, and Javascript.