

Admin dashboards are powerful tools that help increase visibility into organizations' data and operations. One popular tool is ngx-admin. Ngx-admin is a mobile-first, customizable, and open-source platform that allows users to implement dashboards in Angular easily. By using ngx-admin, users save significant time and resources by eliminating the need to manually build various dashboards from scratch. Some common use cases for ngx-admin include creating dashboards for e-commerce, analytics, IoT device management, and user management.
In this article, we'll create an ngx-admin dashboard that displays sales data. We'll walk through how to create a database and populate it with dummy sales data, how to create an API to fetch the sales data from the database using Node.js, and how to display the data on the frontend using ngx-admin.
What is ngx-admin?
Ngx-admin is an admin dashboard template based on Angular 9+, Nebular, and Bootstrap 4+. The template is implemented in a JavaScript framework (Angular). It offers a number of UI components, charts, editors, and more, making it easy to get started. It is also mobile-first and highly customizable with several themes and UI architecture selections to choose from. Ngx-admin is available in both free and premium versions.
Ngx-admin can be used to monitor and interact with connected devices through graphs, charts, and other UI tools in real-time. It can be used to aggregate key business performance metrics to track progress and inform business decisions. Ngx-admin can also be used for common operations such as adding new users, deleting users from the organization's database, and more.
Prerequisites
For this tutorial, ensure you have the following:
- Git
- Node.js version 12.22.12
- npm
- The Angular CLI
- A code editor and a browser
- Depending on your OS, some specific native packages are needed; for instance, Ubuntu users will need build-essential
You can access the full code for this tutorial in this GitHub repository.
Setting up the project
Start by creating a folder called ngx-dash. Inside this folder, create another folder called ngx-server. The ngx-server folder will contain all the server and database files for this project.
Creating a database with dummy sales data
First, we'll need to install the dependencies that will be used in this project. Navigate into the ngx-server folder, open the terminal, and run the following commands to initialize a Node.js project and install dependencies:
The above code installs the following dependencies:
- sqlite3 to create a database
- node-fetch@2 to fetch dummy sales data from a GitHub repository. Node-fetch version 2 is required since this project uses CommonJS modules, and the latest version of node-fetch only supports ES modules
- Express to create the Node.js server and an API endpoint that will be consumed from the frontend
- CORS to allow cross-origin requests
Open the package.json file and add the following code for the scripts below the "license": "MIT" key-value pair:
Next, create a file called database/dummySalesData.db. This will be used as the database file for this project.
In the ngx-server folder, create a file called seeddb.js and paste the code below. This file will be used to populate the database:
The above code attempts to create an instance of the database and establish a connection to the database file using const database = new sqlite3.Database(). If an error is encountered, it's logged into the console. Otherwise, a success message is logged. Fetch then gets the dummy sales data from the specified GitHub repository. The response is converted to JSON, and the code then does the following:
- Creates a table with the name
dummySalesin the database - Defines a SQL statement for inserting the data into the database
- Loops through the data using a
forloop and inserts the data into the database - Fetches the inserted data from the database and logs it to the console to make sure that the script worked correctly
- Closes the database connection
To populate the database with the sales data, run the following command in the terminal:
Creating an API to get sales data
Next, let's create an API to retrieve the sales data.
In the ngx-server folder, create a file called index.js, which will be used as the entry point to the server, and paste the code below:
The code above imports all the required dependencies, creates an instance of the server, enables cross-origin requests, and specifies the port the server is running on. It then creates an API route that allows the HTTP GET method. Inside this route, a SQL statement for fetching all the sales data from the table created earlier is specified. A database connection with read-only permission is then established, and the sales data is fetched from the database and sent to the client as a response. Finally, the database connection is closed.
Creating logic for fetching the data from the backend
Next, let's create the logic for retrieving the data from the backend.
Ngx-admin allows users to install the starter kit, which contains the auth pages and the main layout with a side menu, top bar, and footer, or the full template, which contains various, additional pages. This guide focuses on the starter kit and modifying it to display the sales data.
Navigate to the ngx-dash folder and run the command below in the terminal to clone the starter branch:
When the cloning process is complete, run the command below to navigate to the newly created ngx-admin folder and install the dependencies:
Once all the dependencies are successfully installed and all the packages are compiled, switch to Node v14 by running nvm use v14 if using nvm to manage the Node versions. Next, open the folder in the code editor and follow the steps below.
First, create an Angular service that will fetch the data from the server. To do this, run the following command:
Next, inject HttpClient into the service just created and add a method that sends a GET request to the specified endpoint. Open src/app/services/api.service.ts and replace the existing code with the following:
To define an interface that specifies the structure of the data, create a file called Sale.ts in src/app/pages/dashboard and paste in the code below:
Next, open src/app/pages/dashboard/dashboard.component.ts and replace the existing code with the following:
The code above completes the following actions:
- Imports the
ApiServicethat we created earlier, creates arrays to hold various pieces of data that will be rendered on the dashboard, and creates a Boolean (isDataAvailable) that helps control when the dashboard content is displayed - Injects the
ApiServicevia the component's constructor method - Creates various methods to manipulate the sales data and perform various computations. These methods include
extract(),overviewComputations(),regionalSalesComputations(), andmanagerSalesComputations() - Calls the
getSales()method of theApiServicein thengOnInit()method, which ensures that the data is fetched once the component is loaded - Subscribes to the returned observable that sends a GET request to the specified endpoint
- Pushes the fetched sales data into the
salesarray, calls theextract()method to populate the arrays, and changes theisDataAvailableBoolean to true to indicate that the data has been fetched
Displaying data using ngx-admin
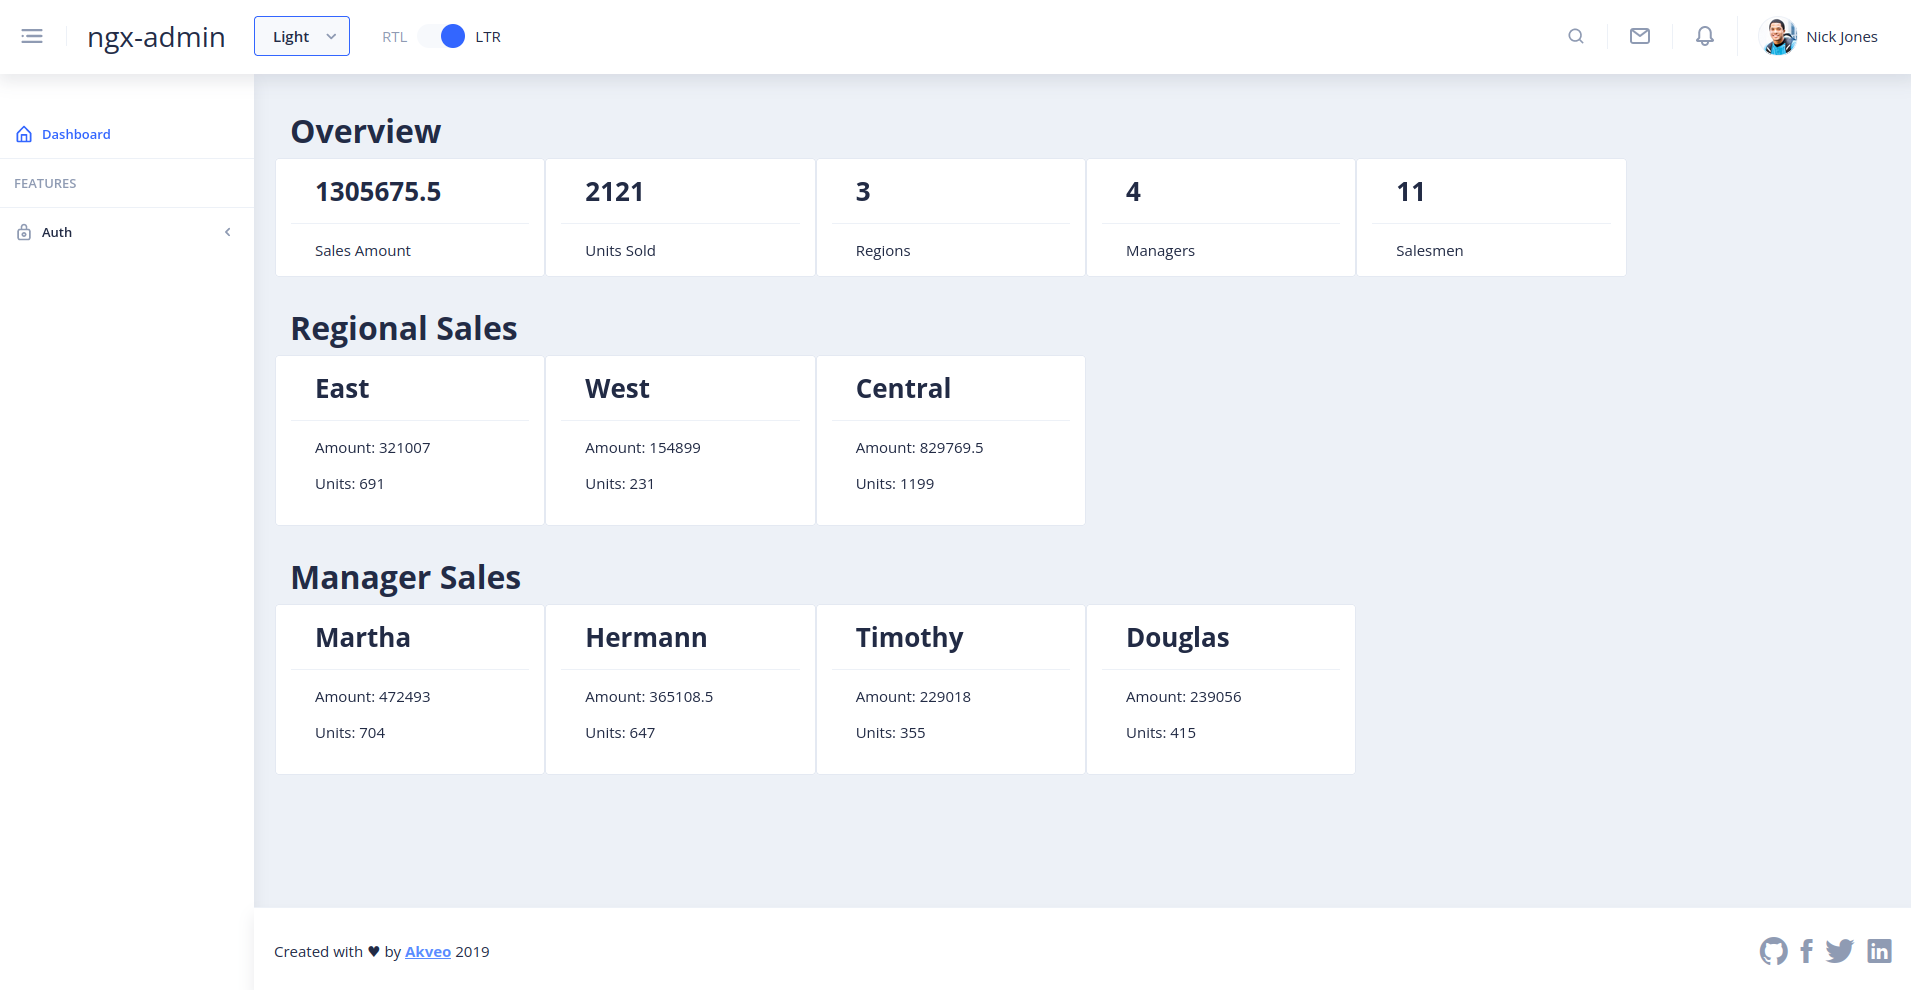
Next, let's display the sales data in the ngx-admin dashboard. To do this, open src/app/pages/dashboard/dashboard.component.html and replace the existing code with the following:
The code above completes the following actions:
- Wraps the code around the
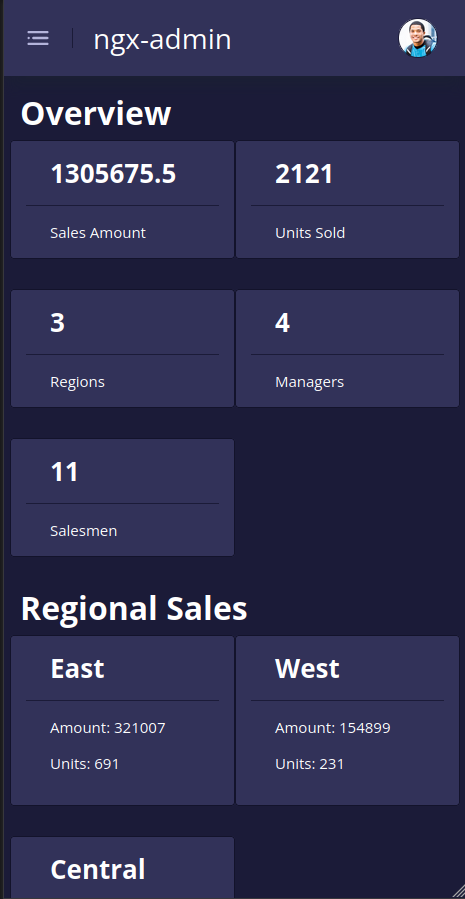
*ngIfdirective to conditionally render this template only when the sales data has been successfully fetched - Creates three different sections to provide different insights about the data:
Overview,Regional Sales, andManager Sales - Uses Nebular Card Component to display the data and Bootstrap to create a layout
Testing the application
To ensure everything is running correctly, open the ngx-admin and ngx-server folders in the terminal and execute the command below to run the development servers:
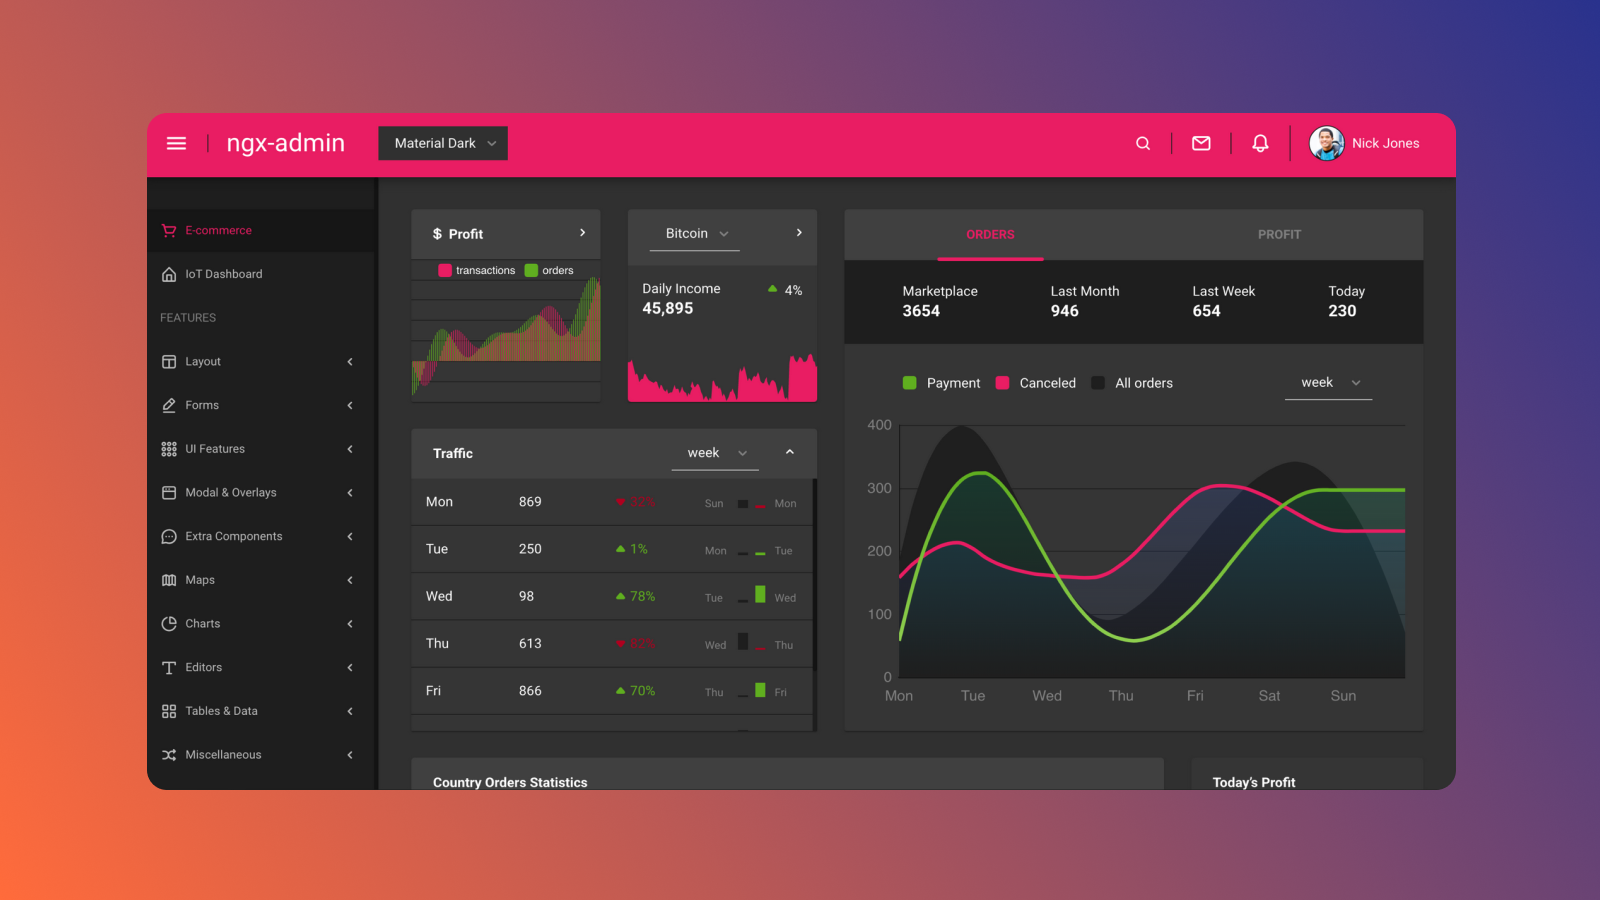
Navigate to http://localhost:4200 in the browser. You should see the following:
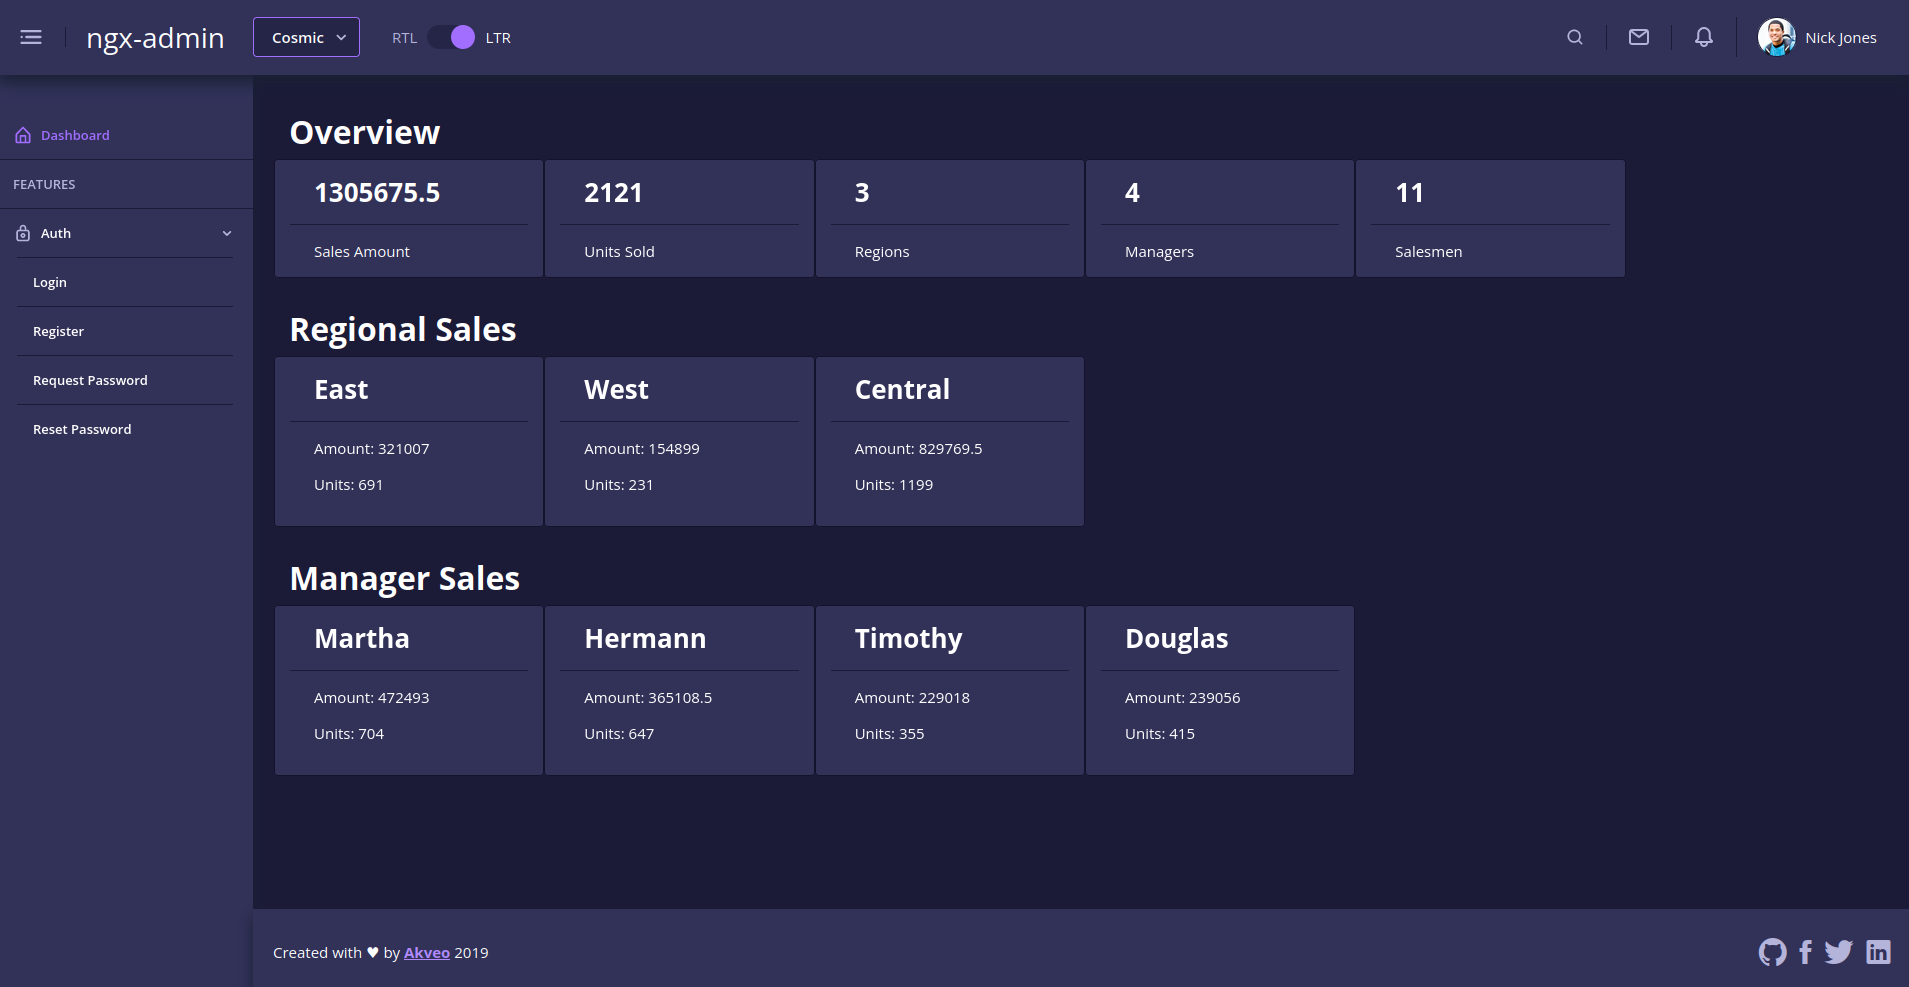
We can also switch between the various themes provided by ngx-admin. With the Cosmic theme, we get the following output:
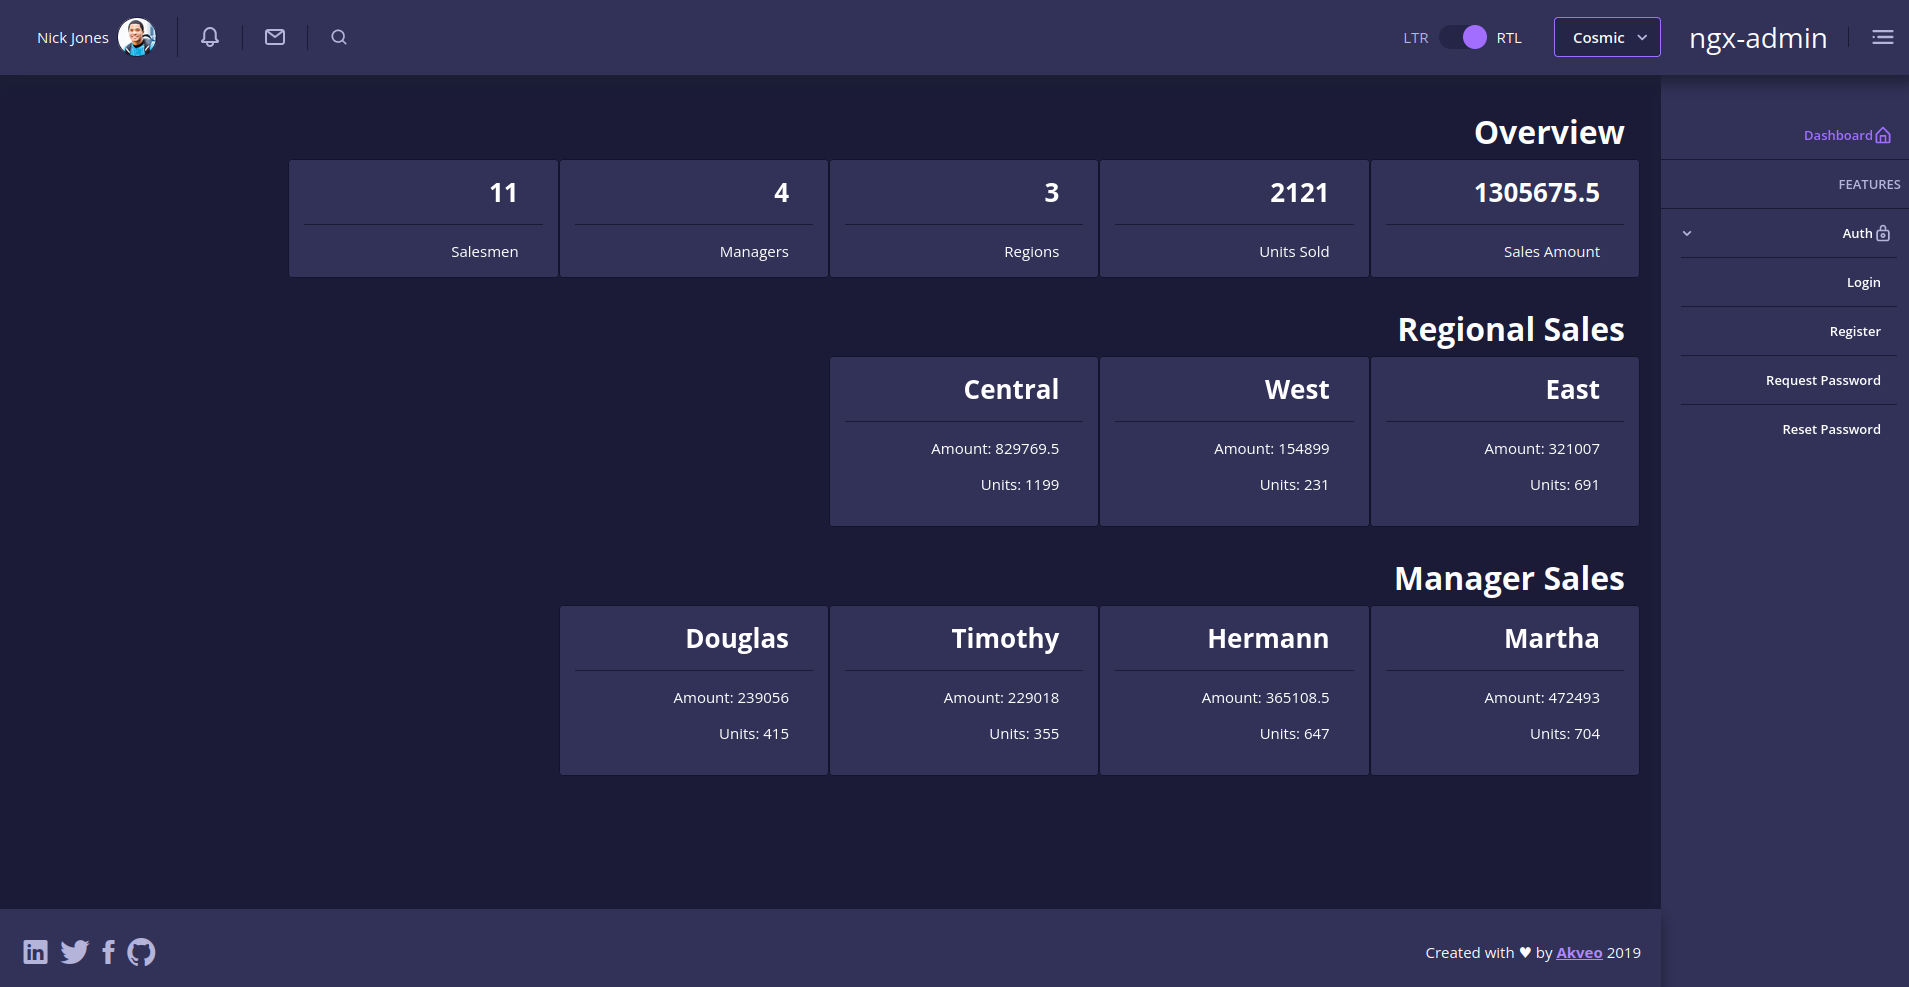
We can also switch between the LTR and the RTL modes. For the RTL mode, we get the following:
For mobile view, we get the following:
And that's how to build an interactive dashboard using ngx-admin in Angular.
While ngx-admin is a popular and easy-to-set-up solution, it is more challenging to use if you are looking to build enterprise-grade internal dashboards. It doesn't offer component state management, data fetching logic, or permissions setting capabilities. It also has limited customization capabilities, which may be challenging for more complex use cases. There are other solutions on the market, but many face the same limitations as ngx-admin. To explore these solutions further, check out our blog for content such as building a dashboard using AdminLTE, building a dashboard using Plotly Dash, React JS tutorial, and getting started with Active Admin.
Luckily, there is another internal UI platform on the market that offers an easy way to build and customize internal dashboards using code in a matter of minutes.
Airplane as an alternative
Airplane is a developer-first platform for internal tooling. Users can build tasks, which are functions that anyone on your team can use, and internal UIs within minutes using code. Airplane's Views feature allows users to build powerful and customized UIs in under 15 minutes.
Because Views are written with code, users have the ability to customize components using standard React patterns for their organizations' unique needs. Airplane also offers a robust pre-built component library and template library, making it easy to get started. Unlike ngx-admin, Airplane offers component state management, permission setting by group, and built-in data fetching logic that allows users to interact with external APIs easily, making dashboard building easy and safe to manage.
With Airplane, you can build powerful tasks and internal UIs with a few lines of code that anyone on your team can use. If you are looking for a code-first platform that makes it easy to build and customize enterprise-grade UIs without compromising security, then Airplane is a great fit for you.
To try out Airplane and build your first internal dashboard within minutes, sign up for a free account or reach out to [email protected].
Author: Kevin Kimani
Kevin Kimani is a FullStack Web Developer and Technical Writer who enjoys teaching complicated concepts in simple ways. He enjoys creating websites, writing technical articles, and collaborating on open-source projects.


