Kubernetes, also known as K8s, is a popular open-source system for running containerized workflows. Like more traditional systems, the Pods in a Kubernetes cluster execute tasks like overnight processes through batch processing. They can also perform scheduled jobs. For example, run transactional data to validate store inventory every night at a specific time.
Kubernetes provides two distinct mechanisms for running batch jobs: Jobs and CronJobs. As the name suggests, Jobs run a single time, while CronJobs run on a scheduled interval. If you're familiar with cron tasks from standard UNIX and Linux systems, you'll find CronJobs in Kubernetes quite intuitive.
In this article, we'll dive into how to create and use Kubernetes Jobs and CronJobs. We'll build a simple example to demonstrate their interaction with Pods, and go over the syntax of the required YAML file. Finally, we'll cover some of the limitations you might encounter when using CronJobs in your Kubernetes cluster and an alternative platform you can use for free, Airplane Schedules.
Differentiating Kubernetes Jobs and Kubernetes CronJobs
Kubernetes Jobs and Kubernetes CronJobs are both types of Kubernetes workload objects that are used to run containers, but they have different use cases and behavior.
Kubernetes Jobs are used to run one or more containers to completion, and they're often used for running batch processing tasks, database migrations, or resource-intensive jobs. Jobs are useful when you want to run a one-time task, or when you want to run a task multiple times until it succeeds, with a specified number of retries.
On the other hand, Kubernetes CronJobs are used to run a task on a specified schedule, such as running a backup every day at 5 pm. CronJobs are useful when you want to run a task regularly at a specific interval, such as running a daily report or cleaning up old logs.
In summary, Jobs are used for one-time or finite tasks that run to completion, while CronJobs are used for running a task on a recurring schedule.
Managing Kubernetes Jobs and CronJobs is essentially no different from running standard containerized workloads. This can be handled through the use of the ubiquitous kubectl CLI and well-structured YAML configuration files.
Let's first discuss how to use Kubernetes Jobs.
How to use Kubernetes Jobs
Kubernetes Jobs are useful for efficient and reliable task management. Let's run through how to use Jobs in a Kubernetes environment.
Prerequisites:
- A running Kubernetes cluster. This can be achieved through Minikube, Azure, GCP, or any other setup.
- Administrative access to your Kubernetes cluster.
- Basic familiarity with the kubectl CLI.
- Basic experience creating and using Kubernetes YAML files.
A Kubernetes Job is a powerful tool for executing and managing tasks. It consists of one or more Pods, each responsible for executing the task until completion. In the event of a runtime failure, the Job will automatically retry the task until success is achieved, ensuring that your tasks are completed with confidence.
In this section, we'll explore the benefits of using Jobs in Kubernetes and show you how to set them up. Whether you're a seasoned developer or just starting out, this guide will help you take your task management to the next level with Kubernetes Jobs.
Understand the YAML manifest for Kubernetes Jobs
The foundation of a Kubernetes Job is the YAML manifest file, which defines the configuration of your job. If you're familiar with other Kubernetes scenarios, the syntax of this file should look familiar.
Here's a sample YAML manifest file for a simple Job that prints a sentence to the screen using the "echo" command:
Let's breakdown the syntax:
apiVersion: This field specifies the version of the Kubernetes API being used, in this casebatch/v1.kind: This field specifies the type of Kubernetes object being defined, in this case, aJob.metadata: This section provides information about the Job, such as its name (echo-job).spec.template: This section defines the properties of the Pod that will run the task.spec.template.metadata.name: This field provides a name for the Pod, in this caseecho.spec.template.spec.containers: This field specifies the container that will run the task.spec.template.spec.containers.name: This field provides a name for the container, in this caseecho.spec.template.spec.containers.image: This field specifies the image that will be used for the container, in this casebusybox.spec.template.spec.containers.command: This field specifies the command that will be executed by the container, in this caseecho.spec.template.spec.restartPolicy: This field specifies the policy for restarting the Pod if it fails, in this case set toNever.spec.backoffLimit: This field specifies the number of times the Job should be retried if it fails, in this case set to4.
With this YAML manifest file, you can create a Job in your Kubernetes cluster by applying the configuration to the cluster using the kubectl apply -f command followed by the name of the manifest file.
Run and validate a Kubernetes Job
In this next section, we'll cover how to create and deploy your manifest file, verify the Pod was created, and view additional details about Job execution.
Step 1: Create the manifest file and deploy it
To run and validate a Kubernetes Job, you first need to create the YAML manifest file and save it on your local computer. Then, you can use the kubectl apply -f command to apply the configuration to your cluster.
- Create a YAML file and add the configuration script. Save this file on your local computer using a descriptive name like
simple-kub-job.yaml. - Next, run the following
kubectlcommand to trigger the deployment of the job definition. - The syntax of the command is:
kubectl apply -f <path to file>/simple-kub-job.yamlwhere<path to file>is the file path to the location where you saved the YAML manifest file.
Once the Job is deployed, you can use the kubectl get jobs command to view the status of the Job, including information on the number of completed and failed pods. You can also use the kubectl describe job <job name> command to view detailed information about the Job, including its status, events, and associated Pods.
Step 2: Verify the Pod was created
You can verify the Pod created by the Job by running the kubectl get pod --watch command, which will display the status of the Pod and update it in real time as it changes.
Once the Pod's status is marked as 'Completed', it means that the Job has completed successfully. You can confirm this by running the kubectl logs command, followed by the name of the Pod. The Pod name will have unique characters appended to it, which correspond to the name of the Job.
For example, if your Job is named simple-kub-job, the corresponding Pod name would be simple-kub-job-<unique characters>.
The output below shows the Pod’s Completed status and unique characters:

Step 3: View additional details about Job execution
Finally, you can view additional details about the Job execution by running the kubectl describe job <job name> command, where <job name> is the name of your Job. The response will provide information such as the Job's name, start and completion times, duration, and the status of the associated Pod.
You can view additional details regarding the Job execution using kubectl describe job, as follows:
kubectl describe job simple-kub-job

Now that we've created a Kubernetes Job manifest file, run the Job, and validated the outcome, we'll discuss how to use Kubernetes CronJobs.
How to use Kubernetes CronJobs
Now, let's move on to Kubernetes CronJobs. Scheduling a CronJob in Kubernetes is very similar to the process we just went through with Jobs, with just a few small modifications. These modifications allow you to first test and validate your job manually and then convert it into a scheduled task for even more efficiency.
Create a YAML manifest for your Kubernetes CronJob
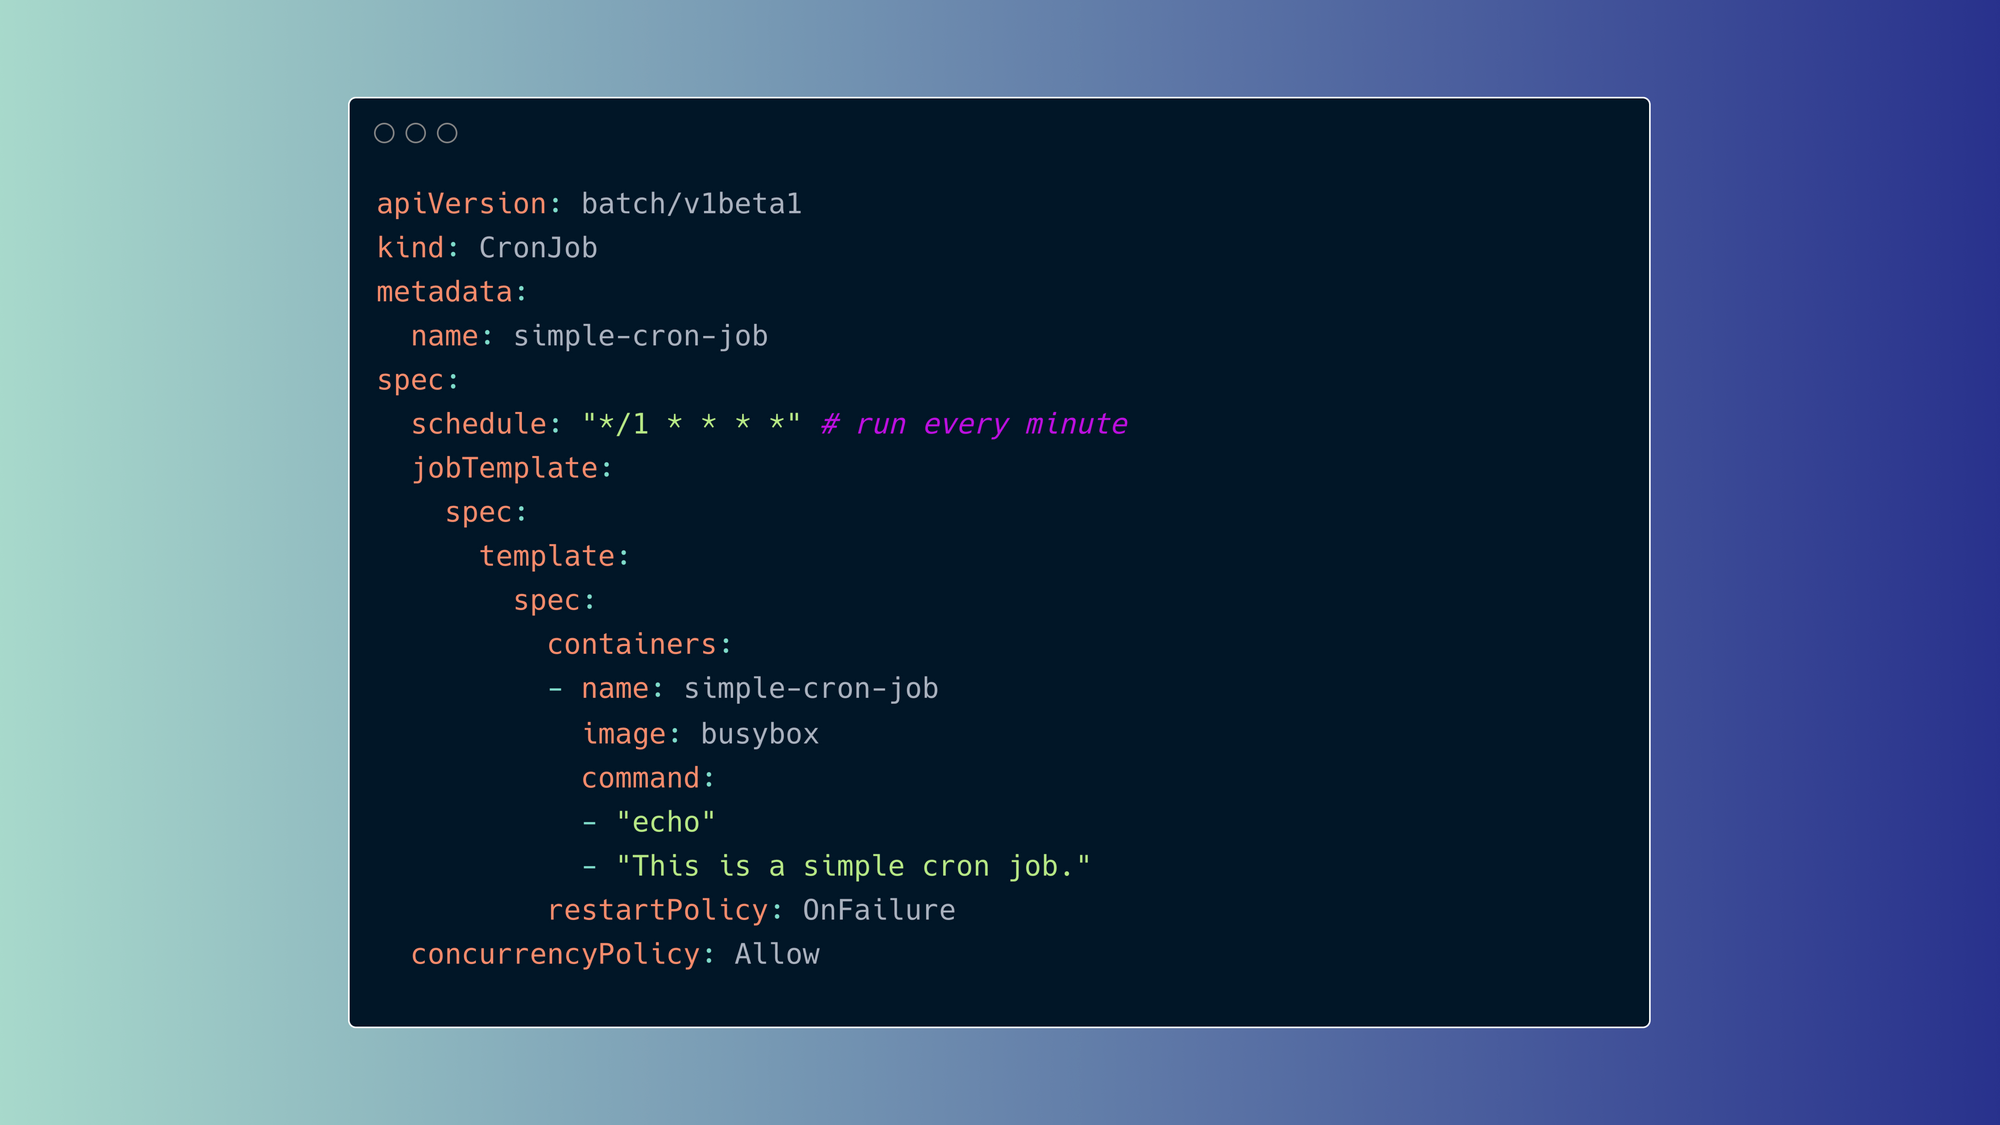
As with Kubernetes Jobs, a Kubernetes scheduled CronJob is initiated from a YAML manifest file. A simple example of a CronJob that outputs a sentence to the screen using the "echo" command might look like this:
This YAML file defines a CronJob named "simple-cron-job" that will run every minute. The actual task is performed by a Pod that runs the "echo" command and outputs the sentence "This is a simple cron job.". The restart policy is set to "OnFailure", meaning that the Pod will be restarted if it fails. The concurrency policy is set to "Allow", meaning that multiple instances of the Job can run at the same time.
Notice the following similarities and differences in this manifest file, compared to traditional Kubernetes Jobs:
kind: This is a required field in the YAML file that specifies the type of resource you're creating.CronJobspecifies this is a scheduled CronJob (not manual).spec/scheduleis the cron notation for the schedule — here, it’s run every minute. This is also a required field that contains the desired state and behavior of your CronJob. In the example YAML file, it specifies the schedule in which the job should run using the "schedule" field and the "jobTemplate" field that provides a template for the actual job to run.spec/jobTemplateis the container name, image, and the specific command to run. This is an optional field that provides a template for the Job resource to create when it starts. This is where you define the actual Job that you want to run, such as the command to execute, the image to use, and any environment variables to set.
Note: The “T” in jobTemplate must be capitalized. Otherwise, the manifest will be invalid and throws an error when applying it:
Let's save the file on our local machine with a descriptive name, such as simple-kubCronJob.yaml.
Schedule a Kubernetes CronJob
Now that the manifest file is ready, you can schedule it within the Kubernetes environment using the kubectl command line:
kubectl apply -f <path>/simple-kubCronJob.yaml

Notice the pointer to cronjob.batch, which indicates that a scheduled task was created.
You can also validate this with:
kubectl get CronJob

From here, you can run a “continuous watch” of the job by executing the following command:
kubectl get CronJobs --watch

In the above output, you'll notice that the scheduled Job is executed multiple times to ensure a successful completion. This is because Kubernetes CronJobs are designed to run to completion, regardless of any interruptions or failures that may occur during the job's runtime.
For demonstration purposes, let's consider a scenario where the code triggers a failure in the cluster, causing a node to go offline during the scheduled Job execution. Despite this interruption, the Job will continue to run on a different node until it completes successfully. This highlights the resilience and robustness of Kubernetes CronJobs and their ability to ensure that the scheduled task is carried out to completion.
Like regular Kubernetes Jobs, CronJobs are based on running Pods, which means you can also validate the Pod status:
kubectl get pods
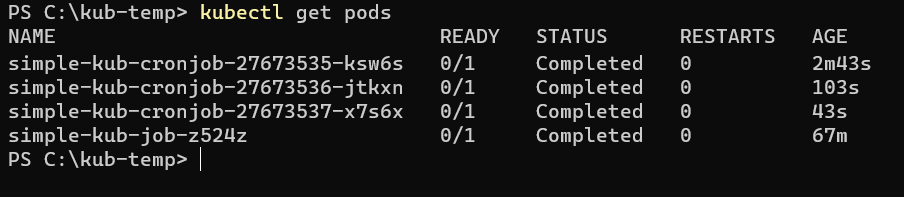
If you wait for the scheduled Job — let’s say one minute — and run kubectl get pods again, you’ll see that some former Pods don’t exist anymore:
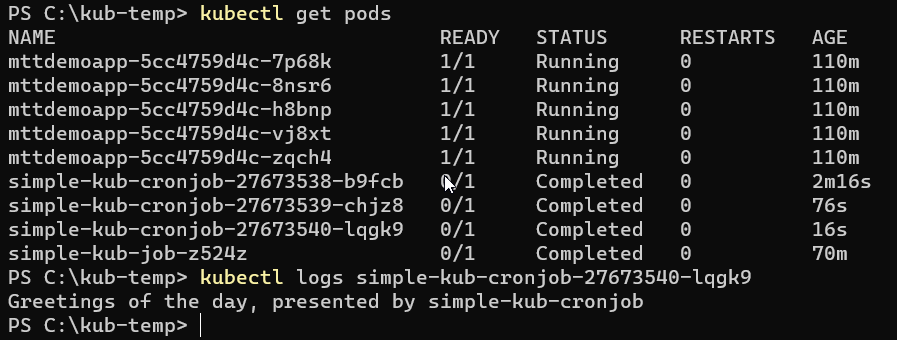
To view the logs of the running Pod, use the following command:
kubectl logs <pod_name>
Here, <pod_name> should be replaced with the actual name of the Pod you want to view logs from. Note that the logs can only be accessed as long as the Pod is still available, which is typically during the Job runtime or shortly after it.
Limitations of Kubernetes CronJobs
We've explored the capabilities of both manual Jobs and automated CronJobs in the Kubernetes environment. However, while Kubernetes CronJobs offer great flexibility, they also have certain limitations that are important to keep in mind.
- Timing accuracy: CronJobs are not guaranteed to run precisely on time. They may create more or fewer jobs, or miss execution time if the controller is down during scheduling.
- Limited time window: Kubernetes CronJobs have a limited time window to run, so they may not be suitable for long-running tasks. If a task requires more time than the window, it will be terminated and will have to be restarted later.
- Minimal interval: You can't schedule a Job to start less than ten seconds from deployment as the CronJob controller only refreshes every ten seconds. If you need your job to start sooner, it's recommended to run it manually as a traditional Kubernetes Job.
- Time zone: It's crucial to know the controller's time zone for accurate scheduling.
- Complex recurrence patterns: Basic patterns are supported, but more complex ones are not possible.
- Single node execution: CronJobs are run on a single node and cannot be automatically distributed across multiple nodes. This means that if the node running the CronJob becomes unavailable, the job will not run until it becomes available again.
- No task chaining: Kubernetes CronJobs do not support task chaining, meaning that it's not possible to schedule a task to run only if another task has completed successfully.
- No task management: You can't pause, resume, or cancel a job.
- No error handling: CronJobs do not have built-in error handling mechanisms, so if a task fails, it will simply terminate without any notification or automatic recovery mechanism.
- No task prioritization: You can't schedule a higher-priority task to run before a lower-priority task.
Airplane: a better alternative for job scheduling and more
If you're looking for an alternative task-scheduling software that is serverless and maintenance-free, you should consider using Airplane Schedules. Airplane is a developer platform for building custom UIs and workflows with a built-in and easy-to-use schedules feature.
You can use Airplane to transform scripts, queries, and APIs into Tasks and Views for your team. Developers use Airplane as a simpler, safer, and more feature-rich alternative to tools like cron, Airflow, and Heroku. Creating a schedule in Airplane takes just minutes and you can get started for free.
Here are some of the benefits of using Airplane for schedules:
- Automated audit logging: Airplane Schedules automatically generates logs for all executed tasks, providing an auditable record of your jobs' performance and history.
- Nuanced permissions: You can set nuanced permissions for different users, roles, and groups and configure RBAC.
- Customizable notifications: You can stay informed of the status of jobs with customizable notifications that can be sent via Slack, email, or in-app.
- User-friendly interface: You can easily manage scheduled tasks and pause, archive, and start them centrally.
- Maintenance-free: Your schedules don't require any maintenance after setup.
You can find more scheduling-related tutorials on the Airplane blog: How to start, stop, and restart cron jobs, How to run cron in containers, Creating Golang cron jobs, How to schedule tasks with systemd, and more.
In conclusion, Kubernetes offers a robust solution for managing both Jobs and CronJobs through YAML manifests. As a developer, you will find that the process of monitoring these entities is similar to that of interacting with traditional container Pods using the kubectl command line. By leveraging the power of Kubernetes, you can effectively manage and scale your scheduled jobs with ease. However, it is important to keep in mind the limitations of CronJobs when using this tool. With a clear understanding of these limitations, Kubernetes becomes a valuable addition to your toolkit for managing and optimizing your job scheduling processes.