Docker is an open platform for developing, shipping, and running applications that enables you to separate your apps from your infrastructure so you can deliver software quickly.
A container is a standard unit of software that packages up code and all its dependencies so the application runs quickly and reliably from one computing environment to another. Containers can isolate processes and services, making them the ideal solution for a number of use cases.
One such use case is running scheduled tasks. There are a couple of reasons why you might want to run scheduled tasks in containers. For instance, you could use one or more containers exclusively as schedulers for other applications that rely heavily on background tasks. Another use case might be to use cron in containers for native jobs that you want to run in a lightweight and isolated runtime environment. Here are some benefits:
- Security: You can create lightweight containers that run in isolated runtime environments and only interact with services and apps that need them.
- Portability: You can create a container with your cron jobs and use it on different platforms.
- Automation: You can version control your Dockerfiles and easily integrate them into your CI/CD pipeline.
In this article, we'll walk through a couple of different options for how to run cron in containers as well as their advantages and disadvantages. At the end, we'll introduce a developer platform called Airplane as a maintenance-free and easy-to-use alternative to cron.
What is cron scheduling in containers?
In simple terms, cron is a command line utility and daemon that is used as a job scheduler on Unix-like operating systems to execute tasks automatically at certain time intervals. You can use cron jobs to run generic scripts, back up files, or turn services on and off. Almost any action you can perform from the terminal can be assigned to a cron job.
Since containers use Linux-based images, you can use cron to assign scheduled tasks to them. To do this, you need to create a crontab that contains the necessary information for the cron daemon to know when to run cron jobs. You can check out this blog post for a more detailed introduction to cron and this guide for more details on how to edit your crontab.
Each crontab definition consists of a line with space-separated values representing the minutes, hours, days of the month, months, days of the week, and tasks to be executed.
You can create such definitions using the crontab command line utility, specifically the crontab -e command, or by creating the crontab file manually. For example, to create a cronjob that runs every minute, you can use the following template:
* * * * * <commands or tasks to be executed>
Note that you can execute commands directly using the crontab file; however, it is common to call scripts instead, especially for more complex tasks.
*/5 * * * * /usr/bin/bash /path/to/script/script.sh
The above example will run the script.sh script every five minutes.
You can check out the Airplane blog for more information on cron topics like how to start, stop, and restart cron jobs and creating Golang cron jobs.
Prerequisites
Before we get started with this quick tutorial, you'll need the following:
- Git version control system installed on your local machine.
- Docker Engine installed and configured on your local workstation. Feel free to refer to the documentation for instructions on how to install Docker.
- A cloned repository for use in the tutorial. To clone it, use the following:
git clone https://github.com/Damaso-DD/docker-cron-tutorial.git
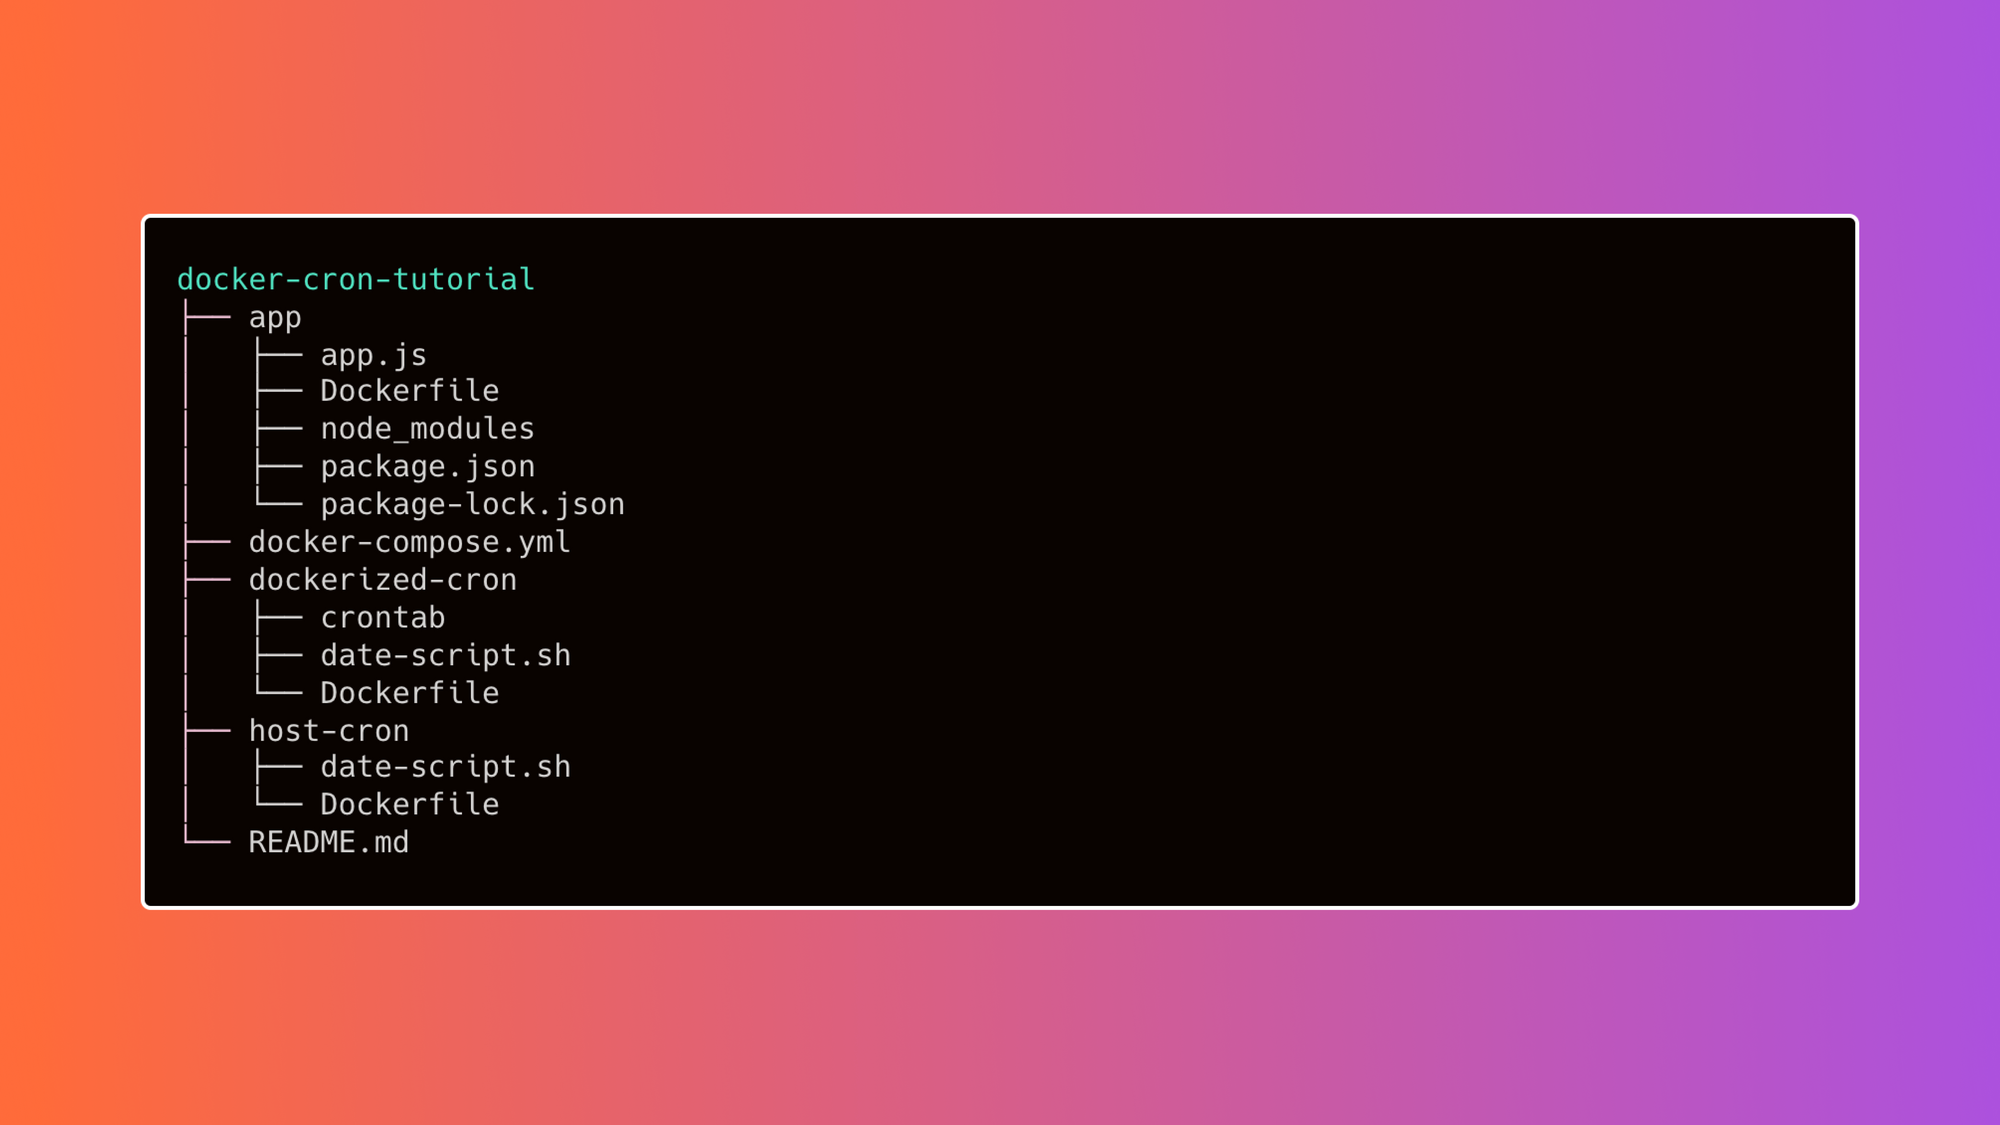
Once the repository is cloned, the directory structure should be as follows:
How to schedule tasks in Docker
There are a couple of ways you can create scheduled tasks in Docker using cron. In this article, we'll walk through using the host's crontab, using cron within your containers, and separating cron from your application’s services. We'll also discuss scheduling tasks with Kubernetes.
Using the host's crontab
One way to create scheduled tasks for your containers is by using the host’s crontab. Since the definition of each cron job allows you to execute commands, you can use Docker Engine in the same way you would the command line.
To start, navigate to the host-cron directory using the following command:
cd host-cron
Check the content of the Dockerfile using cat Dockerfile. You should see the following code:
This Dockerfile is self-explanatory. Since Alpine comes with cron installed by default, all you have to do is update packages (optional but recommended), copy a script to the working directory inside the container, and assign it the necessary permissions.
Now you can build the Docker image using the following command:
docker build -t host-cron-example .
For this example, you’ll use a simple script named date-script.sh that displays the date and time.
#!/bin/sh echo "Current date and time is " "$(date +%D-%H:%M)"
You could check date-script.sh output using the following command:
docker run --rm -it host-cron-example:latest sh date-script.sh
This command creates an ephemeral container, or a container that does not save data locally and is deleted after executing the script. The output shows the date and time, something similar to Current date and time is 03/30/22-11:42.
If you want the container to run such a job every ten minutes, you need to create a new cron job on the host by running crontab -e and pasting the following line:
Instead of running the script, you could use a similar procedure to execute any command at any time interval.
Note that cron requires newline characters at the end of each entry. For more information, see the manual pages of crontab(5) and cron(8).
Following are the advantages and disadvantages of this approach.
Advantages
- Logging is done on the host, which can be an advantage in use cases where you don't want an extra layer of complexity.
- On most Linux distros, cron starts on boot, so you don’t have to worry about restarting containers.
- The cron jobs will be executed from a single location (the host), which facilitates the administration of scheduled tasks.
Disadvantages
- Using the host’s cron daemon limits scalability, since containers hosted on different servers could present conflicts if the time synchronization differs.
- It's also not recommended to use host resources if you’re working with containers, since that defies the isolation principle that containers are meant to promote.
Bottom line: Using the host’s crontab can be an ideal solution for use cases in which you don’t require high scalability and prefer the simplicity of working directly with the host.
Using cron within your containers
A better alternative to using the host’s cron is to schedule cron jobs directly into your Dockerized services. The procedure for this is similar to the previous example.
Navigate to the dockerized-cron directory:
cd .. && cd dockerized-cron
You’ll notice that in addition to the Dockerfile and the date-script.sh, there is also a crontab file.
Check the crontab file content using cat crontab. You will see something similar to this:
In this case, the script will be executed every minute. The use of bash instead of sh is because the container uses a Ubuntu image.
Run cat Dockerfile to check its content:
The structure of the Dockerfile is similar to the one in the previous example, with some notable differences. Since it isn’t included in the official Ubuntu image, cron is manually installed. The crontab file is added to the appropriate location and the necessary permissions are assigned. The container is instructed to start with an entry point, which allows cron to start with the container. This means that the container is intended to run cron and not other services.
Following are the advantages and disadvantages of this type of implementation.
Advantages
- Your application is no longer dependent on host cron, which favors the practice of isolating your application.
- This solution allows you to scale your application more easily.
- You get all the benefits of containers since your application is containerized.
Disadvantages
- To run your application within the same container as the cron job, you will need to include a startup script, which increases complexity.
- It's typically a best practice that each container only executes one service or application. This solution goes against that principle.
Bottom line: This solution is ideal for simple applications - it gives you portability, scalability, and the convenience of containers for simple use cases.
Separating cron from your application’s services
The ideal solution to deploy scalable applications is to use a container exclusively to run cron jobs and make it independent from the rest of your services. Following is a simple example of how to do this.
Navigate to the app directory:
cd .. && cd app
Print the contents of the Dockerfile to the console using cat Dockerfile. You should see the following code:
This is the image of a demo application created in Node.js. It copies the source code of the application to the working directory, installs the dependencies using npm, exposes port 3000, and runs the application when starting the container.
Note that no crontab is added to this image; it’s an image that only contains the app. This allows containers created from this image to be scaled using orchestration tools such as Kubernetes.
Next, run cd .. to return to the root directory. Once there, you can inspect the contents of the docker-compose.yml file by running the command cat docker-compose.yml. The content is similar to the following:
This minimalist template structure links two services. Each service builds the corresponding image according to its Dockerfile. Running docker-compose up creates a container with the Node.js application you just reviewed and another container that runs the cron job described in the previous section. Since they are stand-alone services, there is no longer any limitation to scaling your application as needed.
Following are the advantages and disadvantages of this solution.
Advantages
- Your application runs independently of the cron job, which is best practice.
- Since the cron job runs in a separate container, it’s easy to keep it in sync with your application.
- This solution is easier to scale due to the separation of services.
Disadvantages
- You’ll need some mechanism that checks the health of the container running the cron jobs and takes care of restarting it in a timely manner if it crashes.
- Large-scale applications may need an orchestration tool.
Bottom line: Running cron jobs in a container independent of your applications is likely the ideal solution in use cases where flexibility, scalability, and strict adherence to containerization best practices are necessary.
Scheduling tasks with Kubernetes
One of the many advantages Kubernetes offers is that it comes with its own mechanism for running cron jobs. You don’t need to attach crontabs to your containers or use containers exclusively to run cron jobs. You can just declare the CronJob resource in a Kubernetes manifest, in which you specify which scheduled tasks should be executed at what time interval.
Below is a simple example from the kube-cron directory:
Review the above Kubernetes manifest. In the specs section, you can declare the time interval at which scheduled tasks will run using the same format as cron. Later, in the jobTemplate, you can specify which container will run those tasks as well as the corresponding command(s). Kubernetes allows you to quickly and efficiently separate your cron jobs from other services.
Advantages
- You can use the Kubernetes CronJob resource, which simplifies deployment.
- You gain the advantages of a container orchestration platform like Kubernetes: high scalability, resiliency, and more sophisticated monitoring and alerting mechanisms.
Disadvantages
- Kubernetes can be overkill for simple applications and even complex applications that do not require a large infrastructure.
- Implementing Kubernetes can be more expensive than using a cloud provider to run a few containers in the cloud.
Bottom line: Kubernetes is the way to go for large applications. However, it is not necessarily the best solution for all use cases, especially cloud applications that don’t require all its features.
A better alternative with Airplane scheduled tasks
While the cron and crontab command line utilities provide great flexibility when creating scheduled tasks, they come with drawbacks in several areas including the following:
Cron limitations
- No logs: You may want to have detailed information on each script run for audit, compliance, or general security purposes, which ideally means storing their log outputs. Cron doesn't offer support for this natively so you'd have to build this logic out yourself.
- Poor error handling: Cron also doesn't natively support error handling or alerting which makes maintenance very challenging. Since it's crucial for highly available applications to have a monitoring system that automatically alerts on any failure, you will likely need to implement this yourself manually.
- Lack of UI: Although many tasks are easier to perform through a CLI, when you have to manage dozens to hundreds of scheduled tasks at scale, a UI greatly helps monitor the status of jobs. Cron doesn't have an easy-to-use UI.
- Difficult to run manually: You may want to run a cron job manually or as a one-off; for example, for testing purposes or after one of your jobs has failed. When using cron, it's very difficult to perform jobs as a one-off outside of predefined schedules.
Airplane is a developer tool to quickly transform APIs, scripts, and queries into internal apps for your team. The platform can solve many of the challenges posed by cron. In Airplane, a "task" represents a single business operation and tasks can be configured to run on schedules or stitched together to build powerful multi-step workflows.
These apps can be created and managed entirely via code or from the Airplane UI. You can also use Airplane with both Docker-based deployments and Kubernetes clusters.
Airplane for scheduled jobs
One of the biggest advantages of using Airplane to manage your scheduled tasks outside of ease of use is that you get audit logs, permissions, notifications, and an easy-to-use UI all out of the box. You can also set your tasks to run on schedules or run them manually as one-offs.
Deploying a self-hosted Airplane Docker agent is as simple as creating a container that uses the YOUR_API_TOKEN and YOUR_TEAM_ID environmental variables to connect the local agent to the Airplane platform. Running the Airplane agent on Kubernetes is also easy, thanks to Helm charts.
Airplane can help you navigate the complexity of cloud-native environments like Docker and Kubernetes. You can use it to easily manage scheduled tasks and automate entire workflows.
If you’re interested in learning more about Airplane, you can sign up for a free account 😃. You can also contact the team at [email protected].
You can also check out our blog for more content on task scheduling like the top reasons your cron job isn't running, creating Golang cron jobs, how to schedule tasks with systemd, and how to start, stop, and restart your cron jobs.
To see the entire tutorial, you can check out the GitHub repo.
Author: Damaso Sanoja
Damaso Sanoja is a mechanical engineer with a passion for cars and computers. He's written technical content for both industries for more than two decades.