

React components are independent and reusable bits of code that make building UIs easier. Components let users split the UI into independent pieces and think about each piece individually. These components accept inputs (called "props") and return React elements that describe what should appear.
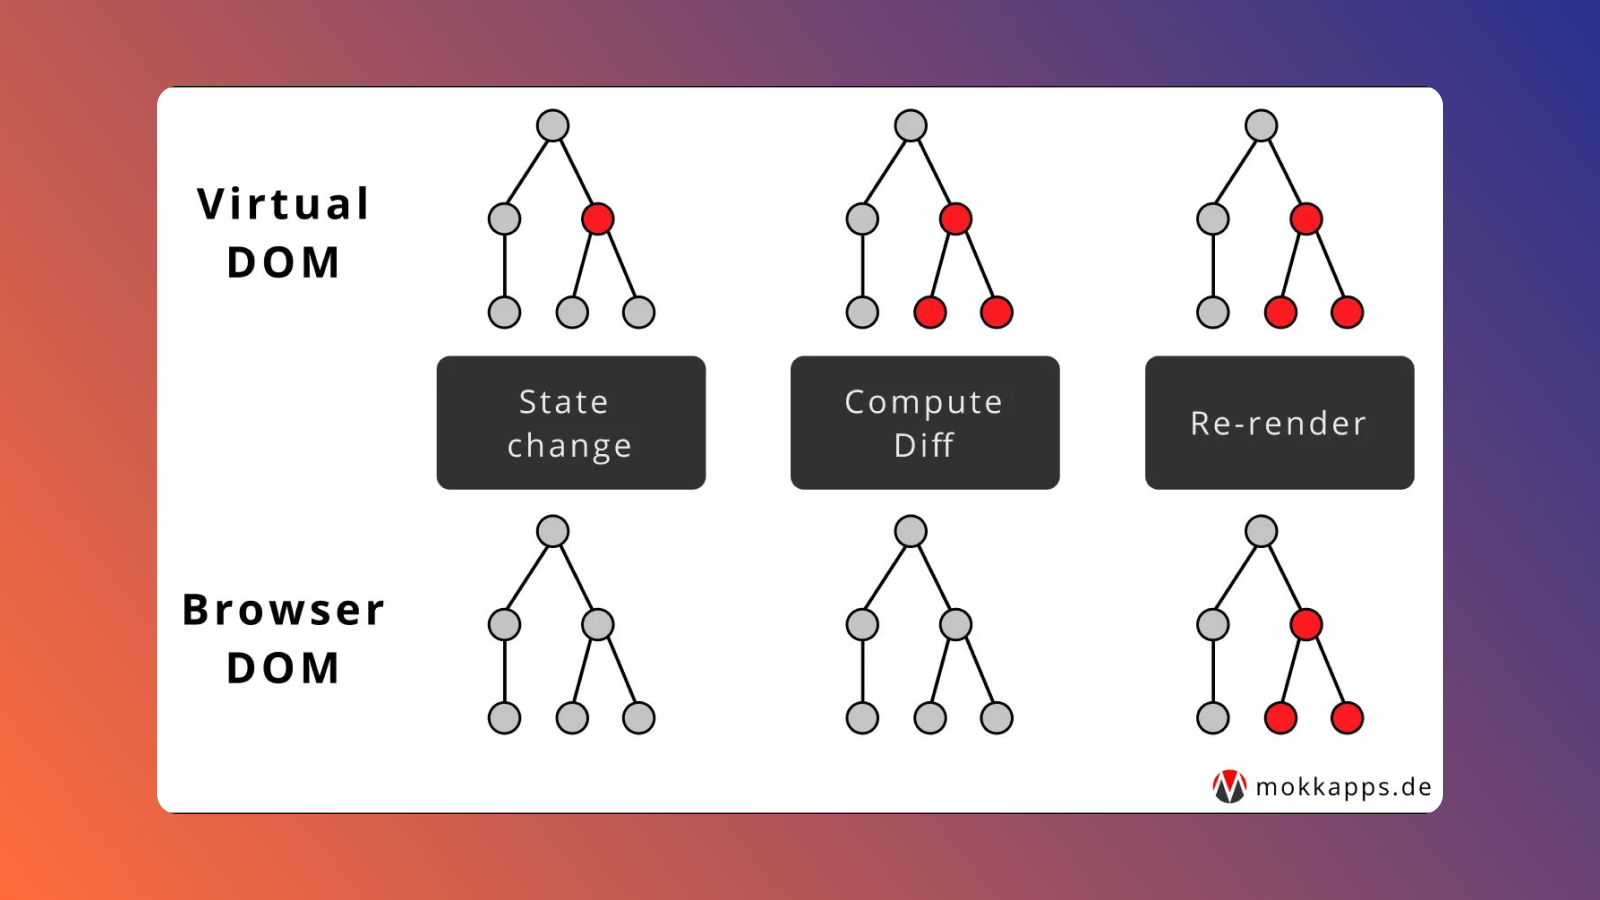
When there is a change of state in a specific React component, a process called rendering is triggered. The rendering process updates the specific parts of the UI where the component state was changed. This avoids reloading the entire web page and saves users time. Re-rendering occurs when a consecutive render must take place of a component that is already displayed. React components are typically re-rendered automatically when a state change or props change occurs, but sometimes users may need to force components to re-render. While this isn't generally a best practice, it is sometimes necessary to do so in order to minimize behavior interruptions and disruptions.
In this article, we will explore two ways to manually re-render React components and discuss best practices and examples of doing so. We'll also cover debugging practices to utilize as an alternative to forcing a re-render. Prior to getting started, ensure you have a basic understanding of React and its concepts, such as components, state, and props.
Two ways to re-render components
Before we start, keep in mind that re-rendering components in React is typically not recommended since it can waste resources and impact performance. Re-rendering may also hide the existence of a state or prop issue, making it challenging to identify and address those issues in the long term.
If a manual re-render is necessary, there are two ways to do so: forceUpdate() and setState() methods. The key distinction between them is the type of component they’re each used in and how they trigger a re-render to occur:
forceUpdate()- this function is used in class components and forces a re-render without needing to change the component's state. It instructs React to re-render the component without checking for changes to its state or props. Typically, this strategy is avoided because it may lead to unexpected behavior in the application.setState()- this function is used in functional components and allows users to change the component's state and start a new rendering process. This method updates the state and React determines if a re-render is required by comparing the new state to the old state. This approach is recommended compared to theforceUpdate()method.
Using the forceUpdate() method
Let's start by walking through how to use the forceUpdate() method in a class component. Here’s a class component that fetches data from an API and displays the data as a list:
This component uses the componentDidMount() lifecycle method to fetch the data when the component is first rendered. However, the code will not work as expected because when the data is fetched, the component’s state isn’t updated. This means the component will not re-render with the new data.
In situations like this, you can tell React to force a re-render by using the forceUpdate() method:
This example uses the this.state.data = data.results method to mutate the state and this.forceUpdate() to re-render the component with the new data.
Using the setState() method
Let's now walk through the setState() method in a functional component. In this example, the functional component displays the current time and has a button that allows the user to update the time.
When the user clicks the button, the value of the setState variable changes. These changes will cause the component to re-render, updating the page with the current time:
The key concept here is that we're using the setState() method with the useState() hook, which allows us to update the state and re-render the component. However, the value of the state is never used in this example. It’s only used as a way to trigger a re-render.
Debugging as an alternative to re-rendering
Although you can use the forceUpdate() and setState() methods to manually re-render a component, these can cause potential problems. For example, if there is a bug in the code, forcefully re-rendering the component won’t solve the bug issue and may even exacerbate it. That’s why debugging is a better solution to use when understanding the root cause of the problem and finding a solution that may not require re-rendering.
Incorrectly updated state
One of the most common reasons for a component failing to re-render is an incorrectly updated state. In the previous example where we used forceUpdate() to re-render the component, the issue was caused by the component’s state not updating correctly.
When changing the state in React, it’s important to use the built-in setState() method, which allows the user to update the state of the component and re-render it.
Here's an example of how to change the state and re-render the component correctly. The code below demonstrates how, each time new data is fetched, the state is updated and the component re-renders automatically, eliminating the need to use the forceUpdate() method:
An incorrectly updated state can prevent a component from rendering again. To resolve this issue, always use the setState() method and ensure that the state is updated correctly.
Incorrectly updated props
Another common reason for a component failing to re-render is incorrectly updated props. A component re-renders when new props are passed down to it from its parent component. Failure to pass new props causes the component to not re-render. Take a look at the example below:
When we click the Update time button in the example above, the component will not re-render because the parent component, App, fails to update the child component, DisplayTime, with updated props. This is because we are passing the date variable as a prop to the DisplayTime component.
It is important to keep the props as states rather than simple variables to guarantee that the parent component constantly updates the child component with new data. As a result, each time the state changes, the parent component will update the child component with new props.
Let's now walk through how to update and pass props to a child component correctly. In the example below, the data props are stored as states in the parent component. This ensures that every time the parent component state updates, the child component receives the new props and re-renders. By using this method, we guarantee that the child component is continuously updated with the latest data:
In general, users should avoid manually re-rendering React components if possible. Forcing re-renders can waste resources, mask hard-to-find bugs, and impact performance. We covered two methods for re-rendering components: forceUpdate() and setState().
Re-rendering a component usually indicates that there is a deeper problem in the code. So rather than using forceUpdate() or setState() to re-render a component, start by debugging the underlying issue.
If you'd like to learn more about React and building UIs effectively, check out our blog for content such as React JS tutorial, building an admin dashboard using ngx-admin, and more.
Introducing Airplane: build robust React-based UIs
Airplane is a code-first platform that allows developers to transform queries, scripts, APIs, and more into powerful tasks and views. The building blocks of Airplane are tasks, which are single or multi-step functions that anyone on the team can use. Airplane Views allows users to easily build custom, React-based UIs using code. Using Airplane, users can build various dashboards, such as admin panels, billing dashboards, support ticket UIs, and more.

Airplane has an extensive React component library and template library, making it easy and efficient to get started. In addition to tasks and views, Airplane offers strong built-ins, such as permissions setting, audit logs, schedules, and more.
To try out Airplane and build a robust UI in under 15 minutes, sign up for a free account or say hello at [email protected].


