


Web development is moving fast, and there are several tools that can help developers create websites that work seamlessly. React Bootstrap is a comprehensive tool that comes equipped with a range of predesigned elements that can enhance the look of websites. With React Bootstrap, users have access to an extensive library of prebuilt components that they can easily integrate into their websites. This means users can focus on the functionality of the site without sacrificing its appearance.
React Bootstrap is a valuable tool for a wide range of use cases. One of its main benefits is its ability to build responsive and mobile-first websites and applications, allowing developers to create sites that adapt to any screen size or device. Developers can use React Bootstrap's predesigned, customizable UI components to quickly and easily add high-quality features to their projects. Additionally, it's a great choice to ensure a consistent design across a team project. By using the same predesigned components throughout the website or application, developers can achieve a polished and professional look.
This article explores React Bootstrap in further detail and explains how to use it to build a navigation bar from scratch.
What Is React Bootstrap?
React Bootstrap is a powerful tool that offers a range of benefits for web developers. Whether a user is building a simple website or a complex application, React Bootstrap can help streamline the development process and improve the overall user experience. Here are a few use cases of how React Bootstrap can be utilized to take advantage of its unique features and benefits:
- Developing responsive and mobile-first websites and applications: With its mobile-friendly components, React Bootstrap makes it easy to create websites and applications that work seamlessly across different devices and screen sizes. This can help improve user engagement and reduce bounce rates while also ensuring that the website or application looks great on any device.
- Adding customizable, predesigned UI components to a project: React Bootstrap offers a vast library of predesigned UI components, including buttons, forms, and navigation bars. These components are fully customizable, allowing users to tailor them to their specific needs and requirements. This can save time and effort in designing and coding UI elements from scratch while also ensuring a consistent design throughout the project.
- Ensuring a consistent design across team projects: React Bootstrap's predesigned components offer a consistent design language that can be applied across all pages and components in a team project. This can help reduce design-related conflicts and issues during the development process while also improving the overall user experience by providing a familiar and predictable interface.
- Streamlining the development process: React Bootstrap's comprehensive library of predesigned components and easy-to-use API can help streamline the web development process. This can save developers time and improve efficiency, allowing them to focus on the core functionality of their project. Additionally, React Bootstrap is well-documented and actively maintained, ensuring that developers have access to the latest features and updates.
Implementing a React Bootstrap Navbar from scratch
This tutorial provides instructions on implementing a React Bootstrap navbar from scratch. We'll walk through how to create a navigation bar with three distinct sections, Home, About, and Contact, and create a unique view for each section using different routes. Following these steps, we'll be able to develop a seamless and interactive user experience that's both responsive and mobile-friendly.
Prerequisites
Make sure you have Node.js and npm (the Node package manager) installed on your system. You can check if they are installed by running the following commands in the terminal:
If they're not installed, download and install Node.js from the official website. npm will be installed automatically with Node.js.
Let's start by creating a new React project using Create React App by running the following command:
This command will generate a new folder with the specified name that contains the boilerplate code for a React application.
Change the current directory to the newly created project folder by running the following:
Start the development server by running the following command:
The React application should now be running at http://localhost:3000/. The page will automatically reload if we make any changes to the source code.
Now that we have a React application set up, we can proceed to install the additional libraries that will be used in this tutorial. Run the following commands to install react-router-dom, react-bootstrap, and bootstrap:
These commands will install the necessary packages for routing and styling the application. react-router-dom is a routing library for React applications built for web browsers (DOM environments). It enables the creation of single-page applications (SPAs) with seamless navigation, allowing users to switch between different views or components without requiring a page reload. react-bootstrap is the library that provides a set of React components built using Bootstrap.
Note that react-bootstrap requires the Bootstrap package as a peer dependency. When we install react-bootstrap, we should also install Bootstrap. react-bootstrap bridges the gap between the two technologies by providing prebuilt React components that are designed using the Bootstrap framework.
Creating views
To get started, open the project in a code editor (such as VS Code). We'll first create basic pages for the Home, About, and Contact sections.
Start by creating a new folder called pages within the src folder. Then, create three files within the pages folder and name them Home.js, About.js, and Contact.js. Lastly, add the appropriate content to each file.
Add the following to Home.js:
Add the following to About.js:
Add the following to Contact.js:
Creating different routes
Navigate to the src folder and create a new file named routes.js. This is where we configure the routes for the application by defining the appropriate routes for each page or component that we want to display using the following code:
Creating the navigation bar
In the src folder, create a file named NavBar.js. In this file, import the necessary React Bootstrap components and define the NavBar component:
The code defines a React functional component called NavBar, which renders a responsive navigation bar using the react-bootstrap library and react-router-dom. The navigation links are created using Nav and Nav.Link components from react-bootstrap and styled using CSS classes from NavBar.module.css. The NavLink component from react-router-dom is used to create links that navigate to different pages in the application without reloading the page. The NavBar component is exported as the default export of the module, allowing it to be used in other parts of the application.
In the src folder, create a file named NavBar.module.css. In this file, add the necessary styling classes for the navigation bar using this code:
This CSS module contains styles for the navigation bar component, including font, background color, box shadow, color, font weight, padding, transition effect, text decoration, border radius, and margins. The code applies the styles to the navigation bar container and navigation links in the NavBar component in the JavaScript module.
Integrating the navbar and routes
In the src folder, open the App.js file and import the necessary components and routes. Next, update the App component to include both the navbar and the routes we've defined:
The code defines the App component, which handles the routing of the application and renders the NavBar component. The Router component handles the routing of the application, and the Routes component is used to render different components based on the URL path.
The routes array is mapped over to create different route components, each with a specified path and corresponding component. These routes are used to render the appropriate component based on the URL path.
Testing and debugging the navbar
To launch the React application, navigate to the root directory of the project in the terminal and run the command npm start or yarn start. Once it has started, open the browser to view the application. To confirm that the navbar links are functioning properly, click them and verify that they navigate to the intended pages. If there are any problems, double-check the previous steps and confirm that all code snippets have been accurately implemented.
And that's how to build a React Bootstrap Navbar from scratch. You can find the code used in this GitHub repository.
Although using React Bootstrap has some benefits, it can be challenging to use and even more challenging to customize components based on your specific needs. Users also need to be well-versed in JavaScript and JavaScript plug-ins to maximize value when using React Bootstrap.
Luckily, there is another easy-to-use and powerful solution on the market that can help you quickly and easily create responsive and interactive dashboards.
Build custom, React-based dashboards using Airplane
Airplane is the developer platform for building custom internal tools. Engineers can transform scripts, APIs, and more into robust UIs and workflows for their organizations. Airplane Tasks are single or multi-step operations that anyone on your team can use. Airplane Views allows users to quickly build custom UIs within minutes.
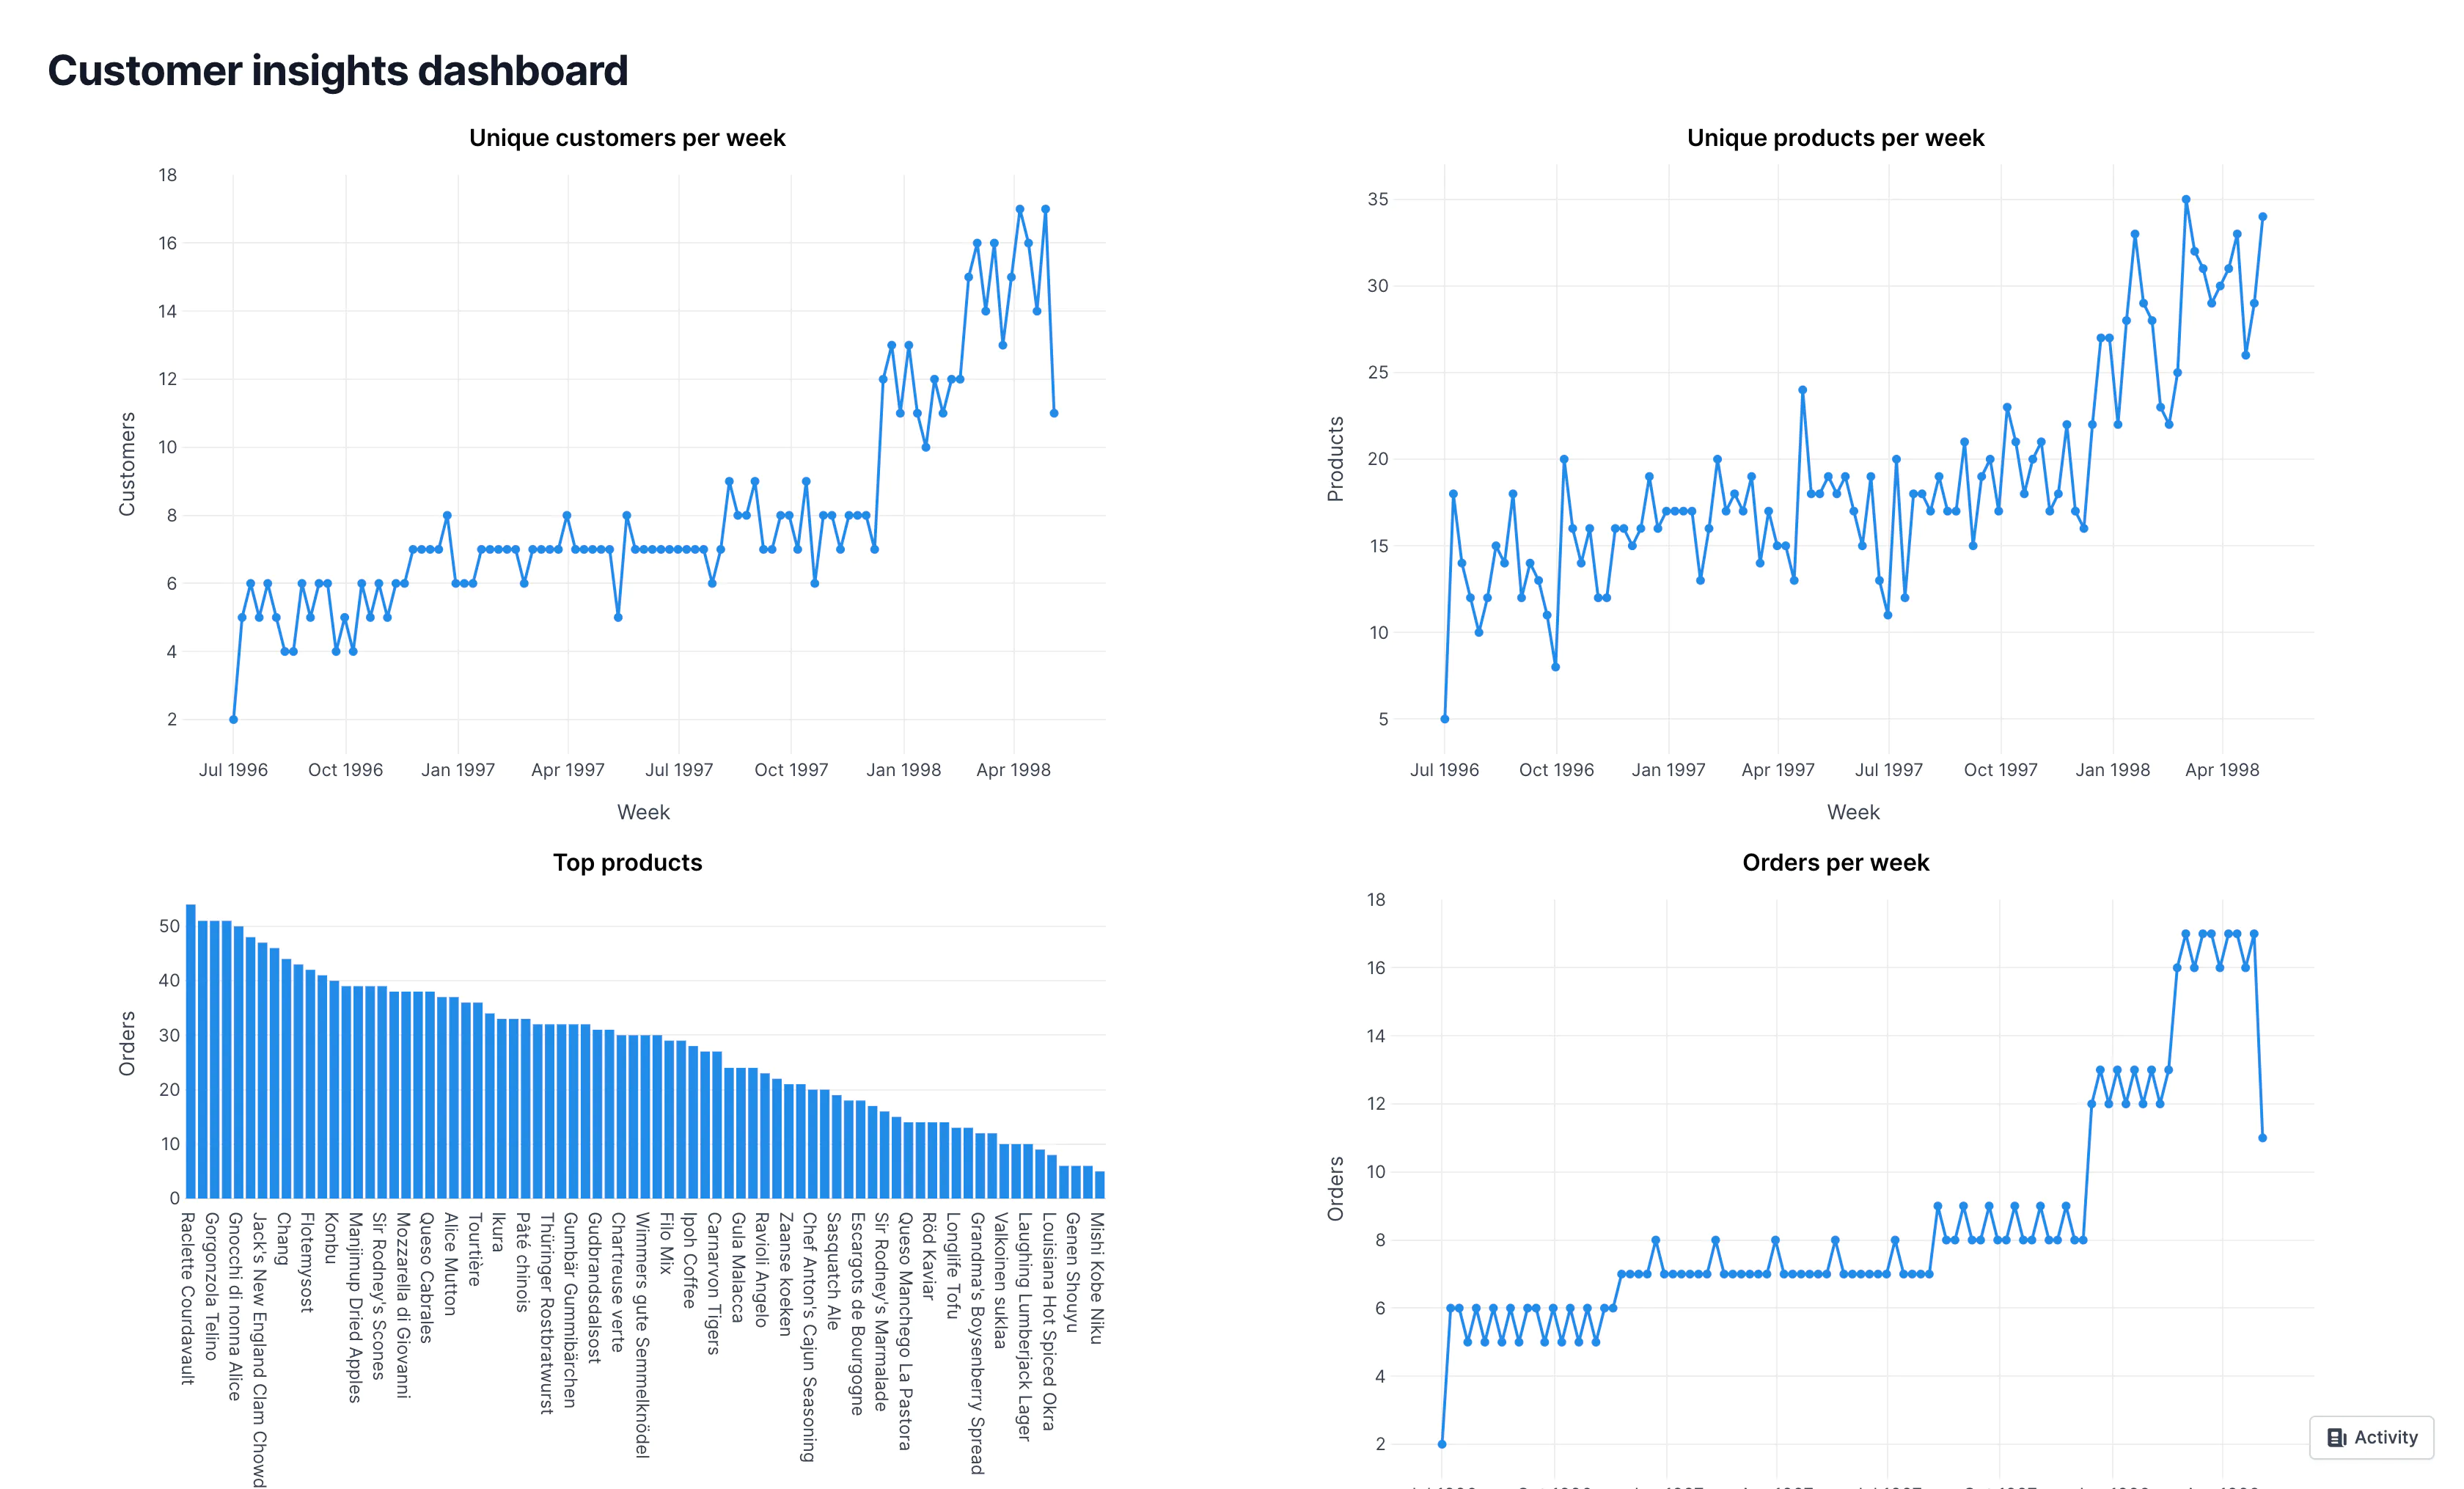
With Views, users can utilize an extensive component and template library, making it easy to get started. For example, if you want to build a customer insights dashboard to show customer, product, and order data, you can use the customer insights template to get started:
Airplane also offers granular permissions setting, job scheduling, self-hosted storage, and more.
If you'd like to learn more about React components and building UIs using Airplane, check out our blog for content such as how to use React draggable component, building an admin panel with react-admin and Next.js, building a Python dashboard using Plotly Dash, and more.
To build an Airplane View within minutes, sign up for a free account or book a demo. If you’re a startup with under 100 employees and are Series A or earlier, check out Airplane for Startups to get even more out of Airplane.
Author: Lucien Chemaly
Lucien Chemaly is an experienced software engineer and technical lead. He has worked on and led various projects including building SCADA platforms, building SaaS solutions for the United Nations, migrating old structures to the latest architecture, and more.


