

Admin panels are becoming critical for many organizations in order to manage their operations and processes effectively. These dashboards allow users to easily monitor and update their admin operations. One common library used to build admin panels is react-admin.
React-admin helps users create admin panels. The library can auto-generate admin panel user interfaces based on the data fed into it. Furthermore, it provides create, read, update, and delete (CRUD) features, so users don’t need to worry about implementing certain features from the beginning.
Next.js is a library developed by Vercel that serves two main purposes. One is to act as a backend for web applications. The other is to reduce the loading time of React applications by providing a feature called server-side rendering (SSR). SSR processes JavaScript on the server side and passes the result to the browser for display.
In this article, we'll walk through how to use these tools to create a simple admin panel for a fictitious e-commerce site.
Prerequisites
Ensure you have the following for this tutorial:
- Node installed on your machine
- A code editor such as Visual Studio Code
- A Supabase account with a project created
- Basic knowledge of creating web applications using React and Next.js
We'll start by creating the data source, Supabase. We recommend using Supabase because it handles all the API creation logic behind the scenes, allowing users to focus on creating and consuming the data.
Creating the data in Supabase
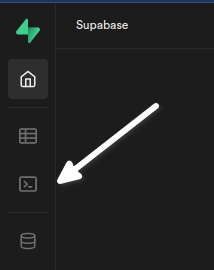
In the Supabase project, access the Supabase SQL editor by clicking the third icon from the top in the left navigation pane:
Click the New query button and paste the following SQL statements in the editor:
These statements create and fill four tables:
home_officehealth_productssporting_goodsbaby_products
The tables categorically store the products depicted by their names. For instance, home_office stores products in the home and office category.
Despite the tables having the same structure, the decision to create four tables instead of one is due to react-admin’s default behavior. For the navigation pane, it expects to be fed different data sources for each menu option. In this case, the data sources are the tables created earlier. In real-world cases, we should do this using views and queries. But for simplicity, this tutorial shows the most straightforward way.
Now let's set up the application.
Setting up the application
In the working directory, run the following command:
Answer each question shown in this image:

Next, change directories using cd next-react-admin.
This project requires two dependencies:
react-adminhelps build the library.@promitheus/ra-data-postgrestis for using a PostgREST data provider since Supabase uses a Postgres database.
Add the dependencies using this command:
Now create a catch-all route that serves the different slugs when a user clicks the components in the admin panel. Create an admin folder in the src/pages/api directory. In the directory, create a file called [[...slug]].js to house the slug-handling logic. Paste the following code into it:
The code starts by stripping and extracting the necessary data source names from the request URL and then appending them to the Supabase REST URL.
Then, the code sets the request options while passing in the Supabase service role for authentication. Finally, it calls the Supabase API and returns a response. All of this happens in an async-await fashion.
To set the environment variables, create a file called .env.local at the root of the next-react-admin directory and paste the statements below in. Replace the contents appropriately. We can get these details from the Supabase project settings using the Supabase guide.
The final phase is to create the application.
Creating the application
In the src/admin directory, create a file called App.js, and add the following code:
This code imports the necessary modules and adds a PostgREST data provider, which points to the directory containing the catch-all route handler (api/admin). Next, it creates a list component to render the contents from the data source. When users click a list’s row, the rowClick attribute takes the user to the show page, which displays the details of the row’s contents. The sx attribute adds some positional styling to the component. The top and bottom paddings are five pixels, while the right and left are ten pixels.
Next, the code adds the App component, under which it adds the Admin component. Under the Admin component, it adds Resource components. The data source passes to the name attribute in each Resource component. It also labels it using the options attribute. The remaining attributes denote which component to display. The show attribute is for displaying the item’s details, edit is for editing the item’s details, and list is for listing the items.
Now, add the show and edit pages by creating a folder called components in the src/admin directory.
In the src/admin/components directory, create a file called ItemEdit.js file, and add the following code to it:
The Edit component is the root component. It edits the details of items. Under it, there’s a SimpleForm component and three inputs to the item’s contents.
In the same src/admin/components directory, create a file called ItemShow.js to display the items’ details. Add the following code to it:
react-admin uses the Show component for display purposes. It uses SimpleShowLayout to arrange elements in a Show component.
Replace the src/pages/index.js file’s contents with the following code:
This directs Next.js to render the file on the /src/admin/App path and avoid using server-side-rendering. It also prevents react-admin’s routing behavior from conflicting with Next.js’s routing.
Start the app by running npm run dev in the terminal.
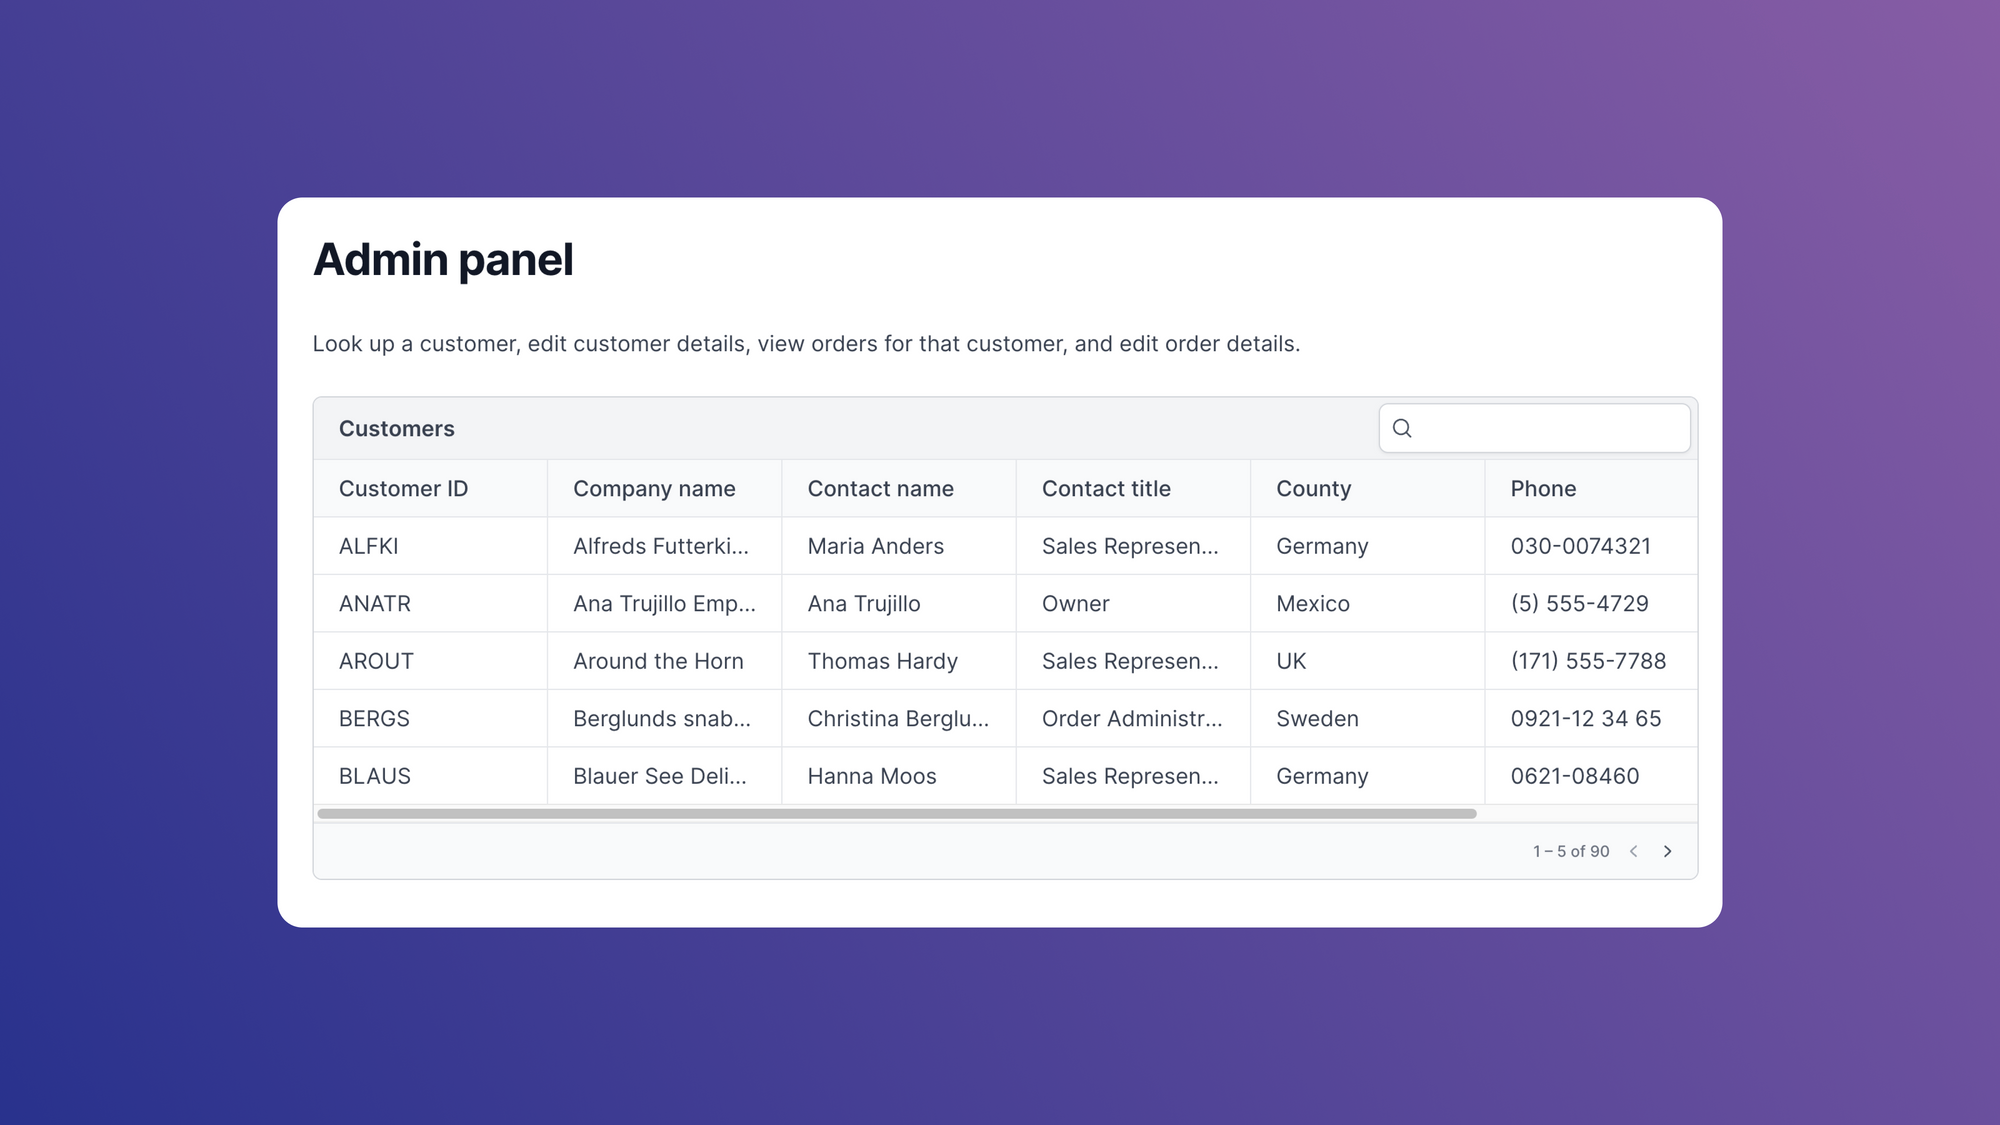
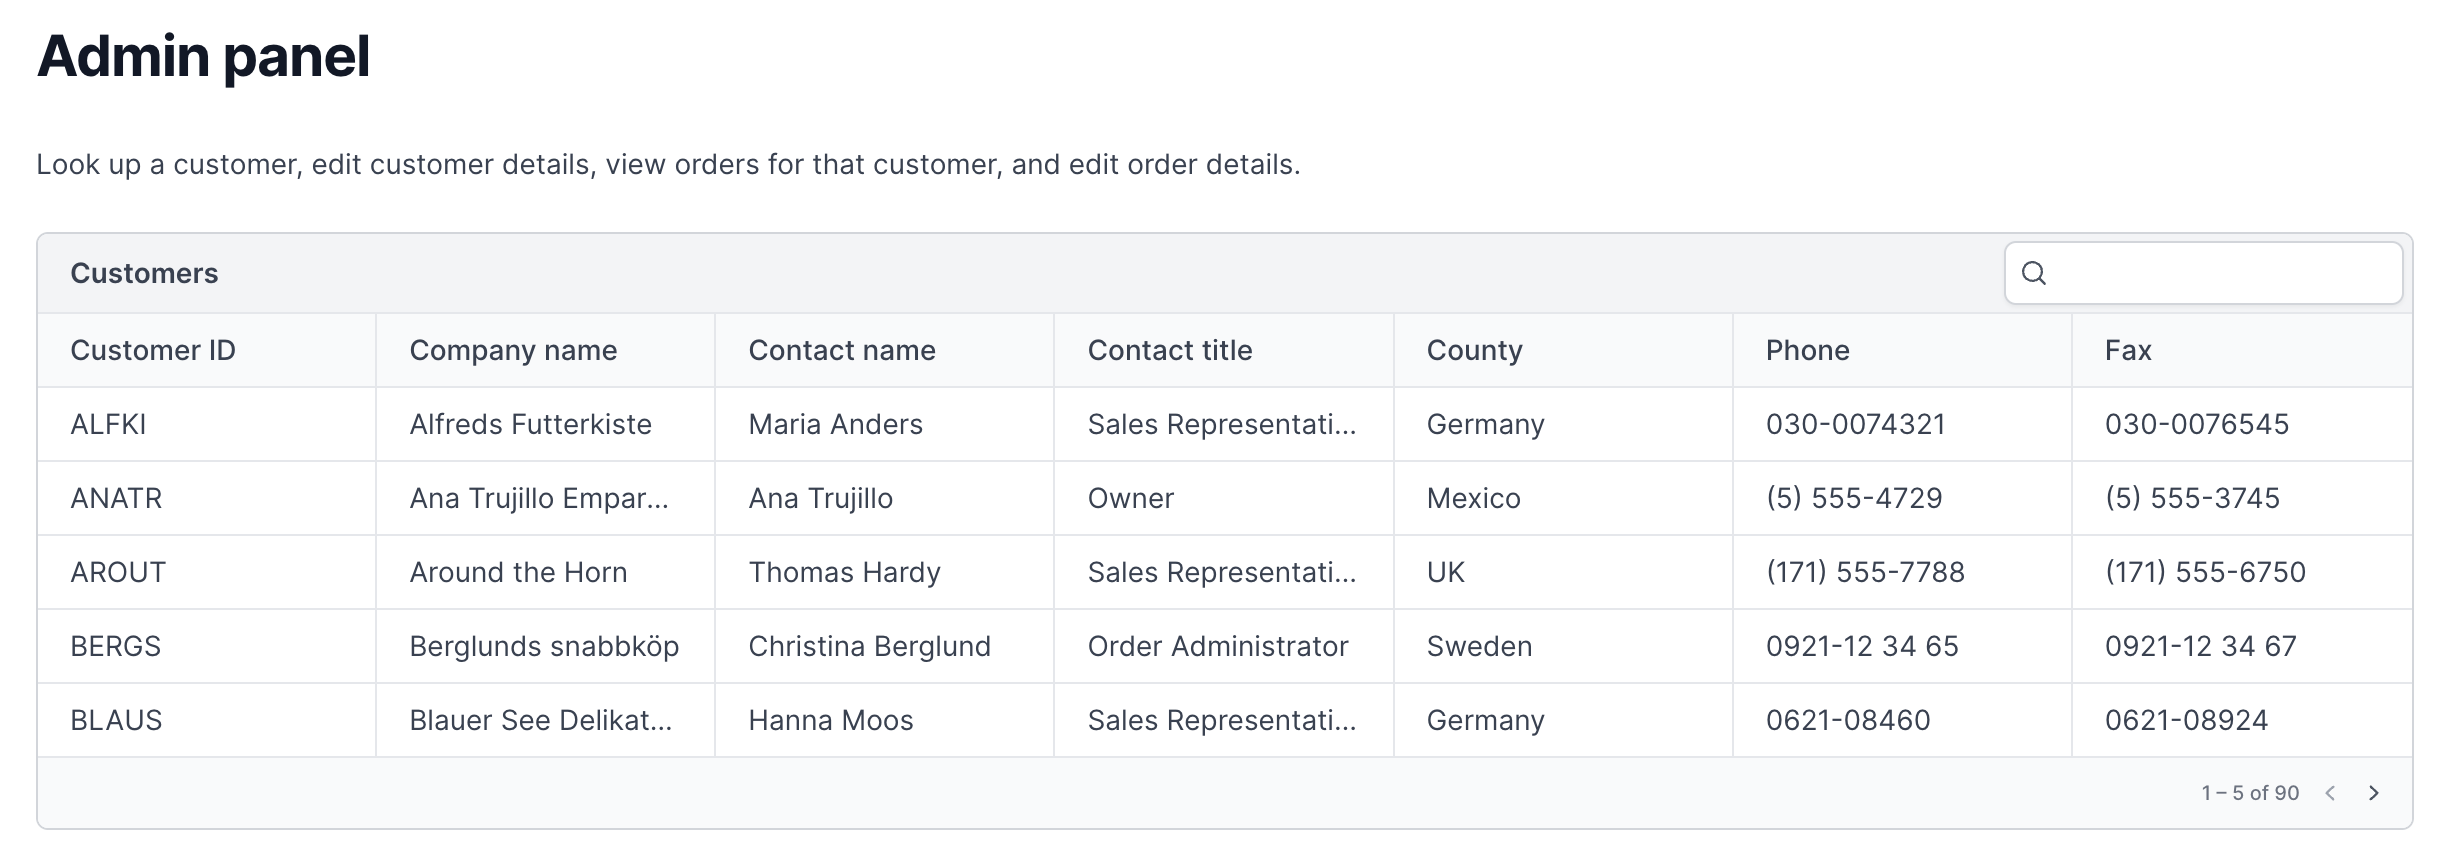
When we open the link in the browser, we should see a page like this:
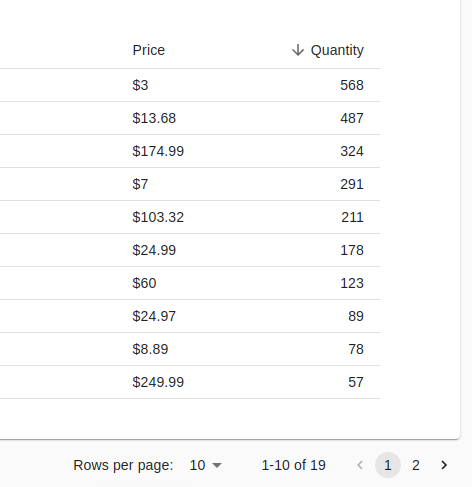
Click the Quantity heading to sort the quantity in ascending or descending order:
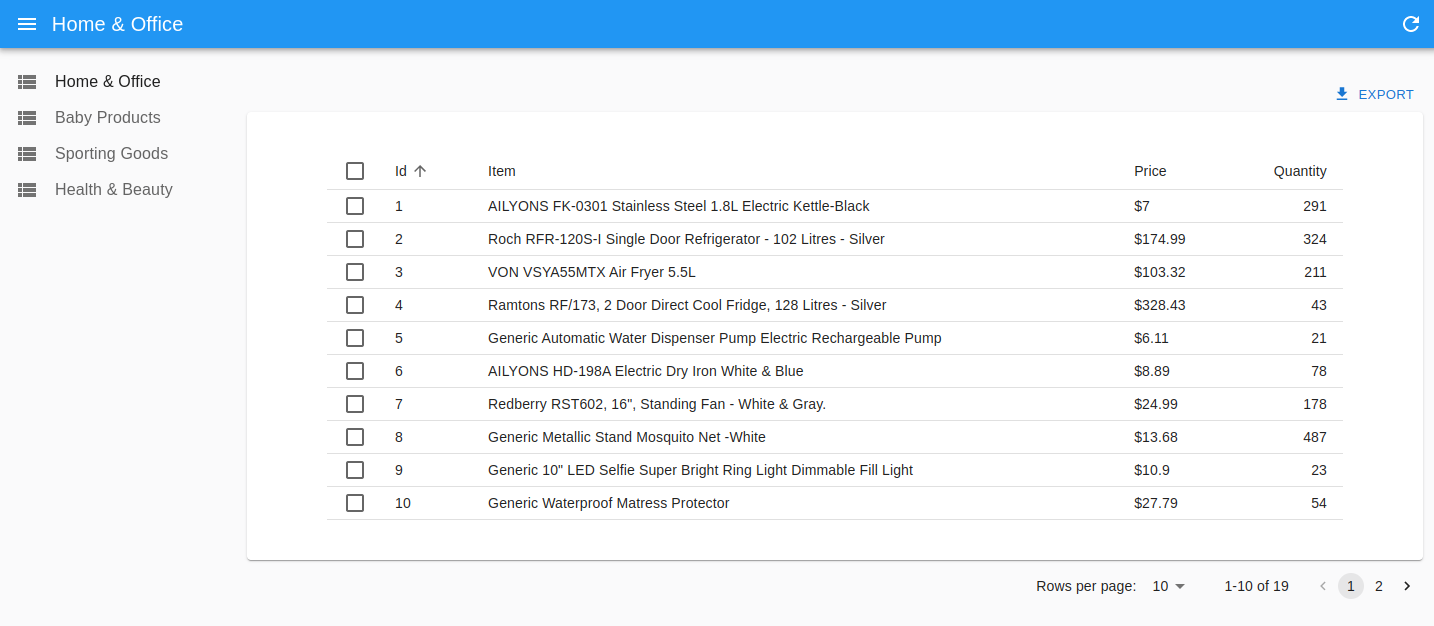
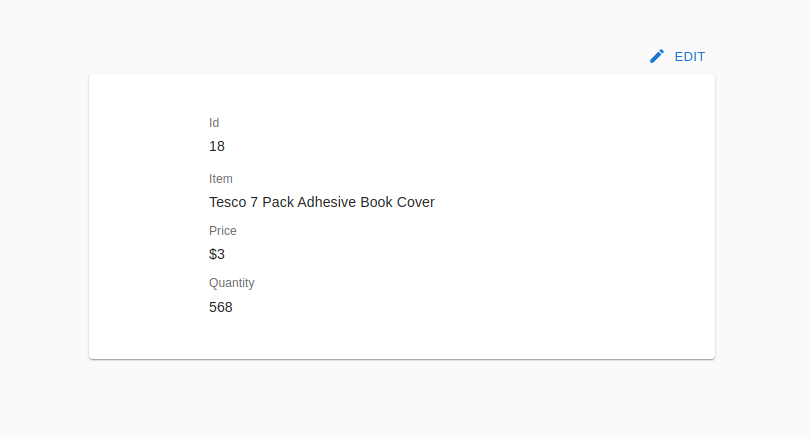
Try clicking an item. The item’s details page appears:
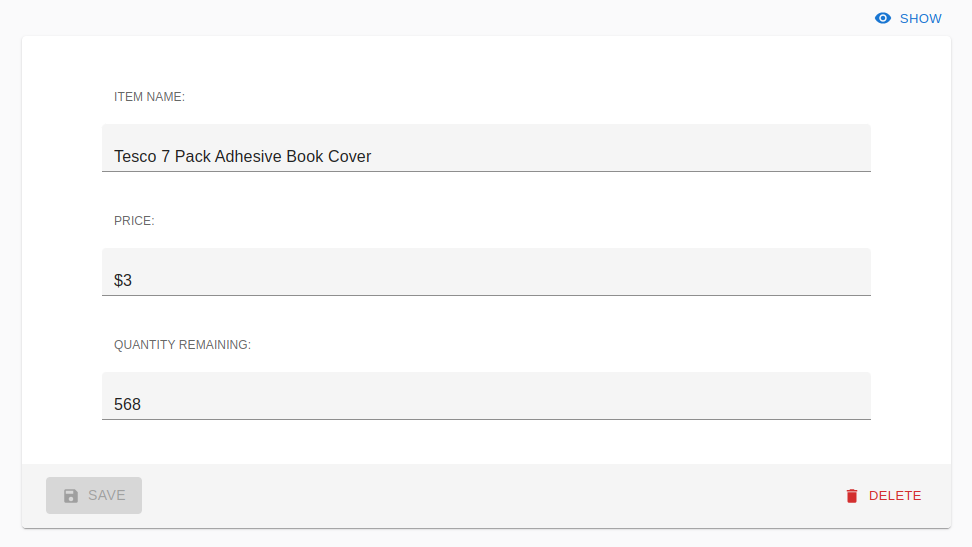
And when we click the EDIT button, the EDIT page appears with a DELETE button:
And that's how to create an admin panel using react-admin. Although react-admin is easy to get started using, building custom panels that meet more complex business needs can prove to be challenging to do.
Luckily, there is an easier way to build custom admin panels efficiently.
Introducing Airplane: An efficient way to build powerful admin panels
Airplane is the developer platform for building custom internal tools. The basic building blocks of Airplane are Tasks. Tasks are single or multi-step operations that anyone on your team can use. Airplane also offers Airplane Views, which is a React-based platform that allows users to build custom UIs within minutes.
Airplane Views supports an extensive component library and template library. This library includes an admin panel template that makes it easy to build and customize an admin dashboard to fit your organization's needs. Airplane also allows users to build custom components or use third-party libraries.
In addition to Tasks and Views, Airplane offers strong built-ins, such as permissions settings, audit logs, and job scheduling.
To learn more about building admin panels and dashboards, check out our blog for content such as ReactJS tutorial, building an admin panel using Plotly Dash, and more.
To try Airplane out and build your first UI in just minutes, sign up for a free account or book a demo. If you are at a startup that is series A or earlier with under 100 employees, check out our Airplane Startup Program for $10,000 in Airplane credits for a year.


