Markdown is a lightweight markup language used to format plain text without the need for a text editor or HTML tags. It uses simple symbols, like asterisks for bold formatting or number signs for headings, rather than complex HTML tags. Markdown is a popular choice for bloggers and developers for writing content and creating websites, blogs, documentation, and much more.
Markdown was created for the web, and it's widely supported by various tools like GitHub, Stack Overflow, and Reddit. Here are a few reasons why it has become one of the most popular markup languages:
- It's simple and easy to learn: Markdown offers a straightforward syntax that allows you to create web content without needing to learn complex markup languages like HTML.
- It's platform-independent: You can create and use Markdown content on any device, regardless of the operating system.
- It's fast and efficient: Markdown lets you focus on the content rather than thinking about technical formatting challenges, which makes it time-efficient. Creating content is also faster with Markdown.
- It's portable: Markdown files can be opened using any application and can also be easily imported into other applications, making collaboration highly seamless.
Markdown is a useful tool for non-technical people who need to format text for content creation. It simplifies the process of structuring content for web pages in HTML, eliminating the need to learn complex markup languages. Additionally, Markdown can be used to effortlessly create application documentation using the react-markdown package to structure HTML content.
In this article, we'll walk through Markdown's fundamental syntax for content creation and follow a step-by-step tutorial to develop a React application that converts HTML into Markdown content using the react-markdown package.
Markdown basics
Basic Markdown syntax consists of the following most commonly used Markdown elements:
- Headings
- Lists
- Links
- Images
- Typography
Headings
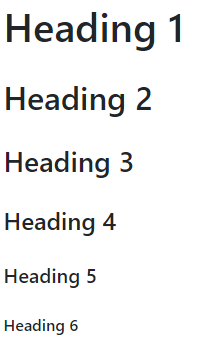
To create a heading, we use the number sign (#) followed by a space and the text we'd like to appear as our heading. The number of symbols we use determines the level of the heading, with one sign (#) for h1, two signs (##) for h2, and so on up to h6:
# Heading Level One## Heading Level Two### Heading Level Three#### Heading Level Four##### Heading Level Five###### Heading Level Six
Ensure there is a space between the # sign and the word or sentence, otherwise the heading won't work.
Lists
Markdown formatting can create two types of lists: ordered and unordered.
For ordered lists, the Markdown syntax involves placing a period (.) and a space after a number:
On the other hand, for an unordered list, we have the flexibility to use a dash (-), an asterisk (*), or a plus (+) sign as a prefix for the list items, again adding a space after the symbol:
Links
When creating a link in Markdown, there are two components to consider: the link or URL itself and the text that serves as the clickable link.
To create a link, we enclose the text in square brackets, followed immediately by the link or URL in parentheses:
Images
In Markdown, we can add images by providing the image path or URL along with alternative text that describes the image. The syntax for adding an image consists of an exclamation mark (!) followed by the alternative text in square brackets and the path or URL of the image in parentheses:
Typography
We can use Markdown to style text using various typography elements. The most common ones are bold and italic formatting. Asterisks (*) are used to create bold and italic text.
For bold formatting, we use double asterisks (**) before and after the text:
For italic formatting, we put a single asterisk (*) before and after the text:
What is react-markdown?
The react-markdown package allows us to render Markdown content as React components. Basically, react-markdown translates Markdown syntax and creates React components that are rendered as HTML in our React application.
Markdown is rendered as HTML in React applications, but other Markdown libraries use the dangerouslySetInnerHTML property in React to render Markdown content as HTML elements. Using the dangerouslySetInnerHTML property lets us ignore the contents rendered by the property, which optimizes performance. But, it makes the React application vulnerable to cross-site scripting (XSS) attacks, which can inject malicious code while fetching data with a third-party API.
The react-markdown package solves this issue by making a syntax tree to create a virtual DOM, which lets the React application update the changes in the DOM instead of overwriting the entire DOM and rendering the Markdown elements. This way, the actual DOM elements are rendered rather than raw Markdown content.
Using the react-markdown package to build a Markdown to HTML converter in React
Now that we've walked through the basics of Markdown and what react-markdown does, we'll build a React application that utilizes the react-markdown package to render Markdown content. We can use this application to bypass the HTML formatting process and structure the code using Markdown instead.
As we're building a React application, ensure that Node.js is installed on your system.
We'll also need to install the react-markdown package after creating the React application.
Creating the React app
Create a React app using the following command in the terminal of the code editor:
We can see here that the app name is react-markdown, but we can name the application anything we'd like.
Installing react-markdown in the React app
After creating the app, step into the app folder using the following command in the terminal:
Use npm i react-markdown to install the react-markdown package.
The app is now ready to execute react-markdown. After importing the library, the code for the entire App component is as follows:
Using react-markdown
The basic syntax for react-markdown is as follows:
As we can see, the content is wrapped in between <ReactMarkdown> tags to render it as a React component.
In the following examples, we'll replace the App component's code with the relevant syntax for the same Markdown styling elements discussed earlier: headings, lists, links, and images.
Headings in react-markdown
Now that we've covered the syntax of react-markdown, let's try our first example using headings. For headings, try adding h1 through h6 headings.
After writing the code, the App component should look as follows:
The output of the above code is:

For the examples ahead, we need to replace the code in between the <div> tags with the appropriate elements.
Lists in react-markdown
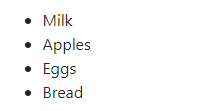
Lists are a great way to organize or highlight content. Start by creating an unordered list with react-markdown using the following syntax:
The output of the above code is:

An ordered list would look like this:
The output of the above code is:

Links in react-markdown
To incorporate links in the React application, we can use the Markdown syntax [Text](Link) in the <div> tags of the App component, like the following example:
The output of the above code is:

Images in react-markdown
For visual content like images, add the appropriate Markdown syntax to the App component, like the following example:
The output of the above code is:

Typography in react-markdown
The following syntax will create some bold and italic text:
The output of the above code is:

In Markdown, we can apply strikethrough formatting to text by using the following syntax: ~~Text~~.
Give it a try in the App component:
The output of the above code is:

As we can see, strikethrough formatting has not been applied to the text. Otherwise, the output would be:

This is because the content with strikethrough formatting is not directly rendered by react-markdown.
Plugins for unsupported formatting in react-markdown
Along with strikethrough formatting, some other formatting elements are not directly supported by react-markdown, such as tables, task lists, and URLs.
The react-markdown package incorporates remark and rehype plugins to extend its default functionality and support additional syntaxes. While remark plugins process Markdown content, rehype plugins handle HTML content.
One of the remark plugins available is remark-gfm, which enables GitHub-flavored Markdown support, including features like tables and strikethrough formatting. remark-math is another example of a remark plugin, and it supports mathematical equations in Markdown content using MathJax or KaTeX.
On the other hand, rehype plugins like rehype-raw are designed to work with raw HTML content without parsing or modifying it in any way.
Let's take an example of each of the plugins: remark-gfm and rehype-raw.
For remark-gfm, first install it using the following command in the terminal:
Now, import remark-gfm in the App component using the following line of code:
Strikethrough formatting is not supported in Markdown by default, but the remark-gfm plugin supports it. We can render strikethrough formatting in the App component with the following code:
The output of the above code is:

For rehype-raw, first install it using the following command in the terminal:
Now, import rehype-raw in the App component as follows:
rehype-raw supports raw HTML content to be parsed and rendered in React. Render a <div> element using rehype-raw with the following code in the App component:
The <div> element is passed to the children prop of the Markdown component using rehype-raw.
The output of the above code is:

And that's how to use react-markdown and its plugins. If you're looking to deploy applications built with react-markdown and other technologies, check out Airplane, a robust internal tooling platform for building workflows and UIs.
Introducing Airplane: an easy way to build React-based UIs quickly
Airplane is the developer platform for building custom internal tools. You can transform scripts, queries, APIs, and more into powerful internal UIs and workflows. Airplane Views is the React-based platform for building custom UIs quickly.
Airplane provide an extensive built-in component library and template library that makes it easy to get started. You can also easily build custom components or extend to third-party libraries.

In addition to pre-built components and templates, Airplane offers strong out-of-the-box capabilities, such as audit logs, permissions setting, approval flows, and more.
To try it out and build your first View using react-markdown, sign up for a free account or book a demo.
Author: Adarsh Chimnani
Adarsh Chimnani is a web developer (MERN Stack) who is passionate about game level design (Unity3D) and an anime enthusiast. He loves to absorb knowledge and implement it in the real world. He enjoys using his communication skills to make learning interesting for others.


