

Job scheduling tools are powerful platforms that allow engineers to automatically schedule recurring tasks, such as restarting systems, running weekly reports, and more. These tools eliminate manual work, increase transparency and save engineers time that can then be used to work on important, customer-facing needs.
One tool used for scheduling jobs is Heroku Scheduler, which allows engineers to automatically run activities at scheduled intervals. While similar to cron jobs, Heroku Scheduler is easier to set up and use through its interface.
In this article, we'll briefly go over what Heroku Scheduler is and a job schedule example using Heroku Scheduler. We'll also cover an alternative platform called Airplane that offers an easy-to-use, reliable scheduling feature.
What is Heroku Scheduler?
Heroku Scheduler is an add-on from Heroku that allows users to run jobs at scheduled time intervals. The platform allows you to configure jobs to run at three different intervals: every 10 minutes, every hour, and every day. The Scheduler function supports basic apps with simple scheduling requirements. For more advanced and flexible needs, Heroku also offers Advanced Scheduler that allows for greater customization and visibility into job runs and logs.
To get a better idea of how Heroku Scheduler works, let's now walk through an example schedule we'll set up using Heroku Scheduler.
Setting up a schedule using Heroku Scheduler
In this tutorial, we'll set up a schedule that will notify a user about their mobile account balance by randomly subtracting amounts from three vote heads: Internet, talk time, and free offer balances. We'll do this by creating a simple Python script and using Heroku Scheduler.
Prerequisites
Before starting the tutorial, ensure you have the following:
- A verified Heroku account
- The Heroku CLI installed on your machine
- A development editor or IDE, such as VS Code or PyCharm
- A GitHub account
- Git and the GitHub CLI installed on your machine
- Basic knowledge of Python
To start, let's create a folder named python-heroku-scheduler for this tutorial. Next, we'll add the requirements.txt file to this folder.
Adding a requirements.txt file
The requirements.txt file is used to instruct the Python dependency installer, such as pip, on which dependencies are needed for the project. We'll need the following:
NumPy— This is used for easy array manipulationpandas— This is used for data analysis. We’ll usepandasto quickly and easily create a table output without loopstabulate— This is for formatting thepandasdata frame output
In the root of your folder, create a file called requirements.txt and add in the below lines:
Now that we’ve updated the requirements.txt file, let's write the script for the app.
Writing the script
To avoid possible tampering with other Python project libraries and dependencies, it’s recommended to create a virtual environment. To do so, we'll use virtualenv, a Python tool for creating and managing Python virtual environments.
Begin by checking if virtualenv is present on your machine by running the following command in your terminal:
If you receive an error, virtualenv is not installed. If this is the case, install it using the following command:
Now, let's create and activate the environment using the command below:
Next, install the dependencies:
In the root of your folder, create a Python file called telco.py. Then open the file and import the required modules:
After, create constants for storing the original balances:
Add in the variables for storing the current balances. Initialize them using the original balances:
Add a NumPy array called bal_array for storing the entries (items, balances, and percentages):
Next, create a function called row_chooser for randomly choosing a row index:
The column index will not be randomly chosen since it contains the vote heads’ titles. That’s why a 1 is returned in addition to the chosen row index in the above code. The function returns a NumPy value position — in other words, the row and the column indices.
The percentage of the chosen vote heads' remaining balance will be computed using the compute_percentage(): function:
Let's then create a function for computing and updating the current balance and the percentage. This function will need a helper function to avoid code repetition. The helper function computes the balance and percentage and stores them in the appropriate variables.
Create the helper function using the code below:
Note that we added 1 to the column index because the percentage column is ahead of the balance column by one.
Because of Python’s semantics, we need to create a display function before the balance computing function. This is because the display function will be called inside the balance computing function.
Create the display function using the code below:
The display function creates a data frame using the NumPy array first. Then, the necessary columns are added. Finally, it prints the output using format placeholders and the tabulate library.
The code for the function that computes the balances is the following:
The function above checks for the row index passed in and determines which item needs to be updated using a conditional if statement.
Now, add the following lines of code to call the functions:
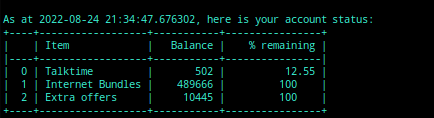
Finally, test the script by running the python telco.py or py telco.py command (the latter if you’re using Windows). You’ll get an output resembling the screenshot below:

Creating the Heroku app
Now, it’s time to deploy the app to Heroku and add the scheduler.
Run the following command in the terminal. It creates an app while setting the Buildpack to Python:
Before deploying the app to Heroku, let's add the code to GitHub. Begin by initializing a GitHub repository using the git init command. Then, log in using the GitHub CLI by running the command below:
Stage the files in preparation for a commit to the Git Version Control System:
Commit the file changes by running the following command:
Then, create a repository using the gh repo create command. Fill in the prompted choices appropriately. The prompts will ask for things like the repository name, the repository’s visibility, etc. In the end, it will ask you whether to add a remote. Press Y and then the Enter key.
Now, deploy the app:
Once complete, you’ll see a similar output to the following:
Let's run the following command:
You’ll see an output like the image below:
Then, add the scheduler using the following command in the terminal:
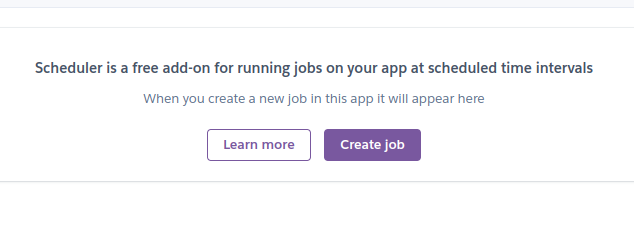
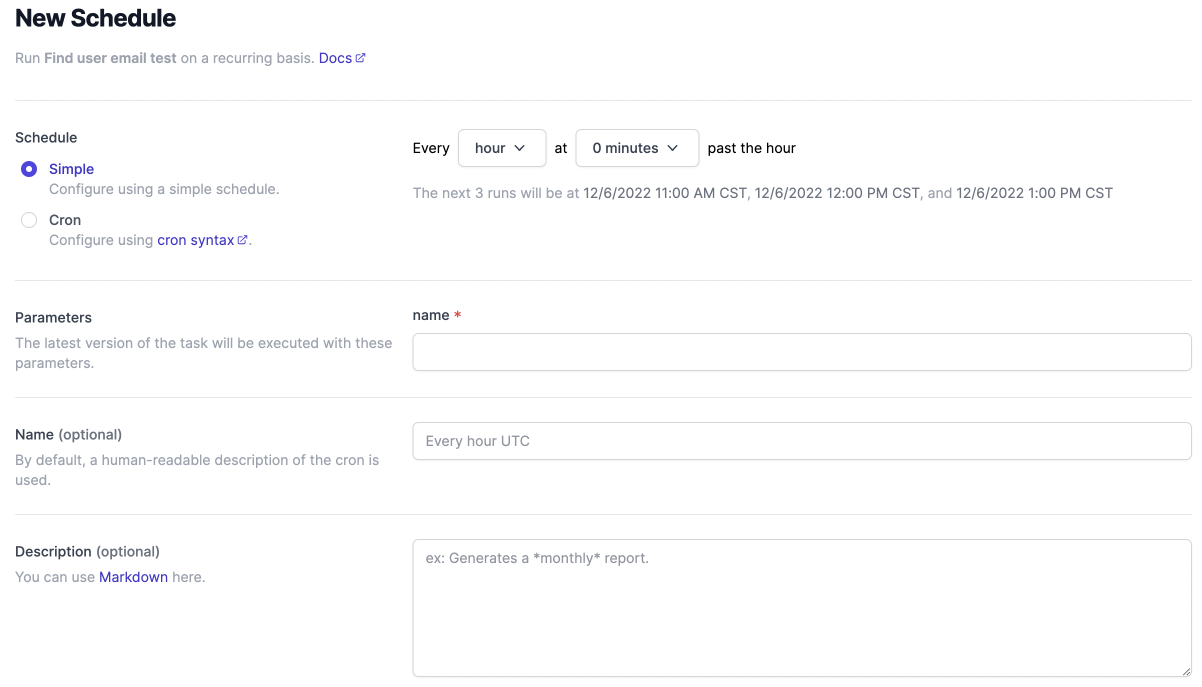
Next, run the heroku addons:open scheduler in the terminal to open the scheduler in your browser. Once this command is executed, a page similar to the following will open:
On the browser page, click the Create job button and fill in the details in the overlay shown below:
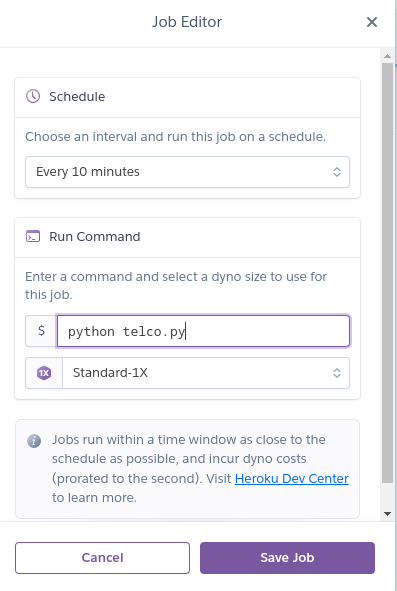
Ensure the interval selected is every 10 minutes then click Save Job to continue.
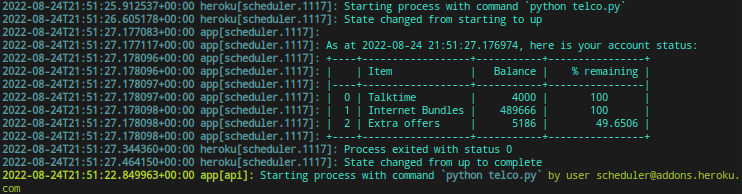
Now, return to the terminal. Run heroku logs --tail to show the latest logs. After 10 minutes, we’ll see the task run by the Heroku Scheduler, as the image below demonstrates:
You’ve now successfully used Heroku Scheduler to run your Python scripts!
Although Heroku Scheduler is a popular tool, there are several limitations to the platform. Heroku Scheduler can sometimes execute scheduled tasks inconsistently or outside specified times, making it less reliable for teams to use. Additionally, Heroku Scheduler doesn't offer clear job observation, task monitoring, and job logs unless upgraded to the Advanced Scheduler. The Advanced Scheduler isn’t available to share across all apps, and Heroku Scheduler tasks have to be imported into the Advanced Scheduler. This means that teams have to manage both tools and that can be challenging.
Luckily, there is another job scheduling option that is reliable, easy to use, and easy to track.
Airplane as an alternative to Heroku Scheduler
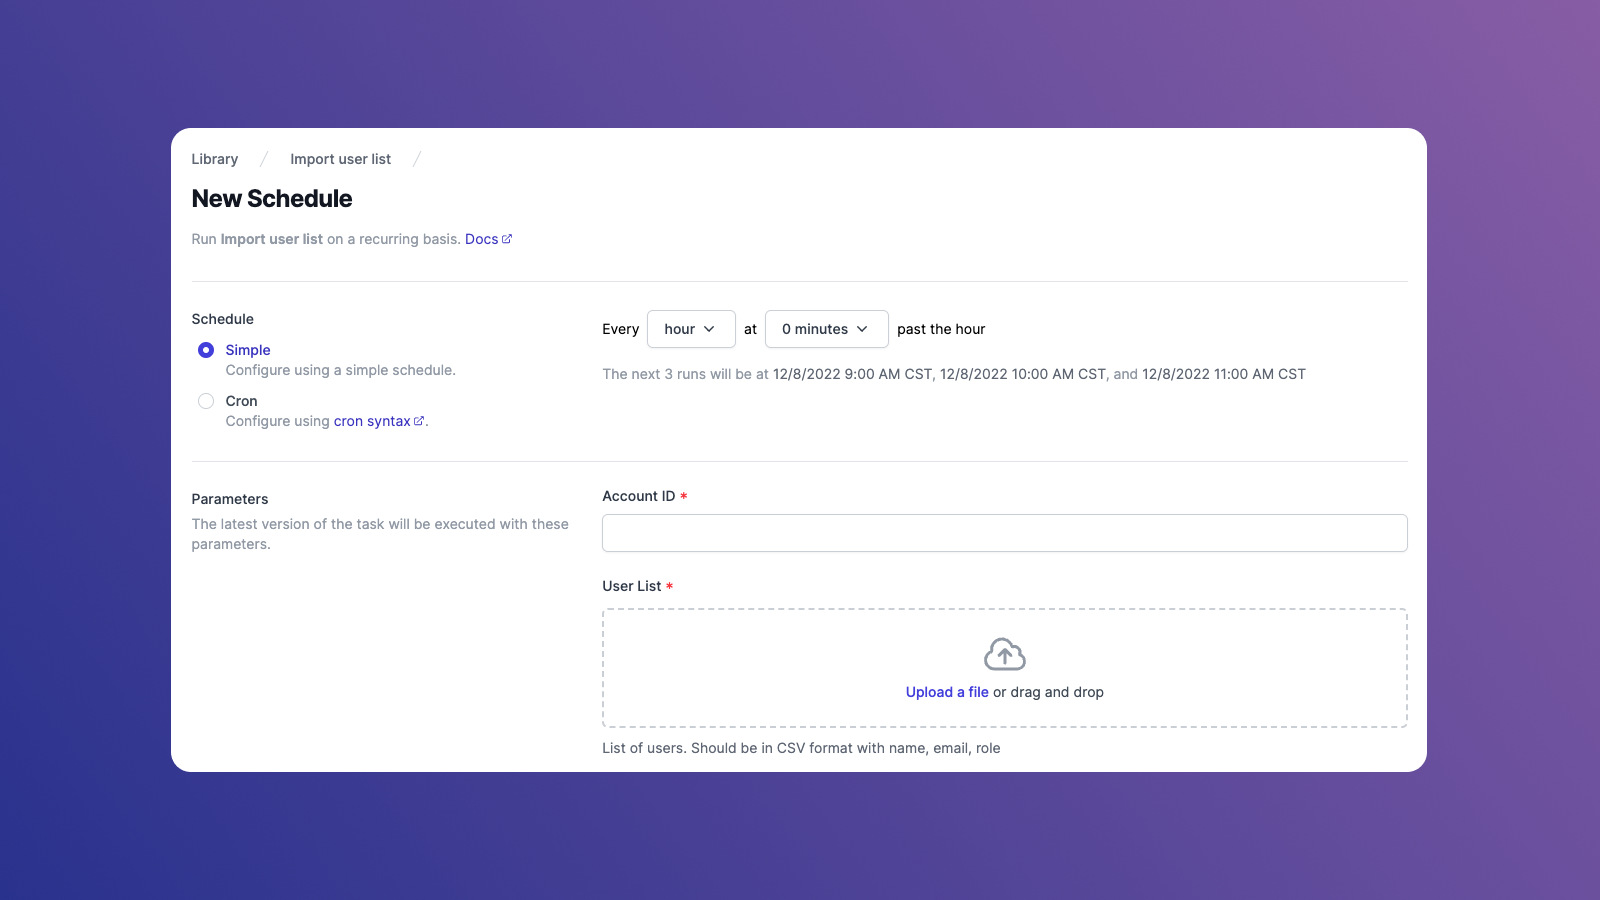
Airplane is a developer tooling platform that allows engineers to build single-step or multi-step workflows, and UIs using scripts, APIs, and more within minutes. Airplane offers Tasks, which are single business operations or multi-step functions that anyone on your team can use. These tasks can be scheduled using Airplane's Schedules feature, which allows you to automatically run tasks at certain time intervals. Schedules can be set using Cron syntax or simple syntax, making it easy to set up for both technical and non-technical users.
Users get several benefits from using Airplane Scheduling for their recurring tasks as well, such as serverless scheduling, full visibility into past and present task run activities, built-in notifications for run failures, and more.
In addition to tasks and scheduling, Airplane offers Views, which allow users to build custom UIs and dashboards quickly and easily using pre-built components and robust templates.
To learn more about how to schedule a task to run a Python script in just minutes using Airplane, check out this detailed guide. If you're looking for an easy-to-use, customizable and reliable scheduling platform, Airplane is a great option for you.
Conclusion
Heroku Scheduler allows users to schedule jobs to run at certain time intervals. Although it is easy to set up, the platform has several limitations that make it challenging to use, such as inconsistencies with scheduled task runs and limited visibility into task monitoring and run logs. Airplane offers a more reliable alternative to Heroku Scheduler.
Airplane's scheduling feature allows users to easily and reliably schedule recurring tasks and monitor them via logs and reporting. The platform makes it simple for users to run one-off tasks and schedule task runs on a recurring basis. Check out the Airplane blog for more guides on scheduling, such as scheduling PostgreSQL jobs in Airplane, how to schedule tasks using systemd, how to start, stop and restart cron jobs, and more.
To learn more about Airplane and its easy-to-use scheduling feature, sign up for a free account today or say hello at [email protected]!


