

Airplane is the developer platform for building custom internal tools. You can transform scripts, queries, APIs, and more into powerful workflows and UIs that anyone on your team can use. It also offers essential features that streamline task management and facilitate seamless integration with databases and other existing systems.
The basic building blocks of Airplane are Tasks, which are single or multi-step functions that anyone on your team can execute. A Task can use SQL queries, code, or API calls.
This tutorial focuses on importing data from a CSV file into a PostgreSQL database. It explores different methods, including SQL queries and Airplane Tasks, and provides a guide on creating and executing an Airplane Task for seamless data upload.
Use cases for CSV file uploads
Before diving into the tutorial, let's take a closer look at comma-separated values (CSV) files. These are plain text files with the .csv file extension that contain data records, usually separated by a comma. They are typically used to store and exchange structured information, especially between programs that can open a CSV file.
Individuals and organizations import CSV files for various reasons, including:
- Bulk data import: CSV files allow multiple simultaneous data uploads. For example, Shopify permits merchants to import a large number of products into their Shopify store at the same time using a CSV file. It requires less time and effort compared to adding the items one after another.
- Data migration: This involves data transfer from one storage system to another. CSV files facilitate seamless data transfer. For instance, when carrying out data storage equipment replacements, maintenance, or upgrades, CSV files can store and preserve the data until the storage device is available.
- Data integration: CSV files also allow you to gather data from various sources into a single repository. For example, you could import employee data in a unified format from individual branches of a multinational company into a central database. This process provides multiple benefits, including streamlining data analysis and other business processes.
CSV files offer flexibility and efficiency when working with data. They simplify data handling, including bulk transfer and data synchronization. CSV is also a popular and widespread data format and the preferred choice for various data-related tasks.
Importing CSV files into PostgreSQL
There are different methods for importing CSV data into a PostgreSQL database. The following tutorial demonstrates how to create a table in the database and populate it with the CSV data using the pgAdmin GUI, SQL commands, and Airplane Tasks.
Prerequisites
This tutorial requires a good understanding of Postgres, PostgreSQL queries, and CSV files. It also uses the following:
- An
employees.csvfile: Create your own or download this sample file. - A local PostgreSQL database: Follow this tutorial to create one.
- A hosted PostgreSQL database: Build a PostgreSQL database instance using the Amazon Relational Database Service (Amazon RDS). Make sure to note the master password, as Amazon RDS does not display it with the other database connection details.
- An active Amazon S3 bucket: Follow the official documentation to create an AWS account and an S3 bucket.
Using pgAdmin
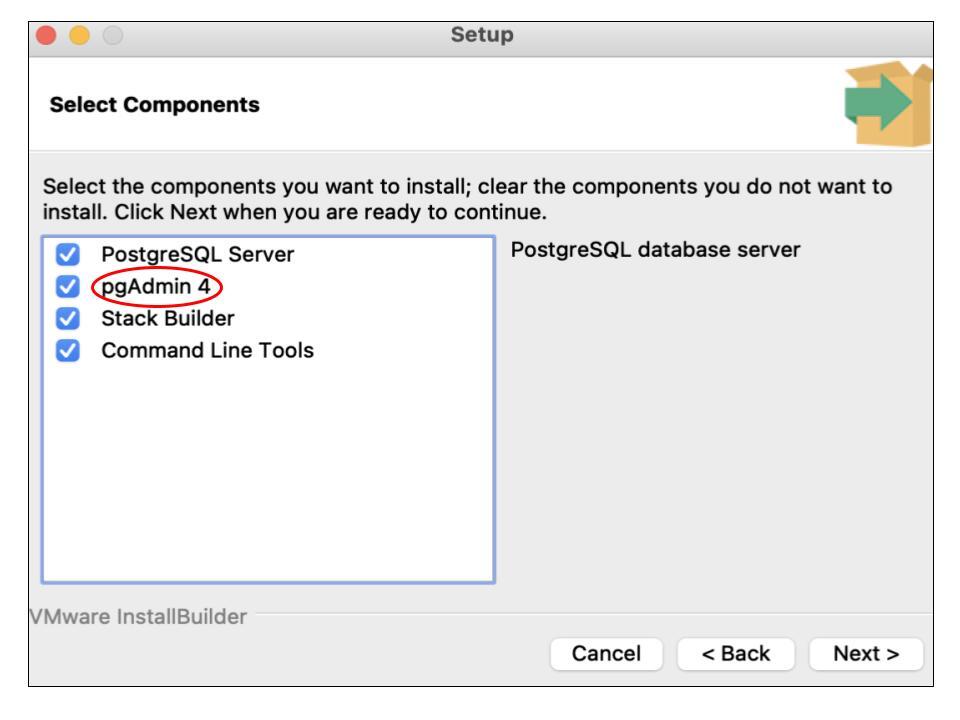
pgAdmin is a GUI that allows users to interact with the PostgreSQL database. Install pgAdmin from the official website or as a component when setting up PostgreSQL:
Creating the table
In this section, we'll add an employees table with the columns firstname, lastname, department, and city to the PostgreSQL database.
It's important to note that the CSV file and PostgreSQL table must have the same name. They must also have matching column names.
pgAdmin displays a list of Postgres servers, their databases, and other menu options on the left side of the screen. To create a table, click the database to expose a dropdown menu.
Go to Schemas > public > Tables and right-click Tables to reveal another dropdown menu. Then, go to Create > Table to open a dialog:

In the dialog, set the table name under the General tab to employees:

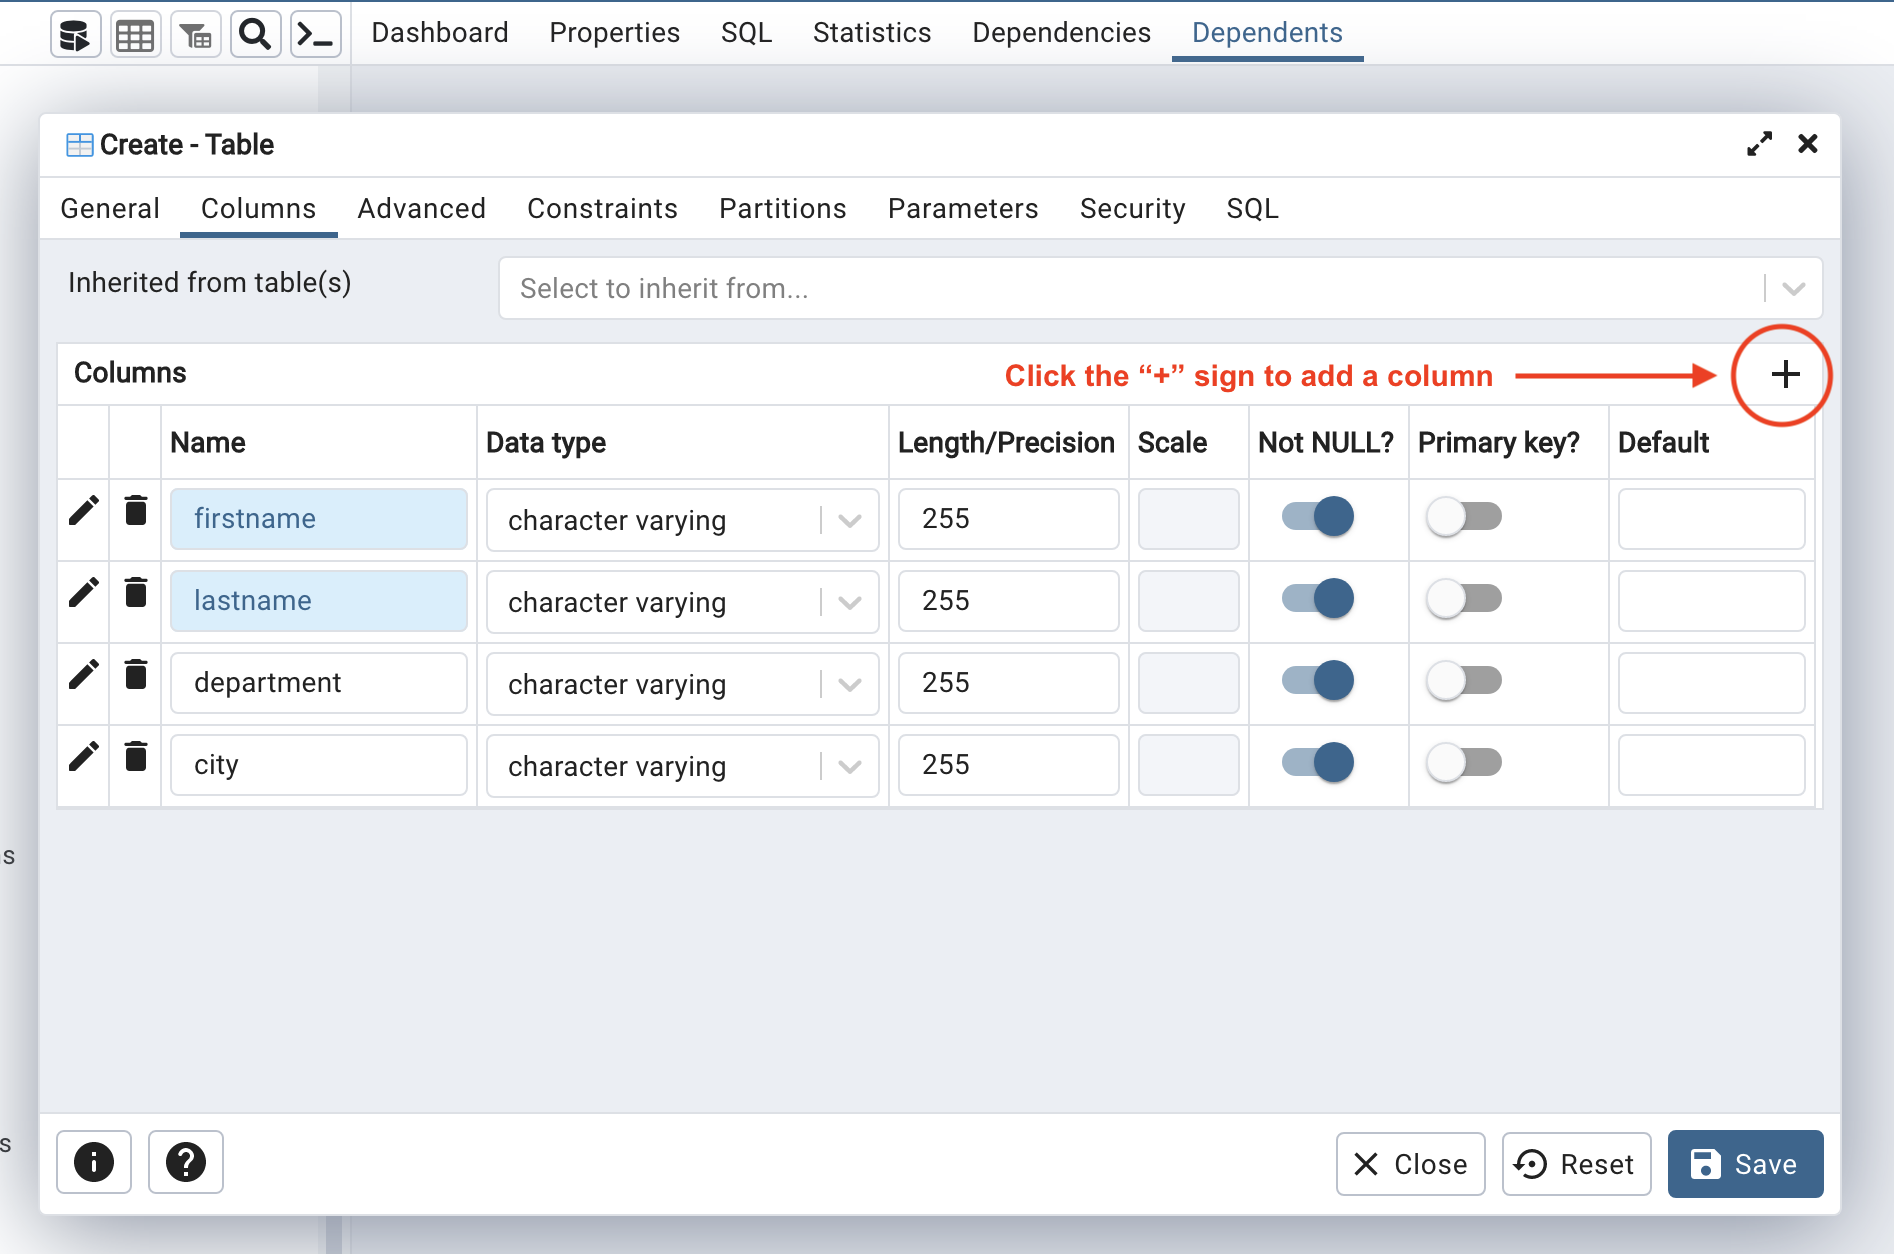
Next, add individual fields for firstname, lastname, department, and city under the Columns tab. Each one should have the character varying data type and a character length of 255:
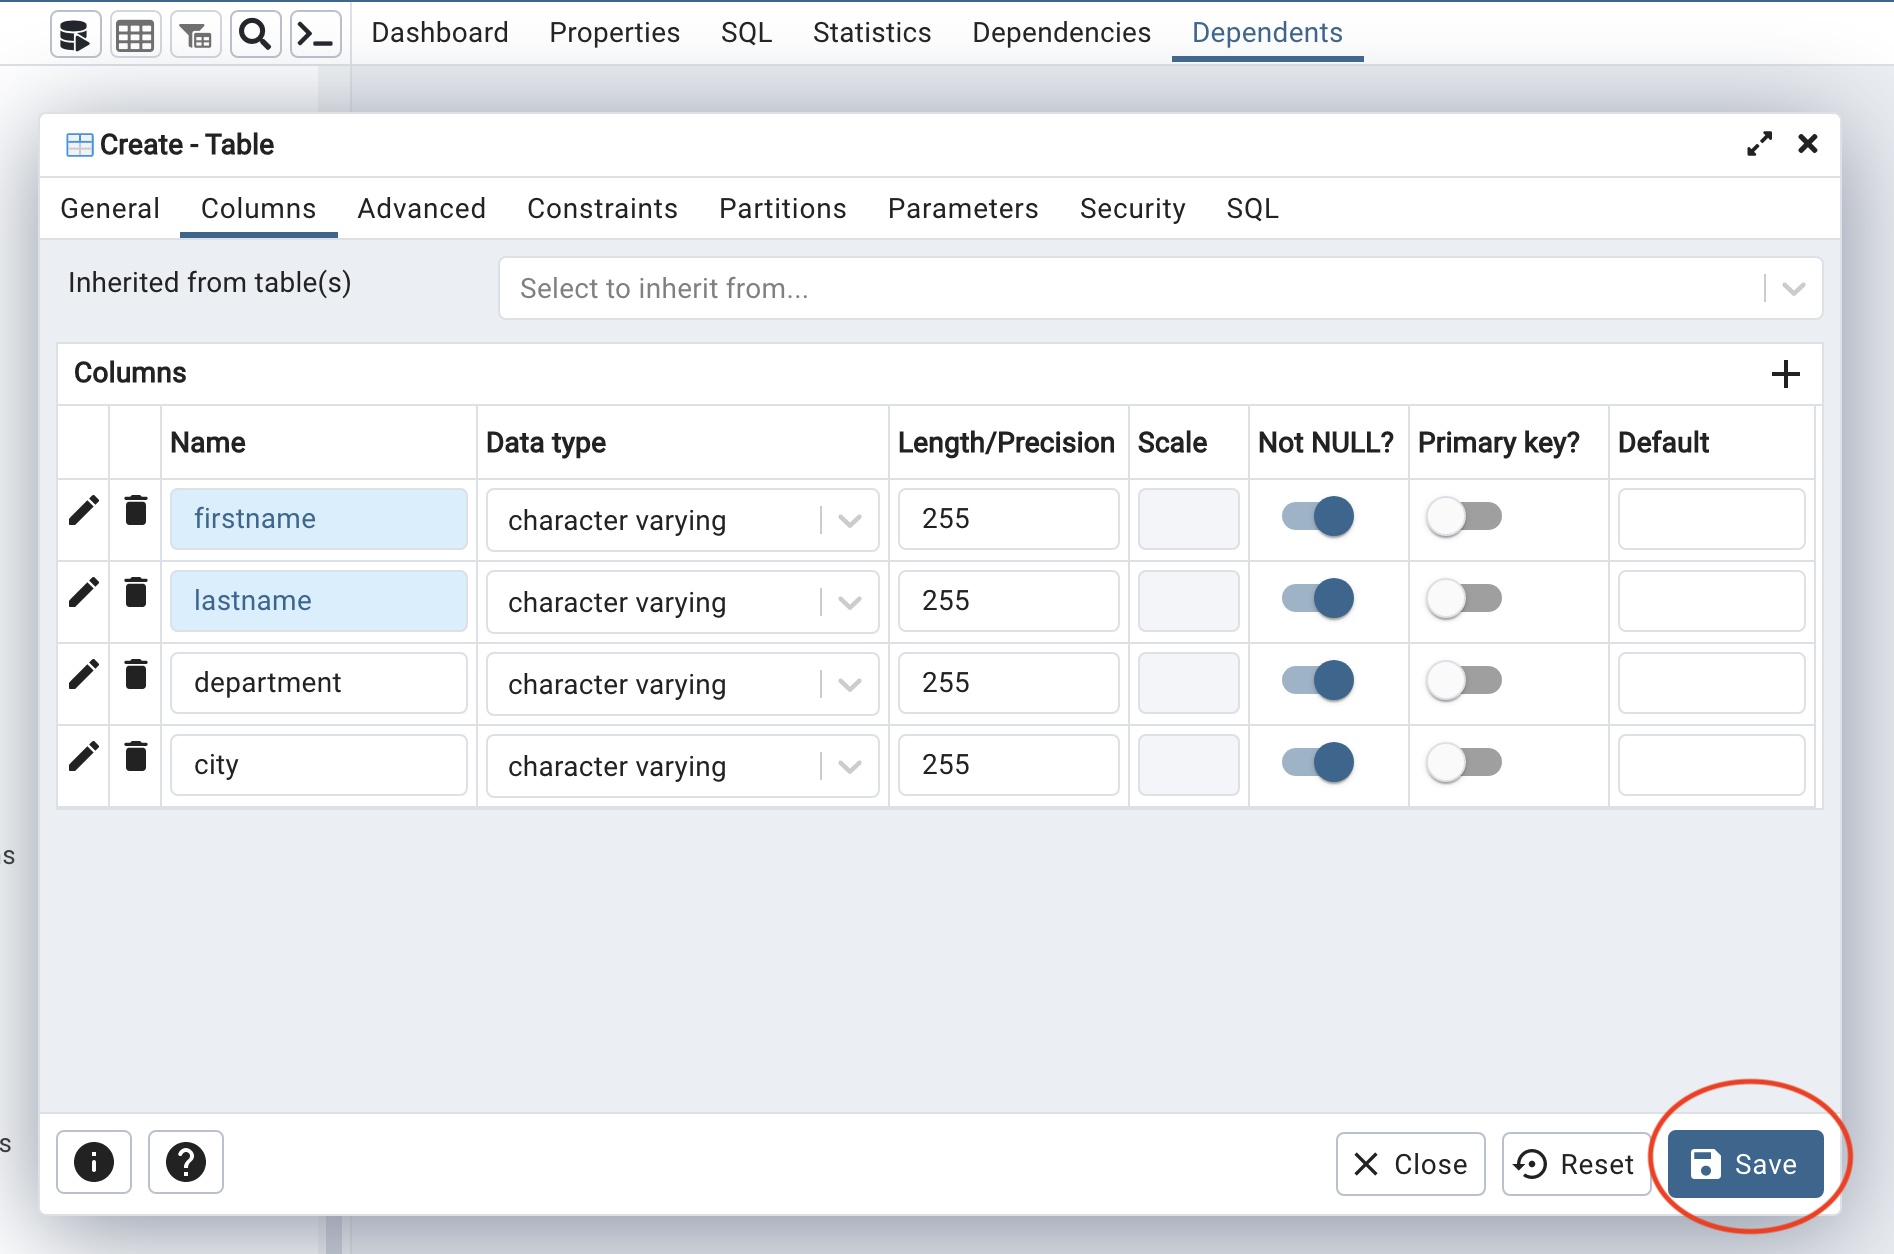
Confirm the input and click Save to close the dialog:
We can find the new employees table in the Tables dropdown menu.
Importing the CSV data
We'll now populate the new table with data from the CSV file. First, right-click the employees table and select Import/Export Data to reveal another dialog:

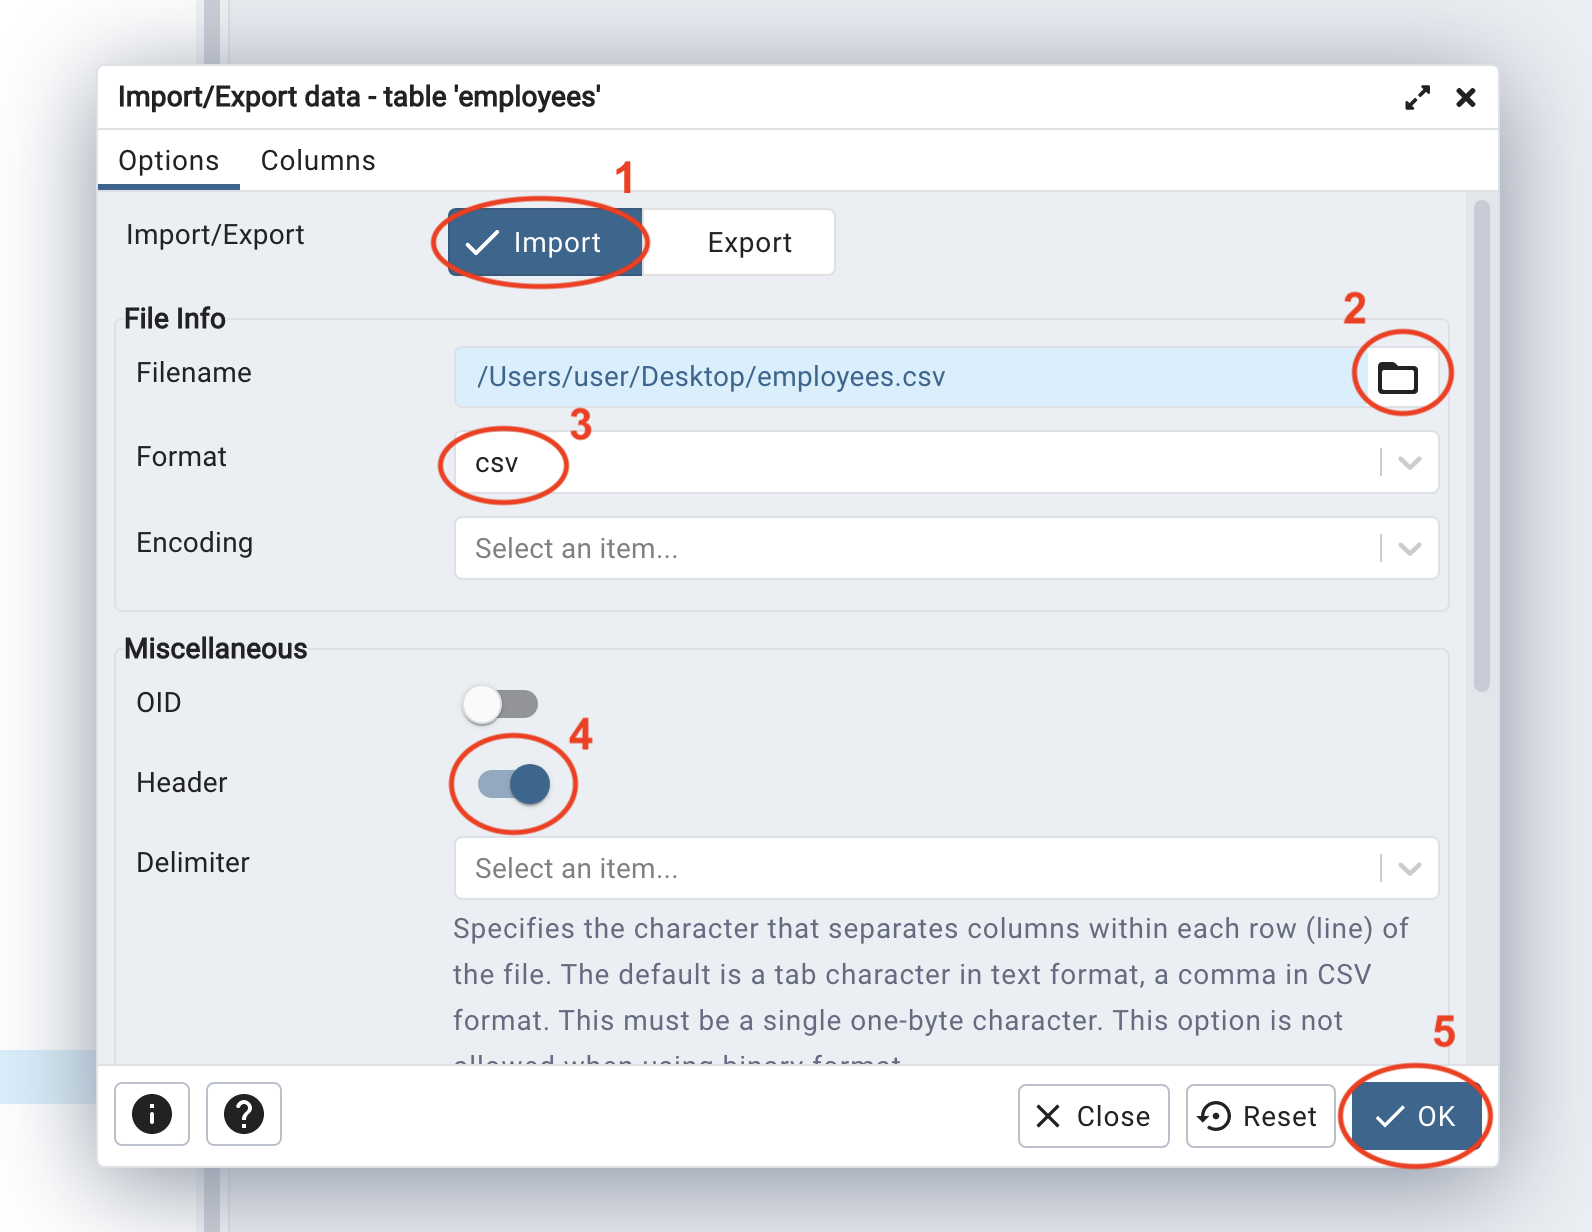
The dialog displays the import/export settings. This section will focus on the basic import settings.
Under the Options tab:
- Select Import.
- Enter the path to the CSV file or browse the local machine.
- Set the format to
csv. - Turn on the Header option to separate the header row.
- Click OK to close the dialog.
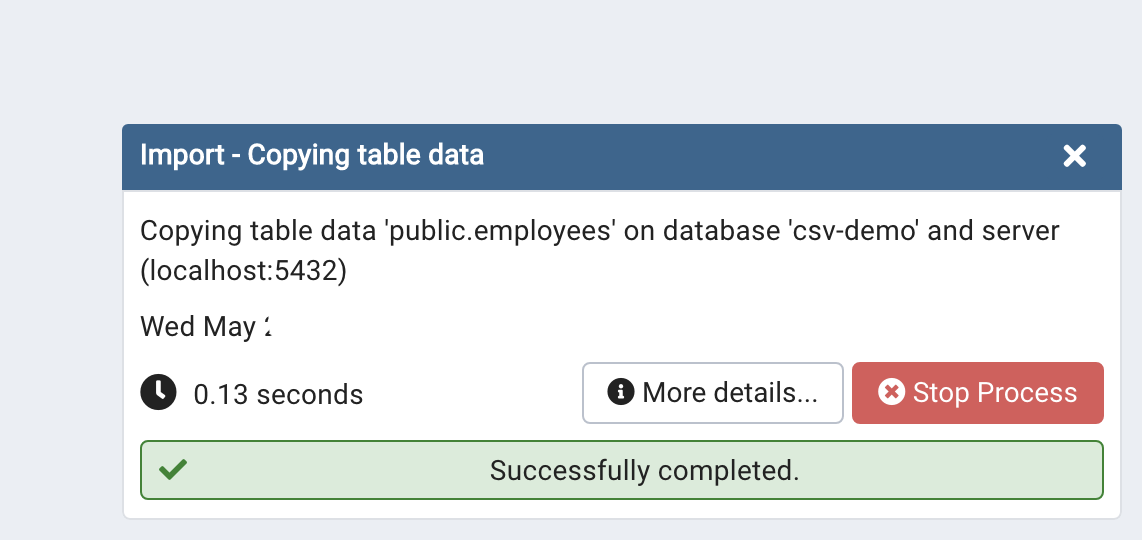
A notification will pop up in the lower right corner, showing the details and status of the import:
To confirm, right-click the table and go to View/Edit Data > All rows to output all entries in the table:
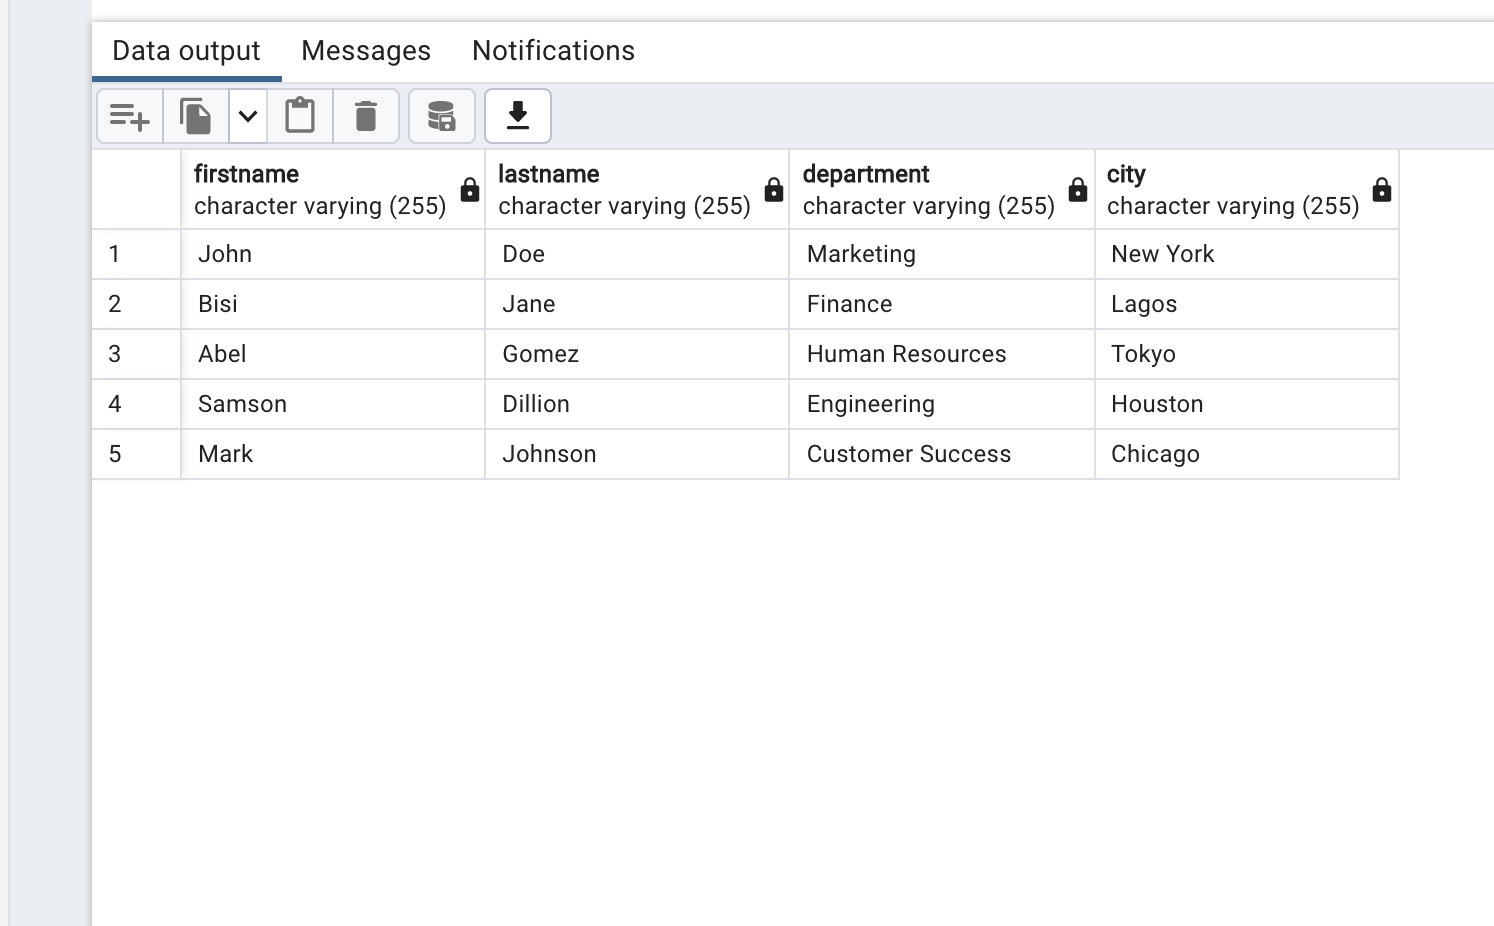
The employees table should now have the same number of rows as the CSV file.
Importing a CSV file using an SQL command
We can also import the CSV data with an SQL command. This section uses the previously created database to demonstrate CSV file importation via the SQL COPY command.
First, delete the data in the employees table using the SQL TRUNCATE statement:
TRUNCATE is a fast way of removing all existing rows in a table without disturbing the structure.
Run the following command to confirm that the table is empty:
It should return 0 rows.
Next, import the CSV file using the PostgreSQL COPY query:
This query copies data between the file and the table. In the code above:
- The columns
firstname,lastname,department, andcityare specified to receive the corresponding data from the file. FROMspecifies the location of the file. Replace/path/to/file/employees.csvwith the correct path toemployees.csvon your local machine.DELIMITER ','indicates that the comma character is the field delimiter in the CSV file.- The
CSVoption means that the file is in CSV format. HEADERspecifies that the first row in the file contains the column headers.
Run the last SELECT statement again. It should now return the same number of rows as the CSV file.
Using an Airplane SQL Task
If you don't have one already, create an Airplane account and install the Airplane CLI on your system. This section will cover the steps required for successful task execution.
Uploading the CSV File
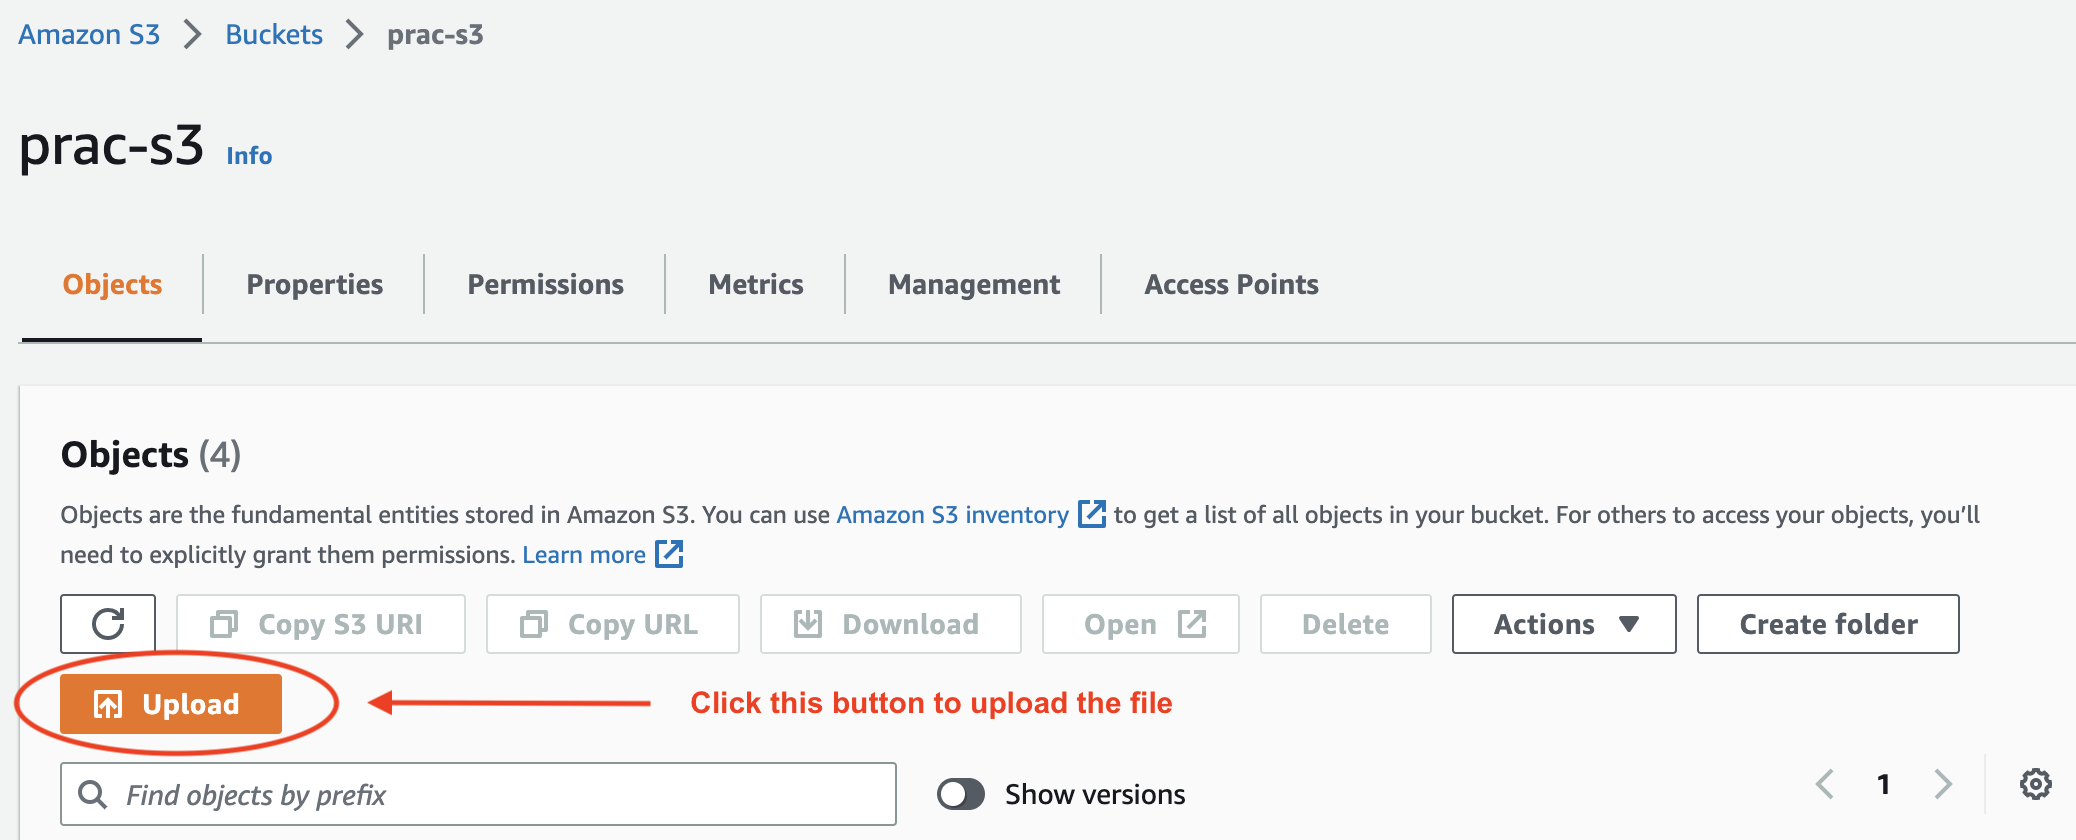
Upload the employees.csv file to the S3 bucket we created in the prerequisites section using the AWS S3 console:
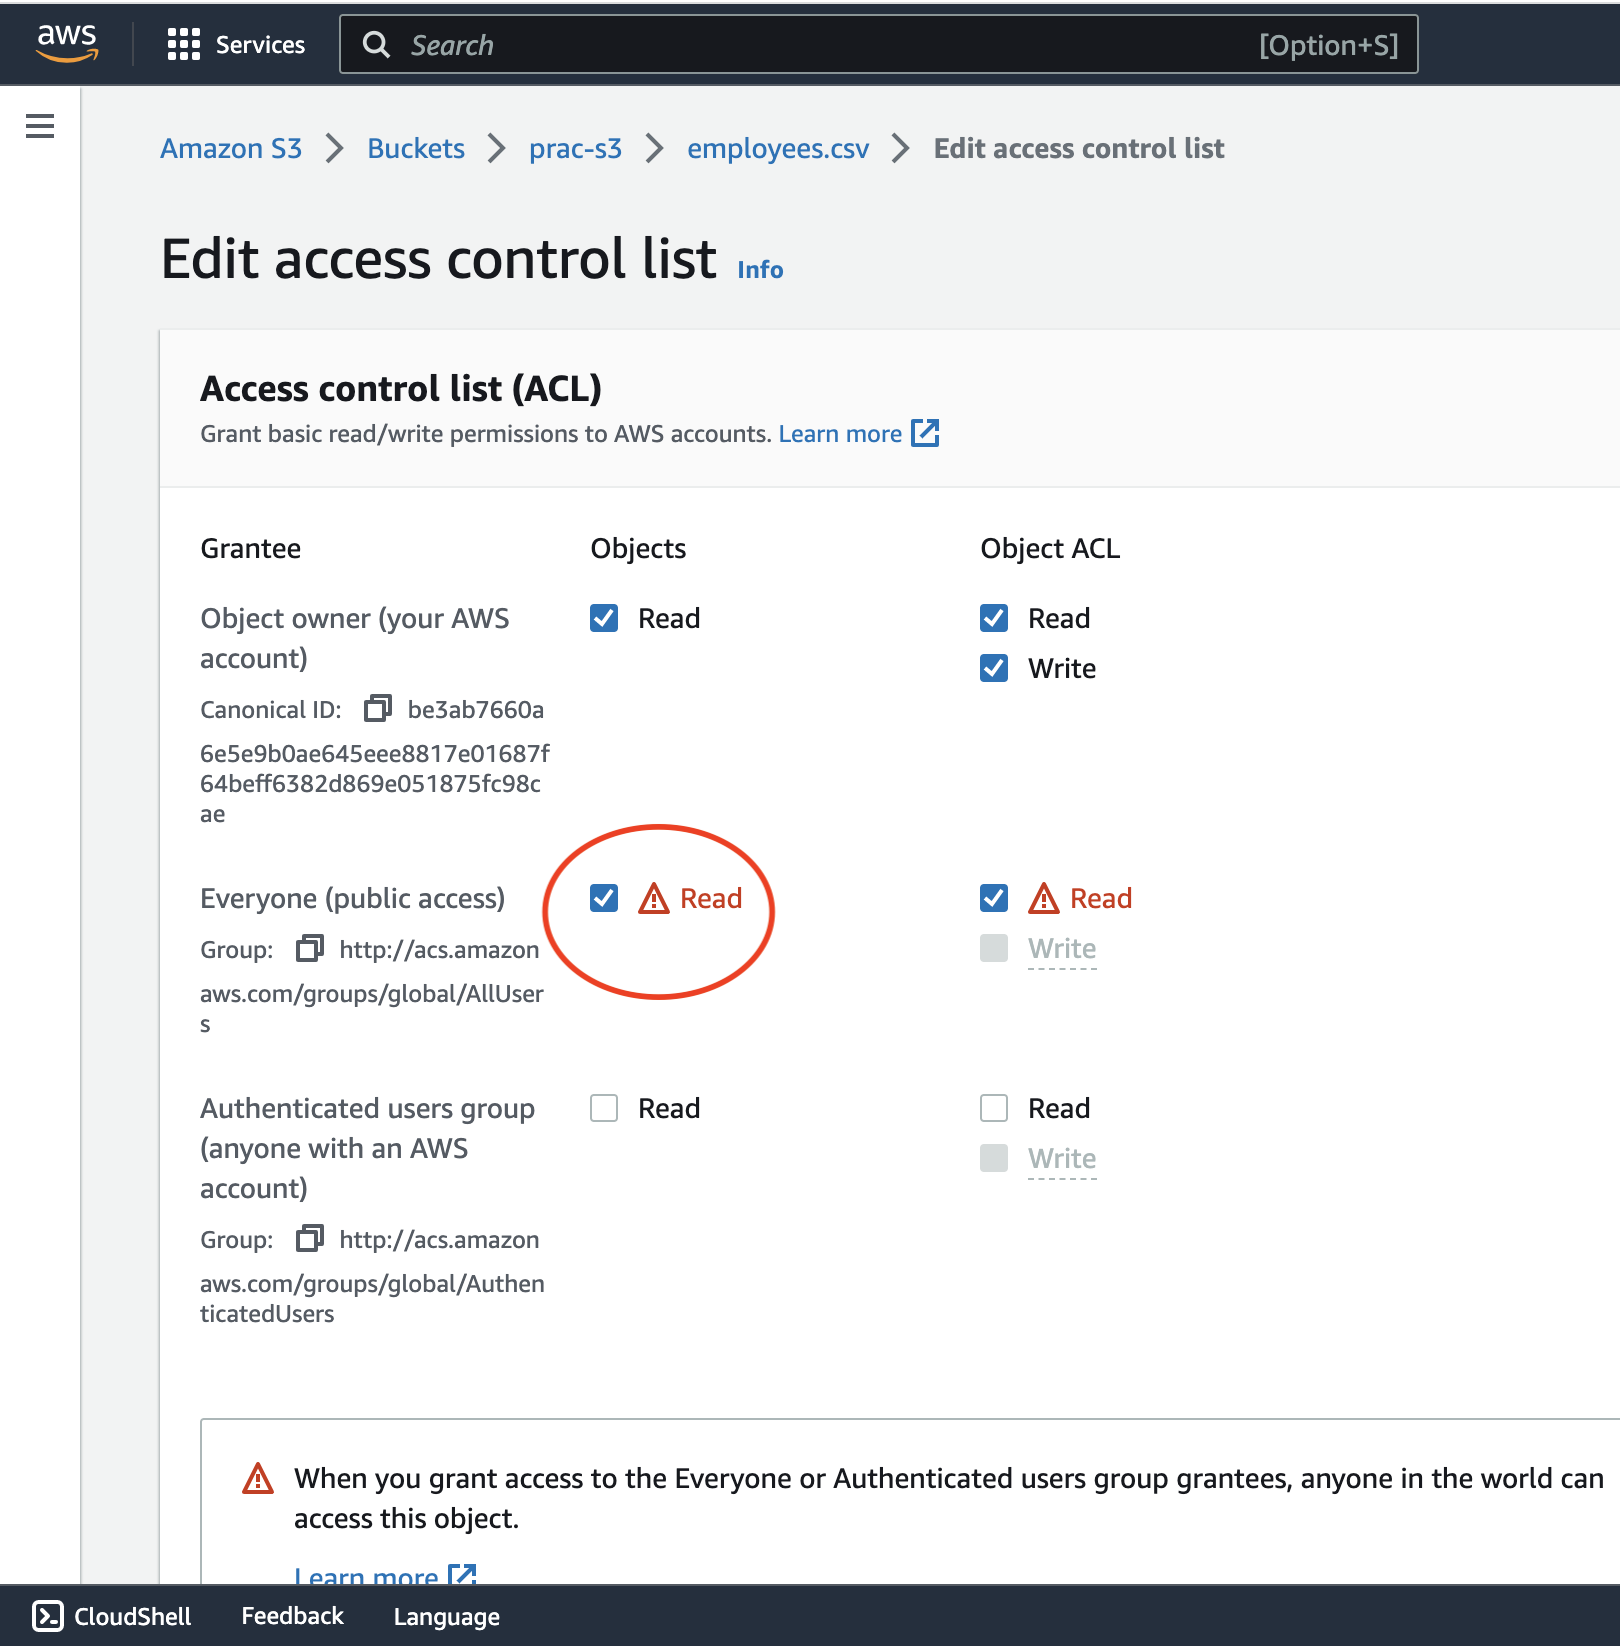
Next, enable public read access to the uploaded object to ensure the database can access the file:
Finally, confirm that the file is publicly accessible by copying the object URL from the Amazon S3 console and running it in the browser:
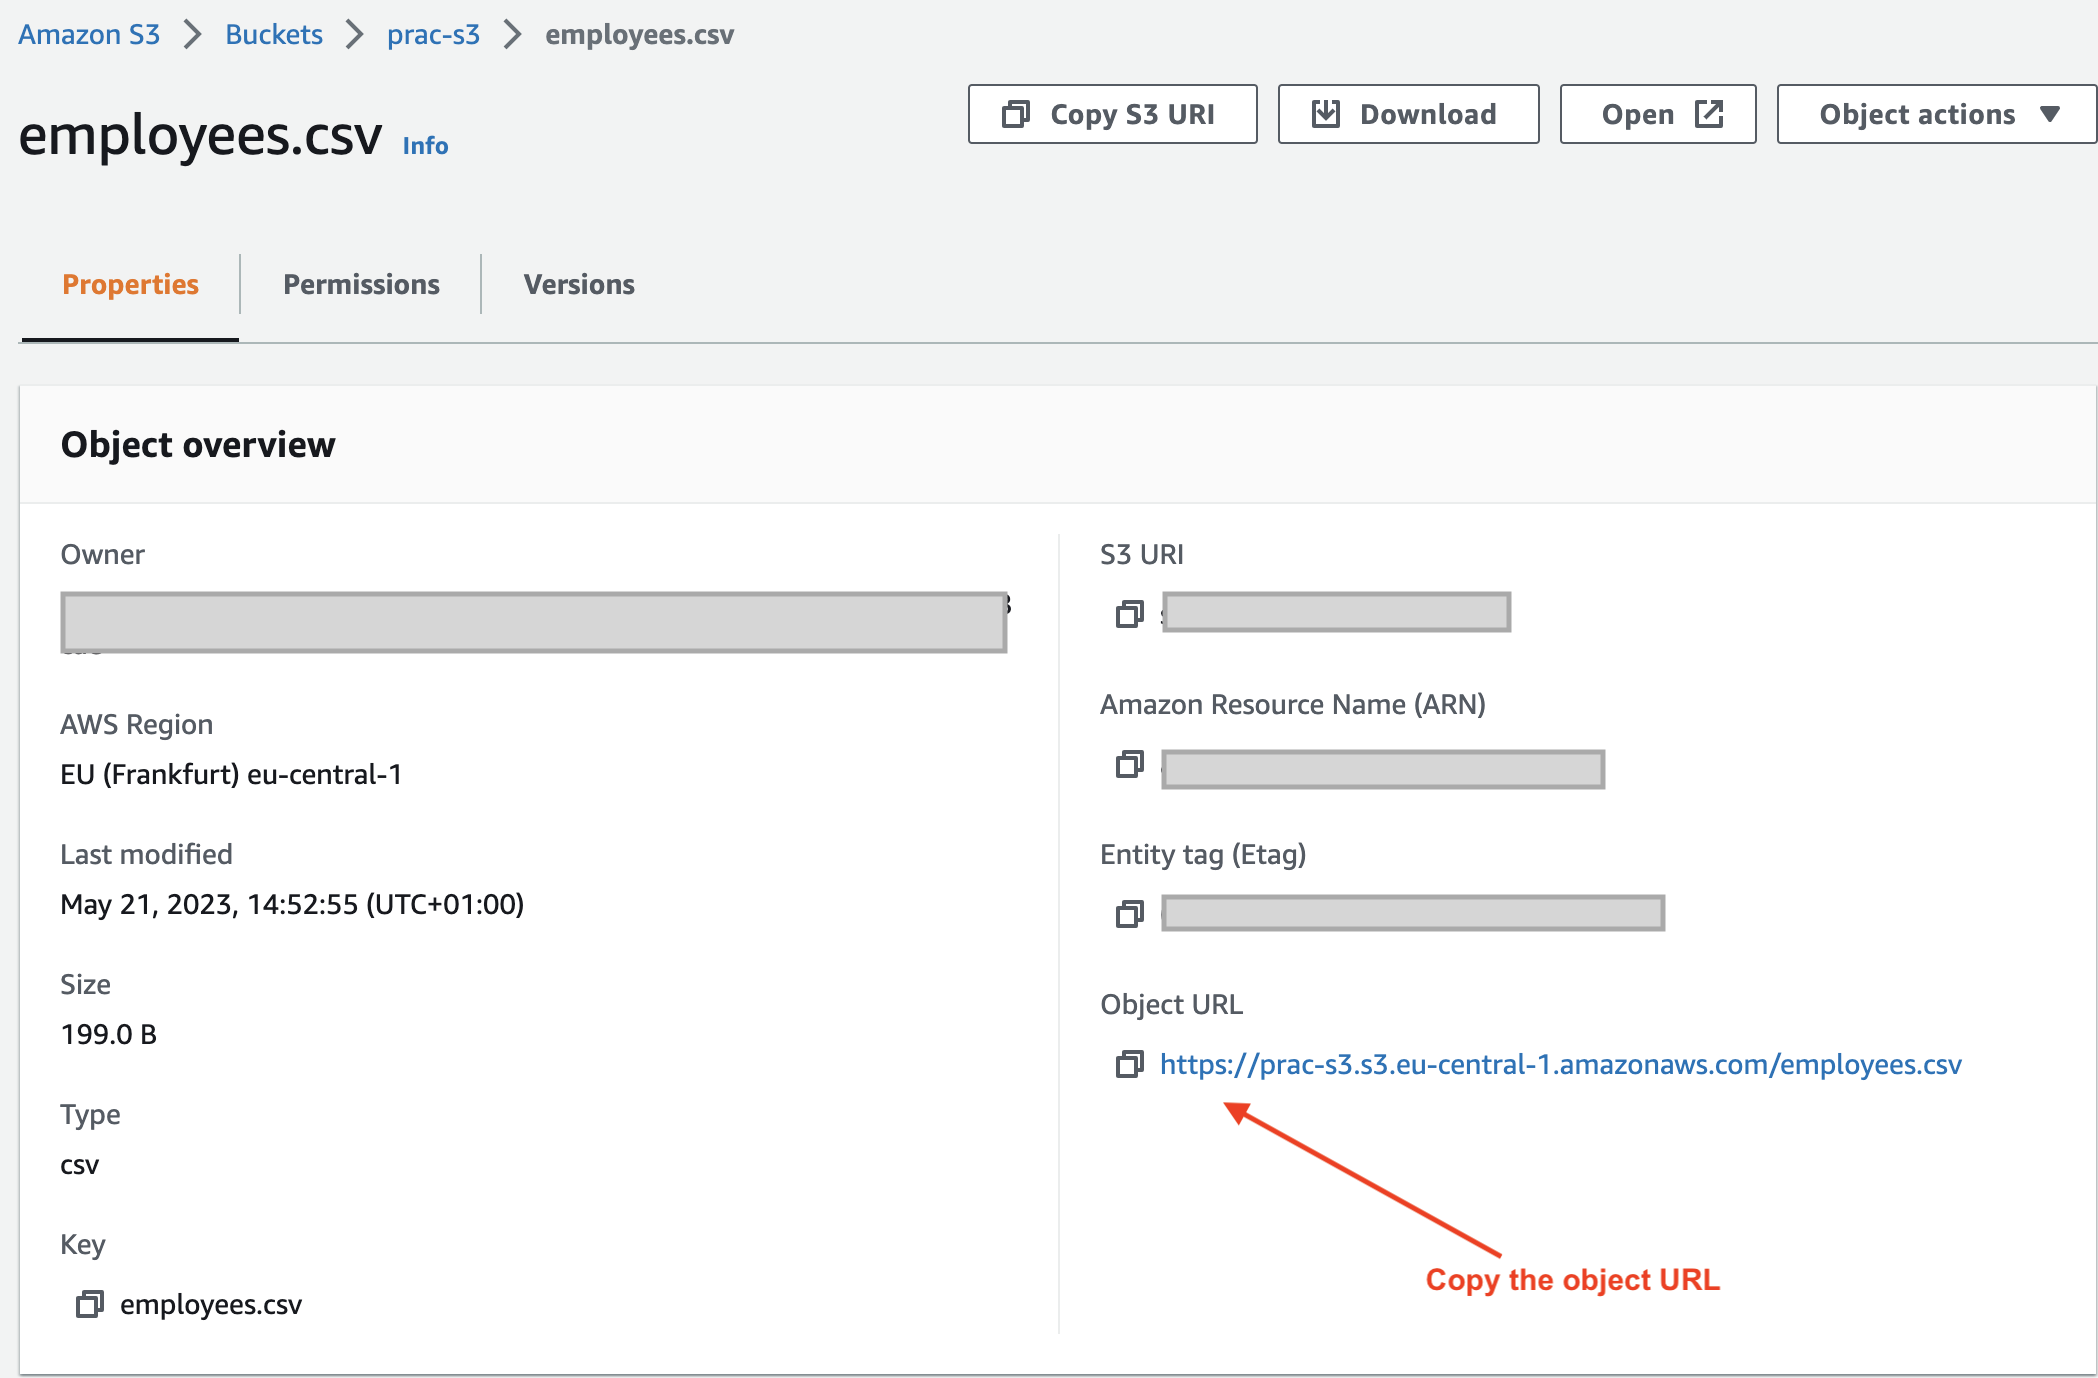
For example, visiting the object URL https://prac-s3.s3.eu-central-1.amazonaws.com/employees.csv should successfully download an employees.csv file.
Connecting to the Amazon RDS PostgreSQL Instance
Airplane accepts different database types, including PostgreSQL, via the Resources dashboard. We can integrate the hosted database into the Airplane account by following the steps in this section.
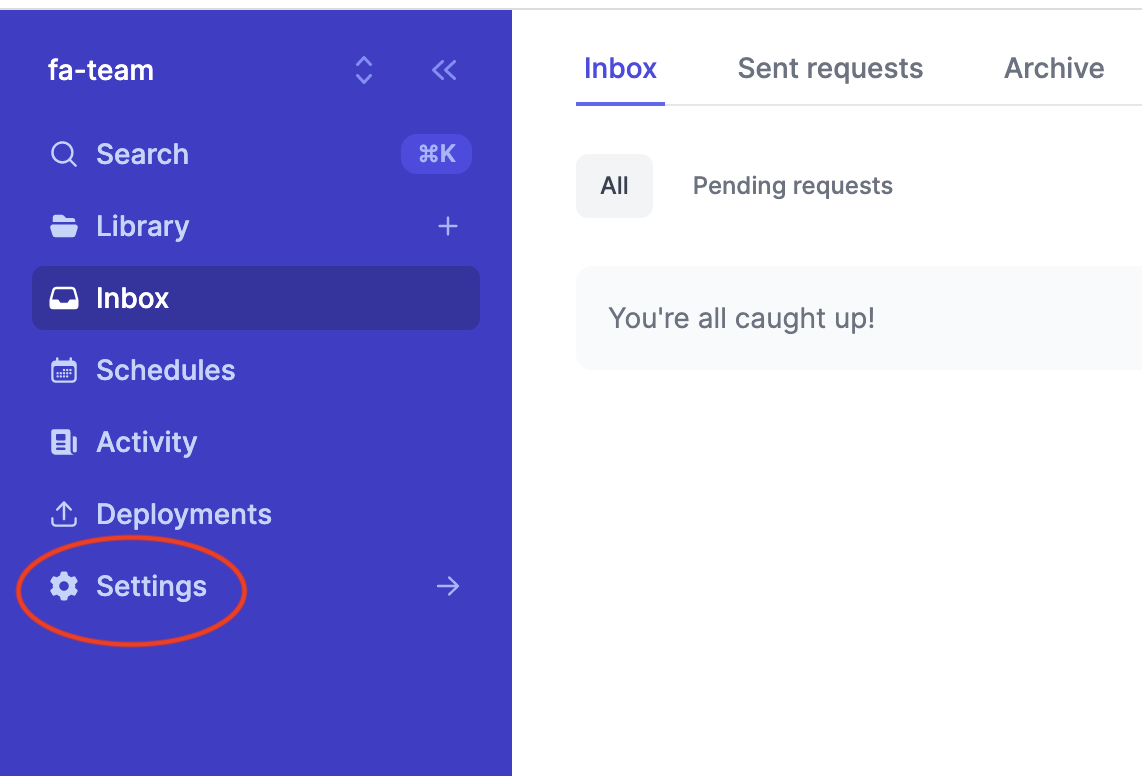
Open the Airplane dashboard and click Settings on the left navigation bar:
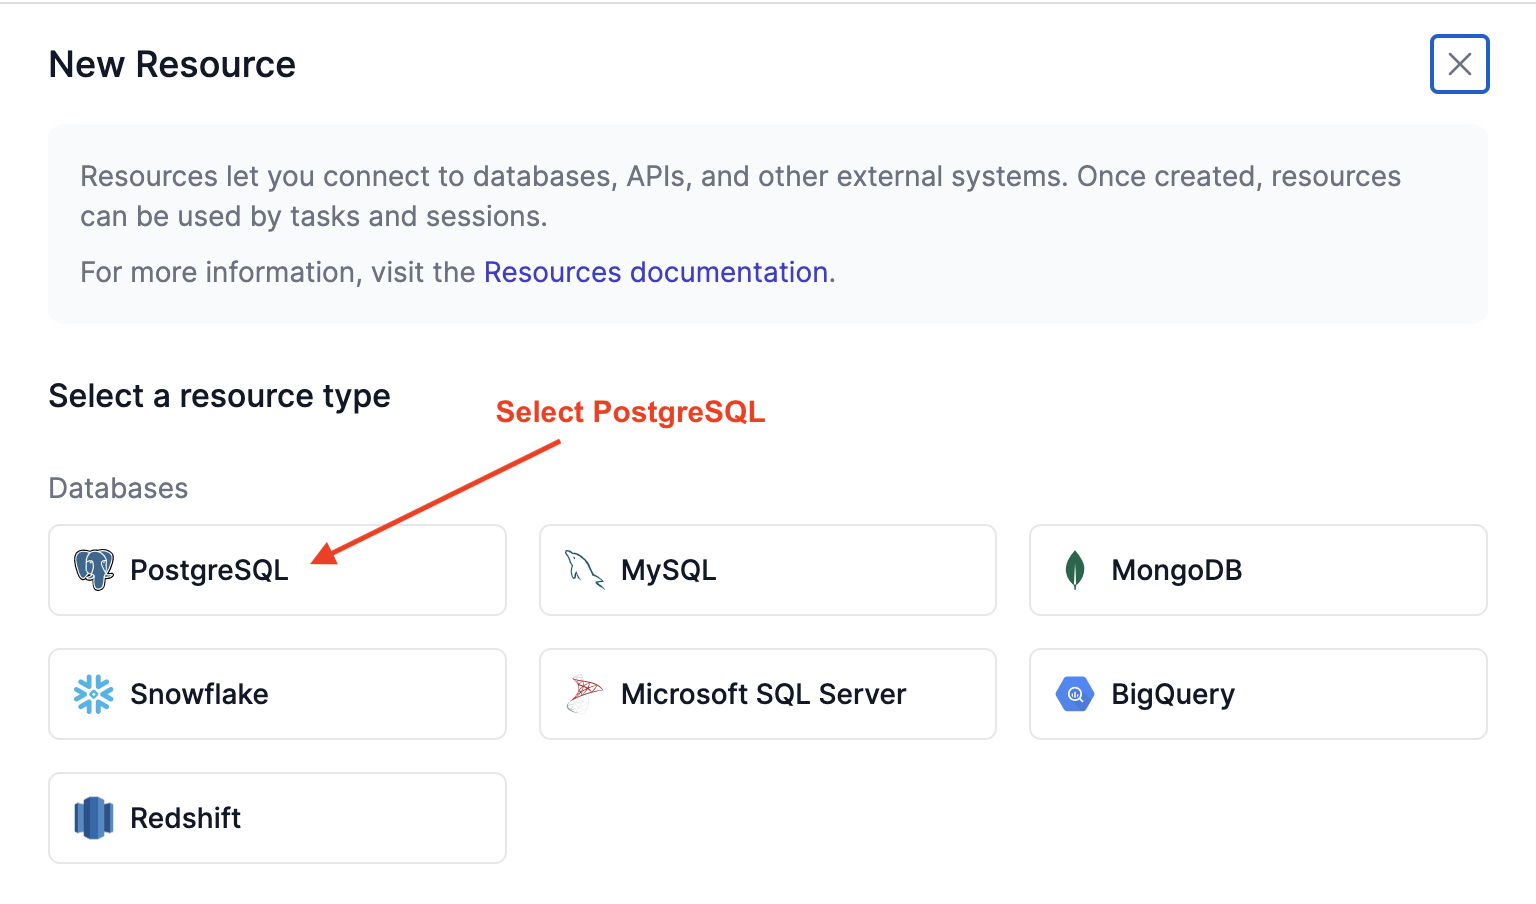
Go to Developer settings > Resources, then click New resource at the top-right corner of the Resources page:

Select PostgreSQL under Databases:
We'll then provide the details required to connect to the database, including a human-readable name for the resource and database connection details. Follow the instructions in the AWS documentation to retrieve the database connection details, then enter them:
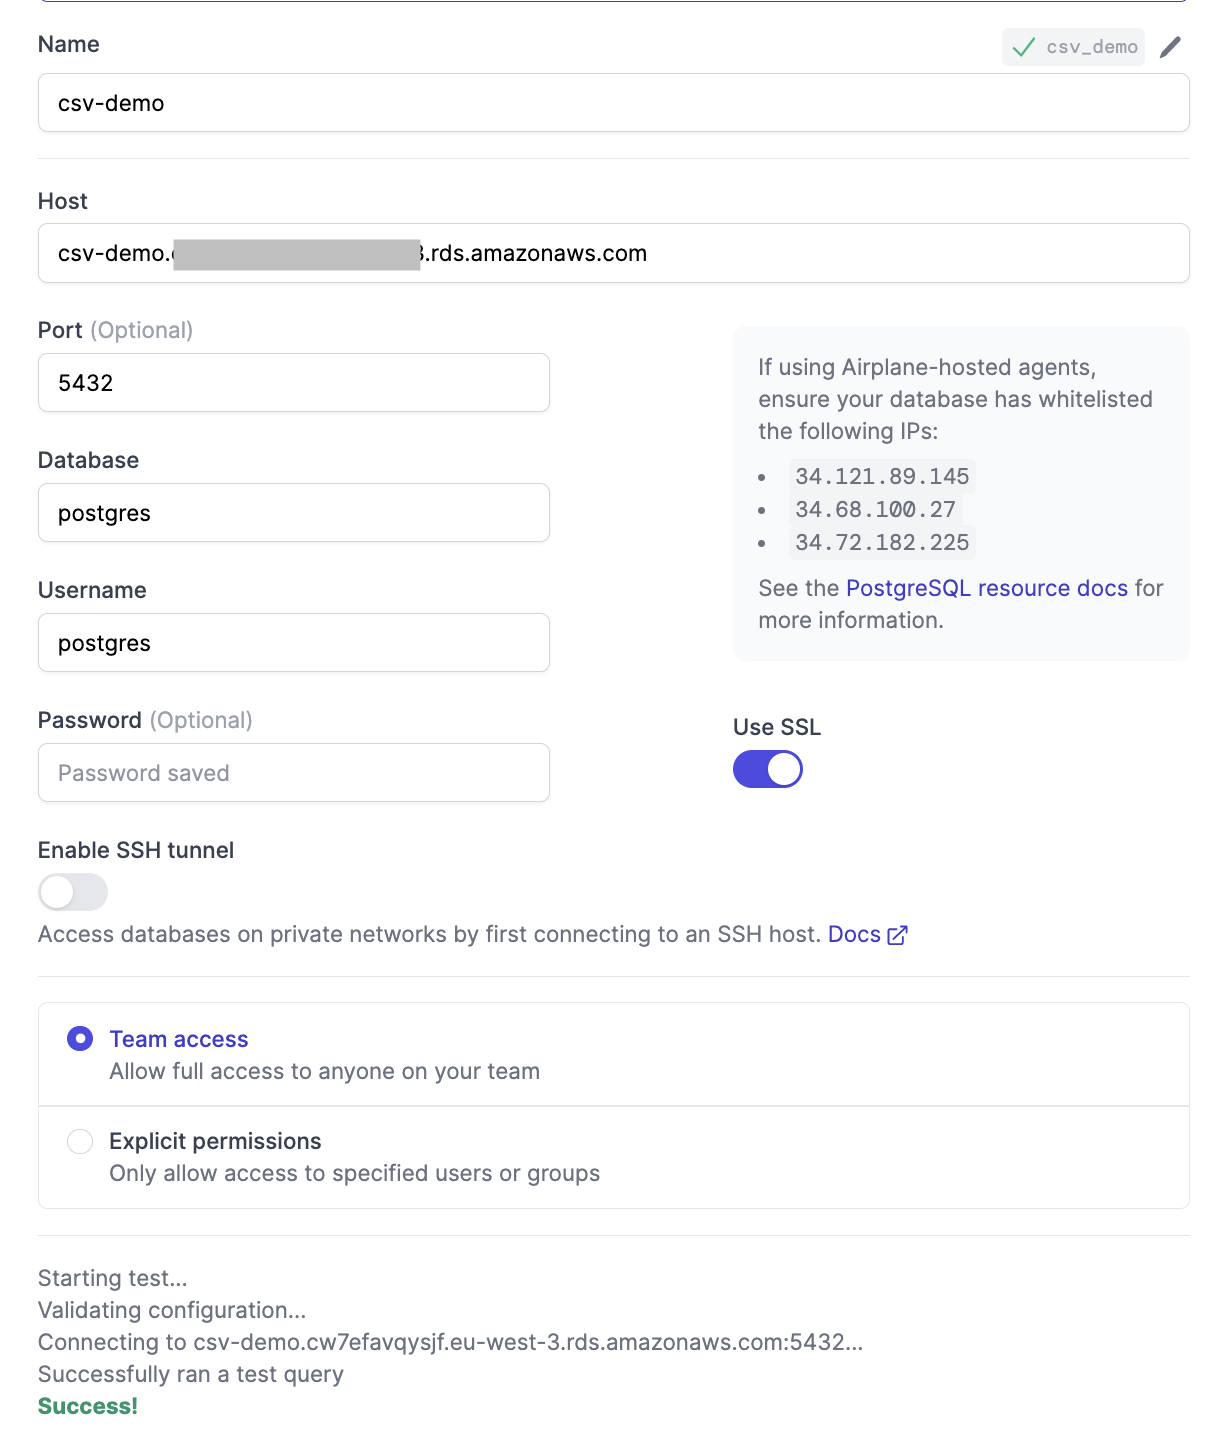
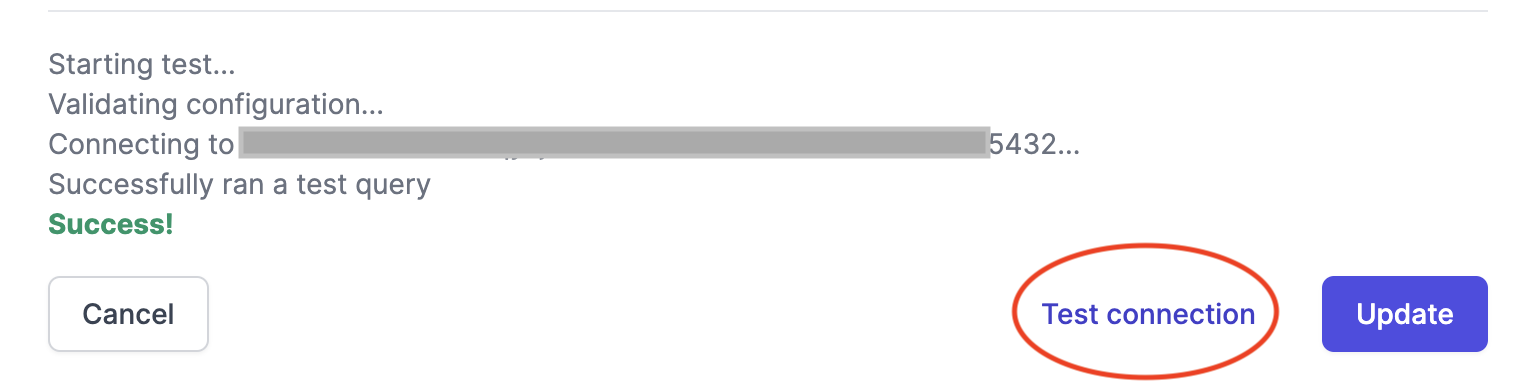
Test the connection to confirm that it works before saving the details:
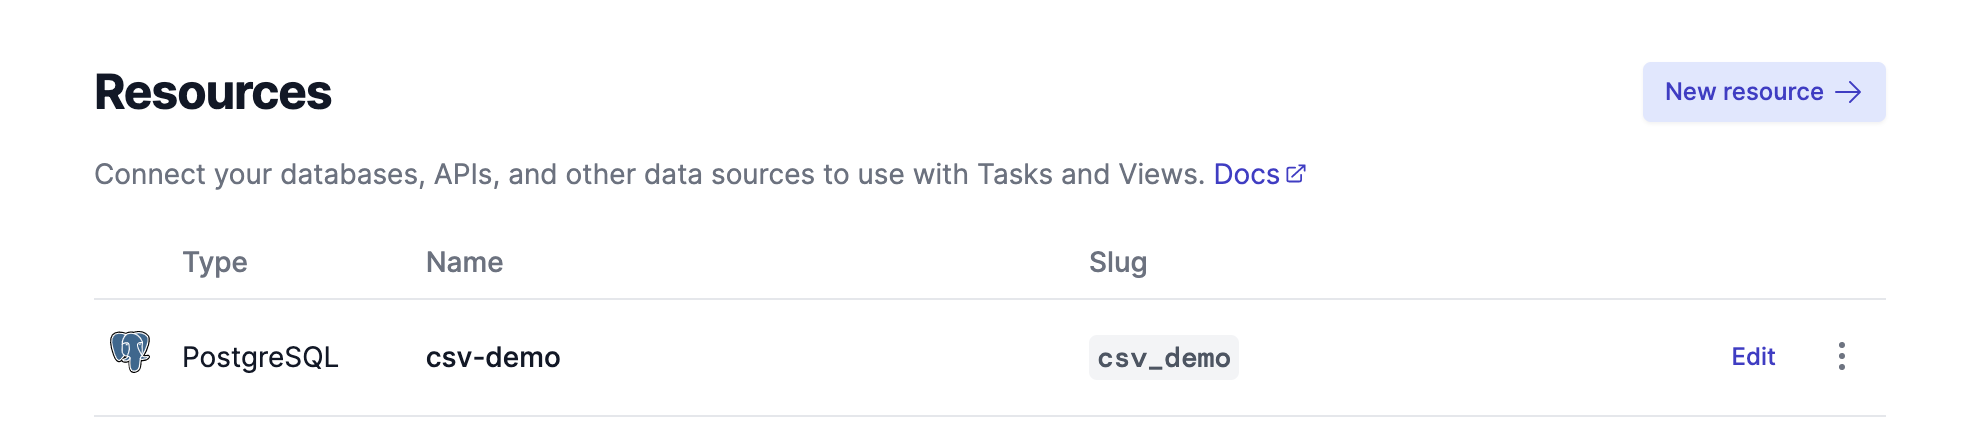
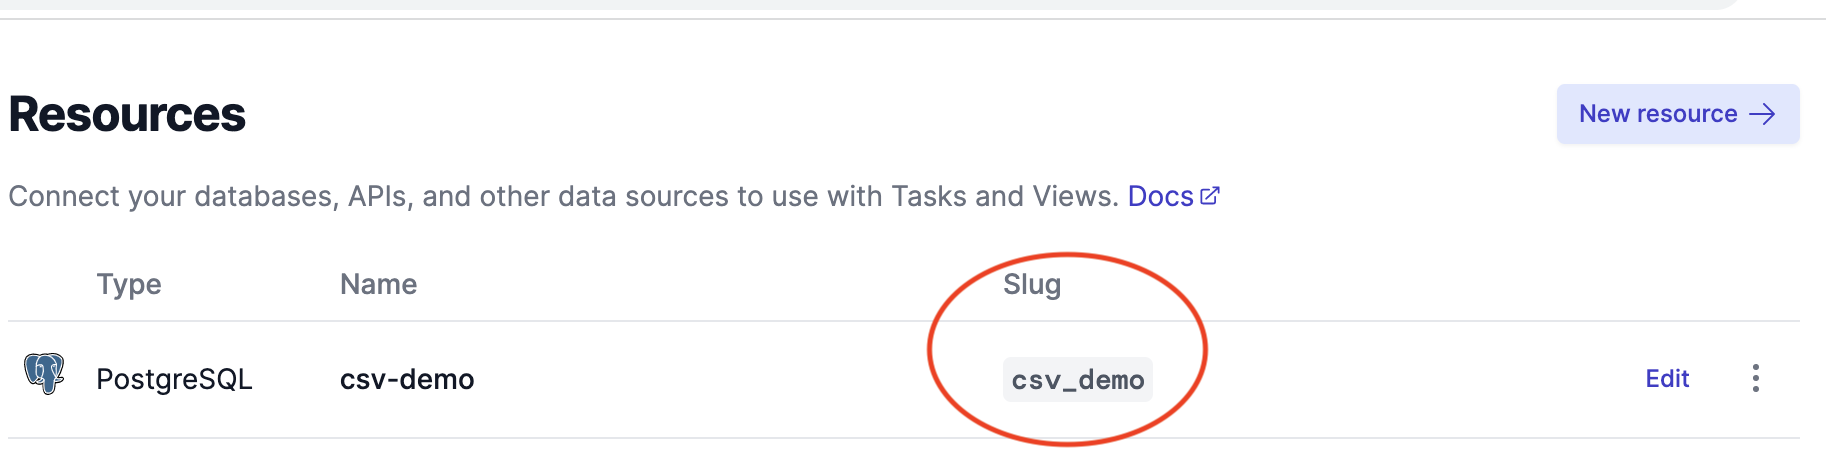
Once saved, the new resource will appear on the Resources page, along with its type, name, and slug:
Configuring the Amazon RDS Instance
The database requires the aws_s3 extension to communicate with the S3 bucket. In this section, we'll install the extension and create an employees table in the integrated database. First, set up the database to receive data from S3.
Run the following to open the psql terminal:
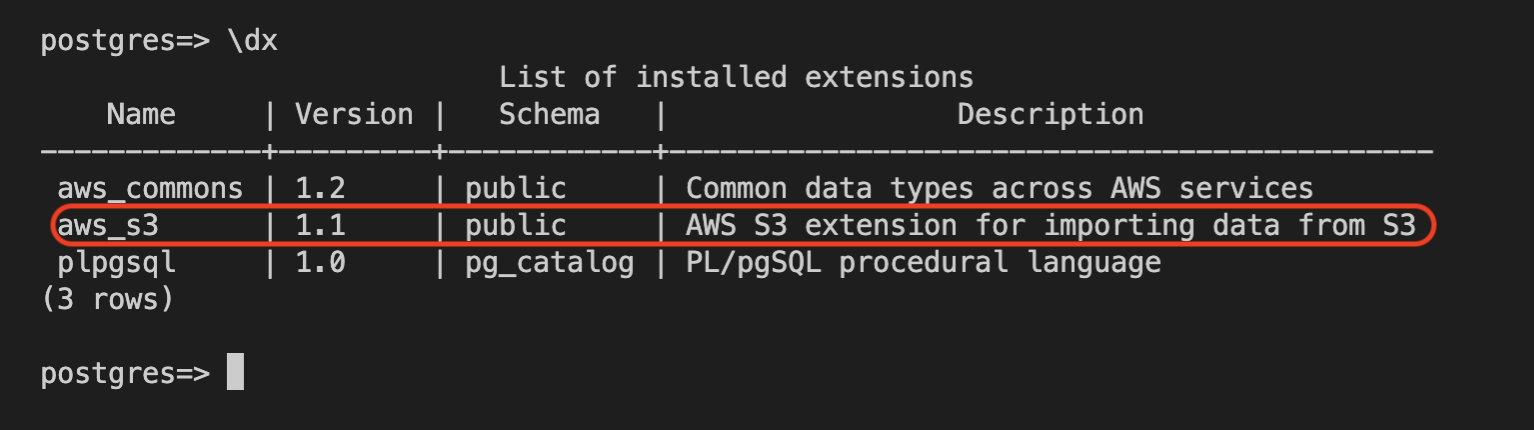
Install the aws_s3 extension to Postgres:
Run the \dx command to confirm that the extension exists for the database:
Next, run the following to create the employees table:
Creating an SQL Task
In Airplane, SQL Tasks execute SQL queries to perform various operations on SQL databases. We'll create an SQL Task to populate the employees table with data from the CSV file. We should use a new, empty directory when creating a new SQL Task in Airplane.
Create a file directory called airplane-getting-started:
Navigate to the new folder:
Then, initiate the process by running the init command:
The init command presents some prompts for details, including the task name and type. The responses will determine the structure of the project.
Name the task csv_upload and choose SQL as the task type:

The airplane-getting-started folder should now have two new files (a script file and a config file):
- The config file is a
.task.yamlfile that defines the SQL task, including the task name, task description, database resource, and the path to the SQL script. It is prefilled with the task name and slug. - The SQL script is a separate file with the
.sqlextension and contains all the SQL statements needed for this task.
Confirm this by running the ls (macOS) or dir (Windows) command in the terminal:

Configuring the SQL Task
Before testing the created task, we must update the config file with the specific configuration details required for successful execution. These include what database resource to use and any necessary environment variables. The Airplane documentation highlights all supported SQL Task configuration fields and their purposes.
First, add the database resource slug from the Resources page to specify the target database:
Airplane automatically generates the slug using the assigned resource name. Assign the slug value to resource under the SQL configurations:
We'll also need the S3 bucket name and AWS region from the Amazon S3 console:

Insert both into the sql.queryArgs object:
This task needs AWS credentials to access the S3 bucket. This data is sensitive and should be kept confidential.
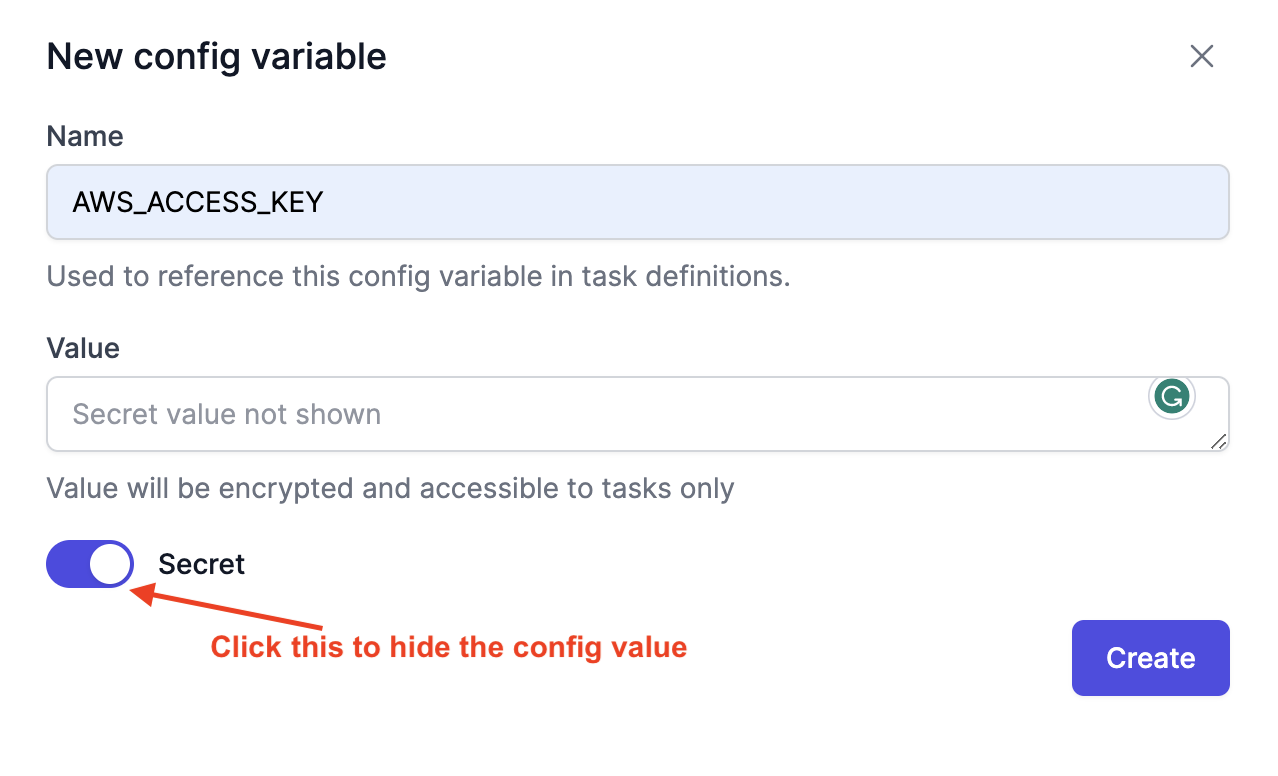
Follow the instructions from the AWS documentation to retrieve the access key ID and secret access key. Then, go to Settings > Developer settings > Config variables on the Airplane dashboard and create new config variables:

On the New config variable screen, insert AWS_ACCESS_KEY under the Name field and the AWS access key ID under the Value field. Click the Secret toggle to encrypt the value, then click Create to save the new config variable:
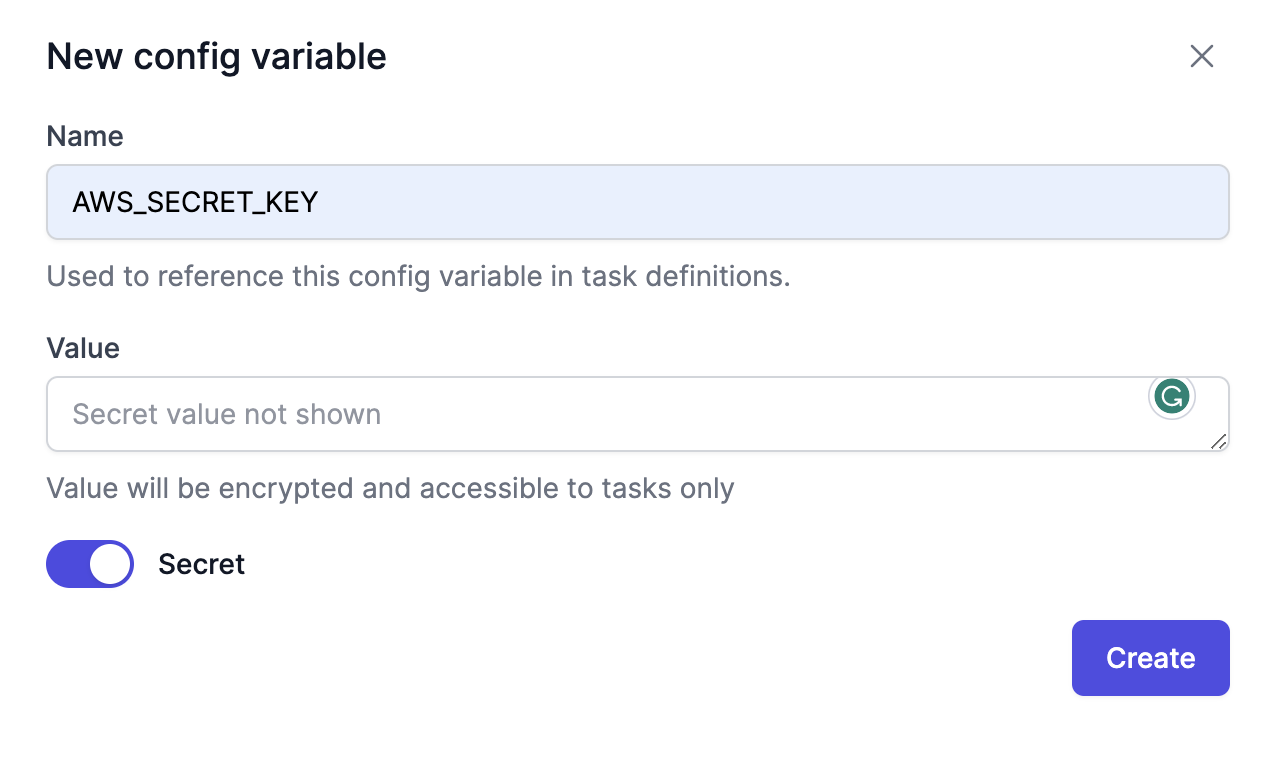
Repeat the above to create another config variable with AWS_SECRET_KEY as the config name and the AWS secret access key as the value:
Attach the AWS_ACCESS_KEY and AWS_SECRET_KEY variables to sql.configs:
Set the variables as query parameters for the SQL script:
Here is the complete configuration setup for this task:
Updating the SQL script
With the configuration details in place, let's now add the SQL SELECT query to the SQL script. This script determines the database operations that the task executes.
Populate the .sql file with the following:
The SELECT statement imports the S3 file into the employees table with the aws_s3.table_import_from_s3 function.
The function accepts the following arguments:
table_nameis the name of the Postgres table (employees).column_listis a string of the columns to import ('firstname,lastname,department,city').optionsare PostgreSQLCOPYarguments, where'(format csv, header true)'indicates a CSV file with a header line.:s3_bucket_namerefers to the S3 bucket name undersql.queryArgs.file_pathis the object key (/employees.csv).:s3_regionis the S3 region undersql.queryArgs.:aws_access_keyand:aws_secret_keyreference the AWS credentials in the config file undersql.queryArgs.
Executing the Task in Airplane Studio
Confirm that the task configuration works as expected by testing it locally before deploying the SQL Task. Airplane Studio provides a rich local development environment for this purpose. The Studio mimics the Airplane app, allowing us to set up resources and configs and execute tasks locally, among other features.
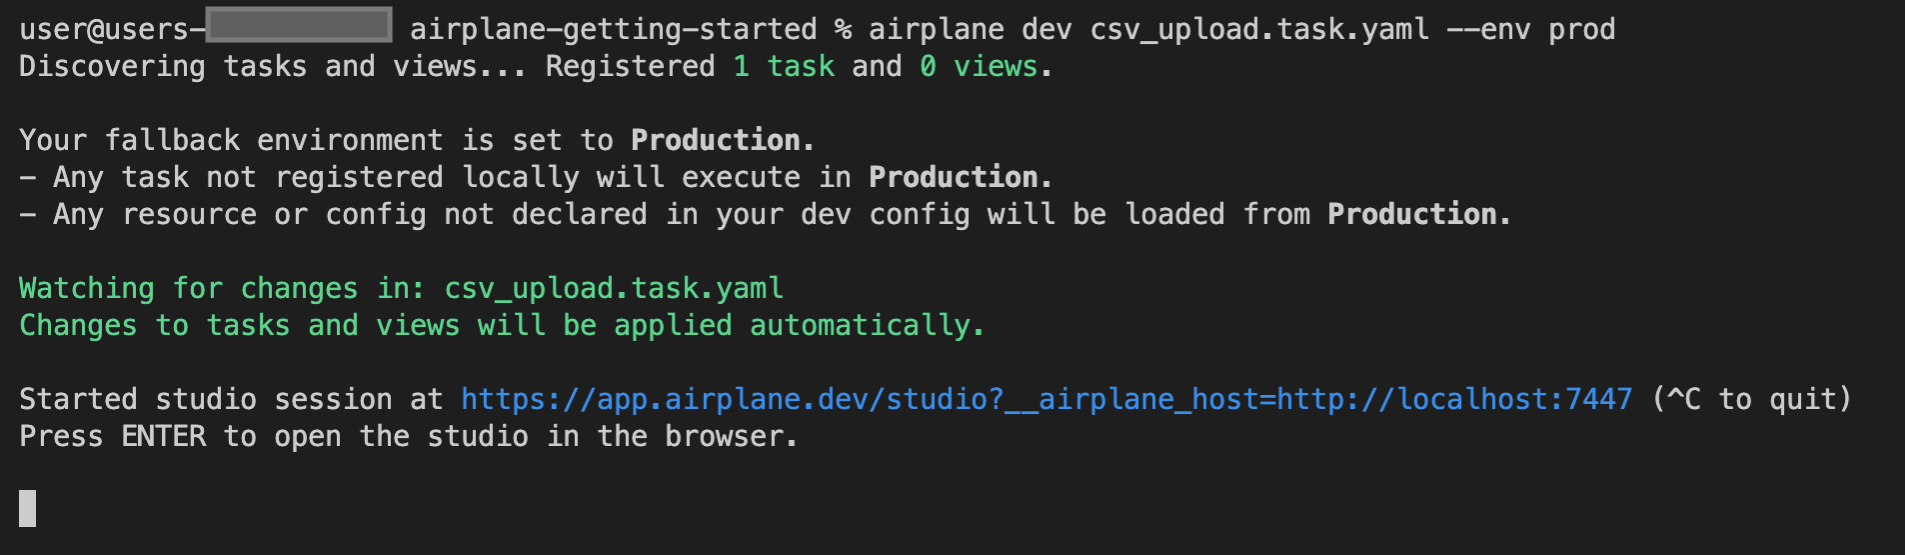
Run this command to start the local dev server:
In this command, csv_upload.task.yaml specifies the task configurations to register with the Studio, while the --env prod flag specifies the fallback environment. The task uses resources and config variables from the production environment.
The output should look similar to the following:
Copy the provided link from the terminal and paste it into a web browser to launch the Studio, or press the Enter key.
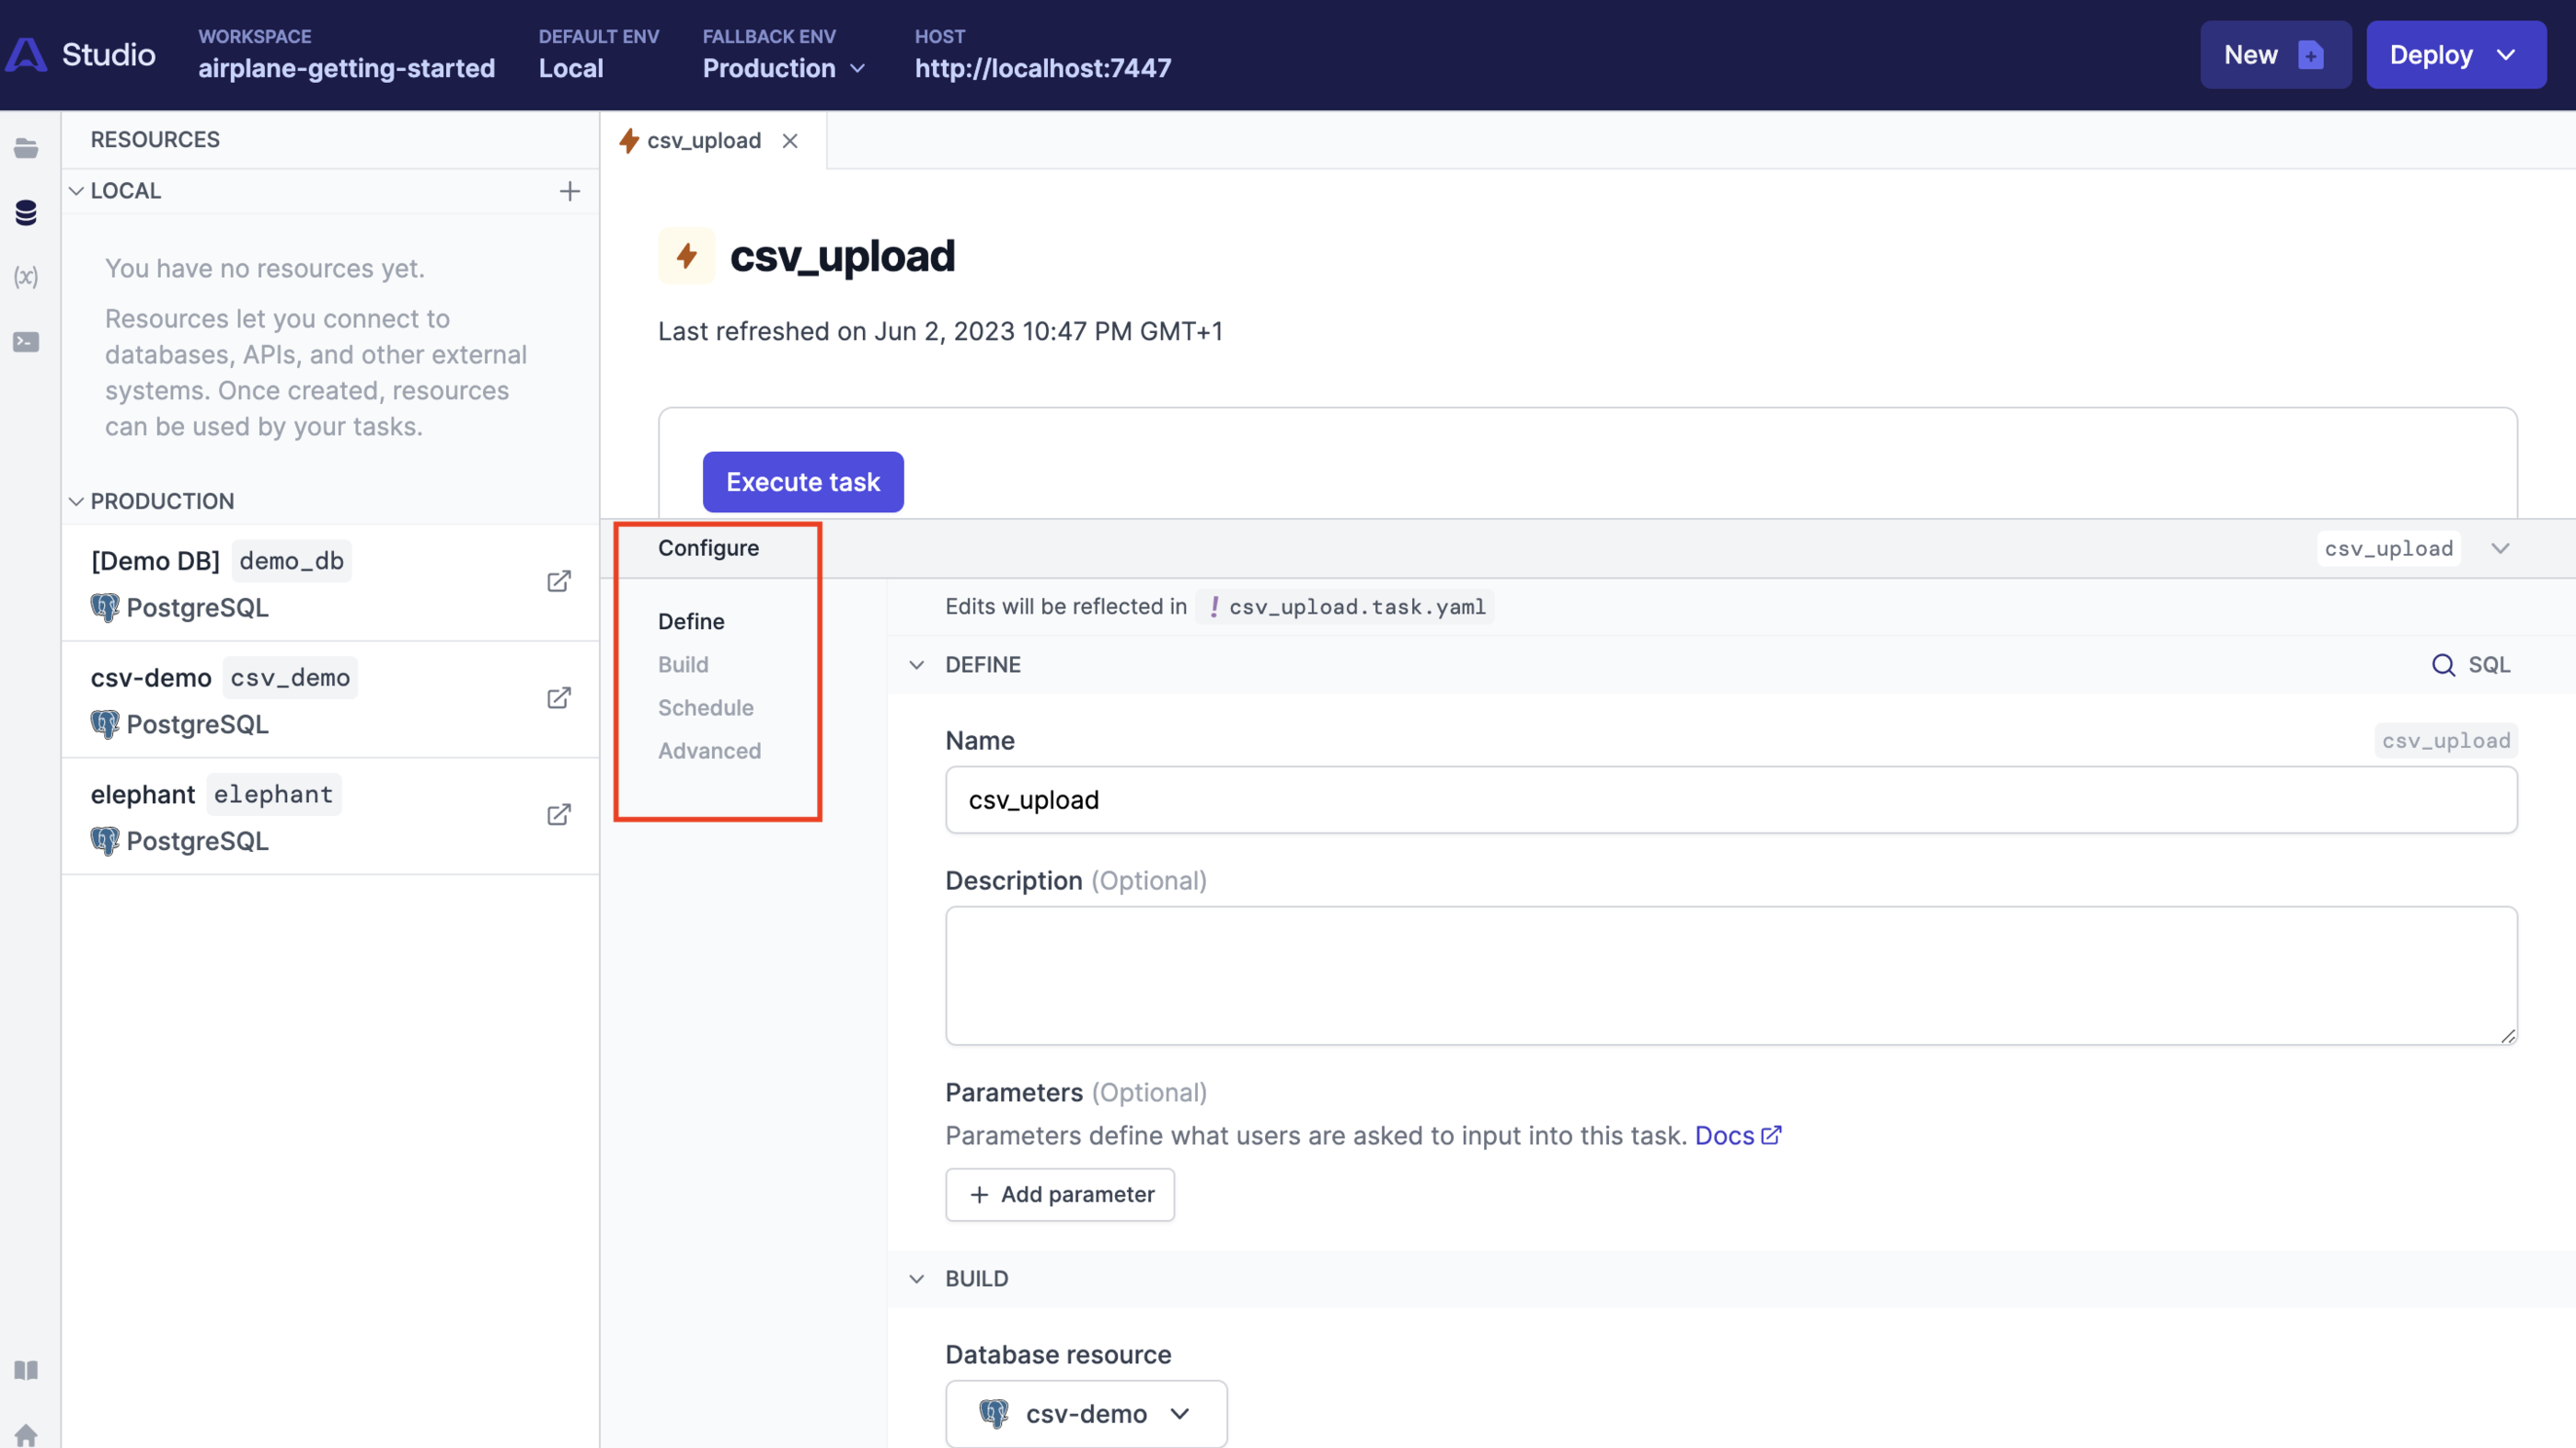
The Studio has a Configure tab for updating and verifying the task's configuration details. Changes made here while the Studio is active will automatically reflect in the config file.
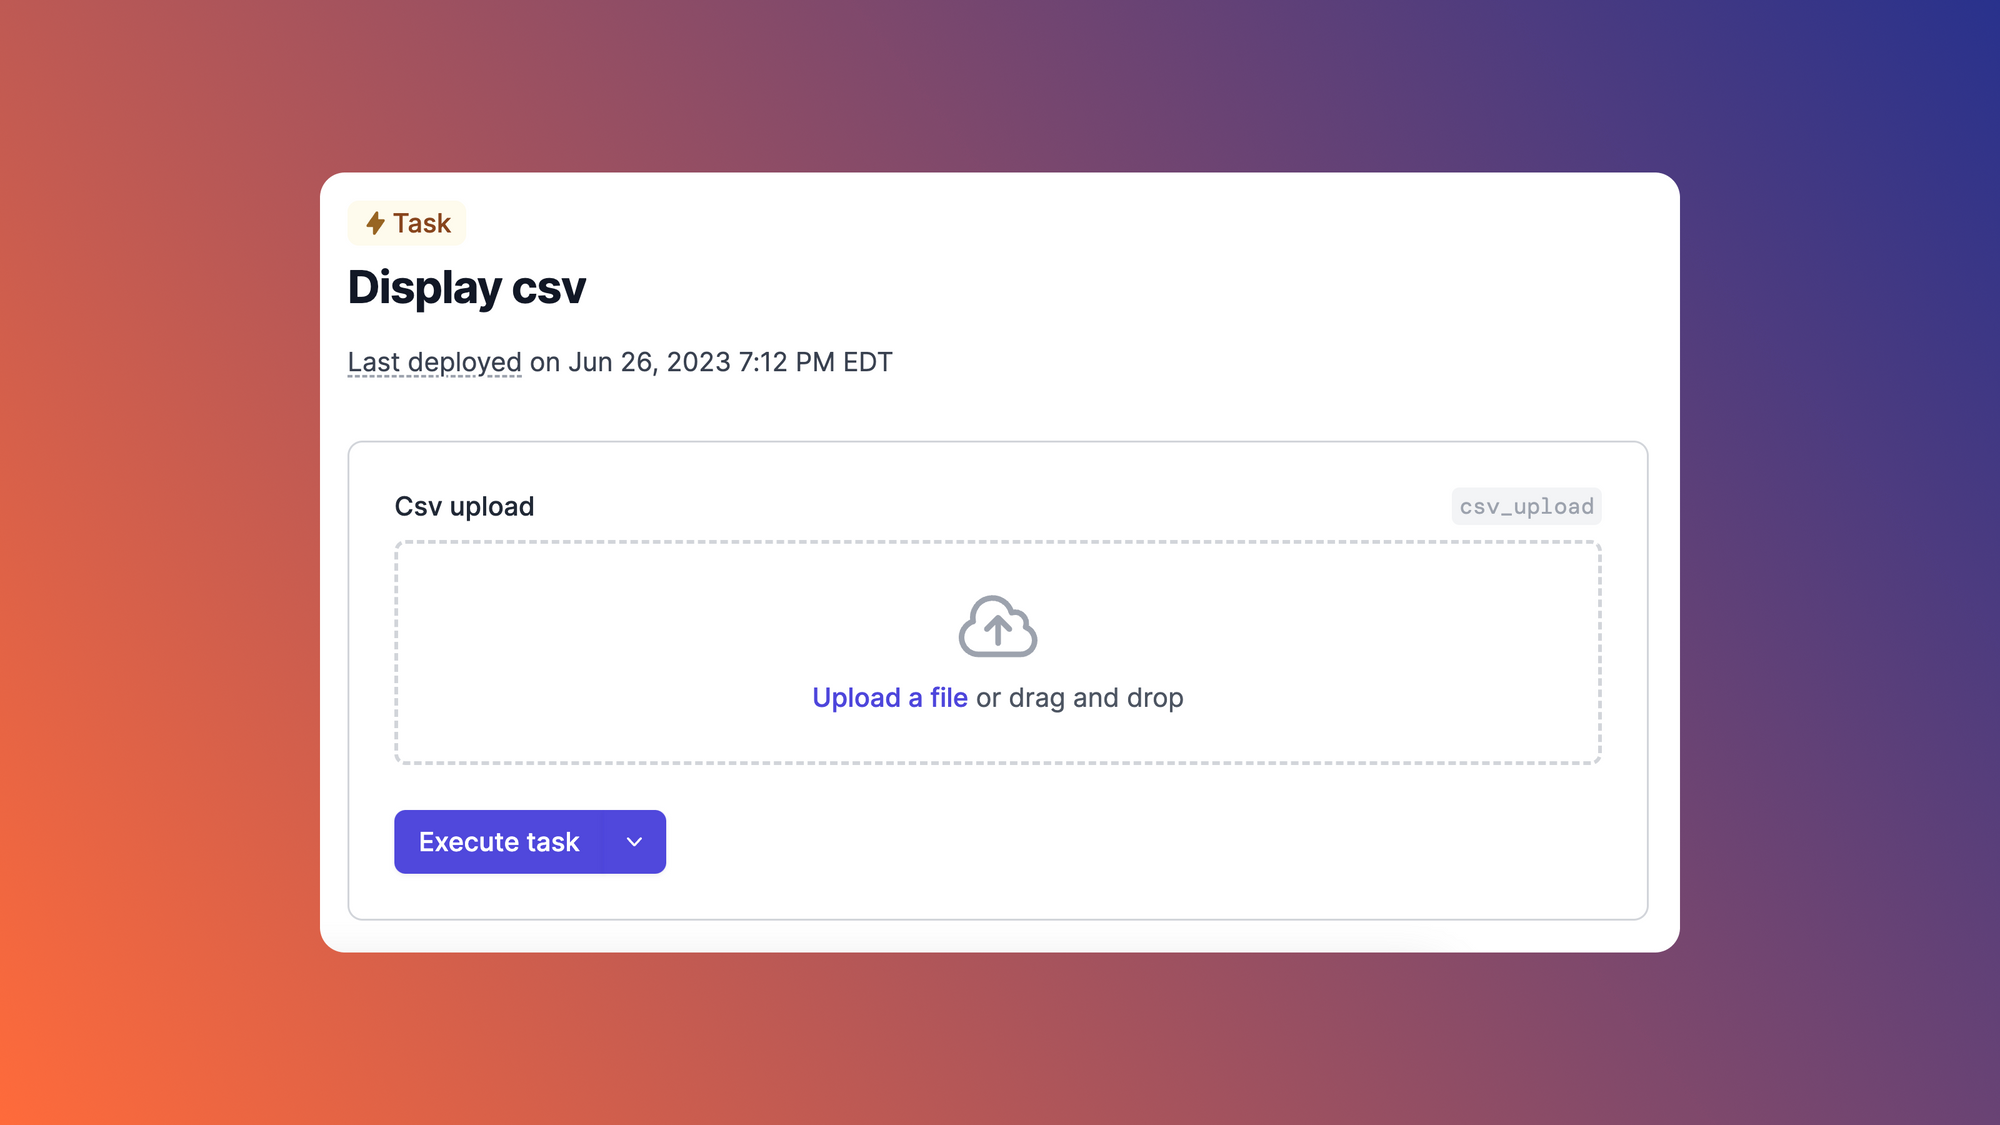
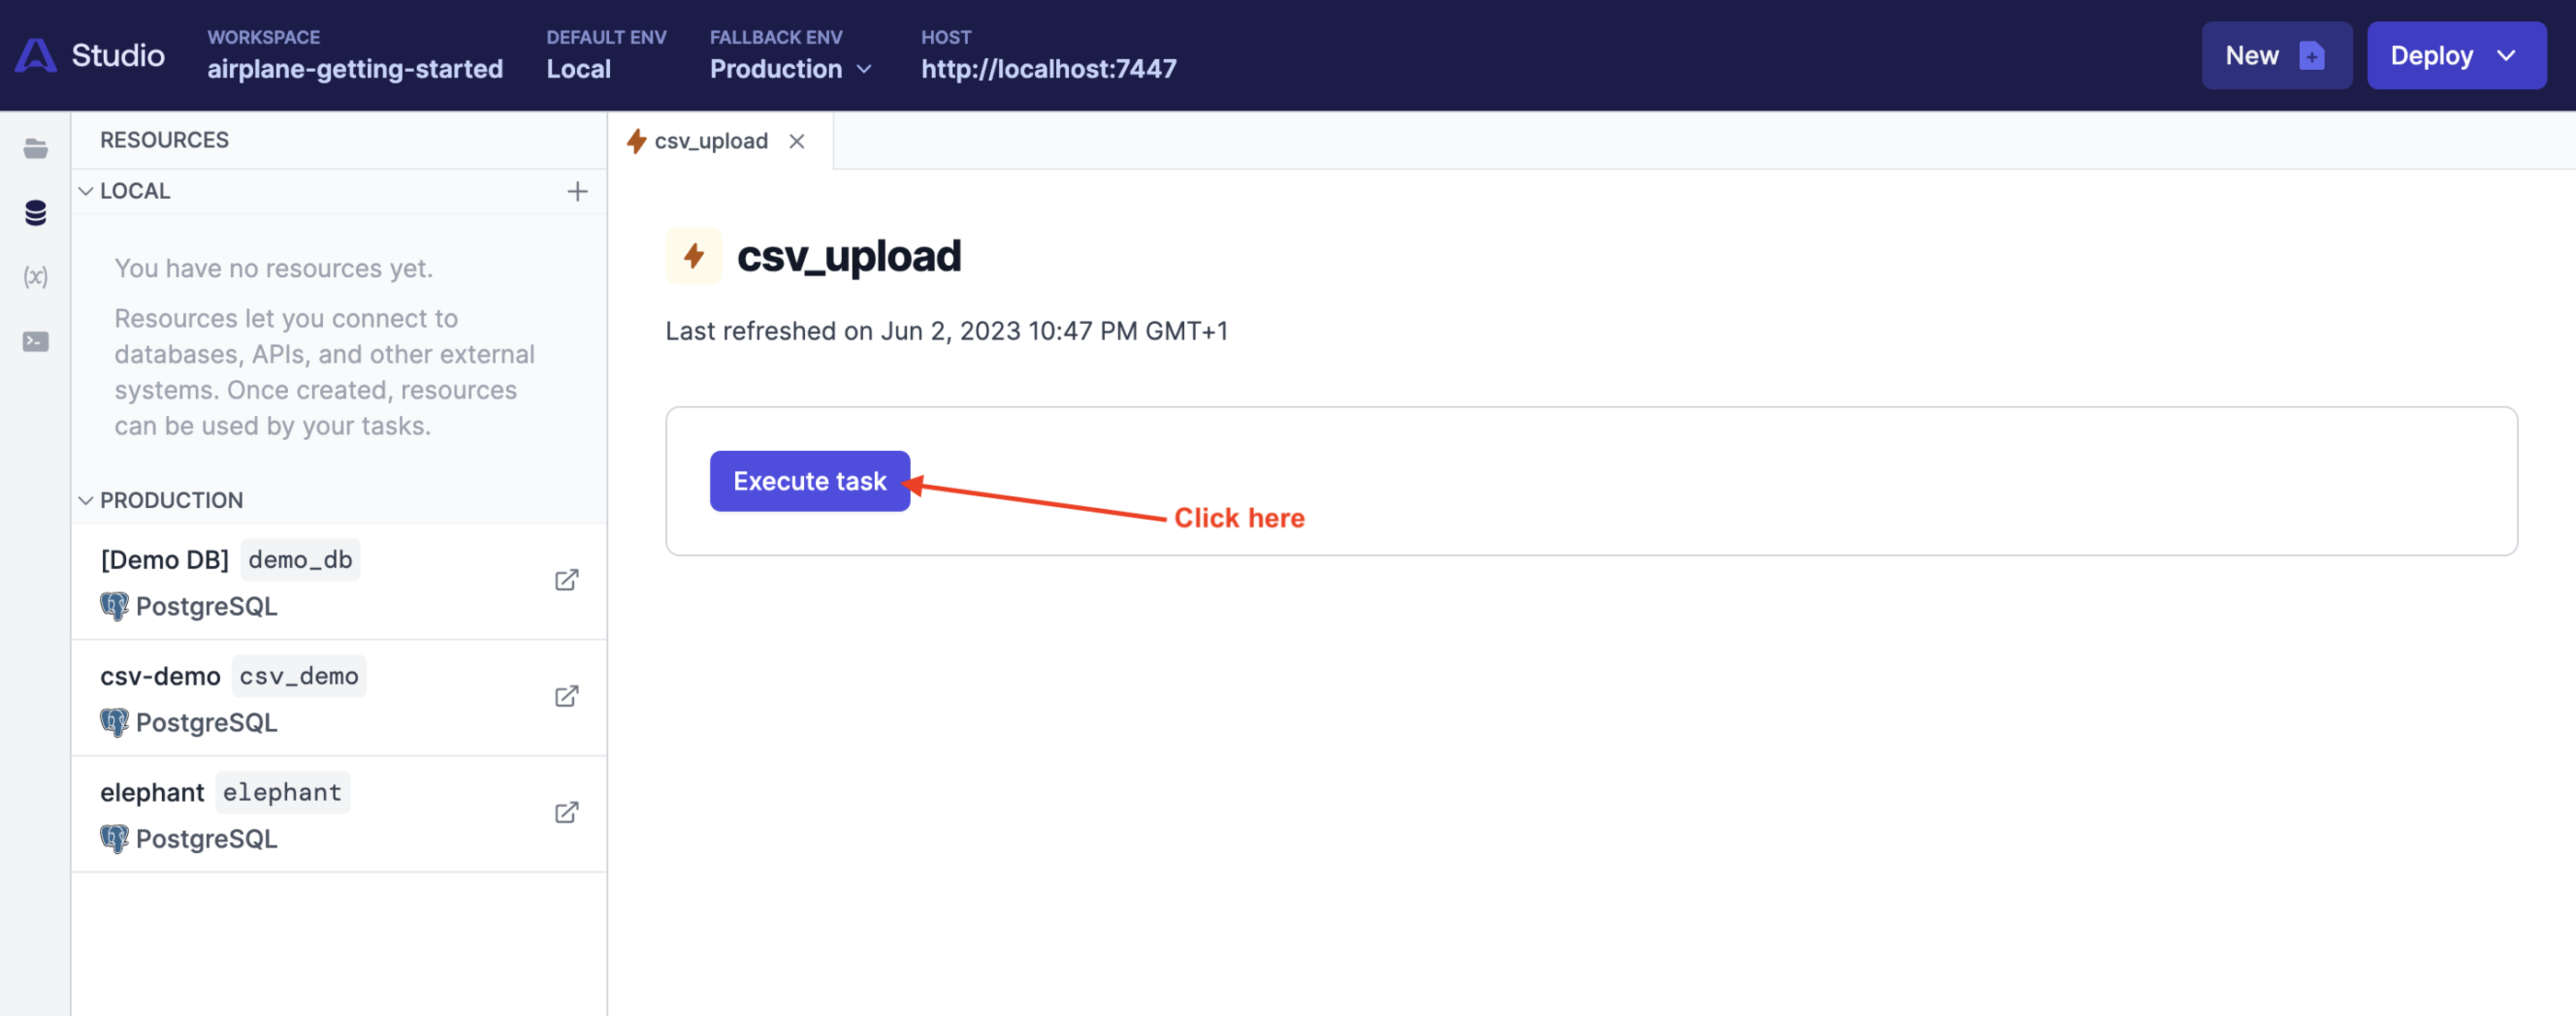
Click the Execute task button to run the query:
The action should return a successful response:

Run the following in the psql terminal to confirm the imported data:
Executing the Task via the dashboard
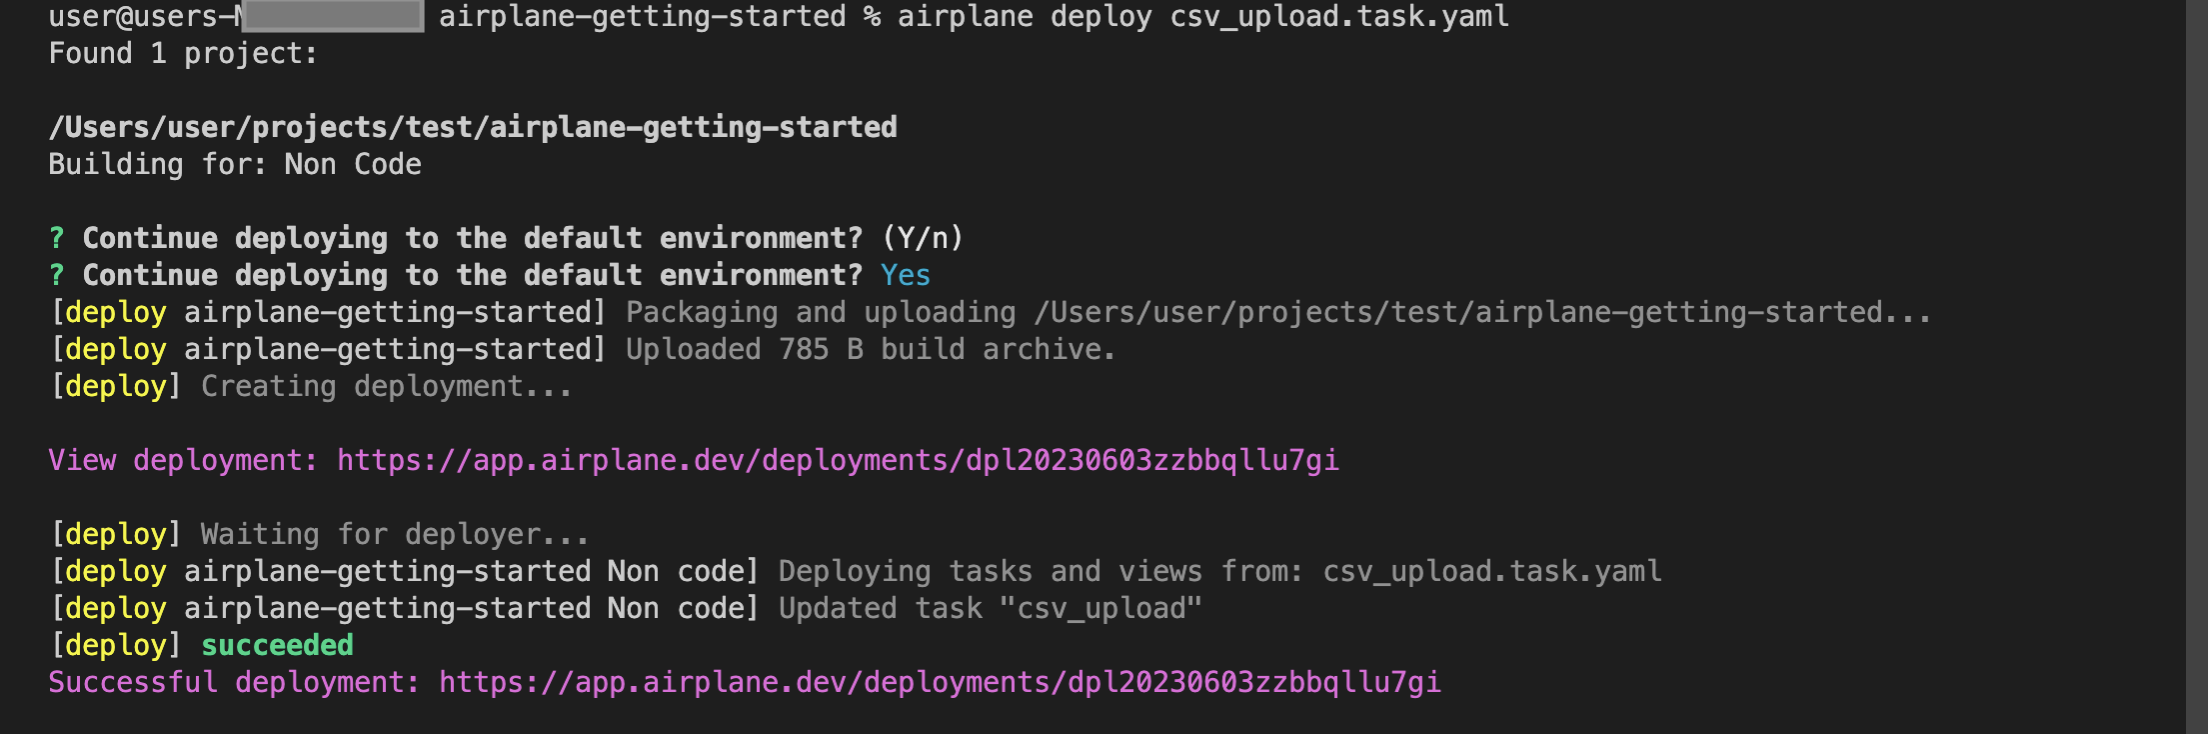
Run the following command to deploy the task:
The airplane deploy command deploys all tasks in the current directory to Airplane. It confirms the target environment before deploying and returns a link after that opens the deployment on the Airplane dashboard:
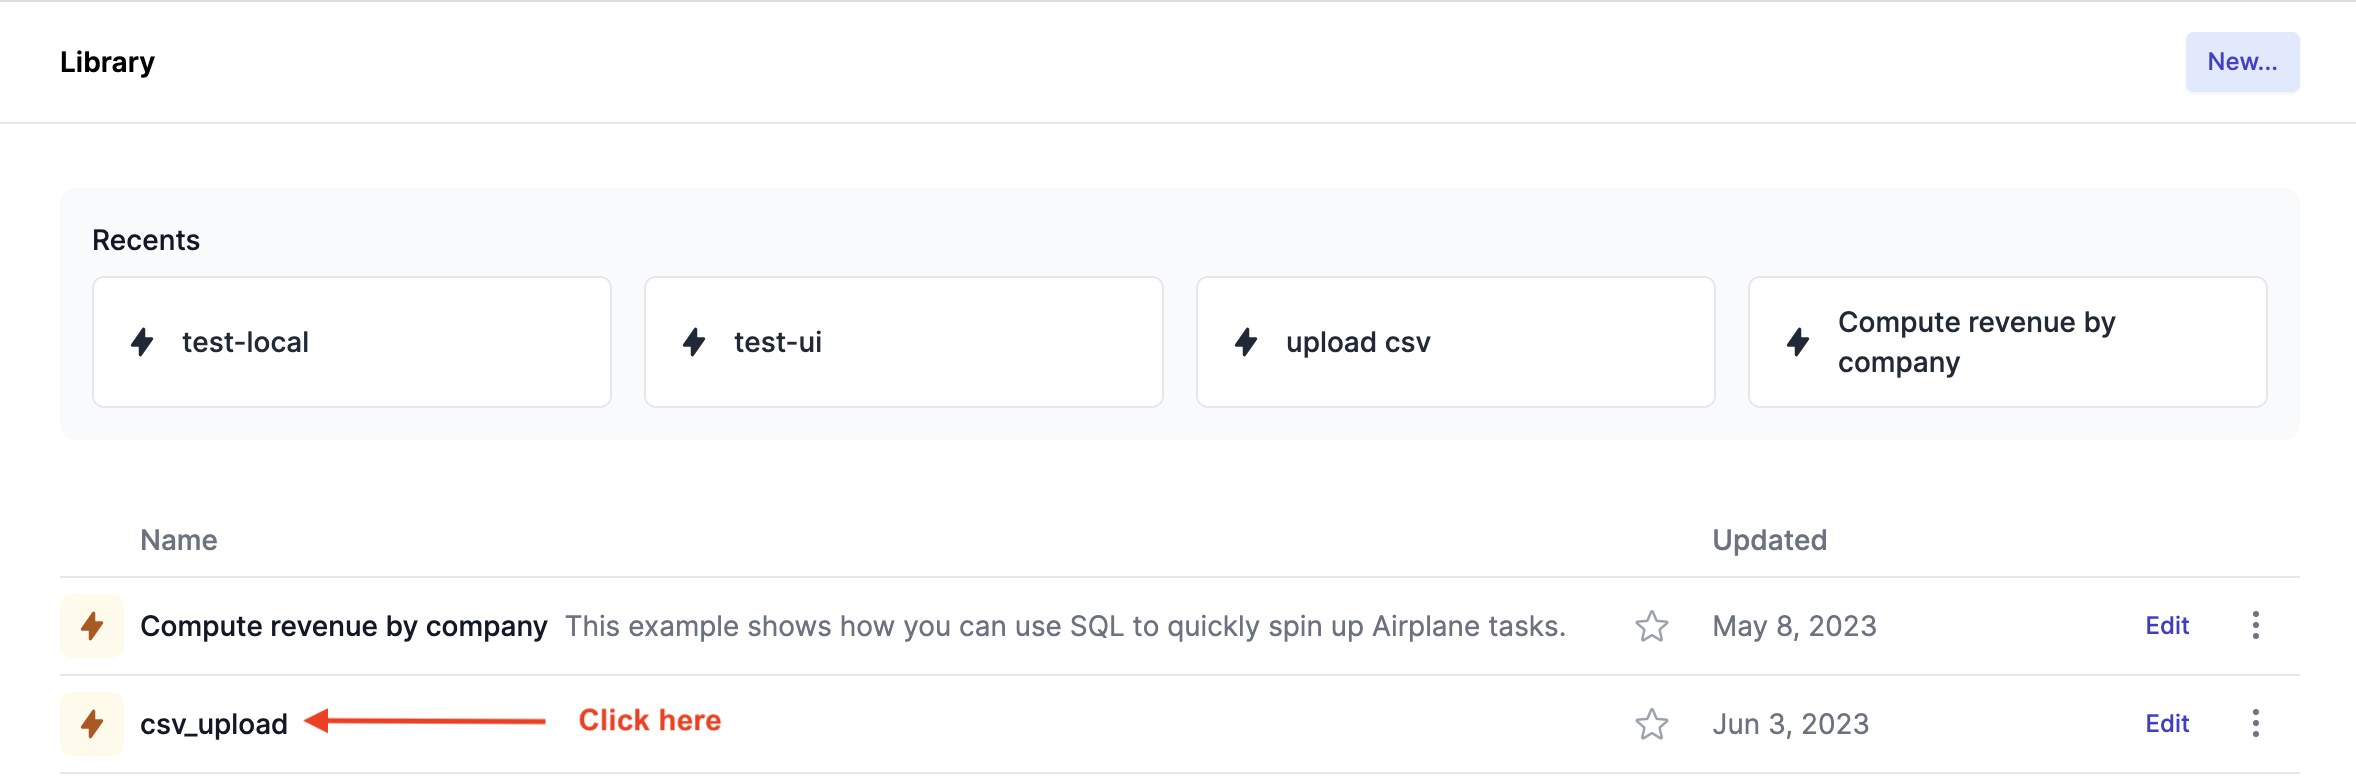
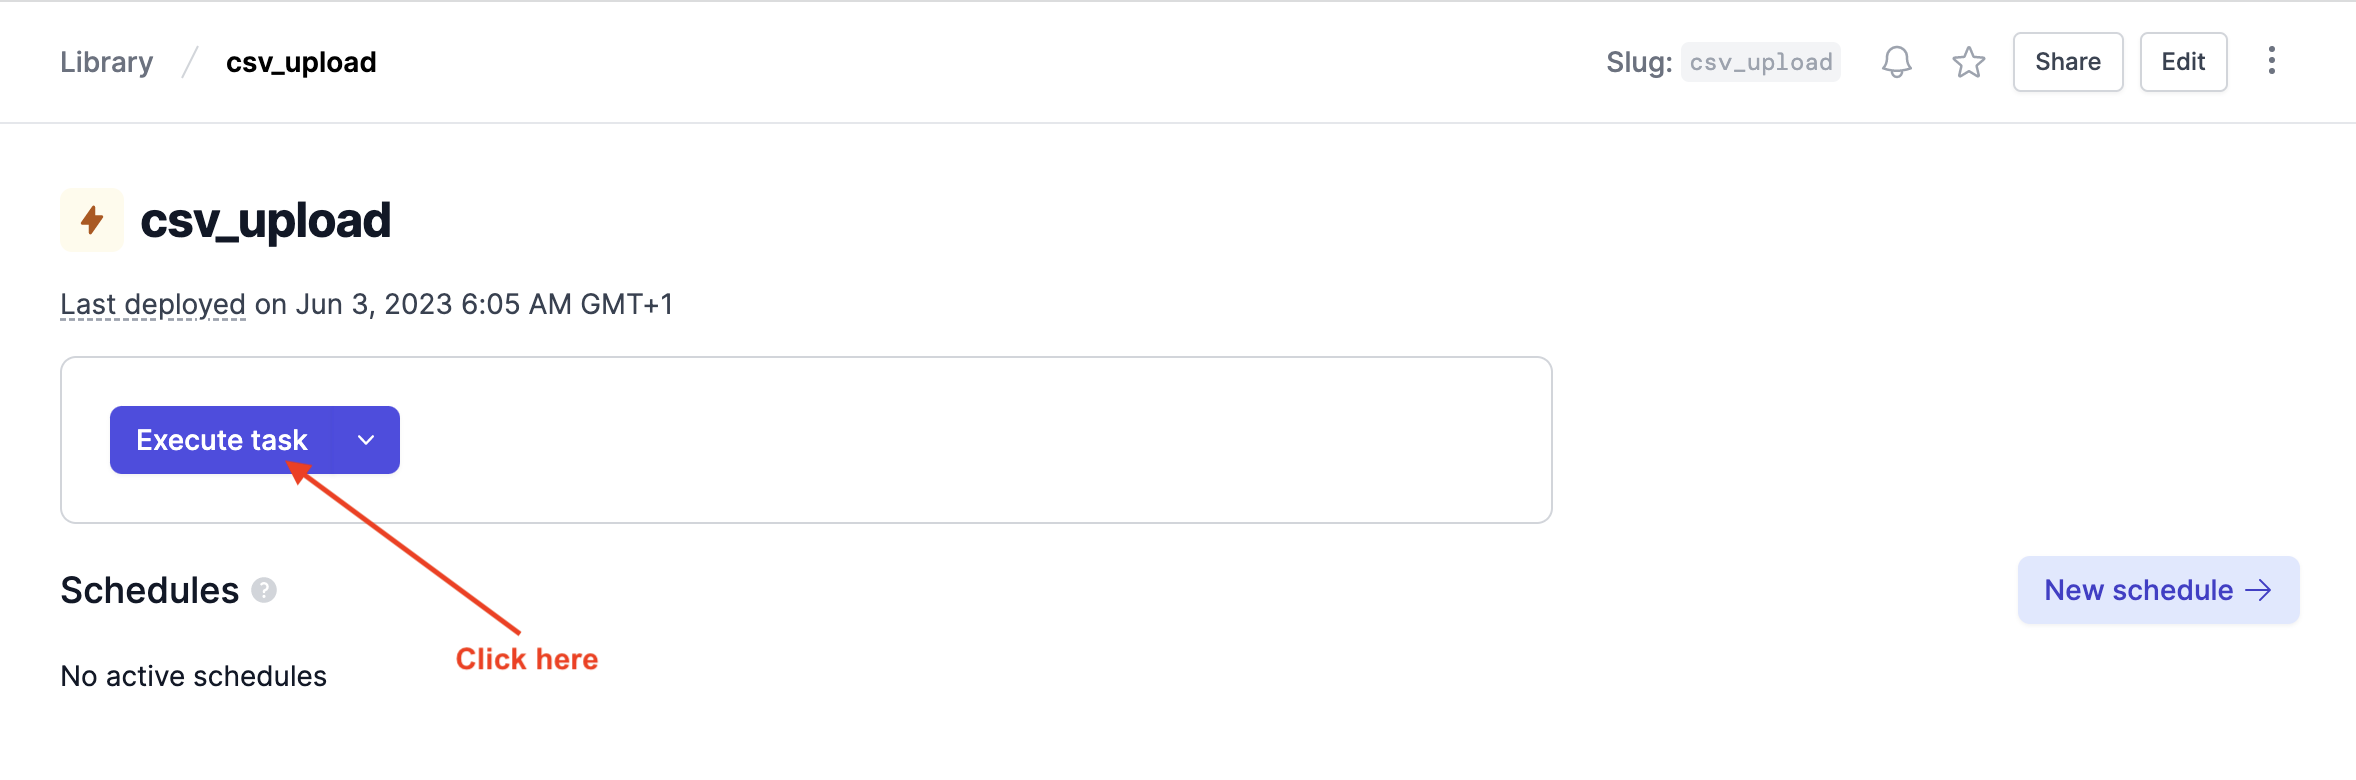
Go to the Library and click the deployed task:
On the task page, click Execute task to run it:
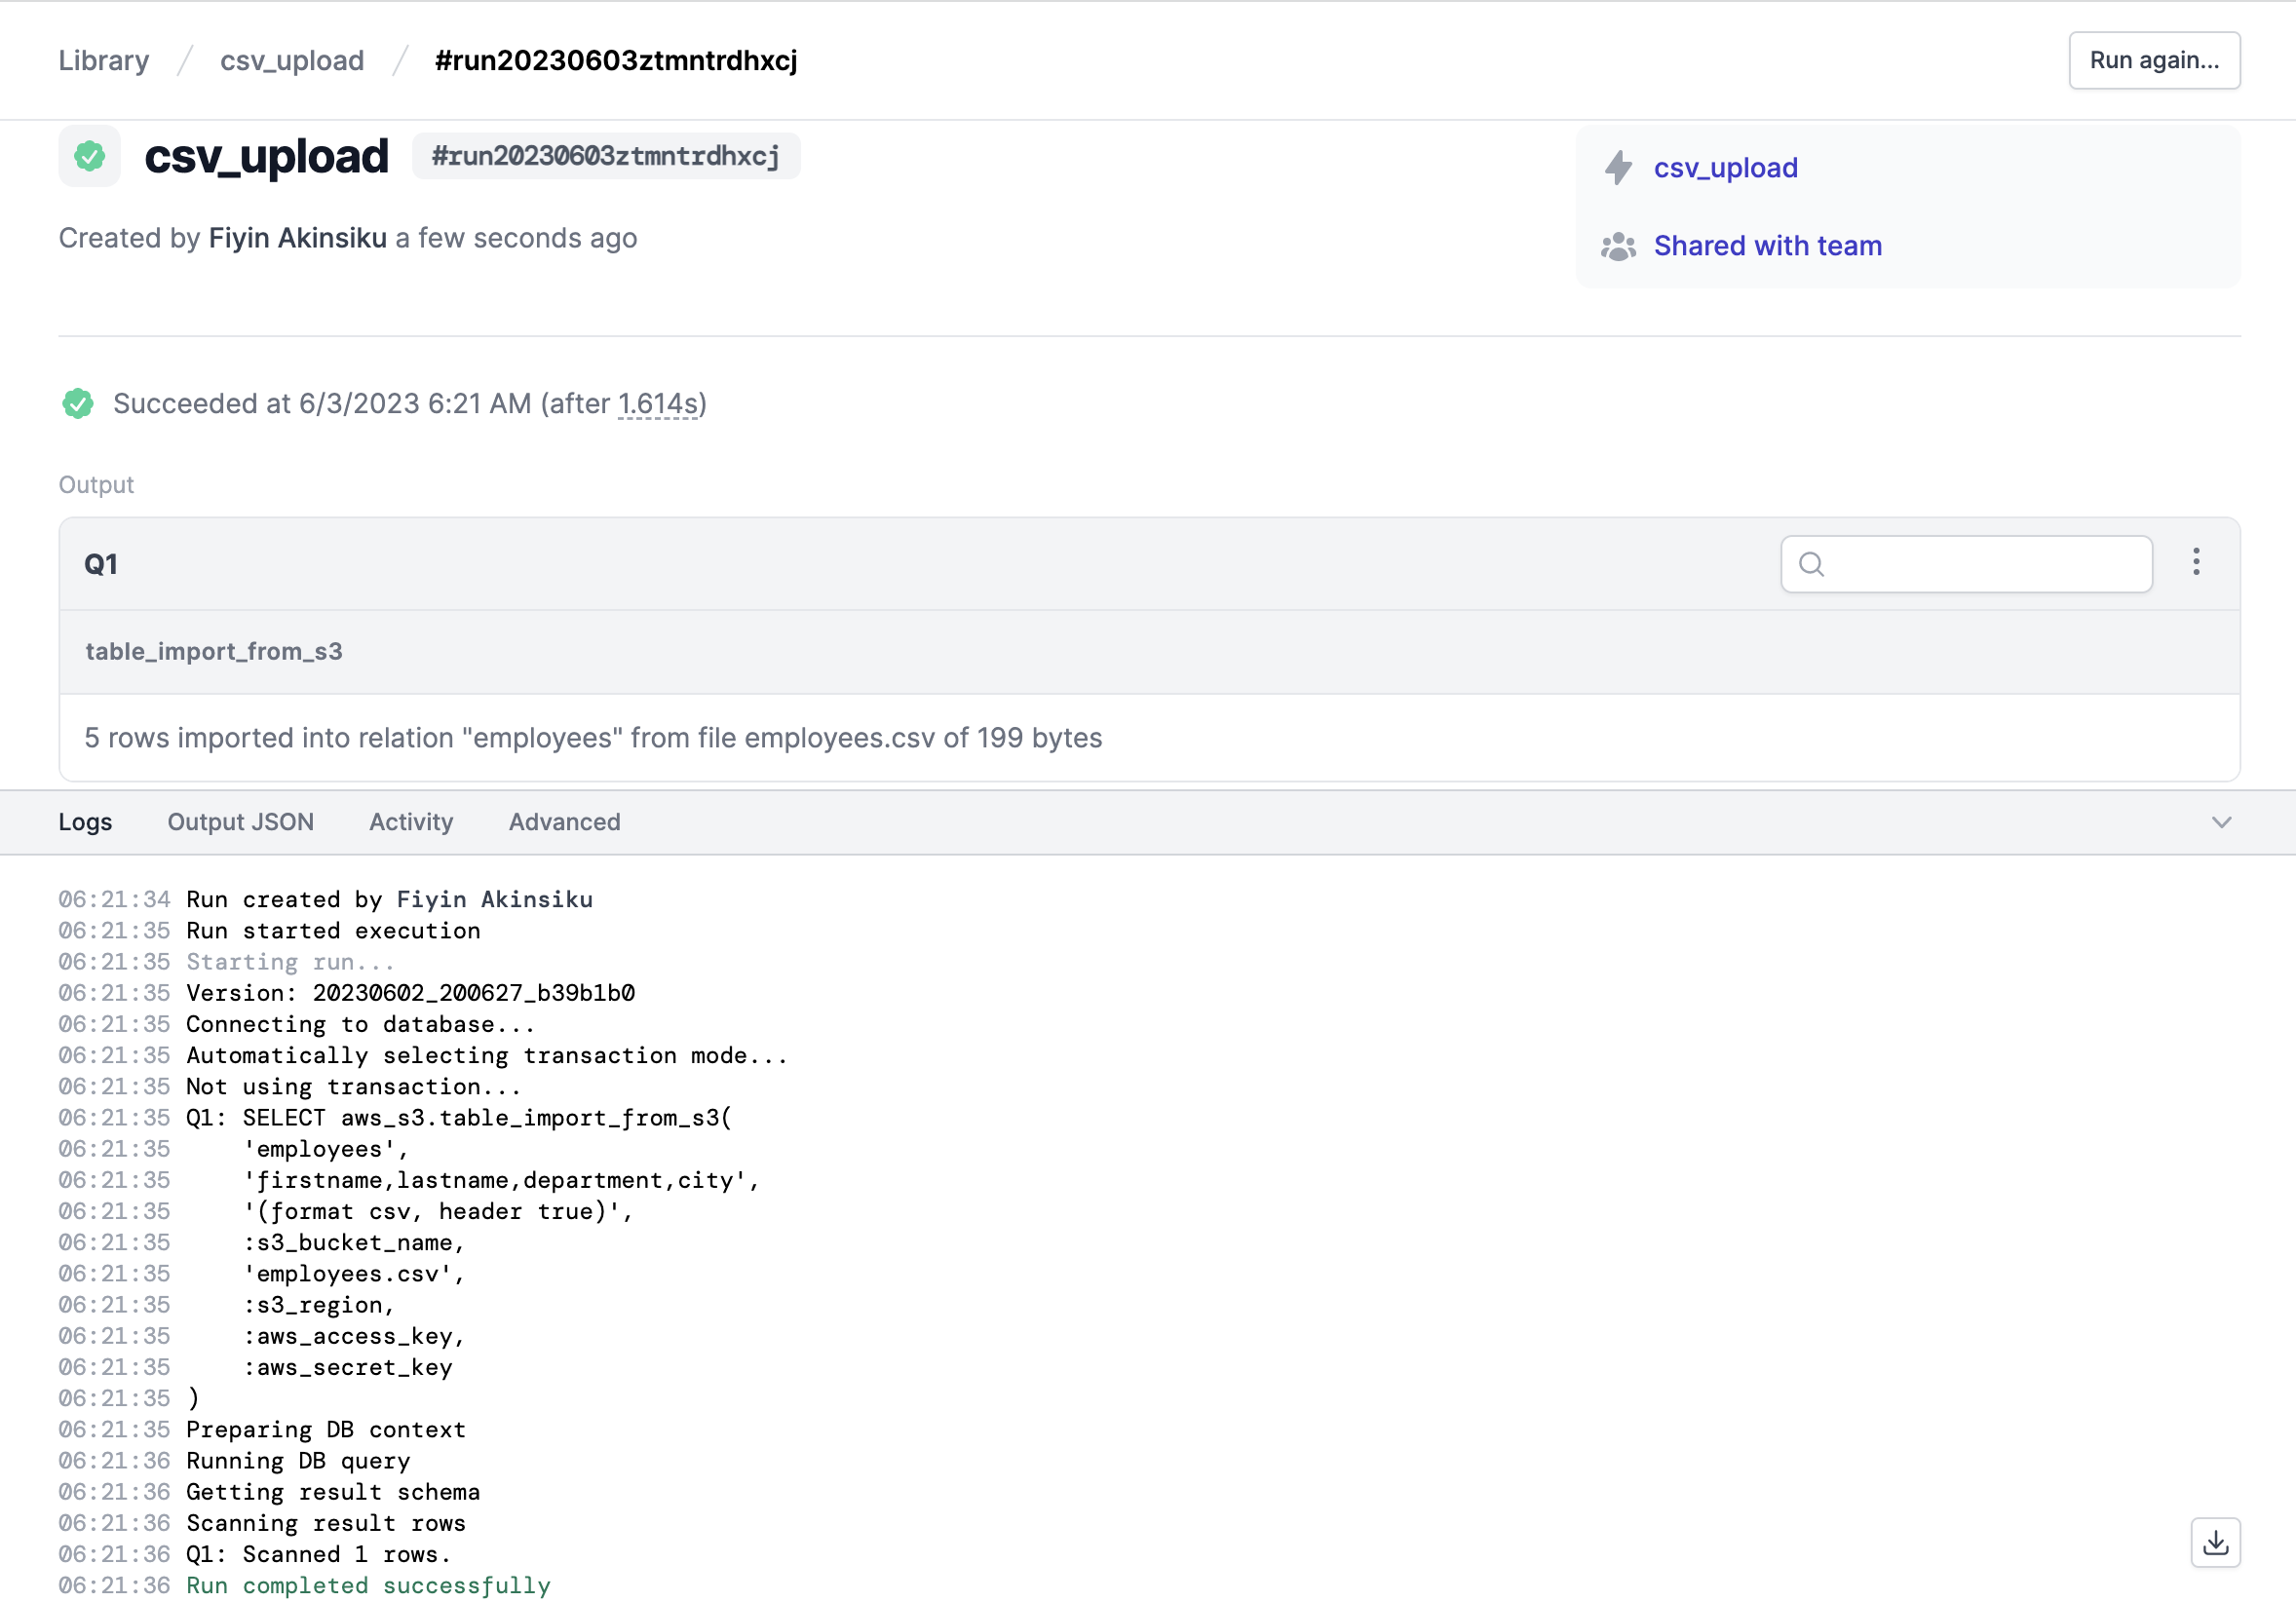
When the task is running, we should see a successful response, similar to the one shown in the Studio:
Airplane Tasks are an efficient way to interact with a database for many reasons. For example, we can make use of group- or user-based permissions that control task access and execution. Teams can employ this to enforce alignment with internal database security policies.
Airplane also supports the automated execution of recurring database operations via its Schedules feature. We could use a schedule to occasionally update a table with CSV file data. The database will stay effortlessly synchronized with the file and reflect updates over time.
Guidelines for working with CSV files
Working with CSV files requires specific techniques for optimal results. They include the following:
- Encode the CSV file in UTF-8: The UTF-8 format is currently one of the most popular encoding systems. It preserves the integrity of the original CSV data across multiple platforms as it supports almost every character, including special characters.
- Add a header row with descriptive titles: A header row must be the first line in the file. This row clarifies what each column represents, improving data interpretation.
- Choose a delimiter that does not conflict with the CSV file data: Despite being one of the most common delimiters, the comma (,) may not always be the most suitable choice. For instance, using commas as a delimiter can lead to data misinterpretation if the file has large numbers that use commas. Other delimiter options include the semi-colon (;) and pipe (|).
- Define the boundaries of column values with quotation marks: Quotation marks wrap together text that should be kept as one value, especially text that contains special characters, delimiters, or line breaks. For example, we should use quotation marks for a field value with embedded commas in a CSV file with the comma delimiter.
Conclusion
This tutorial covered various methods of importing CSV files into a PostgreSQL database, including Airplane Tasks. Airplane provides tools that improve team collaboration and productivity. By following the step-by-step instructions, you successfully executed a CSV file upload and can see the benefits that Airplane Tasks offer over other methods.
To try it out yourself and build your first Airplane Task, sign up for a free account or book a demo.
Author: Fiyin Akinsiku
Fiyin is a backend engineer who is continually impressed by the many ways technology makes life easier. Fiyin currently works as part of a fintech company and enjoys writing.


