

Despite the variety of databases in circulation, relational databases dominate the market because of their reliability and versatility. They're used by various businesses not only for their backend databases but also for analytics and reporting. Many use cases require business users to interact with the databases using SQL—creating temporary tables, summary tables, and so on.
The data in the database must be safe and secure, which is where backups come in. Database backups allow data to be restored from snapshots whenever required. Backups ensure that there's no data loss during a disaster and can be useful for experiments in a non-production environment.
MySQL is one of the most popular open-source relational database management systems. Although MySQL offers some built-in backup and restore options like mysqldump and integration with third-party tools like Percona XtraBackup, these options do not give direct control to data analysts and other business users to back up their data and restore it when required.
Airplane is a developer platform for building custom internal tools. You can utilize Airplane for compliance checks, to send reports, and to back up data easily. The basic building blocks of Airplane are Tasks, which are single or multi-step functions that anyone on your team can use. Airplane also offers Views, a React-based platform for building custom UIs quickly.
In this article, we will walk through how to use Airplane to build automatic backups for MySQL.
Building a backup solution with MySQL and Airplane
In this tutorial, we'll walk through how to build a backup solution for MySQL with Airplane by:
- Installing Airplane and MySQL
- Configuring MYSQL and creating a sample database to back up
- Creating a stored procedure to handle the backup
- Calling the stored procedure using an Airplane task
- Scheduling the Airplane task
Prerequisites
To complete the tutorial, ensure you have the following:
- A local or remote installation of MySQL
- The
classicmodelssample database schema with data - The Airplane CLI (a command line tool to interact with Airplane)
Throughout this tutorial, we'll use different commands, SQL scripts, and configurations. All of these are available in the airplane-mysql-backup GitHub repository. Use this repository to follow along. This tutorial uses macOS as the operating system, but you can achieve the same results on any operating system.
Configuring Airplane
Let's start by configuring Airplane. Doing this is a fairly straightforward process. First, install the command line tool using the following command:
If you are on an operating system other than macOS, check the documentation for alternative installation instructions.
Once we've installed Airplane, let's spin up a dev environment for Airplane on the local machine using the following command:
The output of this command is shown below:

Pressing the Enter key will redirect us to the Airplane web console, where we must log in to the Airplane account. Once logged in, a token will be transmitted to the CLI. After that, the work will be synced to the web console.
Configuring MySQL
If you are on a Mac-based system, use the following command to install MySQL:
If you are on another operating system, use the installation instructions mentioned in the official MySQL documentation. Then check if MySQL is running by executing the brew services list command.
Once MySQL is installed, we'll need to create a user for the Airplane application.
For simplicity, the following command creates a user called airplane with the password airplanedev and gives it read privileges on all schemas:
Though we've granted FILE privileges to the user, the user still won't be able to export data from MySQL because of the secure_file_priv option. This is enabled by default in a MySQL installation, which means that we cannot import or export data using the LOAD INFILE or SELECT * INTO OUTFILE commands.
To disable this option, locate and edit the my.cnf file to add the following line in the [mysqld] option:
Setting secure_file_priv to an empty string allows MySQL to export data anywhere on the file system. Alternatively, we can set this to a specific directory, which is the recommended method in a production environment.
After making any changes to the [mysqld] section in the my.cnf file, we need to restart the server for the changes to take effect. The following command restarts the server:
With MySQL installed and the option to read and write files to disk enabled, we can now create a stored procedure to back up the databases.
Creating a stored procedure to handle the backup
MySQL allows us to view data directly in a file or export data from a table. While MySQL supports various file types, this tutorial only uses CSVs.
To export data from a specific table (for example, exporting the customers table to customers.csv), we can use the following code:
If we don't specify a directory, the CSV files are written to the default directory on the disk. To find the default export path, let's run the following SHOW VARIABLES command:
datadir represents the disk location where the table data resides. To avoid confusion with table data files, we should keep the CSV exports in a separate directory. We can specify the export directory at the time of export, as shown in the following command:
Now, utilizing the SELECT * INTO OUTFILE syntax, create the stored procedure to back up the classicmodels database using the backup_procedures.sql script in the GitHub repository. We'll need to run that script as a SQL statement in the SQL IDE. The procedure loops through every table in the classicmodels schema one by one and exports it as a CSV.
We can check out the complete code of the stored procedure here.
Calling the stored procedure from an Airplane SQL Task
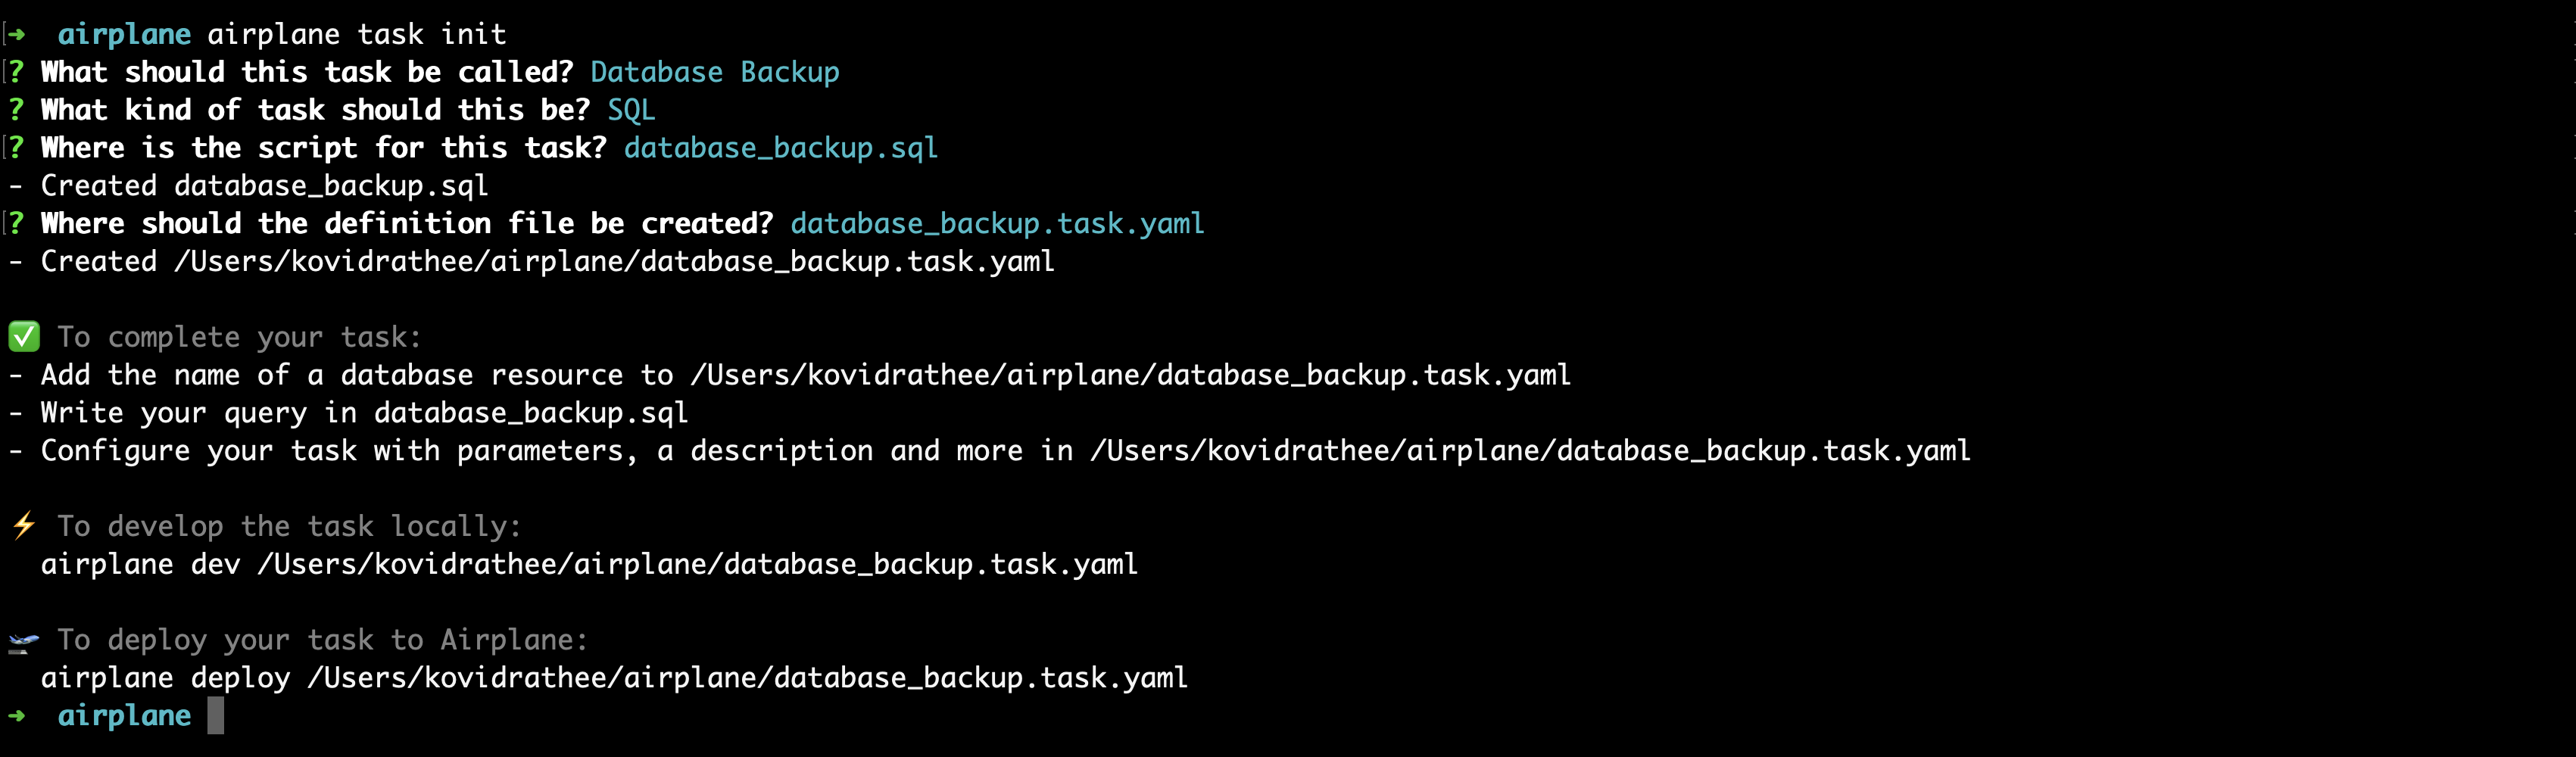
We'll wrap an Airplane Task over the MySQL stored procedure. This task can be manually run or scheduled using the Airplane scheduler. Create an Airplane SQL task from the Airplane CLI using the following command:
This will result in the creation of two files in the working directory:
database_backup.sql, which contains the SQL code we want to execute in this taskdatabase_backup.task.yaml, which contains the configuration for the task that specifies which data resource we want to run which SQL script
The output of the command is shown in the image below:
To call the stored procedure, make the following changes to the database_backup.sql file:
Then, replace the contents of the database_backup.task.yaml file with the following configuration:
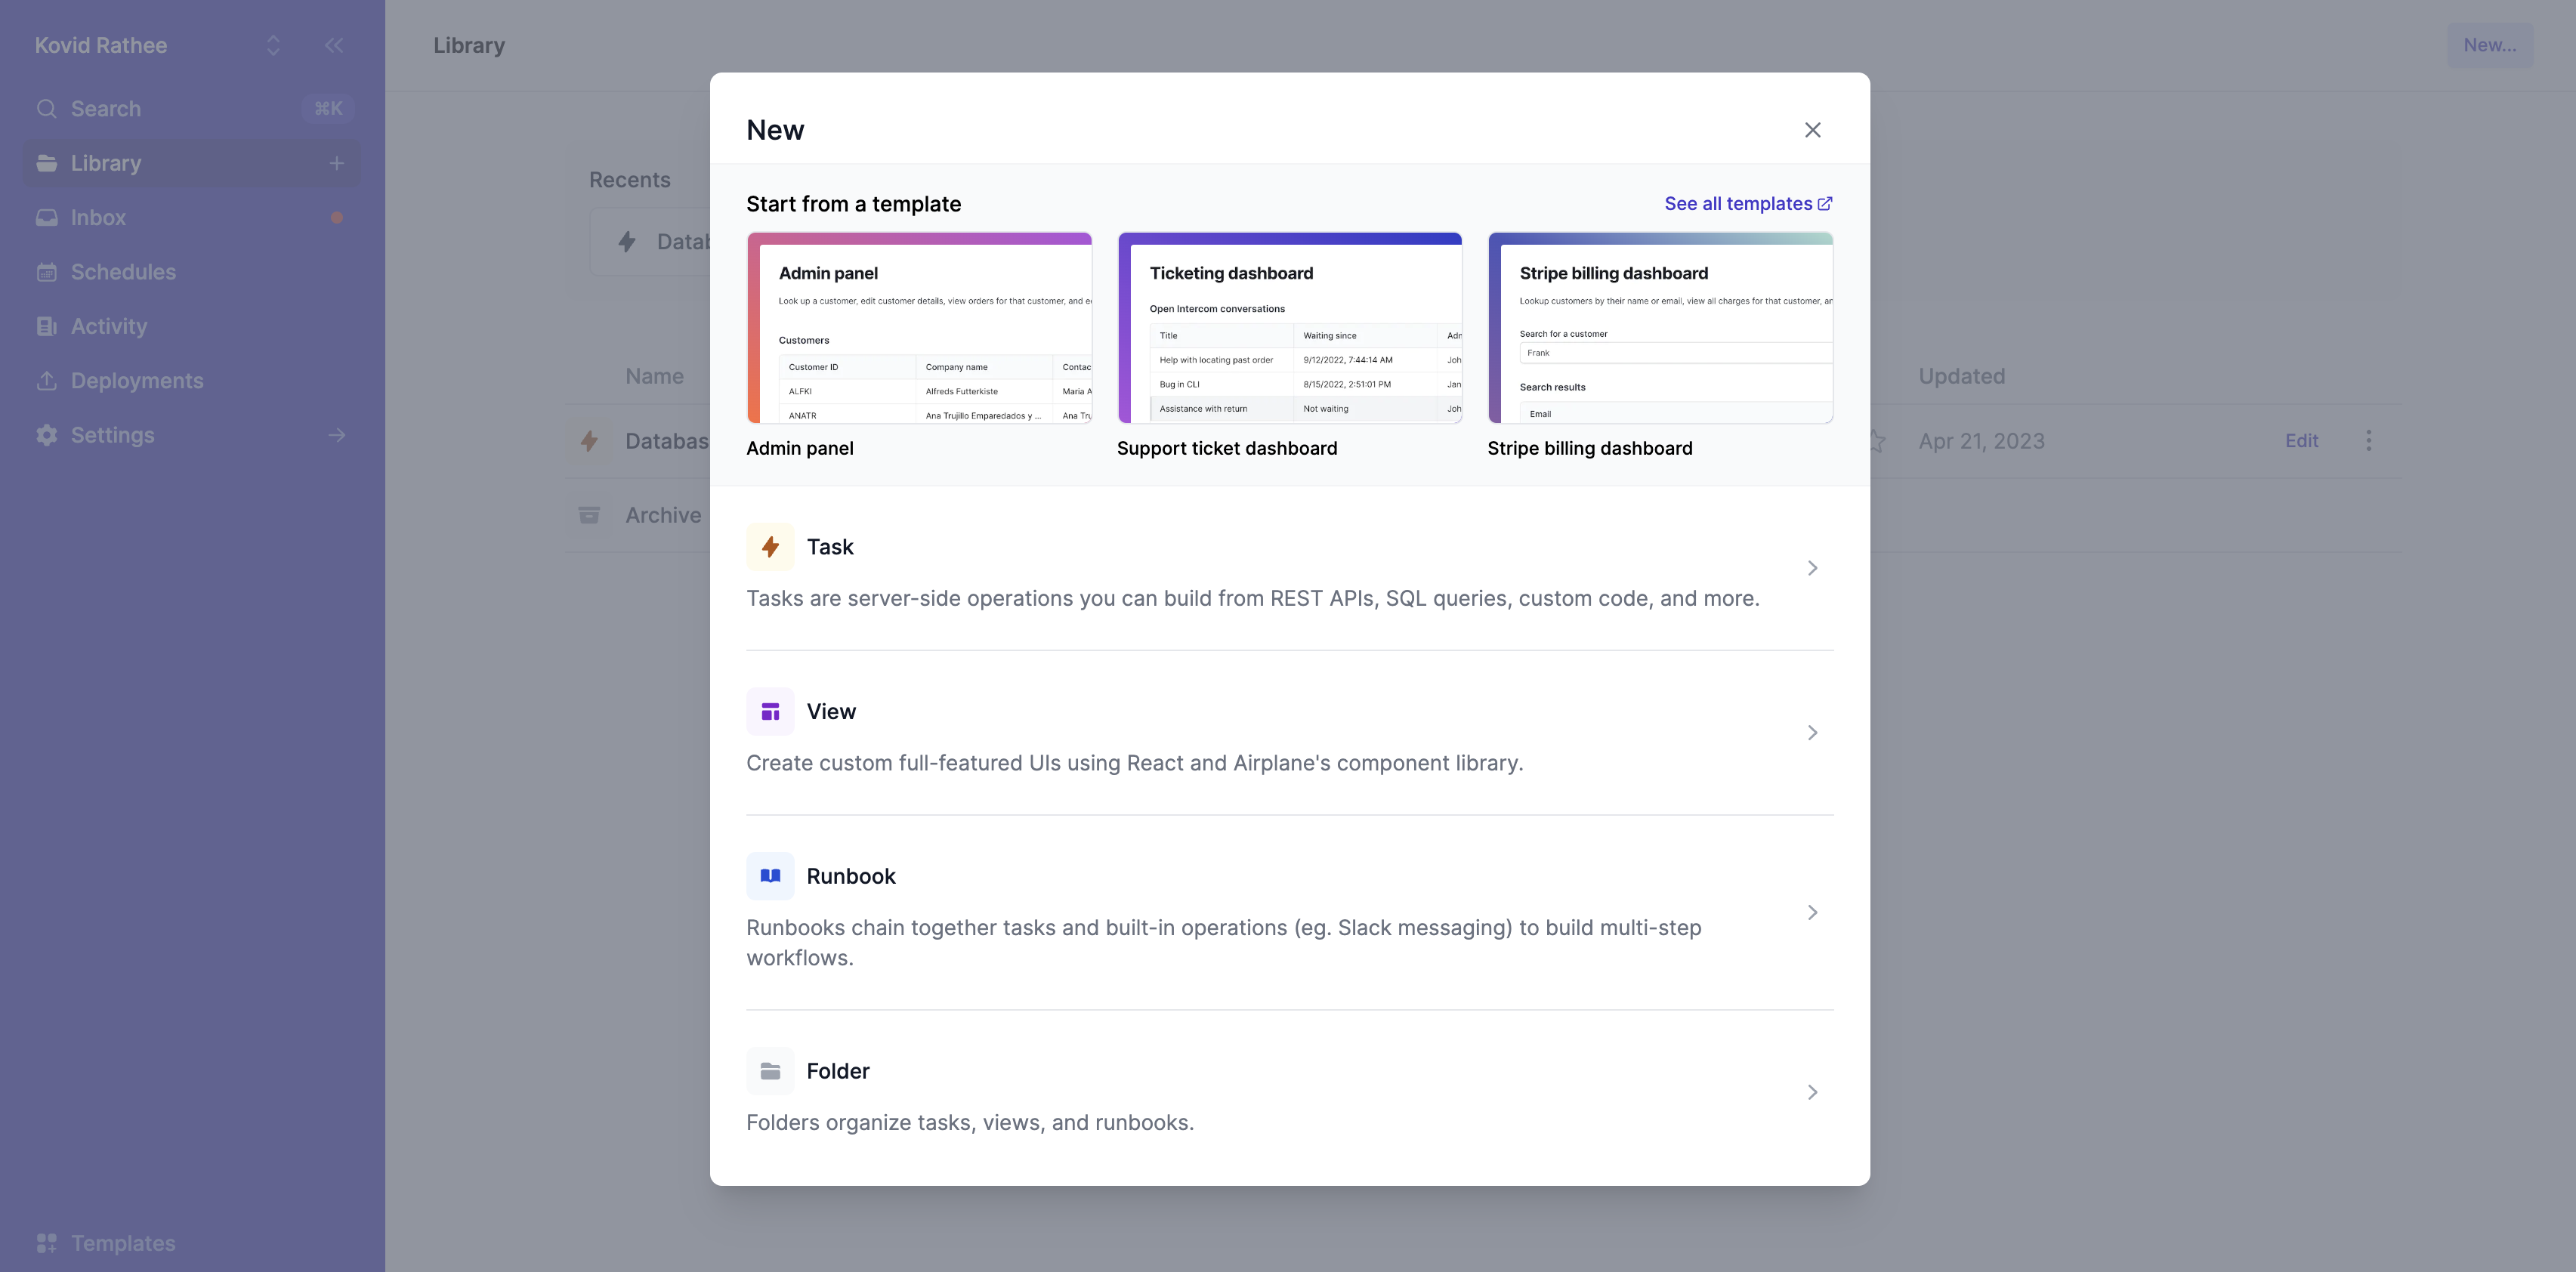
We can also build this SQL task via the console. To do so, create a new SQL task by opening the Airplane dashboard and clicking the + button on the Library menu item in the left panel, as shown in the image below:
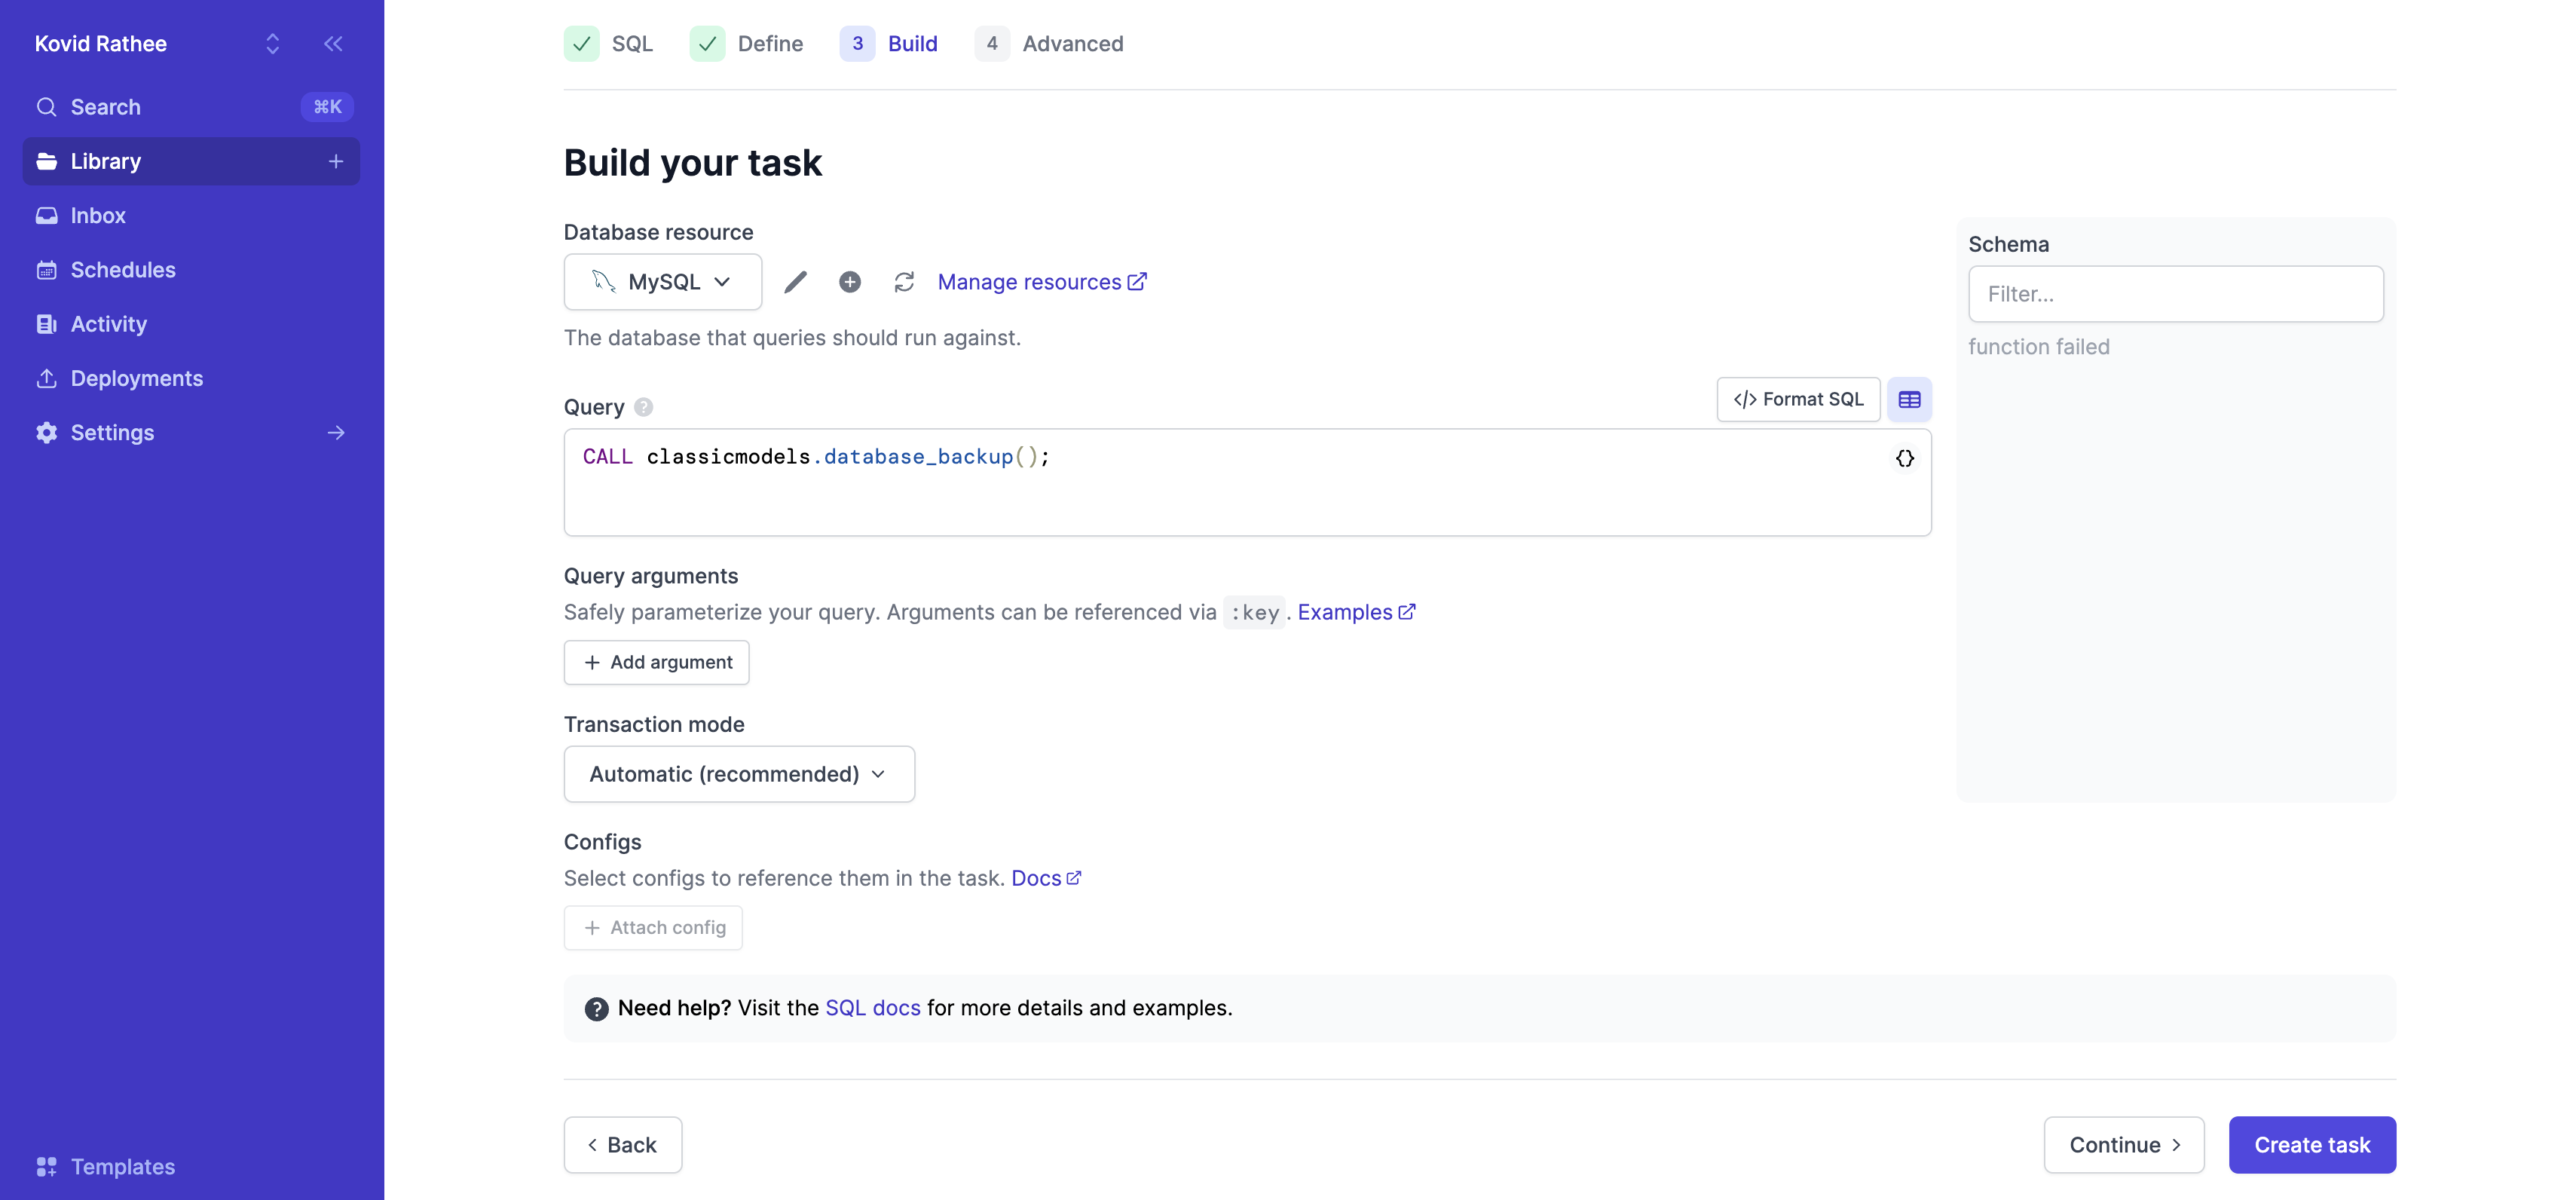
We can then configure the new SQL task to call the database_backup stored procedure, as shown in the image below:
This method will also generate the two files discussed earlier.
Setting up a schedule for the backup
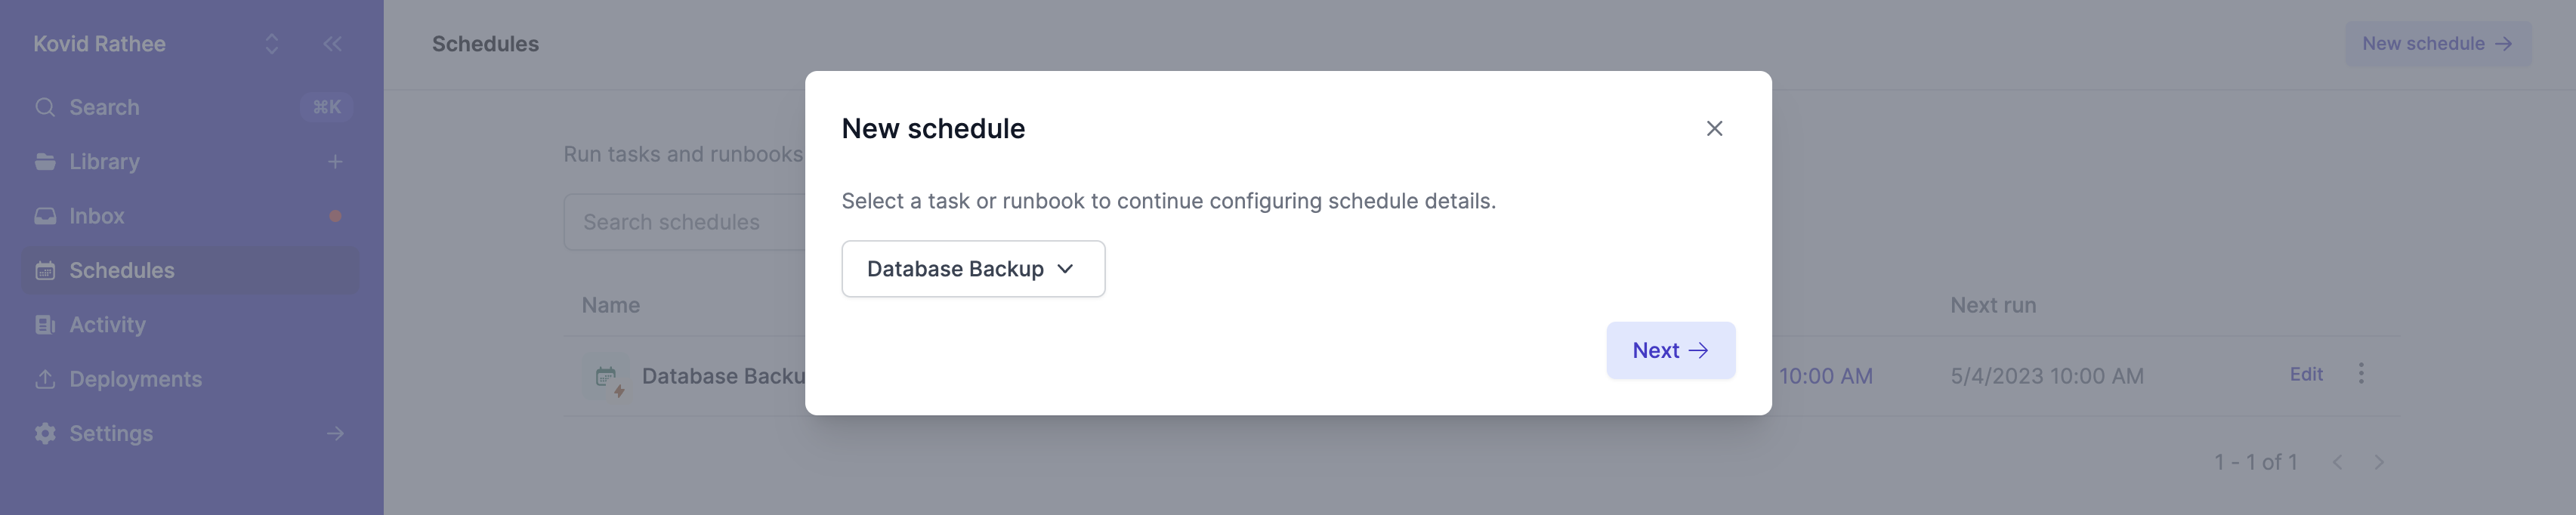
Airplane provides an internal scheduler that lets us define a schedule using either dropdown menus or a cron expression. To create a new schedule, go to the Schedules menu item on the left panel of the console and press the New schedule button on the top-right of the screen, as shown in the image below:
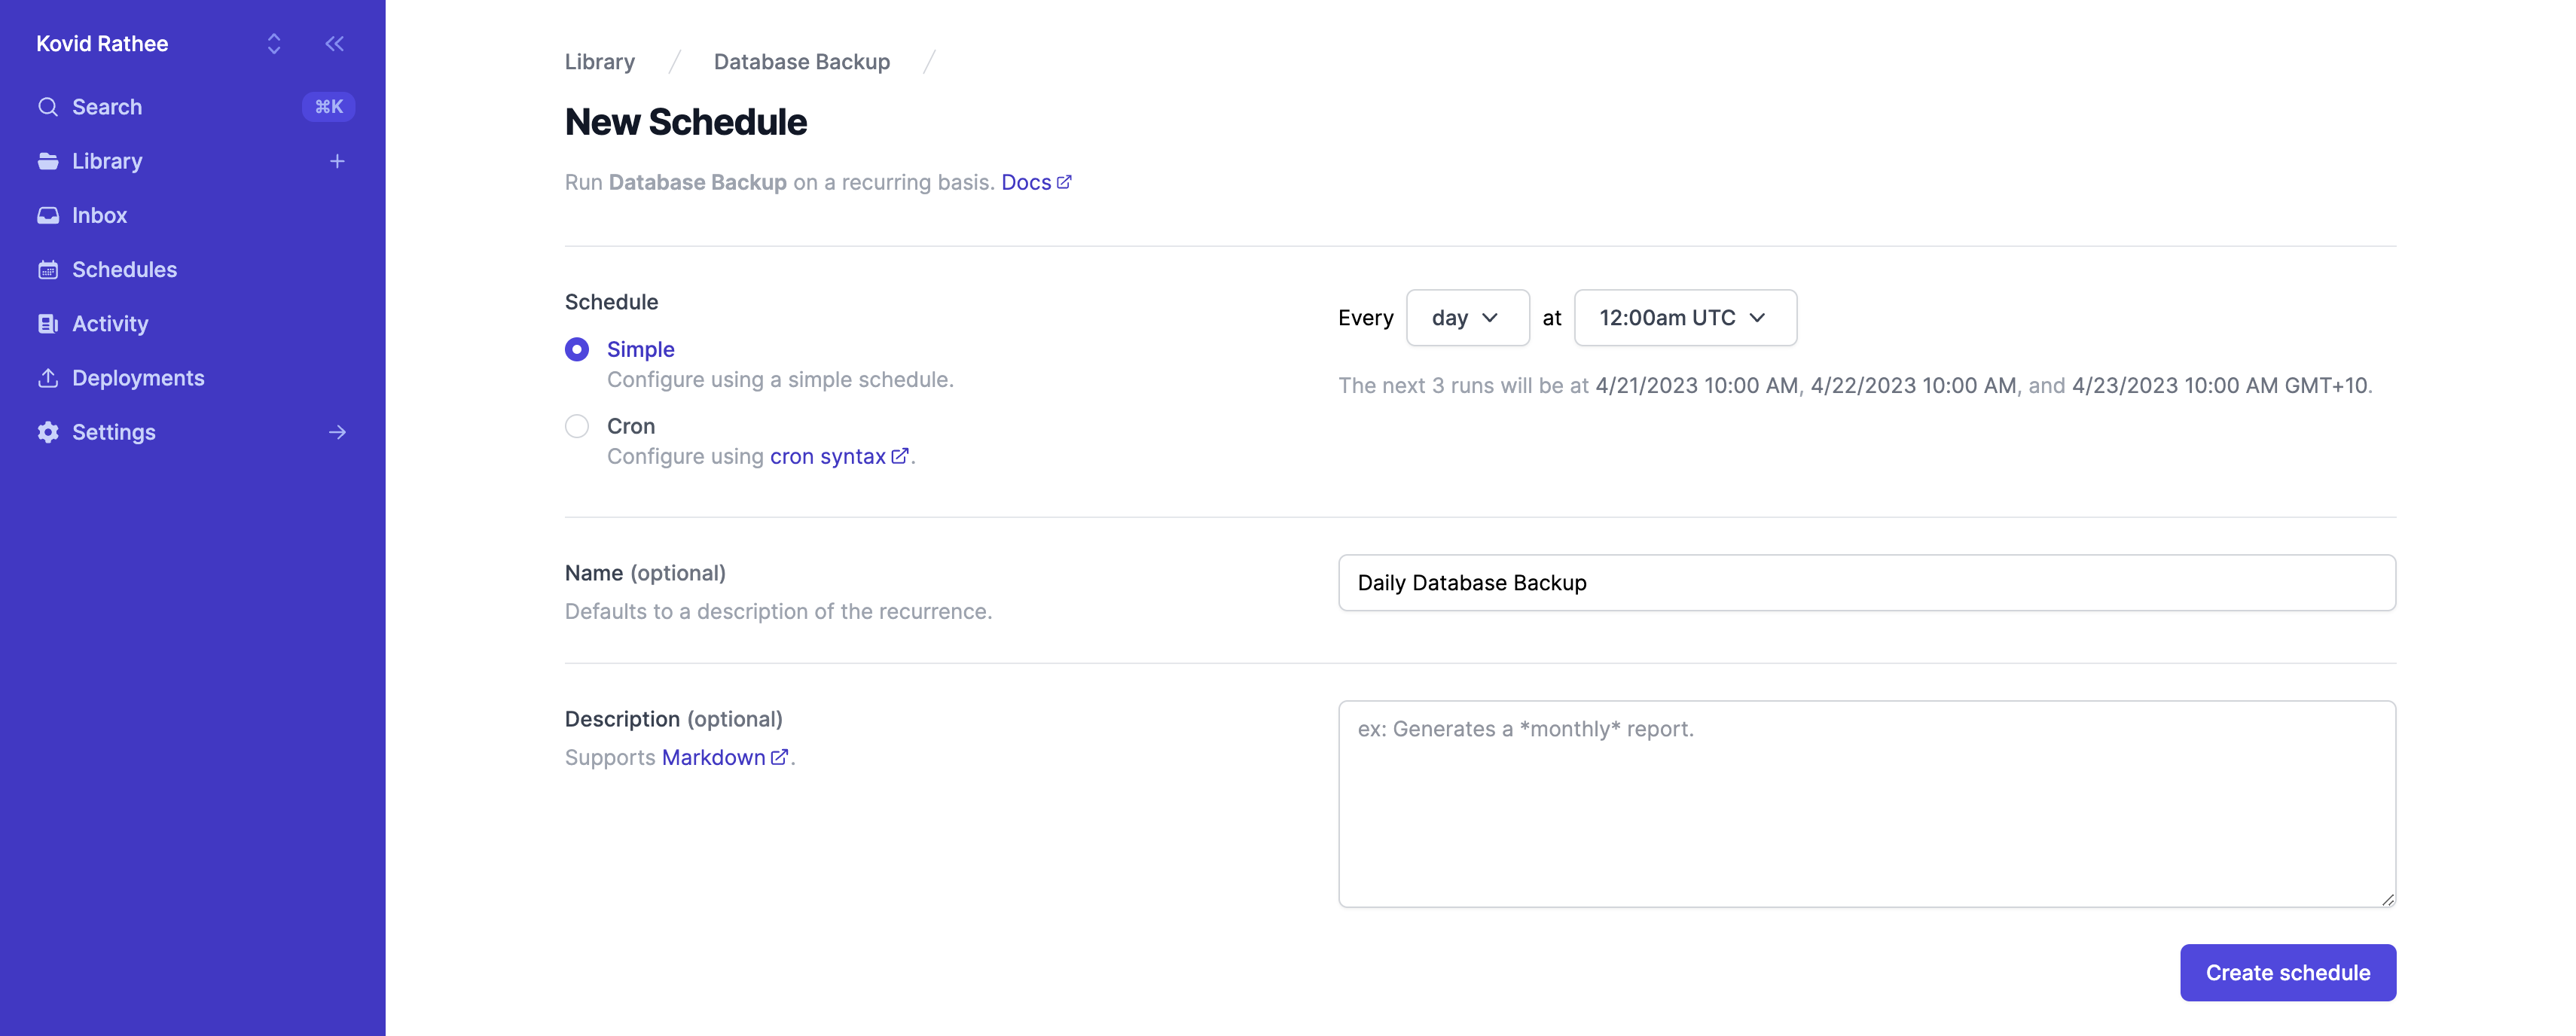
Now, configure the new schedule:
Once the schedule is created, the tasks are executed based on that schedule.
Deploying the Task using the Airplane CLI
If we've developed the task using the Airplane CLI, we must deploy it to the Airplane server before we can run it. To develop the task locally, we'll use the airplane dev command, and to deploy it, we'll use the airplane deploy command, as shown in the image below:
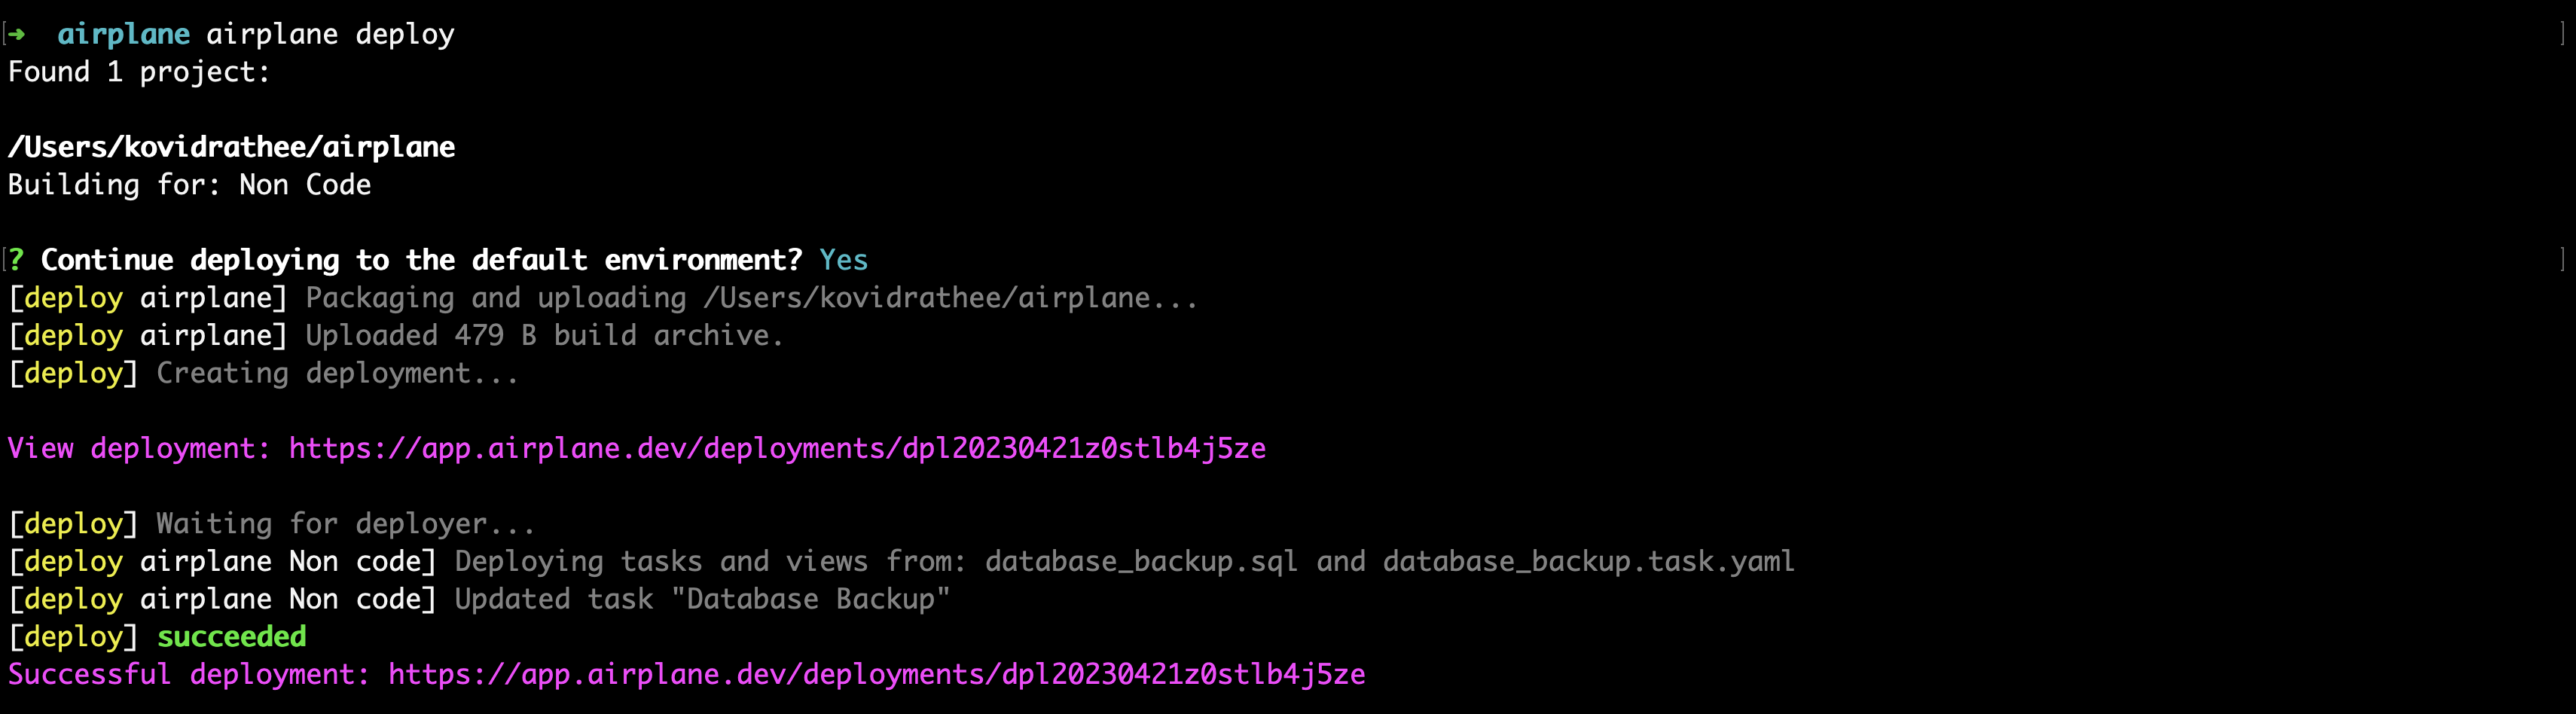
During the deployment or after its completion, we can visit the deployment URL to see the status along with other information, such as logs. We can find the deployment URL in the image above, where it says View deployment:

If the deployment is successful, we can run the database backup task manually or on a schedule.
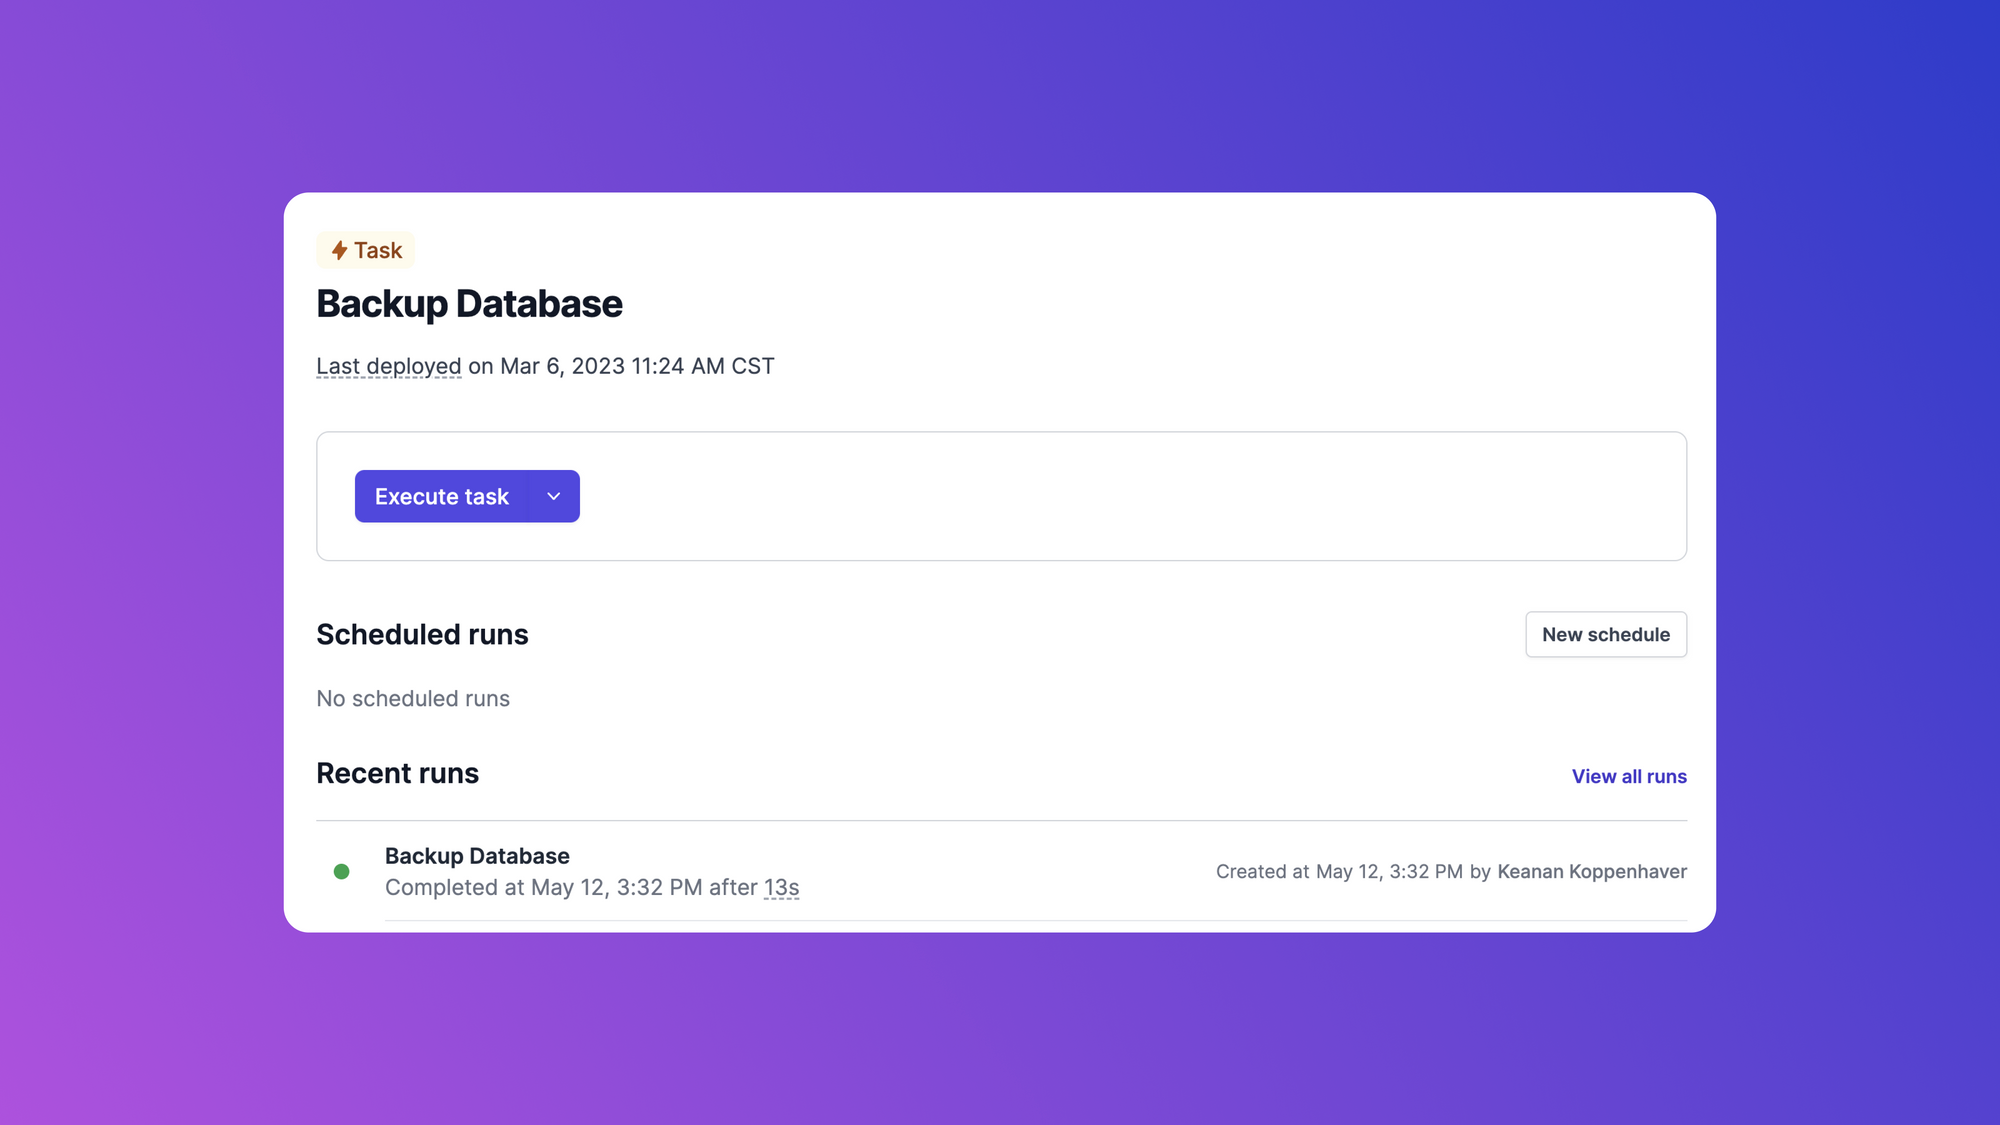
Demonstrating the Task in Airplane
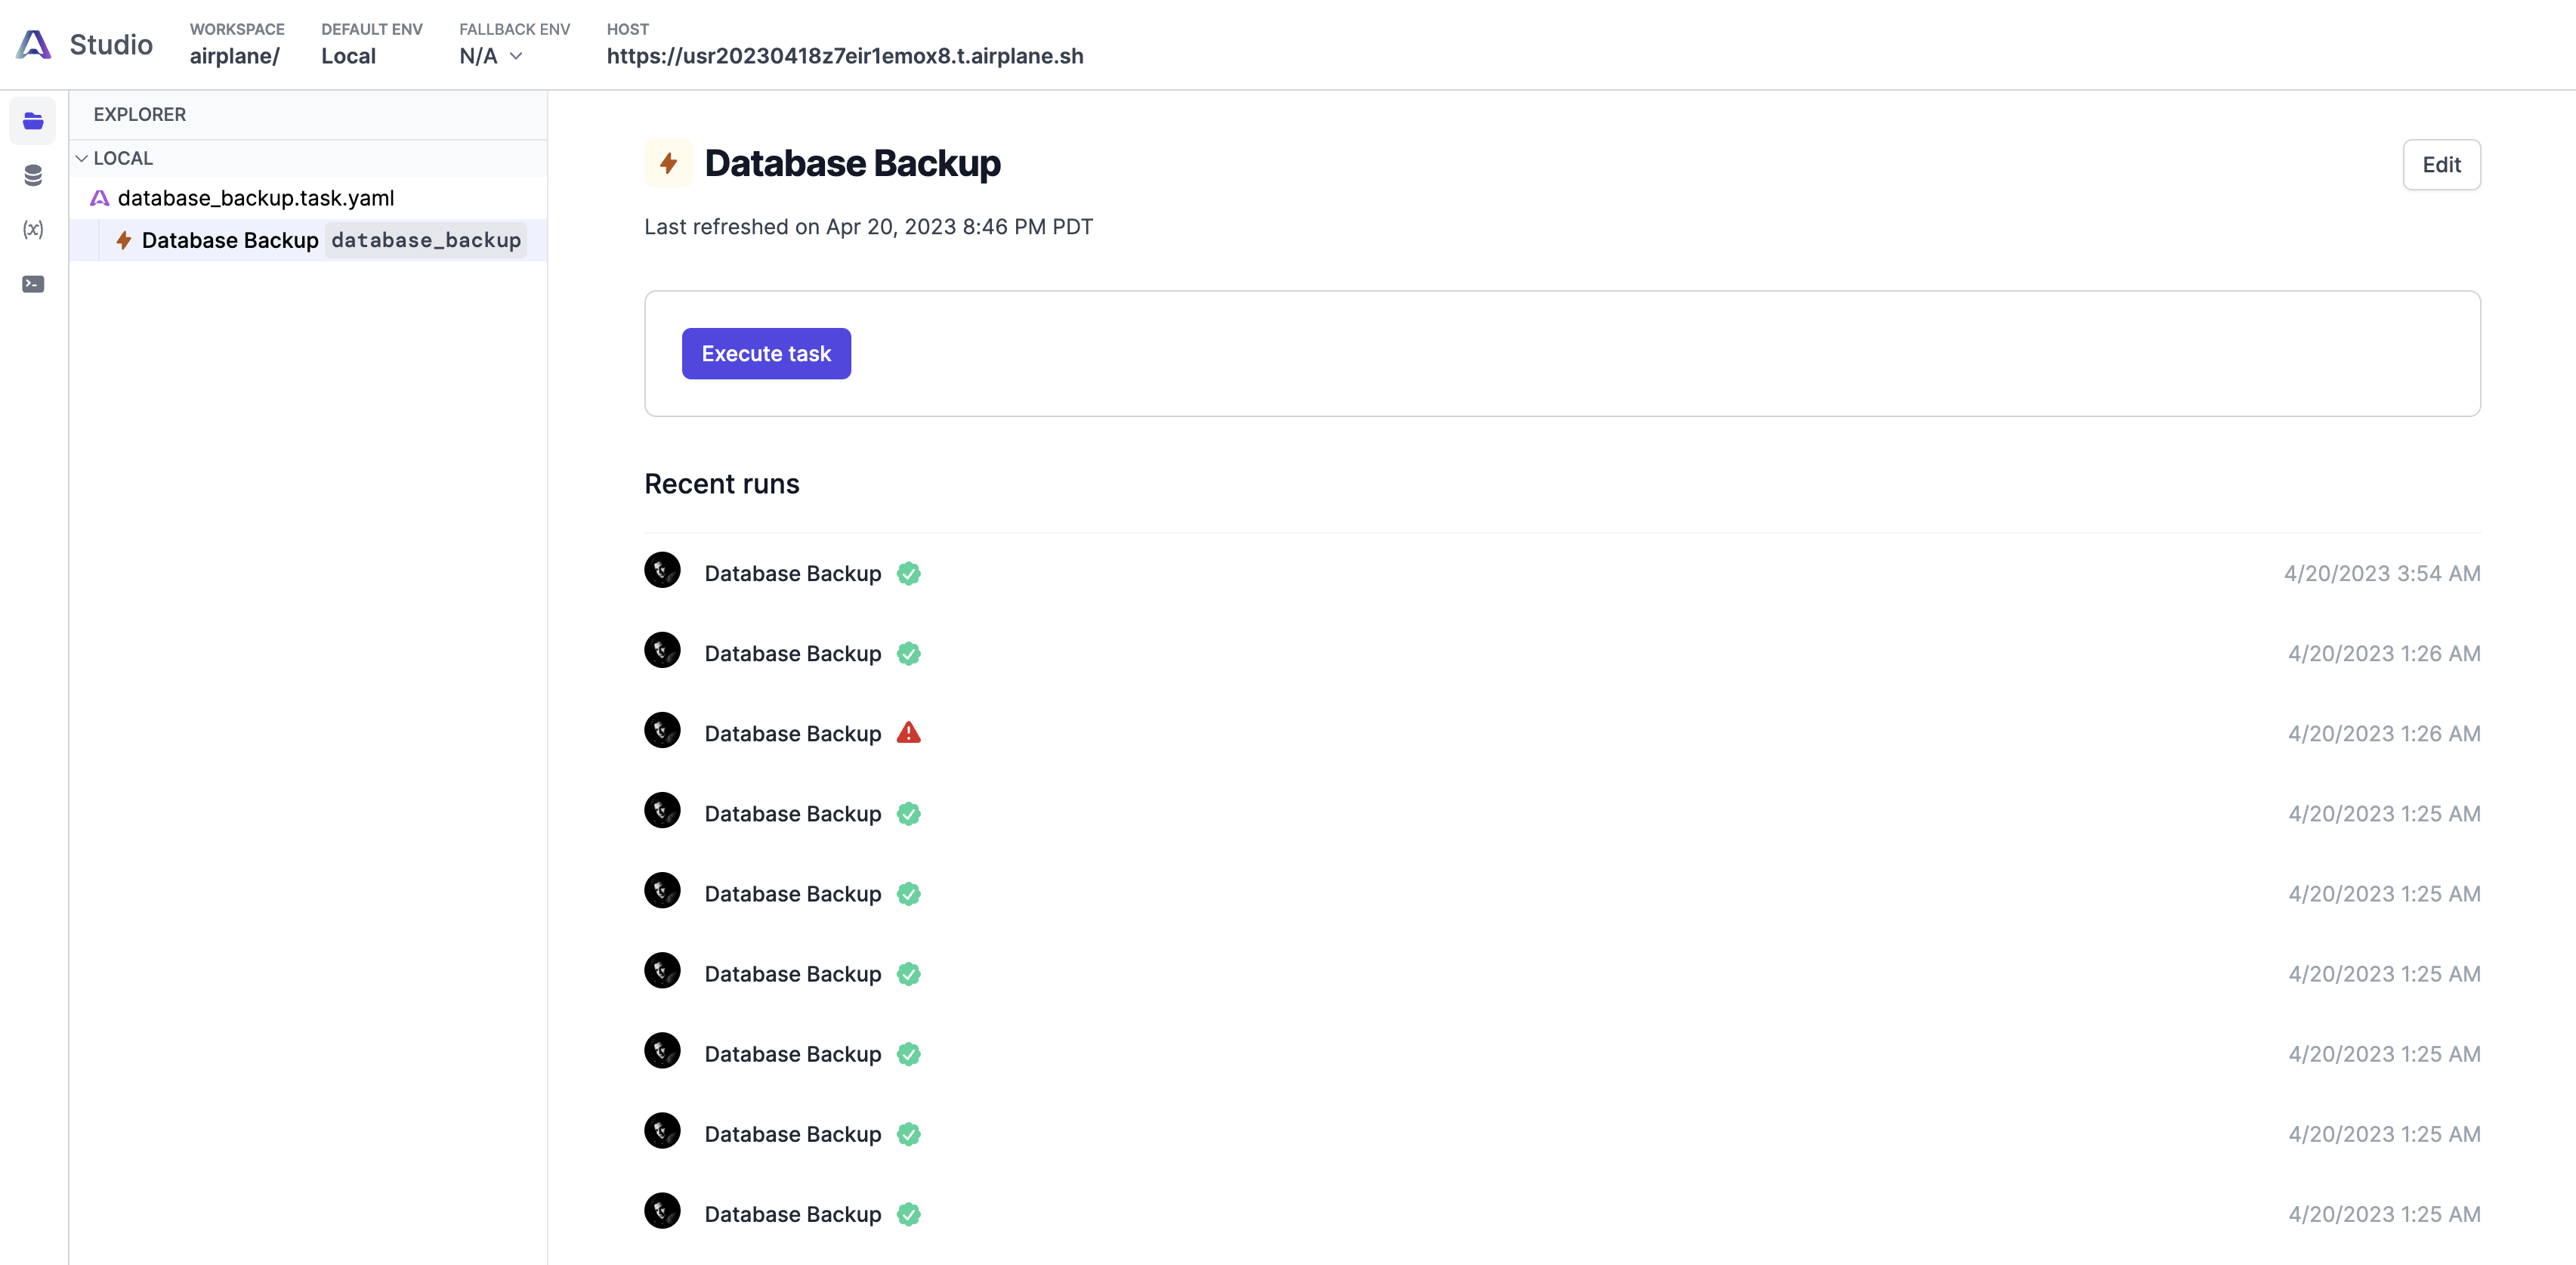
The task is now ready to be executed. A successful run of the database backup task in the dev environment looks like this:
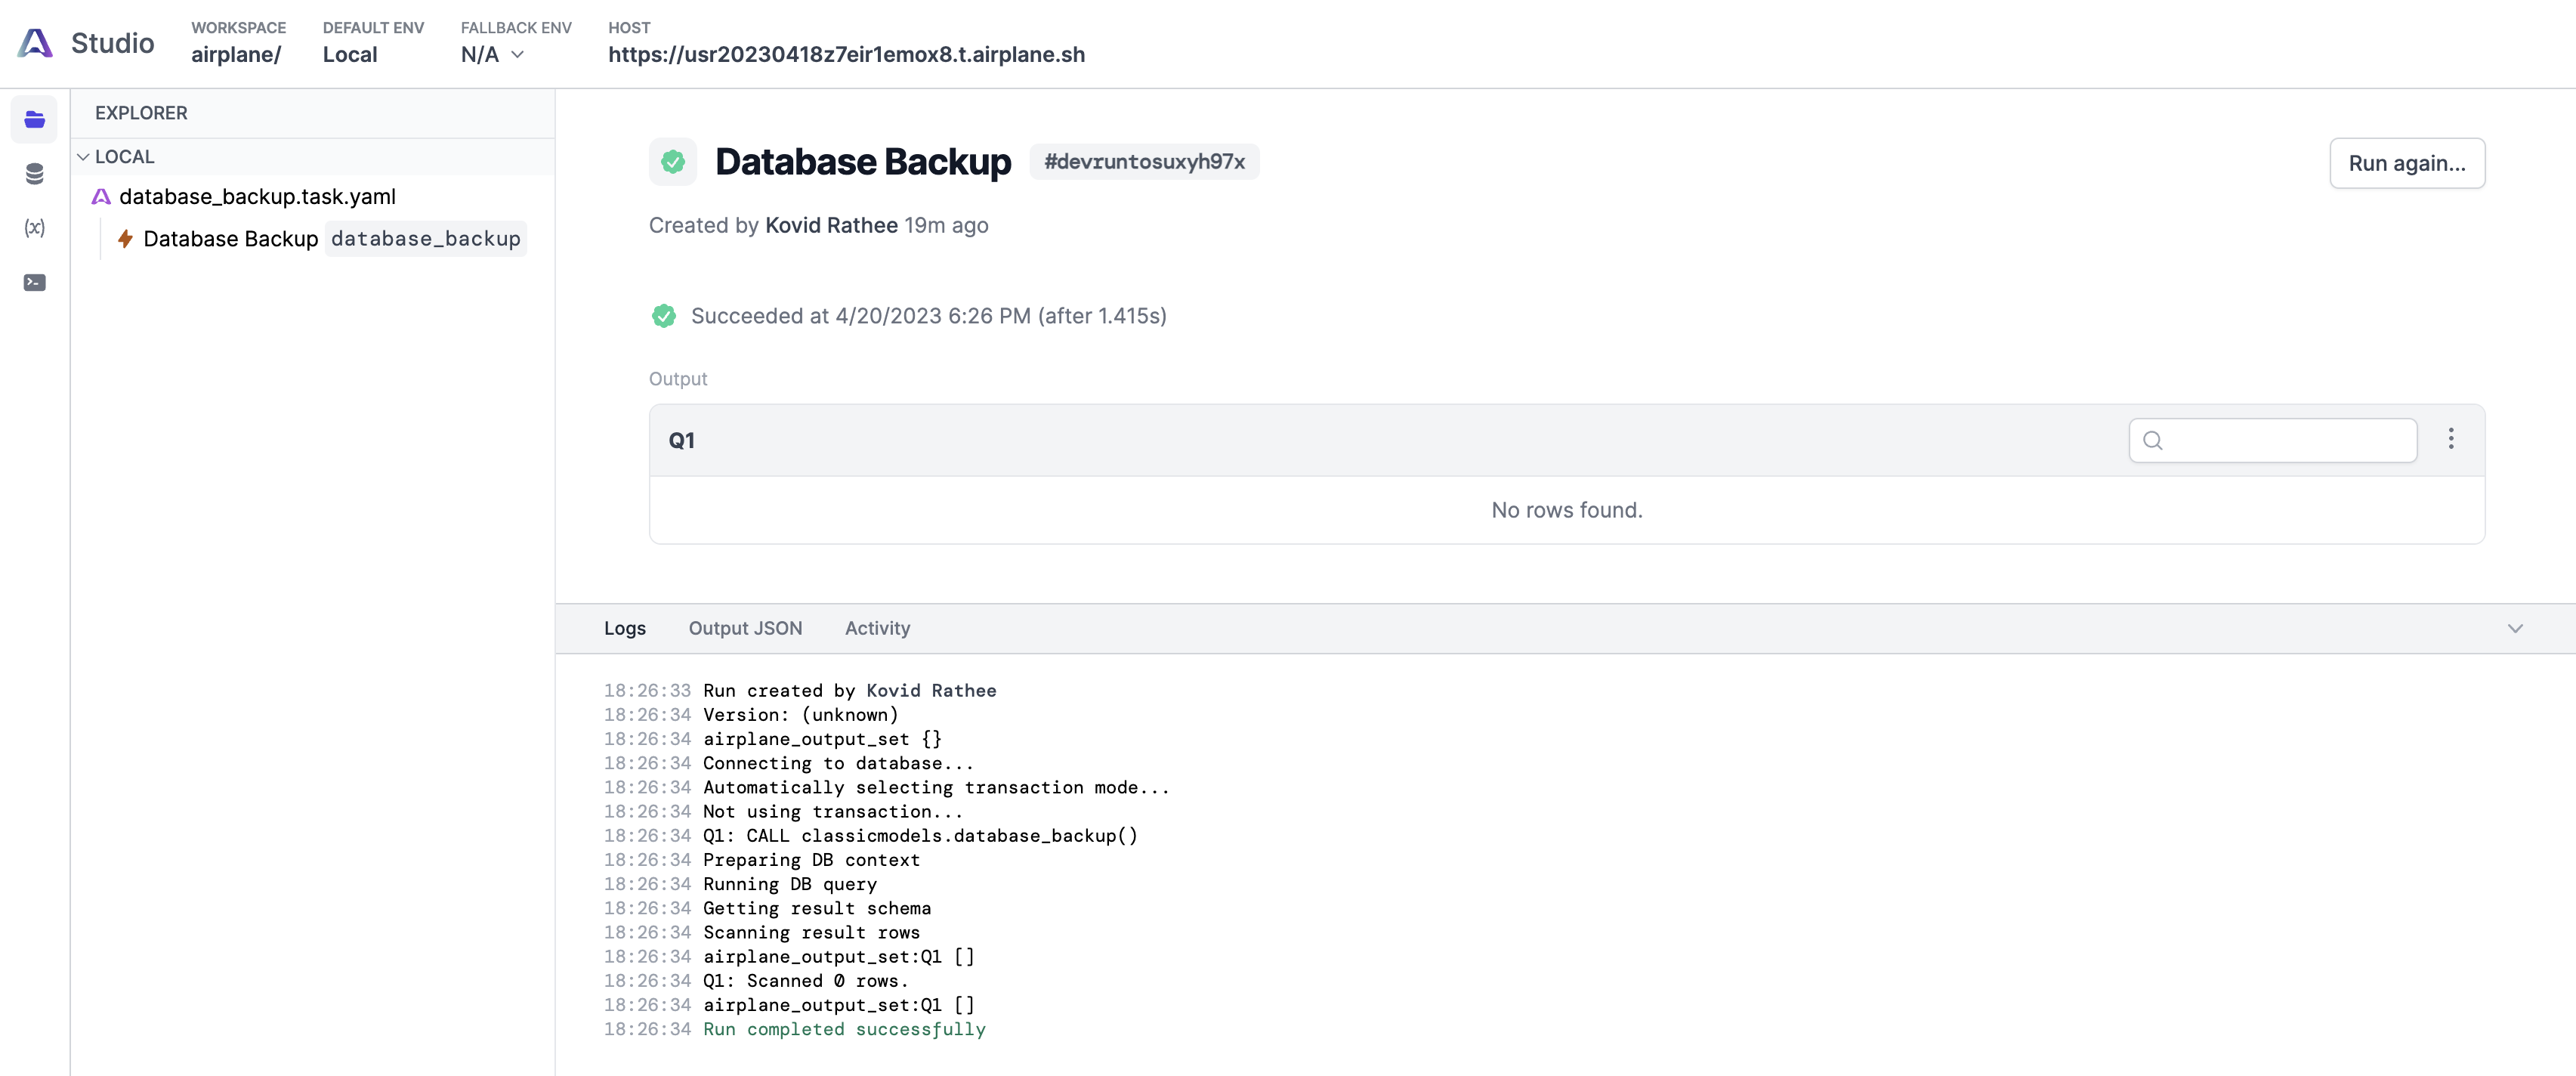
Various runs of the task, scheduled or otherwise, will be listed on the Activity page of the console and via the Airplane Studio IDE, as shown in the image below:
It's important to note that the stored procedure used to export tables to CSV files does not check if a previous export already exists in the directory. This means that if we run the export process multiple times, we may encounter the following error:
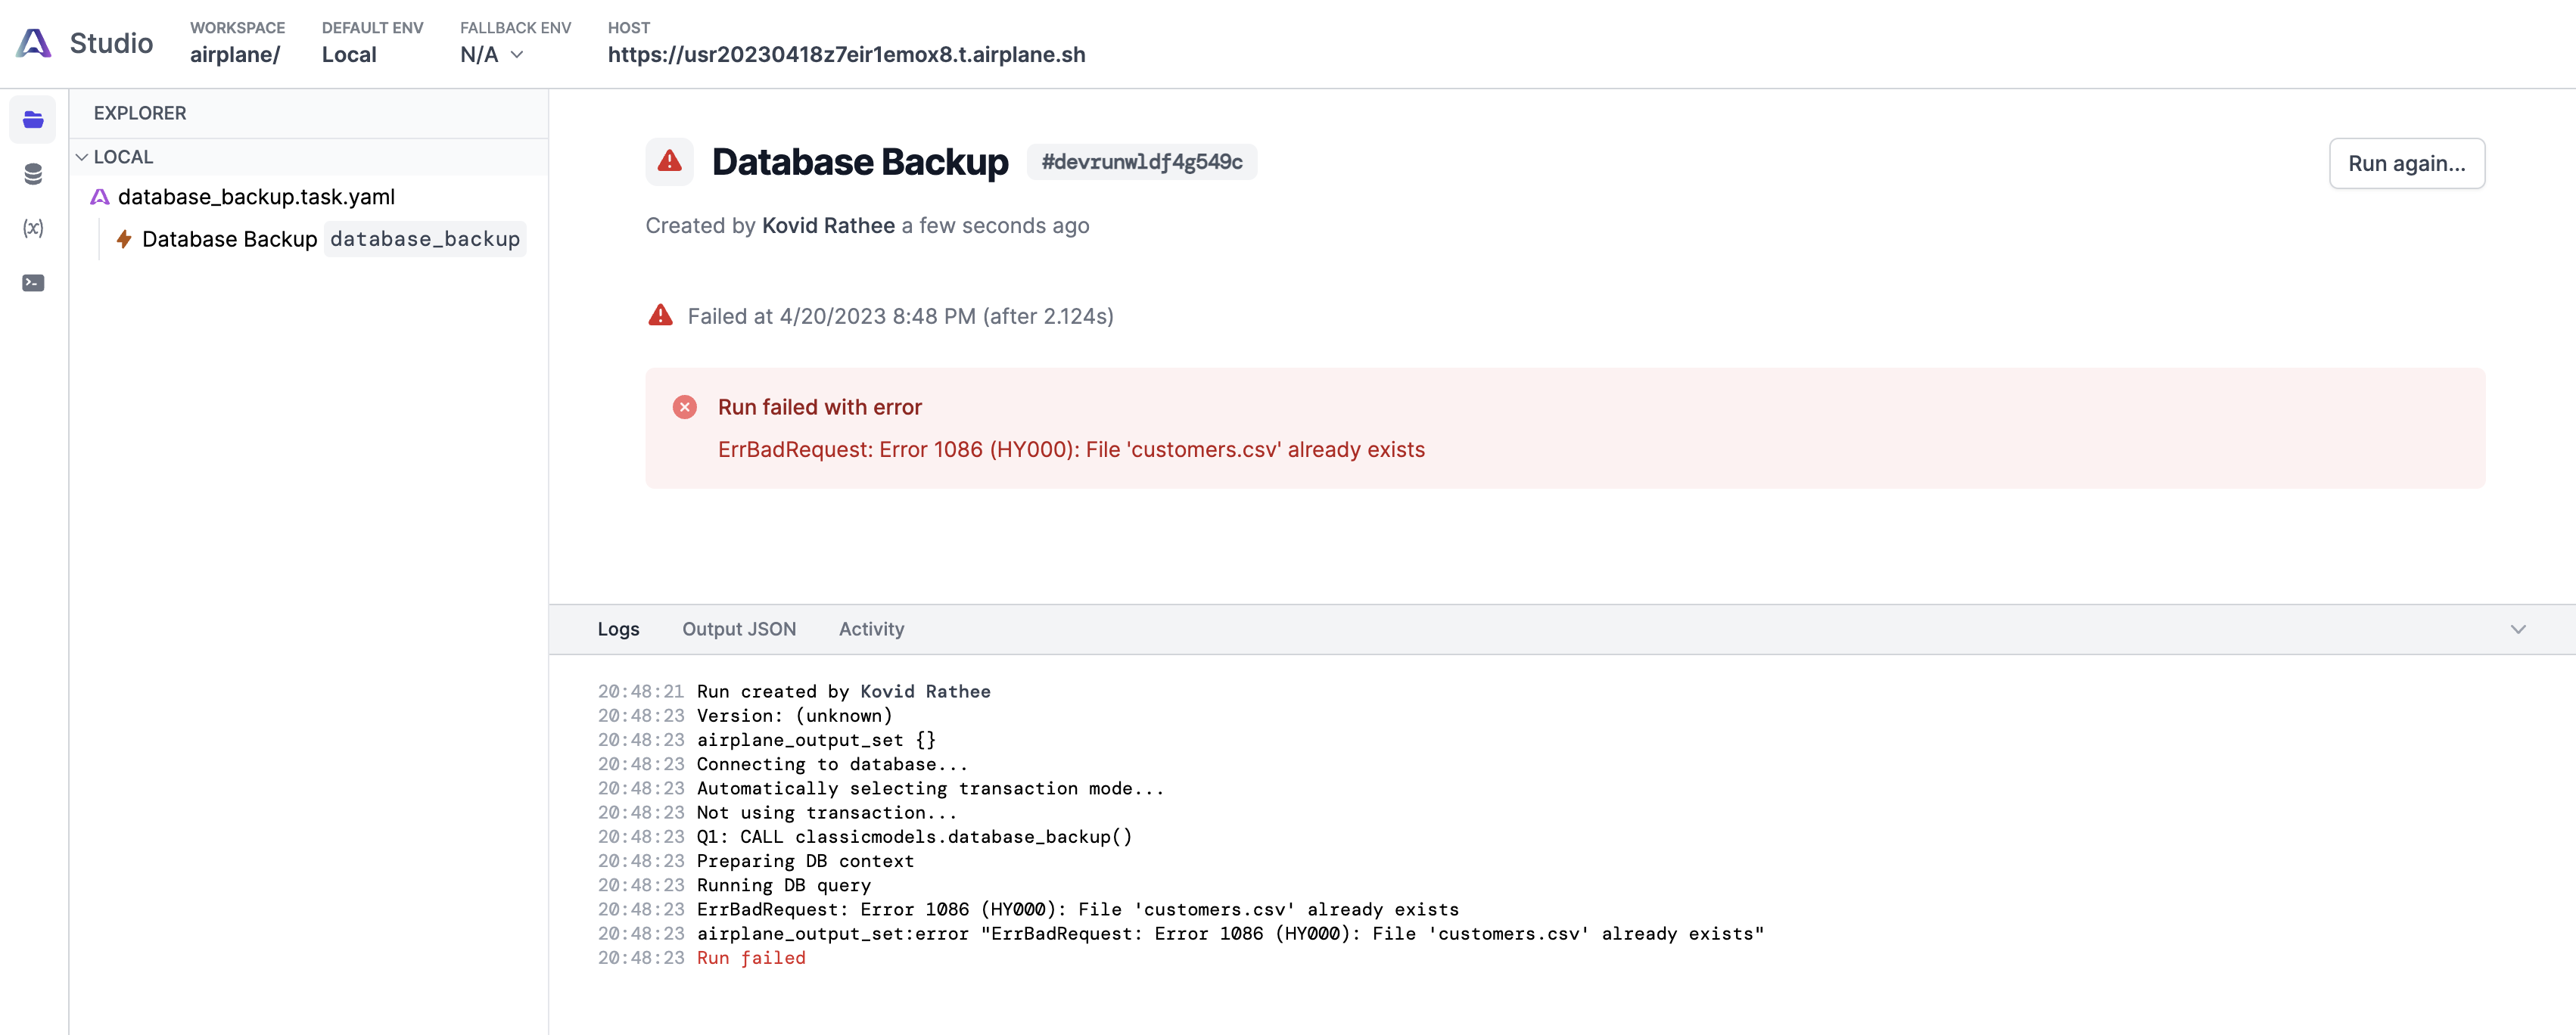
A simple solution is to modify the stored procedure to add a timestamp to the export file name. This will make the file name of every export unique. However, we need to be careful with this strategy because we are exporting CSV files to the same server the MySQL database is running on, and we can quickly run out of disk space on our machines.
Conclusion
This article explained how to automate MySQL backups using an Airplane SQL Task. We also learned about testing and developing tasks for Airplane locally. In addition, we walked through MySQL-specific configuration for exporting files onto disk, as the database requires.
To try out Airplane for yourself, sign up for a free account and book a demo.
Author: Kovid Rathee
Kovid Rathee is a data and infrastructure engineer working as a senior consultant at Servian in Melbourne. Before moving into the data space, he was an assistant professor at an engineering college and a full-stack developer. Kovid likes to write about data engineering, infrastructure-as-code, DevOps, and SRE.


