React has become very popular in the world of frontend frameworks and is frequently used to build out the frontend of Javascript-based web applications. However, as your frontend becomes more and more complicated, you’ll find there are some components that shouldn’t always be shown, but rather should be displayed conditionally based on the state of your application.
Luckily, React supports a few different ways to conditionally render components. In this article, we’ll take a look at a couple of these methods and discuss why you might want to introduce the concept of conditional rendering in your React application.
Why is conditional rendering important?
Performance impacts
Despite React being very performant due to how it implements the virtual DOM and other features of the library, rendering more elements on the page will always be slower than rendering less. Conditional rendering can help increase the performance of your web application by cutting down on the elements that React needs to render and check for underlying changes.
Avoiding an excessive page size has long been a performance recommendation and using conditional rendering to output only the elements that your interface absolutely needs at any given time can help.
Cleaner user interfaces
As your application continues to get more complicated, it’s easy for the interface to start to get cluttered. By using conditional rendering and only showing elements on the page that make sense at a given time, you can keep the interface cleaner. Some examples of when conditional rendering might be a good choice to clean up your user interface are:
- Hiding a chart that doesn’t have any data available in it
- Hiding form fields that aren’t relevant unless previous fields are filled out in a certain way
- Hiding users from a user list that aren’t currently online
When deciding to hide UI elements in this way, it’s important not to go too far and hide things that users might be searching for. If a component needs to be accessible to the user, even in an empty state, then it’s probably not a good fit to be conditionally rendered.
Simplified code
In addition to helping clean up the actual interface of your application, conditional rendering can also simplify your codebase by replacing separate functions to contain display logic. Previously you might have written a separate function to display a loading spinner when some data in your application was still loading. With React you can conditionally render the loading spinner and the underlying component as well, ensuring they display when they’re supposed to without any separate helper functions or needing to track application state separately. This means you’ll write less code and will result in a simpler, cleaner codebase.
How to implement conditional rendering in React
Now that we’ve looked at some of the reasons why you might want to use conditional rendering in your React application, let’s take a look at some of the ways to actually implement it.
If statement
If you have a function that returns some markup to be rendered, we can use an if statement inside that function to decide whether the element it returns should be rendered or not. For example:
In this example, an item marked as “purchased” on the shopping list will not be displayed because the function that generates the markup for each item returns null if the purchased property is true.
Using the if statement to conditionally render an element is best reserved for when there is some more complex logic or code that couldn’t reasonably be written inline (like the next two options).
Ternary operator
In addition to a standard if statement, you can also use a ternary operator, which is a bit more concise format for an if/else statement. In our example from above, a ternary in place of the if statement might look something like this:
The end result is very similar to our if statement example, just in a more compact format. The tradeoff here is that the if statement if very familiar and easy to read for most developers, whereas the ternary operator can be a bit more confusing to interpret.
&& operator
One of the most common ways to conditionally render a React component is to do it inline with the && operator. It’s important to note that this is useful for cases where you either want to display a component or display nothing, whereas some of the other methods we discussed are more useful when you want to display different versions of a particular component or different types of markup depending on the conditional you are evaluating.
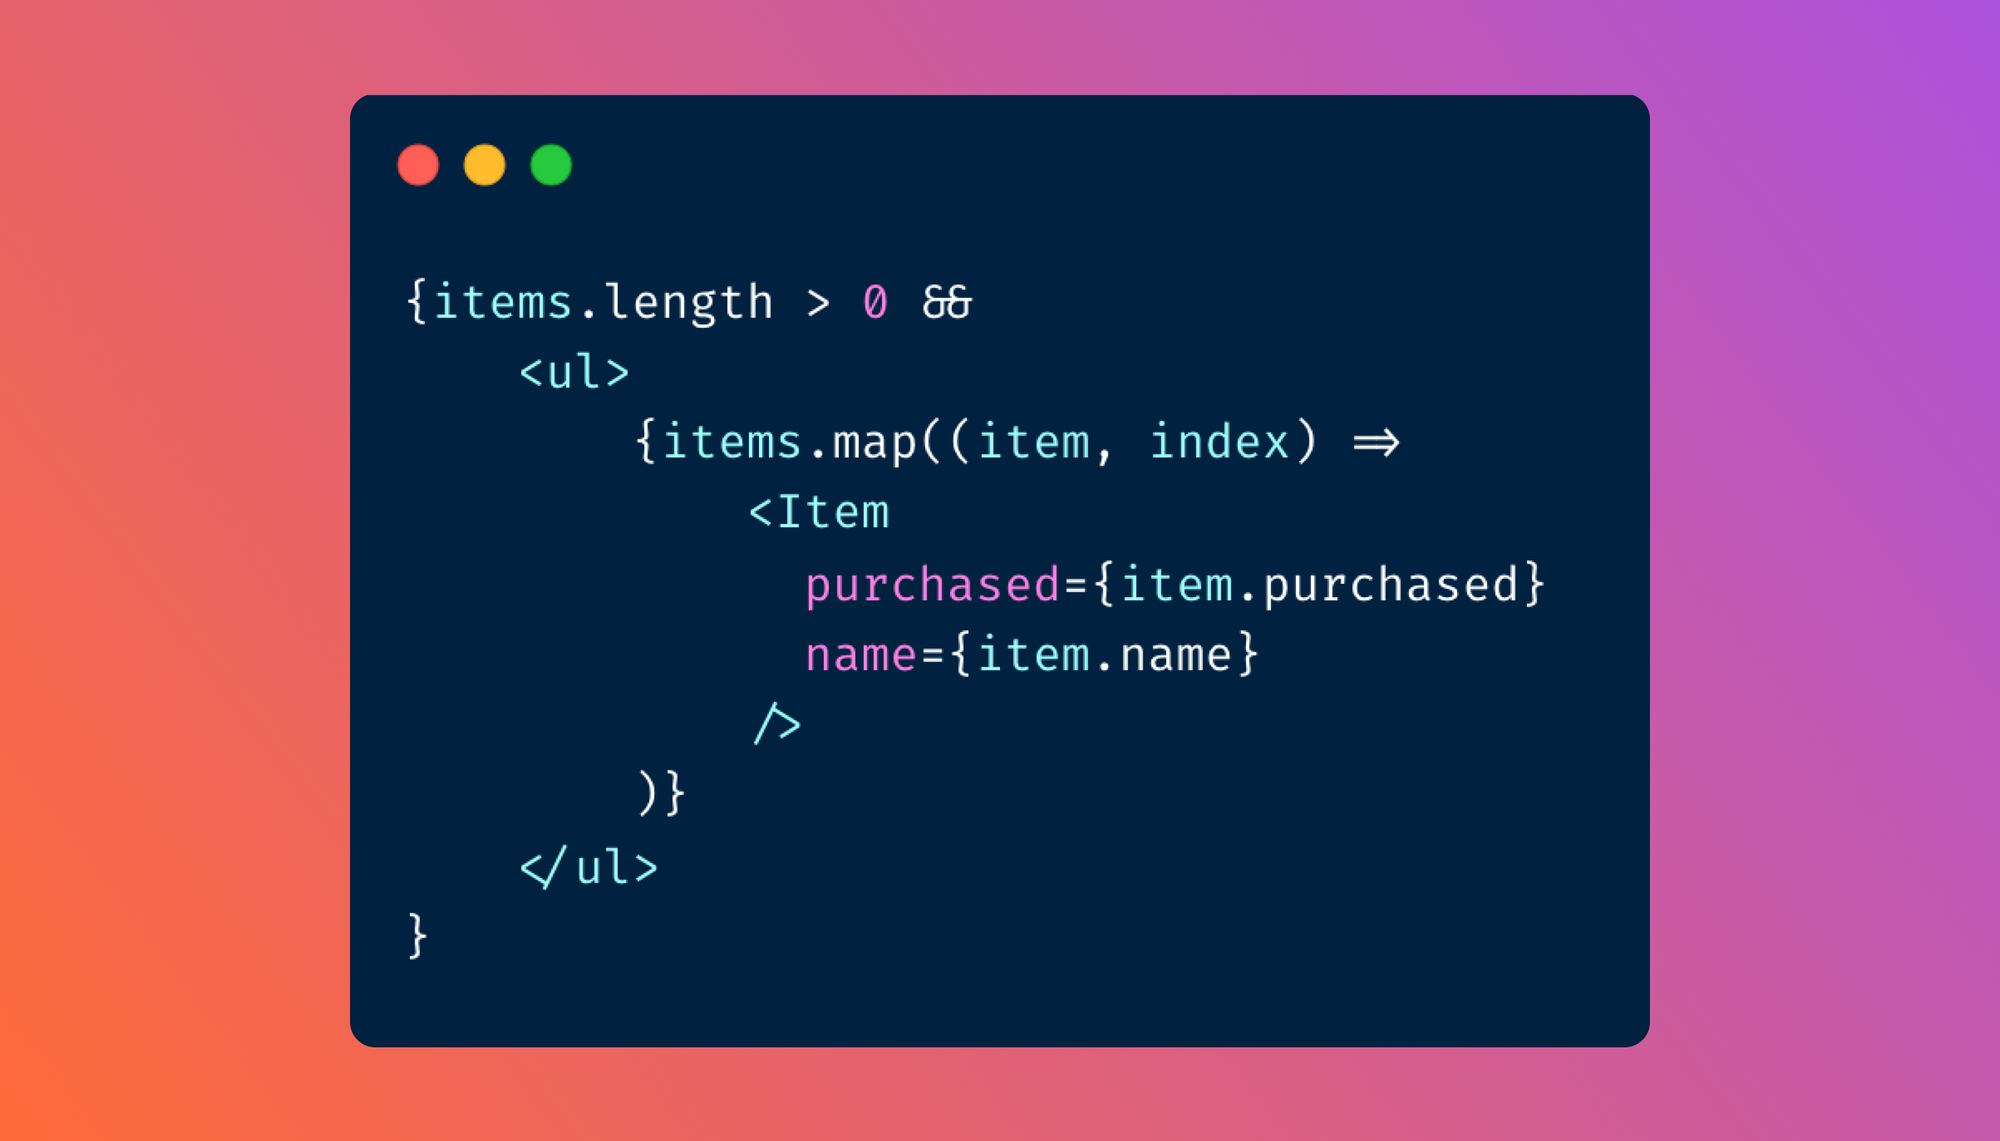
To continue with our shopping list example, let’s say we want to make sure the list doesn’t display if there are no items current in the list. We could use the && operator to guarantee this:
In this example, the <ul> markup for the list won’t even be rendered if there are zero items in the list. This, combined with rendering the list items in a loop, makes our code a lot cleaner and more succinct. In addition, because of this conditional rendering, this code snippet would realize some of the benefits we discussed above of a reduced DOM size (in cases where the list is empty).
Deciding which method to use
With all these different methods, it’s important to choose the right one for the task you’re trying to accomplish.
As a general rule, if you want a component to either display or not based on a condition that’s already contained within a variable or a simple expression, using && directly within the render function of your component is the way to go.
However, if the logic to decide what a component should display is more complicated, you should avoid cluttering up the render function and use an if/else statement elsewhere in the component instead. Since the if/else and the ternary approaches are largely equivalent, you should use whichever better fits the coding style of your project.
No matter which way you choose, you want to ensure that your code is readable while still taking advantage of the benefits of conditional rendering we discussed above.
Using conditional rendering to upgrade your internal tools with Airplane
Airplane Views is a React-based platform that allows users to quickly build custom UIs for their organizations. Because Airplane Views are written in React, you can take advantage of all of the conditional rendering tips we just discussed when building out interfaces for your organization’s internal tools. This allows you to make sure that only the components that your users need to see are visible to them when they need to be and makes your dashboards and admin panels even more useful.
Views comes with an extensive Component library which can help you get started right away, but also allows you to use 3rd-party components if the built-in Components don’t cover all your use cases.

And if you want to get started even faster, Airplane provides templates for many common internal tool use cases that you can start using in just a few clicks. Because everything is code-first, you can extend these templates any way you want once they’re in your Airplane account.
Sign up for a free account or book a demo to try Airplane out! If you are at a startup that is series A or earlier with under 100 employees, check out our Airplane Startup Program for $10,000 in Airplane credits for a year.