


Managing a Kubernetes cluster is like sitting in front of a large DJ mixing console. You have an almost overwhelming number of knobs and sliders in front of you to tune the sound to perfection. It can seem challenging to even know where to begin—a feeling that Kubernetes engineers probably know well.
However, a Kubernetes cluster without resource limits could conceivably lead to the most issues. So setting resource limits is a logical place to start.
That being said, your fine-tuning challenges are just beginning. To set Kubernetes resources limits correctly, you have to be methodical and take care to find the correct values. Set them too high, and you may negatively affect nodes of your clusters. Set the value too low, and you negatively impact your application performance.
Fortunately, this guide will walk you through all you need to know to properly tune resource limits and keep both your cluster and your applications healthy.
What are resource limits, and why do they matter?
First of all, in Kubernetes, resources limits come in pairs with resource requests:
- Resource Requests: The amount of CPU or memory allocated to your container. A Pod resource request is equal to the sum of its container resource requests. When scheduling Pods, Kubernetes will guarantee that this amount of resource is available for your Pod to run.
- Resource Limits: The level at which Kubernetes will start taking action against a container going above the limit. Kubernetes will kill a container consuming too much memory or throttle a container using too much CPU.
If you set resource limits but no resource request, Kubernetes implicitly sets memory and CPU requests equal to the limit. This behavior is excellent as a first step toward getting your Kubernetes cluster under control. This is often referred to as the conservative approach, where resources allocated to a container are at maximum.
Have you set requests and limits on all your containers?
If not, the Kubernetes Scheduler will assign any Pods without request and limits randomly. With limits set, you will avoid most of the following problems:
- Out of Memory (OOM) issues. A node could die of memory starvation, affecting cluster stability. For instance, an application with a memory leak could cause an OOM issue.
- CPU Starvation. Your applications will get slower because they must share a limited amount of CPU. An application consuming an excessive amount of CPU could affect all applications on the same node.
- Pod eviction. When a node lacks resources, it starts the eviction process and terminates Pods, starting with Pods without resource requests.
- Financial waste. Assuming your cluster is fine without requests and limits, this means that you are most likely overprovisioning. In other words, you’re spending money on resources you never use.
The first step to prevent these issues is to set limits for all containers.
Imagine your node as a big box with a width (CPU) and length (memory), and you need to fill the big box with smaller boxes (Pods). Not setting requests and limits is similar to playing the game without knowing the width and length of the smaller boxes.
Assuming you only set limits, Kubernetes will check nodes and find a fit for your Pod. Pod assignments will become more coherent. Also, you will have a clear picture of the situation on each node, as illustrated below.
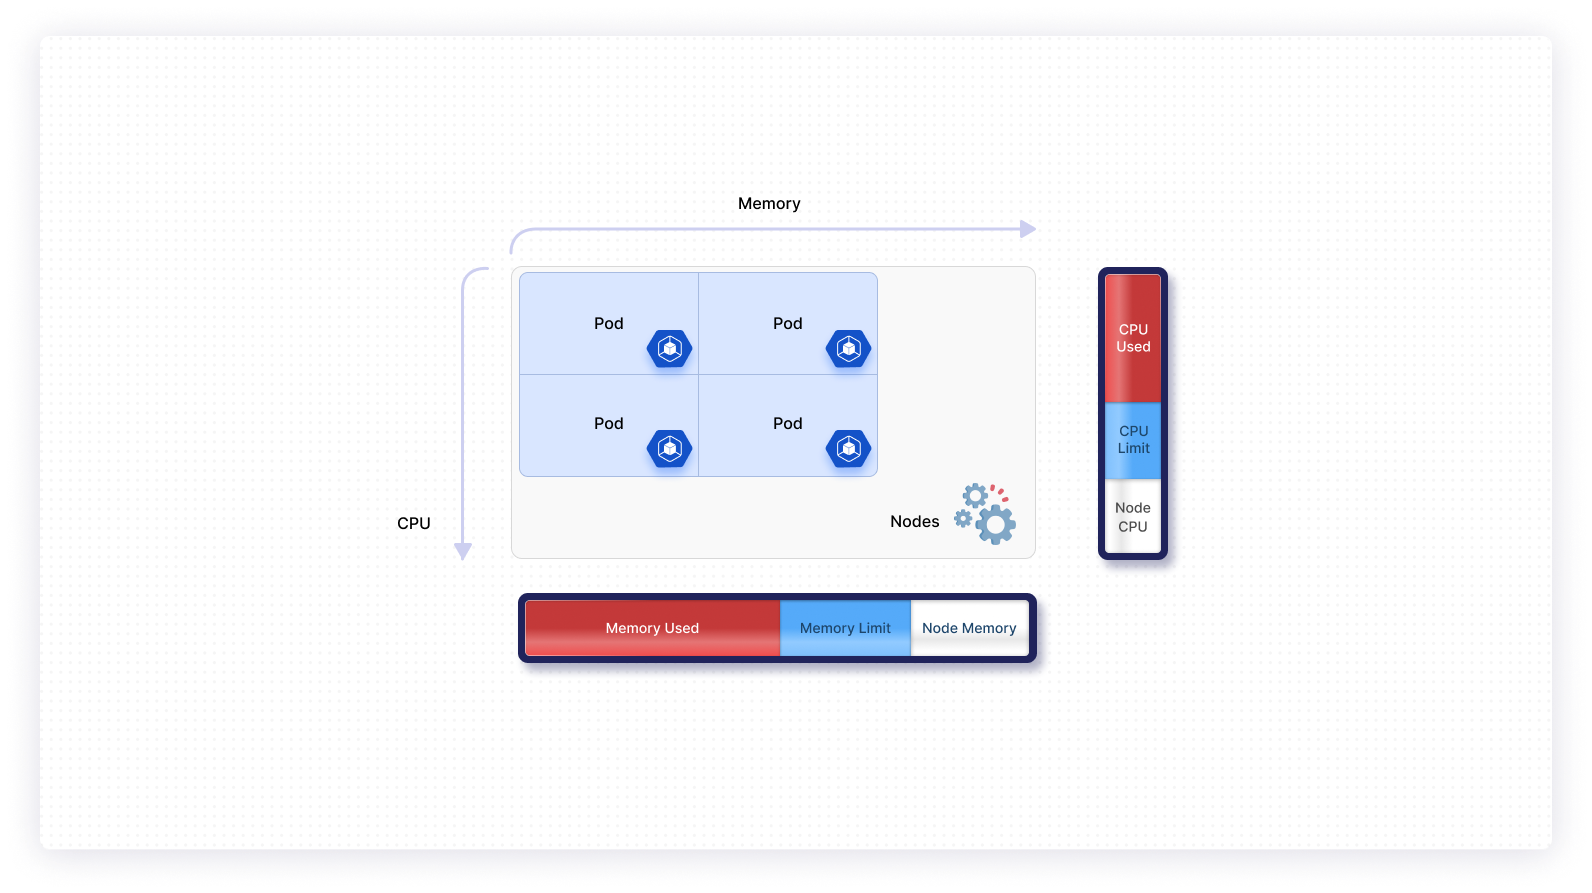
From there, you can start observing your application more closely and begin optimizing resource requests. You will maximize resource utilizations, making your system more cost-efficient.
Implementing rightsizing
What do you need to calculate resource limits? The first thing is metrics!
Resource limits are calculated based on historical data. Kubernetes doesn’t come out of the box with sufficient tools to gather memory and CPU, so here’s a small list of options:
- The Kubernetes Metrics Server collects and aggregates metrics. However, you won’t get far with it because it only gives you the current value of a metric.
- Prometheus is a popular solution to monitor anything.
The next thing you need is to identify Pods without limits.
An easy solution is to use kubectl and a go-template. go-template allows you to manipulate data provided by a kubectl command and output the desired information.
The following go-template iterates through all Pods and containers and outputs a container with metrics.
Now you have a list of Pods to work on.

Finally, you need to revise Kubernetes deployment, StatefulSet, or DaemonSets for each Pod you found and include resource limits. Unfortunately, when it comes to resource limits, there is no magic formula that fits all cases.
In this activity, you need to use your infrastructure knowledge and challenge the numbers you see. Let me explain—CPU and memory usage is affected by the type of application you are using. For example:
- Microservices tackle HTTP requests, consuming resources based on the traffic. You often have many instances of a microservice and have good toleration in terms of failure. Tight resource limits are acceptable and help prevent abnormal behavior.
- Databases tend to consume increasingly more memory over time. On top of that, you have no tolerance for failure; tight resource limits are not an option.
- ETL/ELT tends to consume resources by burst, but memory and CPU usage are mostly static. Use resource limits to prevent unexpected bursts of resource usage.
Setting up limits leads to fine-tuning other settings of your cluster, such as node size or auto-scaling. We’ll come back to that later on. For now, let’s focus on a general strategy for calculating limits.
Calculate resource limits in 3 steps
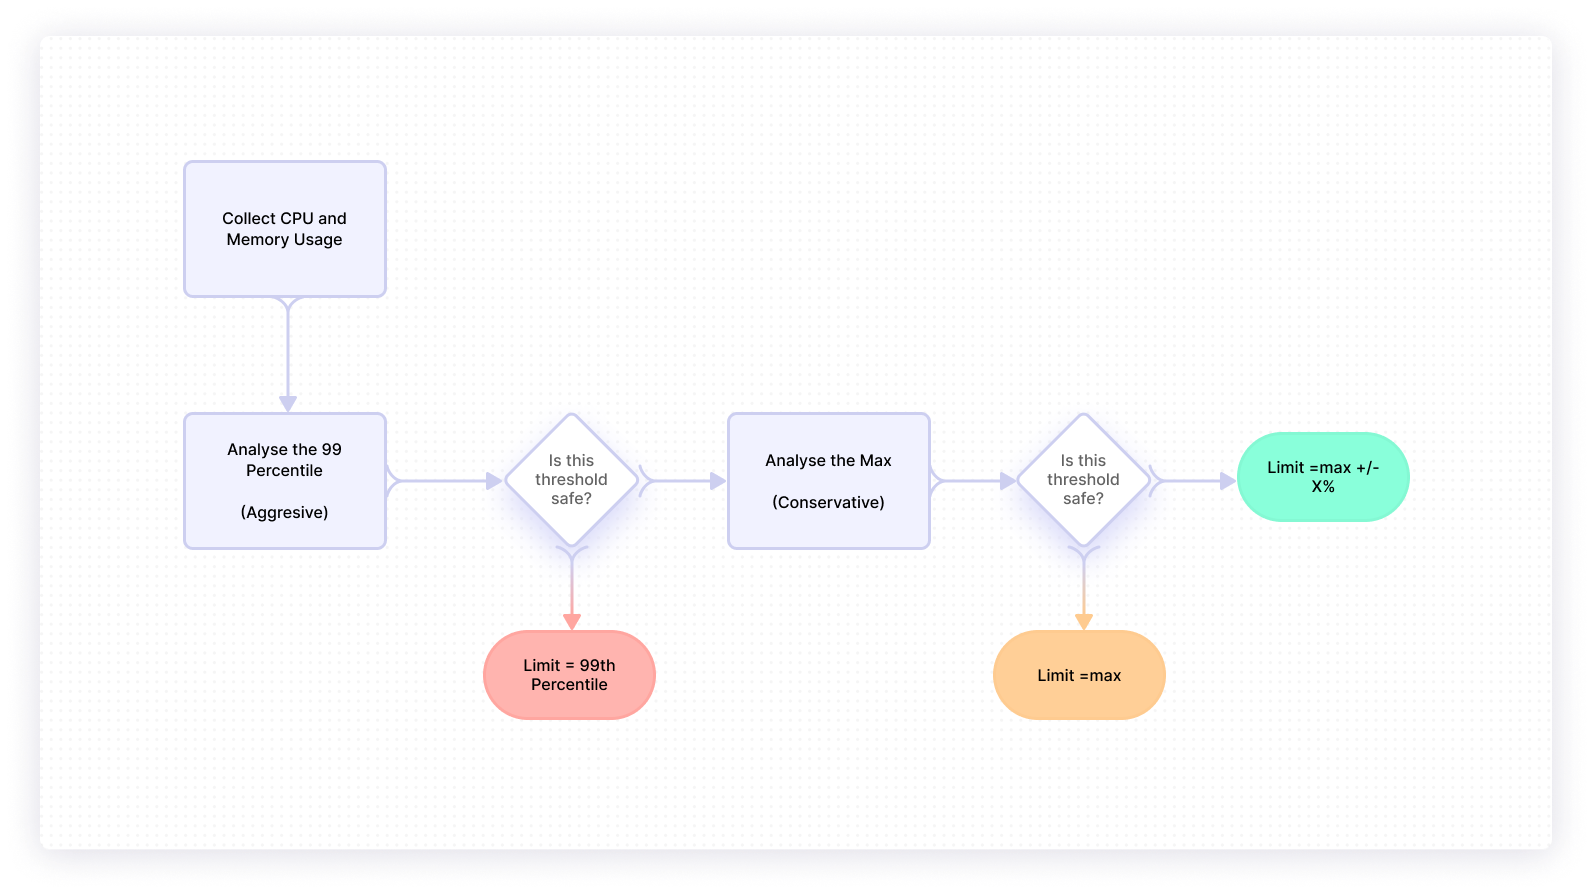
To carefully analyze the metrics, you need to take it one step at a time. This approach consists of three phases that each lead to a different strategy. Start with the most aggressive, challenge the result, and move on to a more conservative option if necessary.
You must consider CPU and memory independently and apply different strategies based on your conclusion at each phase.
1. Check memory or CPU
In the first phase, look at the ninety-ninth percentile of memory or CPU. This aggressive approach aims to reduce issues by forcing Kubernetes to take action against outliers. If you set limits with this value, your application will be affected 1 percent of the time. The container CPU will be throttled and never reach that value again.
The aggressive approach is often good for CPU limits because the consequences are relatively acceptable and help you better manage resources. Concerning memory, the ninety-ninth percentile may be problematic; containers restart if the limit is reached.
At this point, you should weigh the consequences and conclude if the ninety-ninth percentile makes sense for you (as a side note, you should investigate deeper as to why applications sometimes reach the set limit). Maybe the ninety-ninth percentile is too restrictive because your application is not yet at its max utilization. In that case, move on to the second strategy to set limits.
2. Check memory or CPU in a given period
In the second phase, you’ll look at the max CPU or memory in a given period. If you set a limit with this value, in theory, no application will be affected. However, it prevents your applications from moving past that limit and keeps your cluster under control.
Once again, you should challenge the value you found. Is the max far from the ninety-ninth percentile found earlier? Are your applications under a lot of traffic? Do you expect your application to handle more load?
At this point, the decision branches out again with two paths. The max makes sense, and applications should be stopped or throttled if they reach that limit. On the other hand, if the maximum is much greater than the ninety-ninth percentile (outlier), or you know you need more room in the future, move to the final option.
3. Find a compromise
The last stage of this three-step process is to find a compromise based on the maximum by adding or subtracting a coefficient (ie., max + 20%). If you ever reach this point, you should consider performing load tests to characterize your application performances and resource usage better.
Repeat this process for each of your applications without limits.
How to set resource limits
Once you have calculated CPU and memory limits, it’s time for you to update your configuration and redeploy your application. Limits are defined at the container level as follows:
What are the next steps?
I warned you earlier that setting limits isn’t the end of the story. It’s the first step along the way toward refining your Kubernetes cluster management. Considering your resource limits will lead you to reconsidering other settings for your cluster. That’s why I like the metaphor of the mixing console when we think about administering Kubernetes clusters.
In the following diagram, you can see the path of upcoming tasks you’ll need to identify and optimize for efficiency.
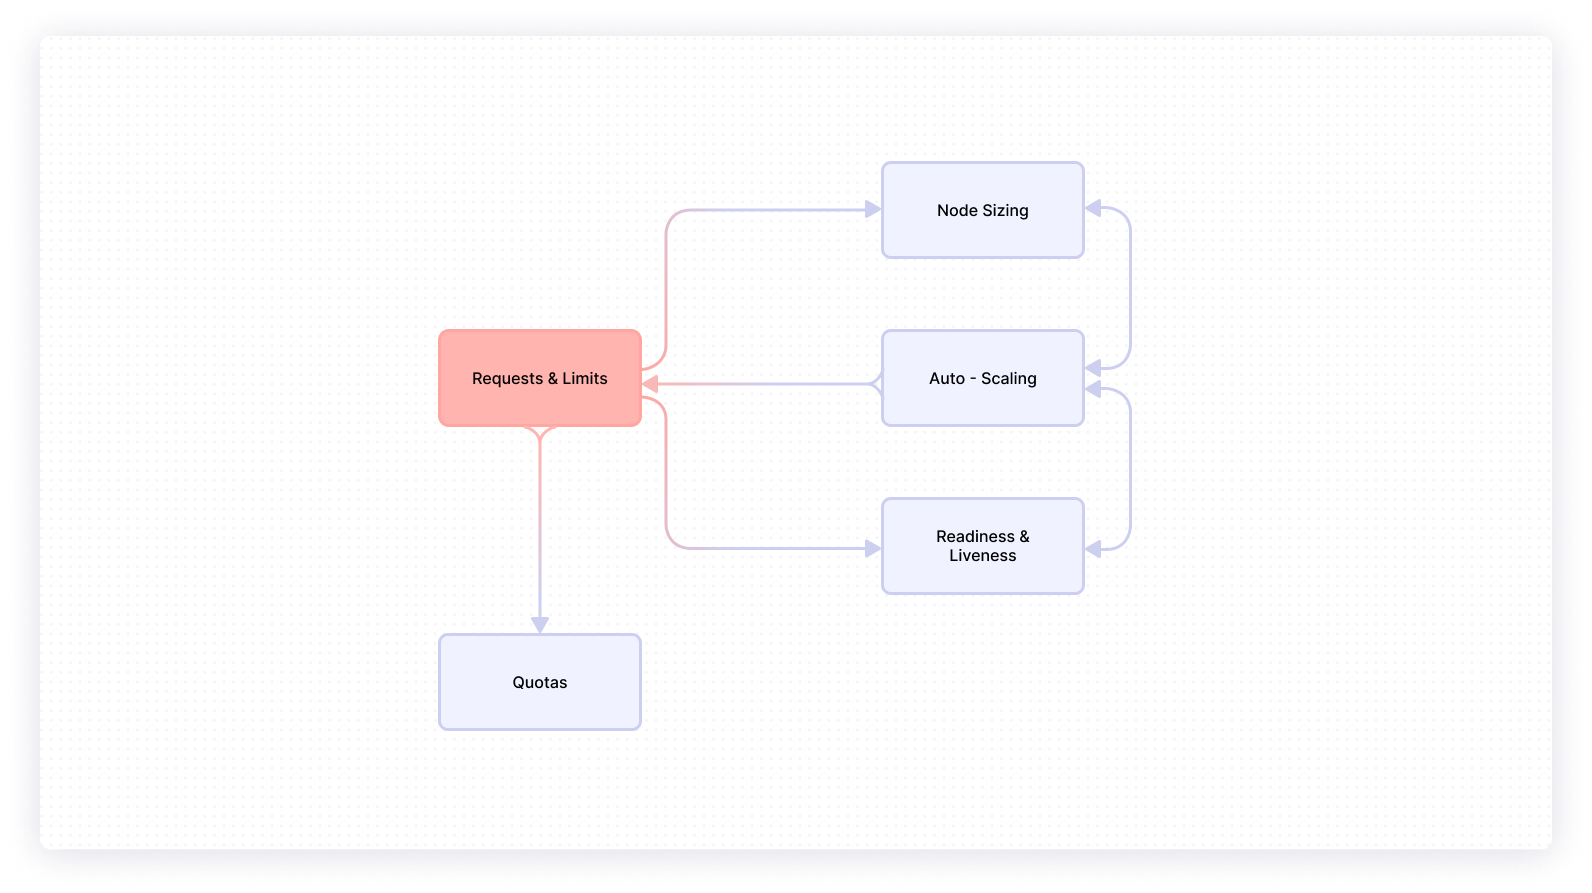
To understand the diagram, consider a box as an activity or a setting related to Kubernetes. An arrow linking boxes together represents related tasks and the direction of impact. For instance Request & Limits impacts node sizing.
Other labels in the diagram include:
- Resource Quota: When dealing with many teams and applications, setting limits can be daunting. Fortunately Kubernetes administrators can set limits at the namespace level.
- Node Sizing: Choosing node size is essential to optimize resource usage. But it relies on understanding application needs.
- Pods and Custer Auto-Scaling: Resource usage is greatly affected by how many Pods are available to handle the load.
- Readiness & Liveness: Properly managing Pod lifecycle can prevent many issues. For example, if a Pod is consuming too many resources, it may not be ready to receive traffic.
Conclusion
You started your journey in managing a Kubernetes cluster by learning about requests and limits and quickly learned that establishing resource limits for all your containers is a solid first step.
If you're looking to build an internal dashboard to monitor your Kubernetes cluster in an easy and efficient manner, consider Airplane. With Airplane, you can transform scripts, queries, APIs, and more into internal workflows and UIs. Using Airplane's component library and template library, you can get started easily and build a monitoring dashboard within minutes using code. This makes it simple to manage and troubleshoot your Kubernetes clusters in real-time.
To try it out yourself, sign up for a free account or book a demo.


