Kubernetes was originally a Google in-house project called Borg, but it’s grown into a prominent and powerful platform in enterprise adoption. For the last two years, it has ranked as one of the most loved platforms, as well as one of the most desired among software developers. As a container orchestration or container management tool, it stands head and shoulders above the rest.
What exactly does a container orchestration platform like Kubernetes help software teams accomplish? To understand this, you would have to start from the concept of containerization. Containers are lightweight software components used to package an entire application, with all of its dependencies and configuration, in order for it to run as expected.
When deploying containerized applications at scale, software teams need a system that can automatically fulfill the following:
- Deploying images and containers to environments
- Managing the scaling of containers and node clusters based on the demand
- Resource balancing in containers and node clusters
- Provide communication across a cluster
- Traffic management for services
Containers require a crane, like Kubernetes, to fulfill the orchestration responsibilities.
Container orchestration automates the scheduling, deployment, networking, scaling, health monitoring, and management of containers. If you have ever tried to manually scale your deployments to maximize efficiency or secure your applications consistently across platforms, you have already experienced many of the pains a container orchestration platform can help solve.
GCP offers a managed Kubernetes service that makes it easy for users to run Kubernetes clusters in the cloud without having to set up, provision, or maintain the control plane to be optimally secure and highly available.
In this article, we will cover running Kubernetes in GCP, using Google Kubernetes Engine (GKE), the best use cases for it, and outline a short tutorial of creating a GKE cluster and deploying an application to it.
Why GKE?
As mentioned above, Kubernetes was created by Google for its own container orchestration purposes. This history of Kubernetes in Google labs is why GKE is considered the most advanced managed Kubernetes service. GKE includes health checks and automatic repair of microservices, logging, and monitoring with operations suite (formerly Stackdriver). In addition, it comes with four-way auto-scaling and multi-cluster support.
Some of the major benefits of GKE are:
- Single-click clusters
- A high-availability control plane including multi-zonal and regional clusters
- Auto-repair, auto-upgrade, and release channels
- Vulnerability scanning of container images and data encryption
- Integrated cloud monitoring with infrastructure, application, and Kubernetes-specific views
Autopilot mode vs. standard mode
GKE provides two main modes of cluster configuration:
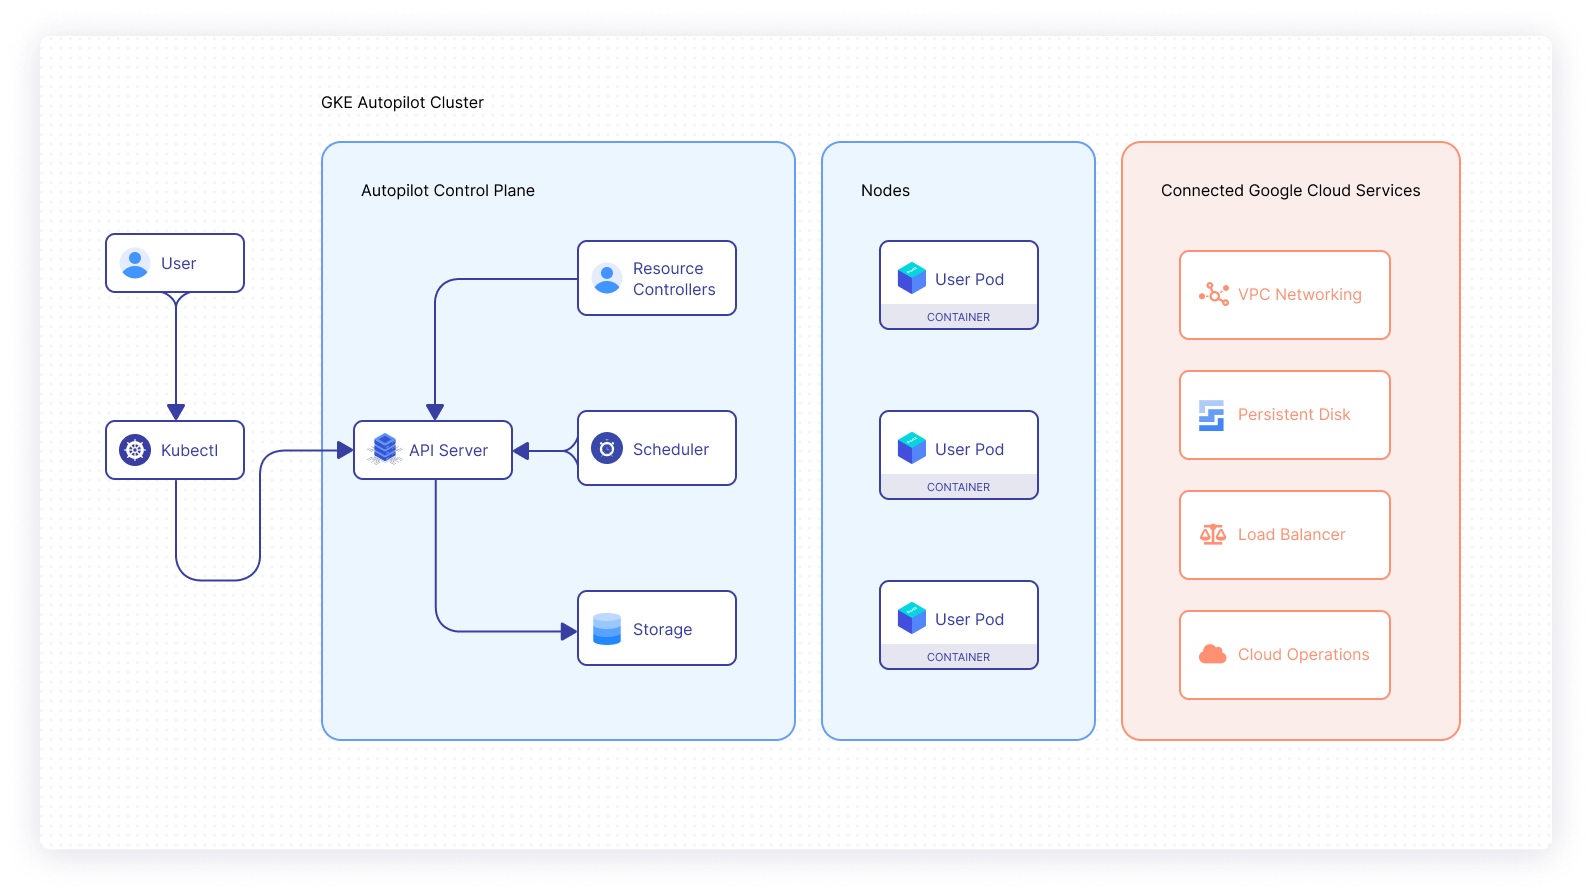
- Autopilot: In this mode, GKE provisions and manages the cluster’s underlying infrastructure, including nodes and node pools, giving users an optimized cluster with a hands-off experience.

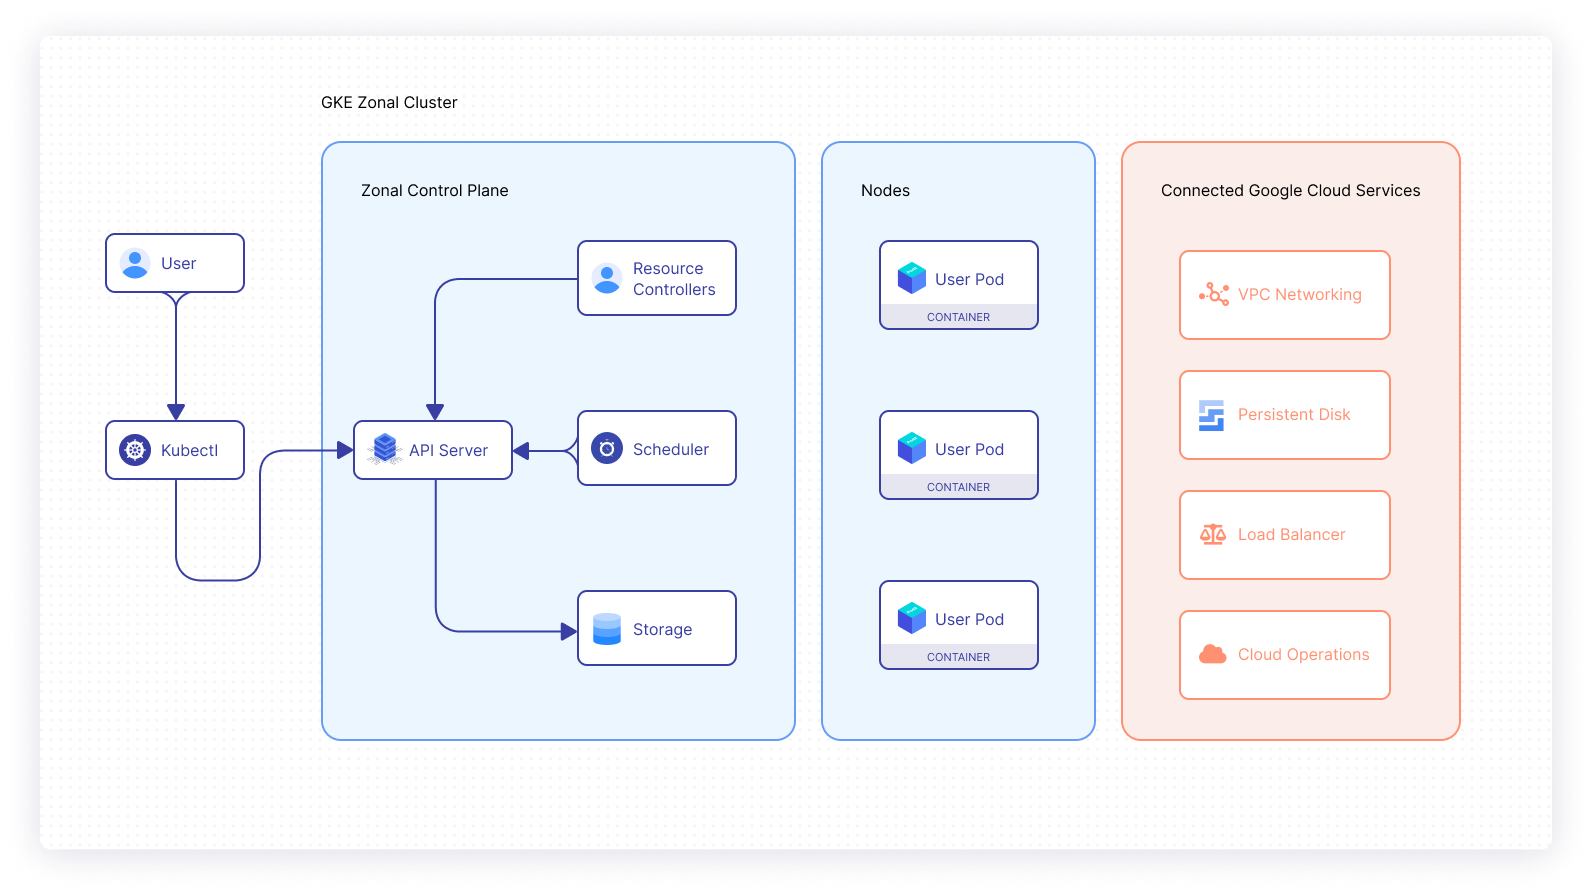
- Standard: In this mode, users manage their cluster’s underlying infrastructure, allowing for more node configuration flexibility.

Why use a managed GKE cluster?
Managed cluster infrastructure: Managing the underlying infrastructure for Kubernetes workloads can introduce a lot of management overhead. In a cloud environment like GCP, software teams can make use of on-demand resources to meet the needs of the applications running in the clusters. This is especially helpful when running compute-intensive applications, as well as when needing to automatically scale the cluster’s control plane up and down to meet application demands.
Minimal Kubernetes knowledge and experience: Managed Kubernetes clusters are designed to take the responsibility of cluster management out of the hands of software development teams. The purpose of this model is to enable developers to focus on application development and optimization, so as not to have to worry about the overhead of configuring a K8s cluster. This reduces the need to have a deep understanding of K8s.
Ongoing operations for upgrades, fixes, and security patches: Making use of a managed cluster like GKE means that the cloud provider is responsible for ensuring an optimal and secure control plane for the cluster. This alleviates a huge burden for software teams who would otherwise have to have a high level of proficiency and invest several hours to reach the same level of optimization and security.
Microservice teams: Microservice teams with a strong ownership model typically have technical heterogeneity. In this approach, these development teams independently choose technology stacks that are best suited for their respective microservices. Therefore, teams have more autonomy to piece together the tools that they believe will enhance the service for which they’re responsible. Working with managed K8s clusters complements this technical diversity to cater to the needs of the different microservices while still maintaining configuration standards across environments.
GKE pricing
As is the case with most public cloud providers, like Azure and AWS, GCP offers a free tier that covers the cost of the cloud resources being used. In the case of GKE, there is a free tier that provides $74.40 in monthly credits. These credits are applied to zonal and Autopilot clusters. Furthermore, GKE offers a cluster management fee of $0.10 per cluster per hour (charged in 1-second increments) which applies to all GKE clusters irrespective of the mode of operation, cluster size, or topology. Further details on the different pricing tiers for managed clusters for the various zones can be seen on the GKE pricing page.
Deploying a GKE instance
In this section, you will create a Kubernetes cluster in Autopilot mode and deploy a basic Node.js application to the environment. In order to do this, you will have to meet the following prerequisites:
- Create Google GCP Account (you will need a valid debit or credit card).
- Install kubectl.
- Install and configure Google Cloud SDK on your machine.
Create GKE cluster
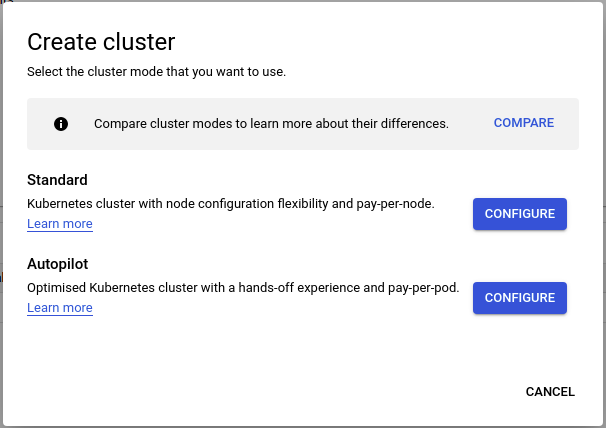
Once you have created your GCP account and have activated the billing, you will receive $300 in credit for use in GCP. By default, a new project called My First Project will be created for you. Under this project, you can go to Kubernetes Engine in the Compute section and click Create to initiate the process.

Once you’re presented with the above window or something similar, select the Autopilot option and you will be redirected to the cluster configuration page. GKE will automatically handle the following configuration steps for you:
- Nodes: Automated node provisioning, scaling, and maintenance
- Networking: VPC-native traffic routing for public or private clusters
- Security: Shielded GKE nodes and workload identity
- Telemetry: Cloud operations logging and monitoring

Next, you will need to provide a name for your cluster and select a region for the resources to be deployed to. In this demo, you will select a public network mode for your cluster so that the control plane API will be accessible from your local machine. For this tutorial, the default CIDR range will provide a sufficient number of IPs for the nodes and pods. The creation of the cluster should take a few minutes once you’ve confirmed your desired settings.

Connect to a GKE cluster
Select the newly created cluster on your dashboard. When you are on the details page for your cluster, click Connect. You will be presented with a command that will configure the kubectl config on your local machine to authenticate and connect to your GKE cluster. The command will look something like this:
gcloud container clusters get-credentials cluster-1 --zone <selected-zone> --project <project-id>
To confirm that you are successfully connected, run the following commands to check the nodes in your cluster, and then view the pods running in the kube-system namespace.
kubectl get nodes
kubectl get pods -n kube-system
Deploy Node.js application to GKE cluster
The last step will be to deploy a basic Node.js application to your environment. The Node.js app is based on the Express framework and has a single route endpoint that will return the response, Simple Node App Working!
As you would expect, the application is distributed as a container image in a public repository that will be specified in the Pod manifest file. A service will also be deployed to make the application publicly accessible through an external load balancer.
The pod manifest file
The service manifest file
When you have created the above manifest files, you can create the two different resources in your cluster by running the following commands:
You can verify that the pod is running as expected by running the kubectl get pods command in your terminal. This will fetch all running pods in your default namespace. To view the details of the pod, you can run kubectl describe pod express-test.
After confirming that the pod is running, you can check the service with kubectl get svc. Creation of the load balancer may take a few minutes, so you might not see an external IP immediately after creation.
When the load balancer has successfully been created, you can open a new tab in the browser and access the /test route on your application. You should get the following response:

Conclusion
Managed Kubernetes clusters like GKE allow companies to benefit from running their workloads in an optimally configured and secure Kubernetes environment without the requirement of having a team of Kubernetes experts. Running applications in the cloud provides unparalleled operational agility to customers, especially in the context of computation.
With service offerings like GKE, software teams can deploy compute-intensive applications to their clusters and leverage the elasticity of cloud infrastructure. The advantages of cloud-native development are made accessible through platforms like GKE that manage the heavy lifting of Kubernetes management, while offering the benefits of container orchestration.
If you're looking for a powerful internal tooling platform that can help streamline your Kubernetes management, check out Airplane. Airplane is the developer platform for building internal tools. With Airplane, you can transform scripts, queries, APIs, and more into custom workflows and UIs. Using Airplane Views, you can build a React-based monitoring dashboard that makes it easy to track and manage your applications in real time.
To try it out and build your first dashboard using Views, sign up for a free account or book a demo.


