


Installing and setting up a Kubernetes cluster to run a containerized workload can be a challenge, especially if you are running it on the cloud. You need to take care of networking the worker node, setting up the master node, security, and continuous updates and patches.
Thankfully, to simplify running Kubernetes on AWS, you can use Elastic Kubernetes Service (EKS). EKS is a managed Kubernetes service that makes running Kubernetes on AWS and on-premises as simple as pushing a button.
In this article, we’ll walk you through how to set up and run a Kubernetes deployment on AWS using EKS.
Why EKS?
EKS makes it easy for you to run Kubernetes on AWS and on-premises. It has a range of benefits, sensible pricing, and additional features such as log monitoring.
Benefits
- Improves security of Kubernetes environment: EKS automatically applies the latest security patches to the current cluster’s control plane. To make every cluster secure, AWS works closely with the community to address critical security issues. EKS also integrates with the current AWS services like IAM policies for you to take full advantage of AWS Infrastructure.
- Efficiently scales your workloads: Using EKS managed node groups, you don’t need to separately provision compute capacity to scale your application on Kubernetes. You can choose between a Fargate or EC2 instance to run your application.
- Improves observability and availability: EKS runs the Kubernetes control plane across multiple AWS Availability Zones, automatically detects and replaces unhealthy control plane nodes, and provides on-demand, zero downtime upgrades, and patching. The uptime SLA of EKS is 99.95%. It also offers observability of your cluster on the console so you can resolve issues faster.
Pricing
For every cluster you create on EKS, you pay $0.10/hour. Additionally, you will also be paying for the resources you consume separately. For example, if you are using EC2(including with EKS managed node groups), you pay according to the size of the EC2 and the EBS volumes attached to it. There are no minimum fees and no upfront cost to use EKS.
If you are using EKS on Fargate, the pricing is calculated based on the vCPU and memory resources that are consumed from the time you start to download the image until the EKS pod is terminated. A minimum charge of 1 minute applies.
Logging and monitoring logs in EKS
All the control plane logs in EKS, which provide audit and diagnostic information, are available directly in Cloudwatch logs in your account. Monitoring these logs makes it easy for you to keep the cluster secure. You have the option to choose what type of logs you want to be sent in the Cloudwatch.
Since the Kubernetes API server exposes a wide number of useful monitoring metrics by default, you can use those with Prometheus for better monitoring the cluster.
Deploying an EKS cluster on AWS
Now that you know the benefits of EKS, it’s time to learn how to deploy it, connect it with kubectl, and configure the worker nodes.
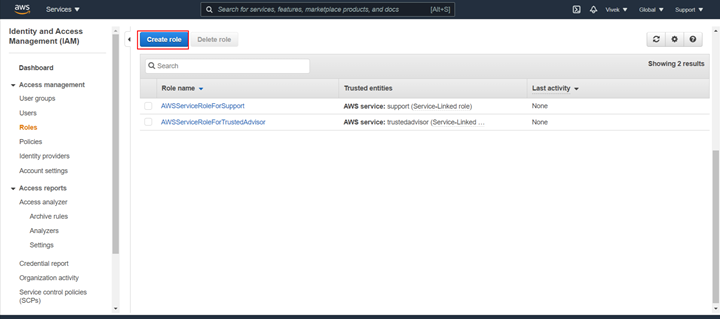
Setting up the IAM roles
First, you need to create an IAM role for EKS. So go ahead to IAM and click Create role.
Select EKS to set the required permissions.
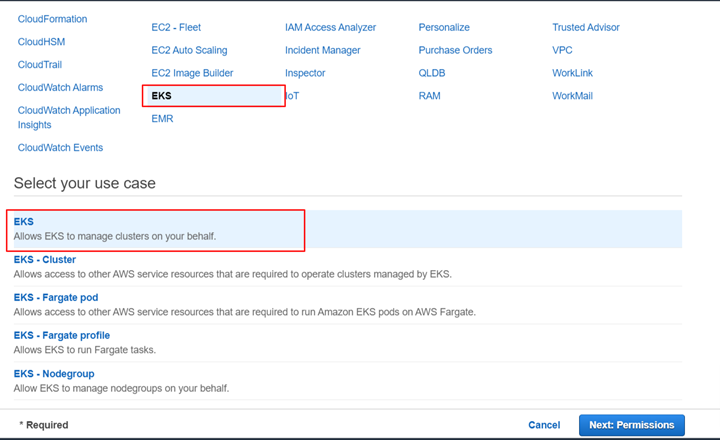
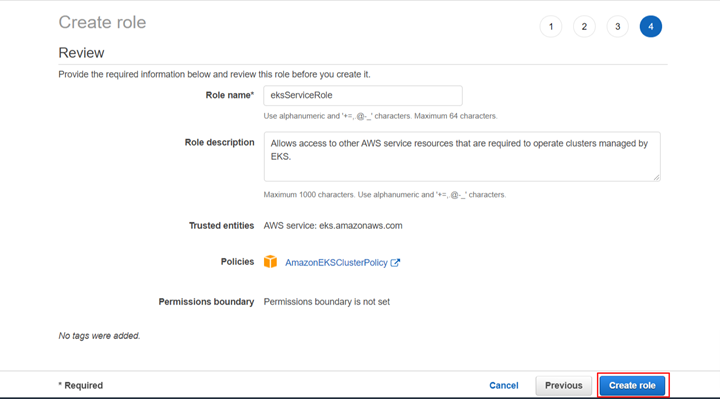
Select AmazonEKSClusterPolicy, name the role, and click Create role.
Creating VPC for EKS
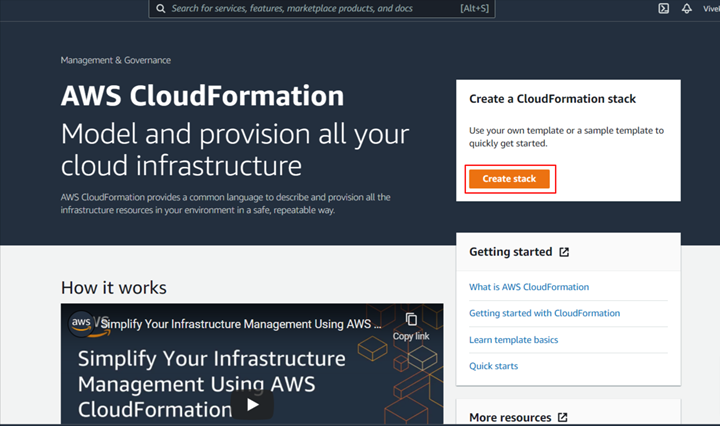
Next, you’ll need a VPC to have all the components of your cluster in one place. You will use a CloudFormation script to create a VPC stack. You will need the link to the script.
Make you sure log in to the AWS console, then go to CloudFormation and click Create Stack.
On the Create Stack page, paste the following link into the Amazon S3 URL field:
https://amazon-eks.s3-us-west-2.amazonaws.com/1.10.3/2018-06-05/amazon-eks-vpc-sample.yaml
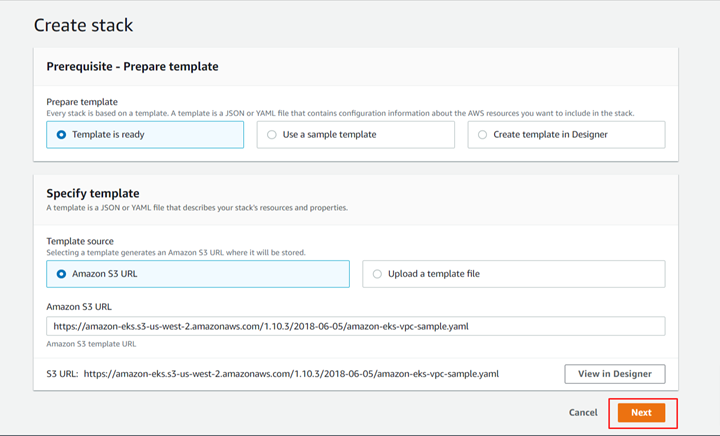
Name the stack and leave the other settings as their default, then click Next, and finally click Create Stack.
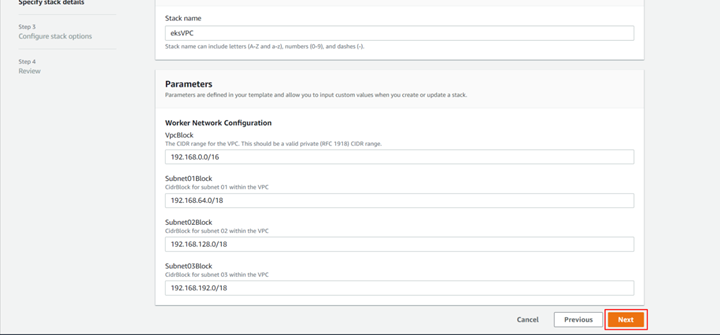
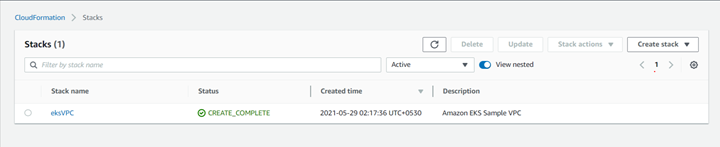
After a few minutes, your stack will be created.
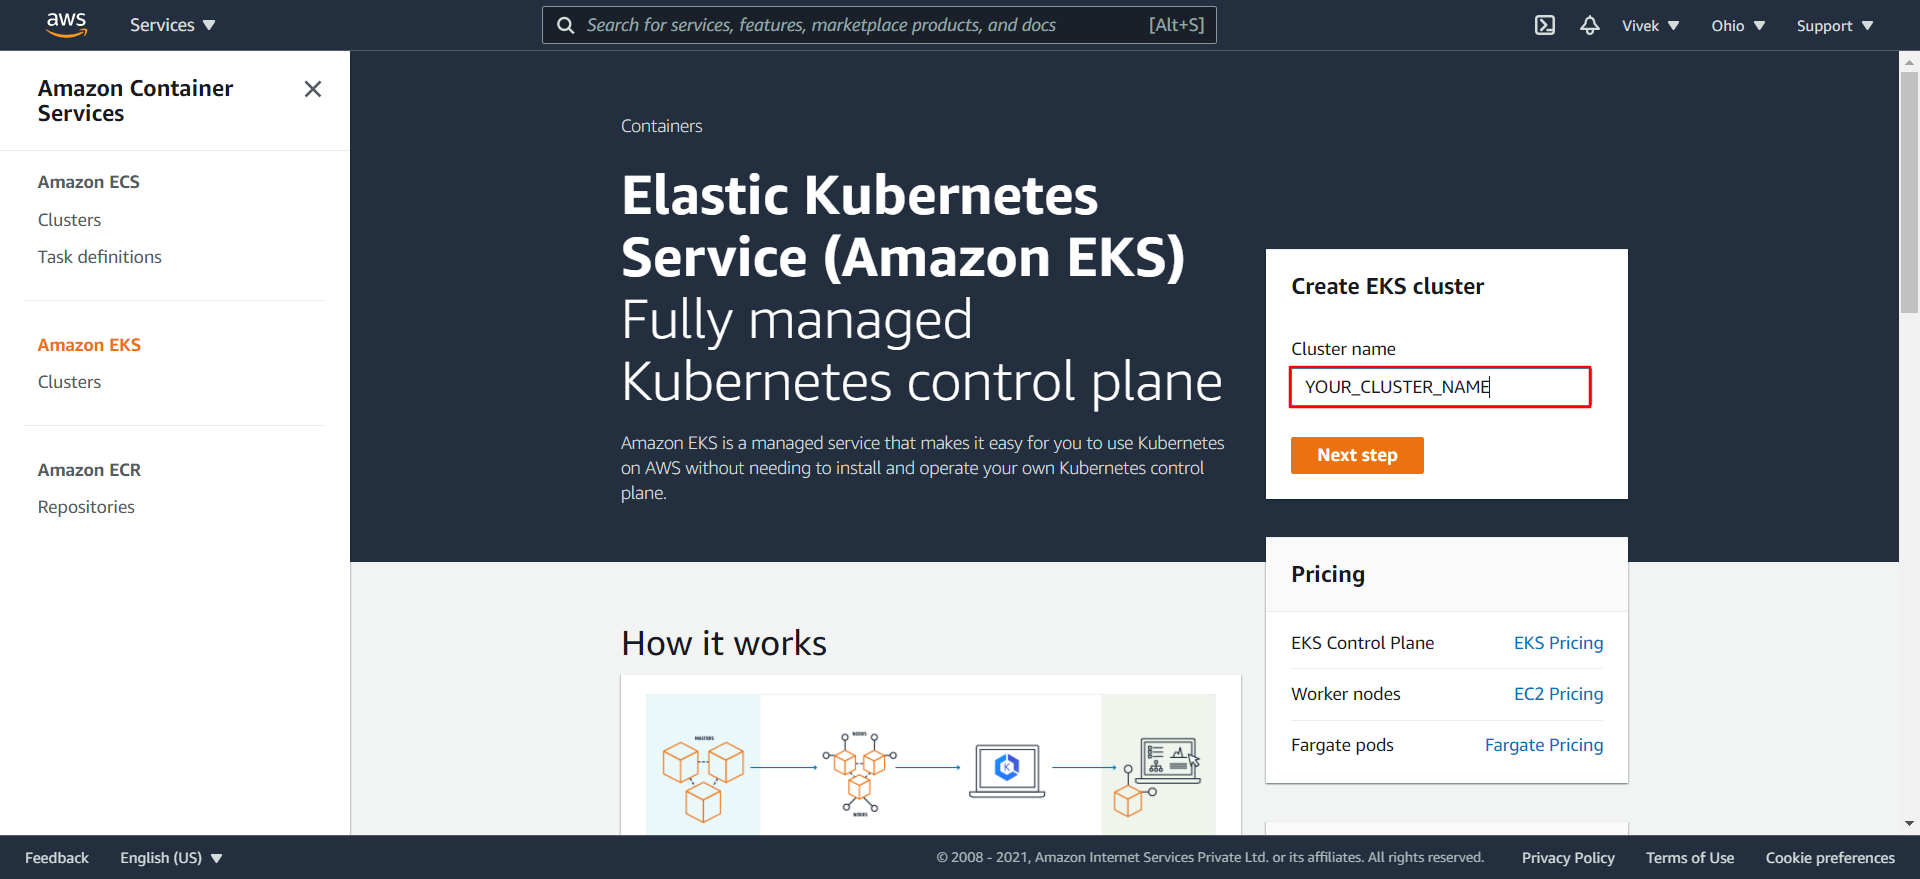
Creating an EKS cluster from the console
Go to https://aws.amazon.com/eks/, name your cluster, and click Next step.
On the next page, select the version of Kubernetes you want to use. The cluster role will be automatically selected after you have set the appropriate version for the cluster.
Click Next.
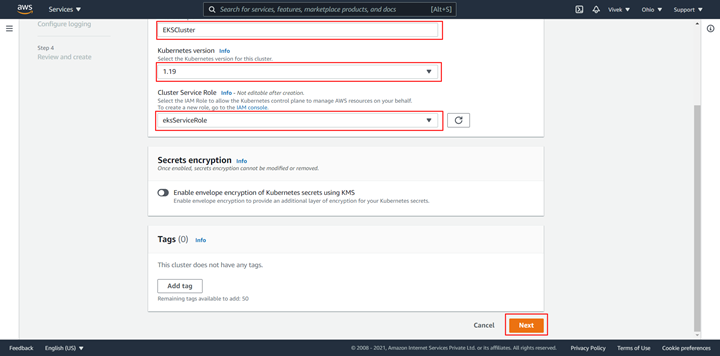
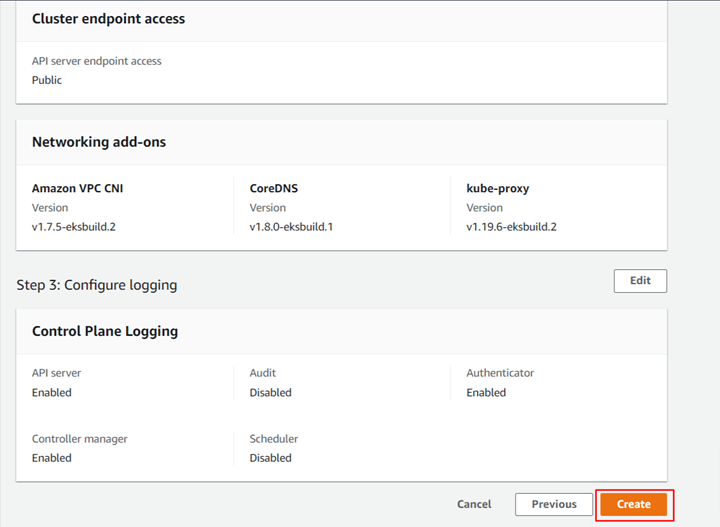
Next, configure the networking settings for the cluster. Select the VPC that you created in the previous step. The subnets will automatically get attached. Select both security groups and click Next.

Keep the network add-ons as default and click Next.
For logging settings, you can select the options according to your preferences. After you have set the required options, click Next.
Finally, review the setting. After you have verified all the options, click Create.
Connecting an EKS cluster with kubectl
Before continuing, make sure you have kubectl installed on your machine. Also, make sure you have installed and configured AWS CLI.
To update the config file on your local machine, you can use this command:
aws eks --region <region-code> update-kubeconfig --name <cluster_name>
Make sure you enter your own cluster details here.
You can verify the connection using:
kubectl get svc
The output should look something like this:

Configuring the worker nodes
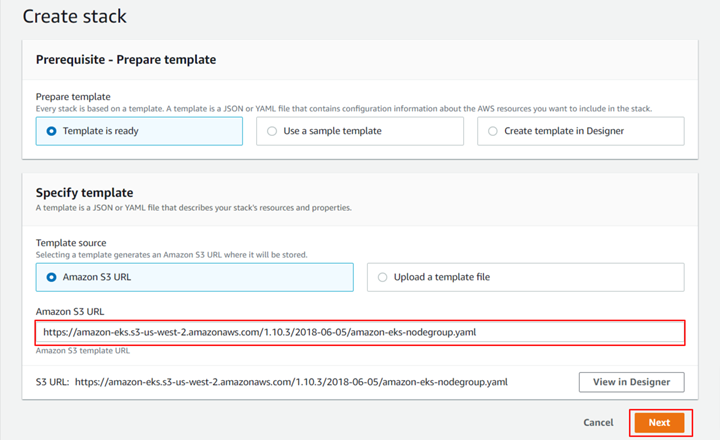
Since there are no worker nodes attached to the cluster, go ahead and connect the nodes to the cluster. You will be using the official AWS CloudFormation template to make this easy. Go to CloudFormation and click Create Stack.
Paste this URL in the Amazon S3 URL field:
https://amazon-eks.s3-us-west-2.amazonaws.com/1.10.3/2018-06-05/amazon-eks-nodegroup.yaml
And click Next.
Next, you have the option to set parameters. Here you can fill in the details of your cluster.
- ClusterName: Your cluster name
- ClusterControlPlaneSecurityGroup: Select the VPC you created earlier
- NodeGroupName: Any name you want to give the node group
- NodeAutoScalingGroupMinSize: Number of minimum nodes you want to run
- NodeInstanceType: Type of instance you want
- NodeImageId: Select the AMI ID of the image you want to use as the node
- KeyName: SSH key you want to use
- VpcId: Selec the VPC we created
- Subnets: Select the default three subnets

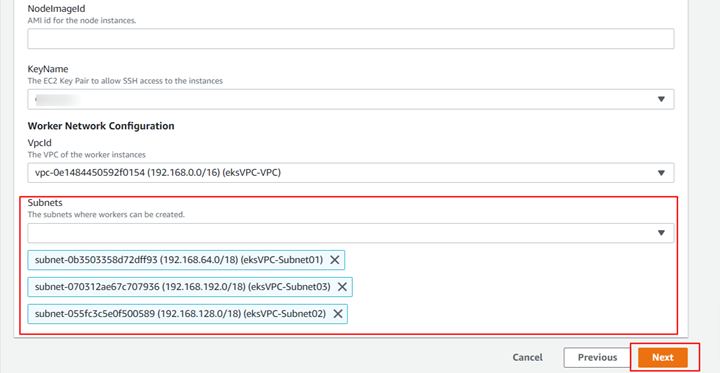
After you have entered the parameters, click Next.
Verify the settings and click Next. On the final page, review the template and parameters and click Create Stack. Wait a few minutes and your worker node group will be created.
Go to the output and copy the NodeInstanceRole. You’ll need it shortly.
Next, make a file named workerNodeGroup.yml and paste in the following code:
Then, paste the role you copied in the rolearn and apply the configmap using:
kubectl apply -f workerNodeGroup.yml
You will receive configmap/aws-auth created as the desired output.
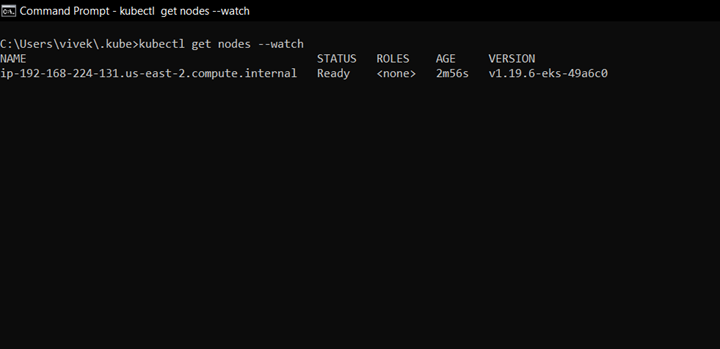
Next, type:
kubectl get nodes –watch
If everything goes well, you can see output as something like this:
If you can’t see anything after running the command, have a look at some troubleshooting steps in the documentation.
You are all set to run the containerized workload on your own EKS cluster.
Conclusion
When you set up your Kubueretes cluster on AWS, EKS is essentially to ensure that set up runs smoothly and efficiently. What’s more, when it’s all done, you’ll be able to use AWS services like Cloudwatch, and IAM, which will help keep your cluster more secure, have automated patching, and allow for better monitoring. Before you go to set up your cluster, you may want to compare AWS to Microsoft’s Azure and Google’s GCP which also offer a variety of services.
You now know how to set up an EKS cluster using the console, but there are more ways to do it, including using AWS CLI.
If you're looking for an easy-to-use solution for monitoring your Kubernetes clusters, then try using Airplane. Airplane is the developer platform for building custom internal tools. You can transform scripts, queries, APIs, and more into powerful workflows and UIs. With Airplane Views, you can build React-based dashboards that make monitoring your clusters easy to do.
To build your first dashboard within minutes, sign up for a free account or book a demo.


