


Kubernetes, also known as K8s, has established itself as the standard platform for running distributed applications and managing software in the cloud.
Despite the growing popularity of Kubernetes, getting started with it can be quite challenging. This article gives software and DevOps engineers beginning to use Kubernetes an overview of what Kubernetes nodes are, how they work, how to handle common failures and challenges, and how to monitor them effectively.
Importance of nodes
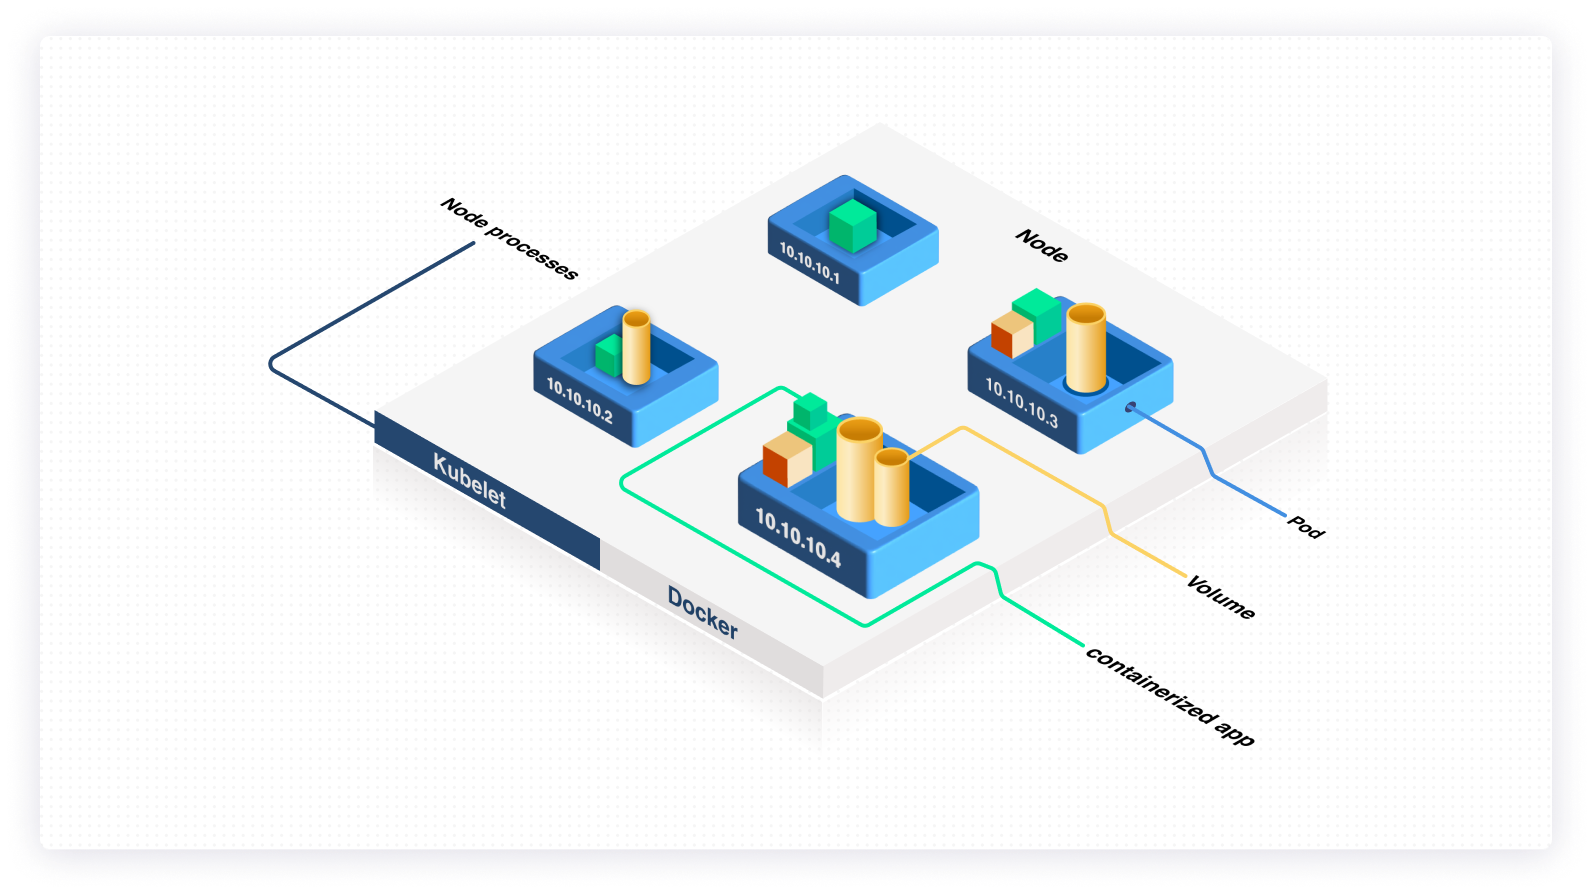
Kubernetes runs your workloads by placing containers into pods which then operate on nodes. The official Kubernetes documentation explains that a node contains all the required resources to run pods. Additionally, depending on the cluster, nodes could be virtual machines (VM) or physical machines. Perhaps the simplest definition of a node used by many experts is that it is the smallest unit of computer hardware storing and processing data in Kubernetes. In other words, nodes are to clusters what cells are to the body, which is why you need to understand them.
A Kubernetes node has three main components: a kubelet, a kube-proxy, and a container runtime.
- The kubelet manages the deployment and scheduling of pods to Kubernetes nodes. It receives orders from the API server and controls the container runtime, starting and stopping it as required, and stops pulling containers from the registry.
- The kube-proxy is a network proxy running on each node to facilitate and maintain network communications between pods in a node.
- The container runtime is responsible for pulling, unpacking, and running containers on a node. Some container runtimes that Kubernetes supports include Containerd, CRI-O, and Docker, among others.
How nodes work in Kubernetes

Now that you have an overview of the essential components of a node and how they fit into a Kubernetes system, let’s dive deeper into some key concepts that will aid your understanding of how nodes work in Kubernetes.
Nodes creation
There are two ways to create nodes in Kubernetes: you can either add nodes to a cluster manually or let the kubelet on the node do it automatically by self-registering to the control plane. Right after you have created a node object manually or through the kubelet, the control plane authenticates your new node. Once this is done your node is ready to run.
Kubernetes’ example of creating a node object from a JSON manifest shows how to add nodes automatically. See below:
After creating a node, Kubernetes checks if the kubelet registered to the API server matches the node’s metadata.name field. If it matches, the node is successfully registered as a healthy node, and pods can be scheduled on it. If it doesn’t match, the node is considered to be unhealthy and it will be ignored by the cluster. However, if in the future it becomes healthy, it will be considered for hosting pods.
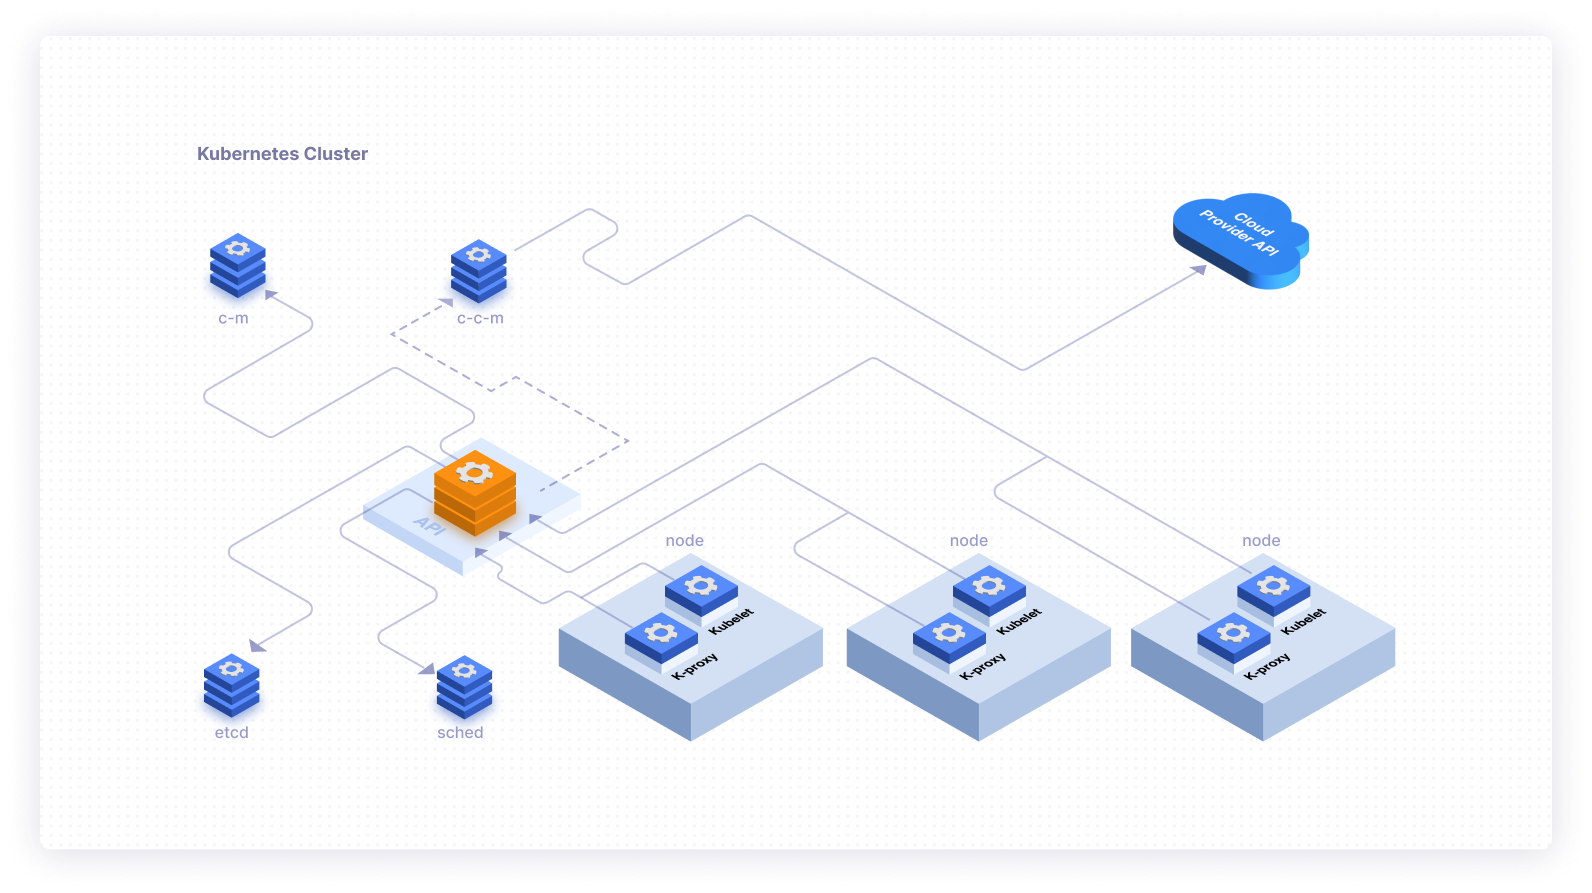
Control plane and node relationship
The next important concept to understand is the relationship between the control plane and the node. The control plane is an essential part of a cluster that manages various aspects of nodes. It has multiple roles in a node’s life, which include assigning pods to nodes, monitoring them, and checking for their validity in a timely fashion.

Before assigning pods to a node, the control plane checks for the node’s resources and affinity, then it sets pods that are suitable for the node’s potentials and resources. Further, it checks the nodes’ validity every second.
Node and pod relationship
Kubernetes doesn’t run containers directly; instead, it embeds the containers into a high-level structure called a pod. Containers in the same pod share the same resources and network as they all run on the same node. These containers can also easily communicate while others on different pods maintain a degree of isolation.
Note that each pod is tied to the node where it is scheduled and remains there until termination—according to restart policy—or deletion. In case of a node failure, identical pods are scheduled on other available nodes in the cluster.
While pods can house as many containers as possible, it’s much better to set limits and treat all the containers in a pod as if they would scale together as a unit. To consider a pod as solitary, all containers in the pod must be scaled together regardless of their individual need for resources. However, this leads to a waste of resources.
So, pods should wrap only primary process containers and their tightly coupled containers to make them as small as possible—thereby preserving resources.
Node condition

Node condition describes the status of all running nodes. Examples of node conditions are Ready, DiskPressure, Memory Pressure, and Network Unavailable. If the status of a node is False or Unknown, the node controller or control plane triggers the API-initiated eviction of pods associated with that node. Also, if a node is unreachable, the pods may be scheduled for deletion.
Node heartbeats
Just like heartbeats can reveal critical health-related information about a person, Kubernetes nodes have a concept called heartbeats that let the control plane know about the health of the nodes under its control.
Sent by the kubelet of each node in regular intervals, heartbeats communicate the status of the node with the control plane. The control plane can then make decisions about whether the node is available for hosting pods or not, and if it’s not healthy, what actions can be taken.
According to the official Kubernetes documentation, there are two types of heartbeats for nodes:
Unlike updates to a node’s .status, lease is a light resource. You can reduce the performance effect of updates on large clusters by using leases for heartbeats.
Node controller
Node Controller, also known as the control plane, manages various parts of the node. It affects the node in three ways:
- assigning a Cross Inter-Domain Routing (CIDR) block to the registered node
- updating the node controller’s internal list of nodes
- monitoring the node’s health
The node controller achieves the above by verifying the state of each node every --node-monitor-period second.
Node name uniqueness
The name of a node object must be a valid DNS subdomain name. Nodes are identified by their name only, so no two nodes can have the same name simultaneously. If there are two nodes with the same name, Kubernetes assumes they are the same object, leading to inconsistencies in the cluster.
If you do an upgrade without replacing a node, it might cause pods already scheduled on the node to malfunction since they’re tainted with new labels assigned to the node.
To ensure the uniqueness of a node in a cluster, remove the existing node from the API server before replacing or updating a node, and re-add it only after the completion of the upgrade.
Node resource management
Node objects manage and track information about the node’s resource capacity. Nodes that self-register can report their capacity during registration. If you manually add a node, you need to set the node’s capacity information from the start for the node objects to be able to track and alert you.
Nodes and clusters
Each cluster also has a control plane that manages the nodes and pods of the cluster.
Node security
You can harden and secure the services running on a node by doing the following:
Control access to sensitive network ports via access lists.
Implement a strong authentication method.
Ensure the host is configured correctly and securely.
Limit SSH access to the node.
Apply the Center for Internet Security (CIS) Kubernetes benchmark.
Monitoring nodes
While Kubernetes by default will assist you with monitoring and securing node performance, health status, and configuration aspects, using third-party and open-source tools can be a more effective way to monitor and protect your nodes.
Open-source monitoring tools like Prometheus are also popular in the Kubernetes community.
Final thoughts
In this article, you’ve learned about the essential components of a node, what they do, how to handle common failures and challenges, as well as how to monitor and secure them.
While Kubernetes is becoming increasingly popular with software and DevOps engineers for managing containerized applications, several challenges still persist. Adopting Kubernetes requires DevOps teams to rethink and adapt to the monitoring strategies of the various applications in clusters.
If you're looking to build workflows or dashboards that make it easy to monitor and update your various applications in clusters, then Airplane is a good fit for you. With Airplane, you can transform scripts, queries, APIs, and more into custom internal workflows and UIs. You can use pre-built components and templates to get started easily.
To build your first dashboard in Airplane quickly, sign up for a free account or book a demo.


