


Kubernetes is known for its immense scalability - just a single cluster can have 5,000 nodes and 300,000 total containers. This means that there’s plenty of room for multiple groups and projects to share the cluster, which is known as “cluster multi-tenancy”. But, when you’ve got several teams and projects running within one cluster, things can get confusing and people can step on each other’s toes if the order isn’t maintained.
Thankfully, this is where namespaces come in. Namespaces help keep things connected, yet logically siloed from an organizational standpoint. They allow you to easily divide clusters into sub-clusters, that can still communicate with one another. By remaining isolated within a namespace, a team’s infrastructure is better protected against outages and malicious threats.
In this article, we’ll teach you how to set up a namespace, talk about some of their capabilities, and discuss some of their limitations.
Why use a namespace?
We’ve touched on the fact that namespaces are good for organization and isolation. It’s entirely possible that different teams, semantically speaking, might want to use identical resource names for their specific projects. Since a namespace’s components aren’t directly tied to those in another namespace, it’s possible to have an object named, for example, resource files in multiple namespaces without issue. Additionally, item manipulation in one namespace won’t impact similar items in another. This provides potential damage control. On the organizational side, developers can use namespaces to separate test and production environments.
Namespaces are also useful for defining specialized sets of permissions—especially those pertaining to Role-Based Access Control (RBAC). A Kubernetes administrator may creatively use namespaces to form groups with shared permissions and roles. It’s an effective way to bolster security in your environment.
You may also use namespaces for smart resource management. Admins can define quotas for resource usage and distribution. You can tailor these to Kubernetes policies, and ensure that one namespace doesn’t hog all available CPU or memory capacity.
Finally, namespaces are useful for boosting performance across your clusters. Separating namespaces can increase search speeds under the Kubernetes API. This reduces latency and bump application speed for each containerized app on the cluster.
How namespaces are created
Namespaces arise in two ways: default namespaces and manually generated namespaces. Kubernetes creates a default namespace encompassing any system resource. The system must account for its components, and this is therefore an essential step in doing so. Conversely, nodes and persistent storage volumes exist outside of namespaces, as they’re always visible to all namespaces. Aside from the default namespace, kube-system and kube-public respectively pertain to Kubernetes components and public resources. It’s recommended that users avoid tinkering with these spaces to prevent issues from arising.
Kube-system is the namespace for objects and service accounts with high-level privileges within Kubernetes. Utilization of the Kubernetes controller stems from this namespace, and users should therefore avoid assigning anything personal there. Kubernetes itself owns this namespace, which specifically contains vital components like kube-dns, kube-proxy, kubernetes-dashboard, and more. Messing around in this namespace can damage the Kubernetes system. Unless you revel in deleting things like System 32 and the Windows Registry for kicks, don’t poke around heavily in kube-system. The results could be quite similar.
Meanwhile, a namespace like kube-public contains information deemed insensitive and therefore accessible to all inquiring users. It’s reserved for things like system usage.
How to manually generate a namespace with Kubectl
Users commonly called “cluster operators” can manually generate namespaces. This is done via kubectl commands, which are relatively simple in execution. Say you’ve created a bunch of namespaces already, and are adding yet another to your cluster. In this case, it’s often useful to summon a list of namespaces to avoid accidental repetition. You can accomplish this via the following, after accessing your master server:
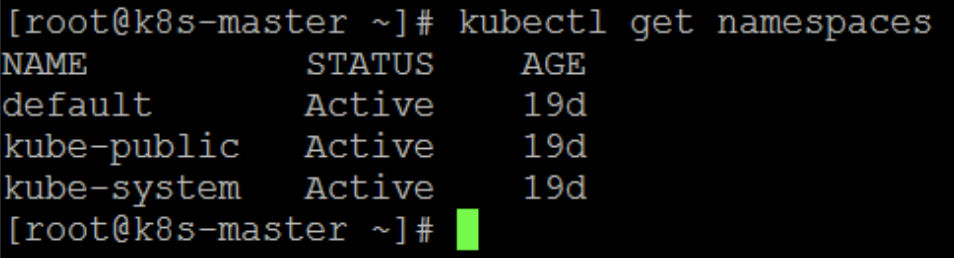
This is your standard output. Any additional custom namespaces are listed above default.
Once you complete this initial check, use the create command type to form your own cluster namespace:
When designating your name, enter it into the command minus the symbols, which simply exist for readability purposes. This will create your new namespace, which Kubernetes will confirm by saying namespace “samplenamespace” created. You’ll want to verify that this was made successfully by running the previous get namespaces command. This new namespace will appear atop the list.
You may also create a namespace via YAML file, which is reliable yet incurs additional steps. You must create the configuration file, designating an apiVersion, kind (namespace), and metadata. The Indented line underneath metadata contains the name field, which is where you’ll enter your namespace. After saving and closing the file, use the apply command as follows to solidify these changes:
Thankfully, deleting a namespace is just as easy. We instead replace the create portion of our earlier command with delete, as such:
It’s also true that multiple pods can live within a specific namespace. What if you want to delete these pods? Simply use the following command: kubectl delete pods --all --namespace examplenamespace.
Remember that no custom namespaces should contain the kube prefix, as this naming convention is reserved for system components.
What if we want to summon a list of objects, both within and outside of our namespaces? To view these lists, enter the following commands one at a time:
Namespace tips and best practices
Consider a situation where you’d use multiple namespaces. These namespaces act as repositories for your crucial resources, which in turn have their own assigned names. That basic structure is critical. While namespaces can coexist alongside each other, one cannot exist within another. Additionally, the names of objects within a given namespace must be unique to each other.
You can deploy resources like pods within specific namespaces as needed. Note that if you create a pod without specifying a namespace in kubectl or within a YAML file, Kubernetes will place that pod within the existing active namespace. This is the default namespace. You may specify a destination namespace in two ways.
Method one is via the namespace metadata subfield in a YAML file. Simply enter the namespace you prefer. Otherwise, you can leverage the namespace flag within kubectl. Enter the following when attempting to create a pod within a custom namespace:
If you want to view a pod in a given namespace, simply running a generic “get” command won’t work properly. This command applies to the current active namespace—not necessarily the one you wish to inspect. You must instead use the following:
This would retrieve something akin to the following output:
| NAME | READY | STATUS | RESTARTS | AGE |
|---|---|---|---|---|
| Bestpod | 1/1 | Running 0 | 20s |
Namespace communication
You know that namespaces are isolated from one another, but did you know they’re also hidden from each other? This means one namespace isn’t discoverable to another. While we may want these to be divorced at the systematic level, there’s a high possibility that services within different namespaces need to communicate, for example, if you have two namespaces that contain different users and RBAC policies.
The applications governed by these policies might share information back and forth, so it wouldn’t make any sense to wall them off from one another completely.
Whatever the use case, using DNS service discovery can expose your endpoints as required. This allows services to talk effectively by pointing apps toward service names. A service’s DNS pattern might look like this:
To access a service in another namespace, you’ll need the service name and the namespace name where it resides. To connect a service named “LoggingUtility” within namespace “examplename,” you’d use the following address:
This same process can be used for any combination of service and namespace. Note that non-isolated namespaces instead dictate that you use Network Policies. This tool allows you to declare which pods or namespaces can connect with one another. Therefore, you can define how your services communicate with greater granularity. Network policies live within manifests and editable within the source repository. You can ALLOW, DENY, and LIMIT traffic between namespaces using these configurations.
How many namespaces should you use?
Too much of anything is a bad thing, as the adage goes. Not even namespaces are immune in this regard. While it’s useful to isolate and organize, too much division and declaration can cause confusion. The trick is getting the most out of your namespaces without overwhelming your management abilities. Can we apply some rules of thumb?
For example, a small team knows each other well and can house a small lineup of microservices under one umbrella. This is convenient and means that custom namespaces aren’t so critical to an organization. Production services can likely exist within the default namespace. However, it might be useful to create two separate namespaces for testing and production. Conversely, a growing team will benefit from defining multiple namespaces. This makes it easier to scale your organization's efforts in lockstep with your team’s expansion.
Teams in large companies need their own namespaces. Not all employees know each other, permissions vary widely, and some data might be considered sensitive. At the very least, not all projects are common knowledge. Separating team members and projects into their own namespaces preserves security. It also prevents resources from being mixed up.
Finally, enterprises have the most intricate setups. The average enterprise uses 1,295 microservices and houses many teams to manage these. External teams might also have integral roles here. Employing a combination of hardened namespaces and multiple clusters is useful in keeping things organized. Strong RBAC prevents data exposure. Increased isolation can also mitigate damages from any failures, attackers, or misconfigurations.
Conclusion
Managing a complex system like Kubernetes can be an immense challenge for seasoned administrators. Thankfully, a strong understanding of namespaces can make those tasks much easier. Today’s companies leverage hundreds of containers in production—and even more in testing. Resource tracking is more important than ever. Namespaces remain powerful tools for defining the security, performance, and hierarchy of your Kubernetes system.
If you're looking for a maintenance-free platform that makes it easy to build dashboards and workflows to help monitor your applications, then consider using Airplane. Airplane is the developer platform for building custom internal tools. The basic building blocks of Airplane are Tasks, which are functions that anyone on your team can use. Airplane also offers Views, a React-based platform that makes it easy to build custom UIs quickly. Use Airplane to build admin panels, deployment pipeline dashboards, database issues alert workflows, and more.
To build your first Airplane View within minutes, sign up for a free account or book a demo.


