


In recent years, Kubernetes has become synonymous with container orchestration in the cloud-native space. Container orchestration involves operational tasks, such as provisioning, deploying, networking, and scaling, in the lifecycle of running containerized workloads. Kubernetes is an open-source platform that manages these operations automatically based on user-declared configurations.
Today, Kubernetes is recognized as the most popular technology in the field, with over 3800 contributors, meetups all over the world, and over 100,000 users in the public Kubernetes Slack workspace. A recent Stack Overflow survey reveals that Kubernetes is one of the most beloved tools, and that over twenty percent of developers who don’t currently work with it would like to.
A common strategy among organizations is to use a single Kubernetes cluster that consists of multiple workloads sharing the platform’s infrastructure, which helps minimize the cost of running the cluster, as well as the amount of management needed. This arrangement is referred to as multi-tenancy.
A workload in Kubernetes is an application composed of either a single resource or several resources working together. Typically, namespaces are used to segregate these workloads, creating a layer of isolation between the deployed resources in the respective namespaces. This is beneficial in many use cases, such as when running unrelated applications in different namespaces. It also allows you to run different versions (such as dev, test, and production) of the same application in a single cluster. In situations like this, there are multiple users, such as software developers, quality assurance testers, DevOps, and solution architects. Both the applications and the users are considered cluster tenants.
By default, namespaces don’t offer strict isolation, but with the right measures and policies applied, you can improve your cluster’s security by restricting the actions users can perform in a given namespace, controlling network traffic for your applications, and managing application resource usage such as CPU and memory. This article will explore the concept of multi-tenancy, how it compares to a multi-cluster deployment strategy, and how best practices can help you avoid common pitfalls.
Understanding multi-tenancy
Multi-tenancy is a Kubernetes cluster model or architecture model in which a single cluster’s resources are shared among multiple tenants. Examples of the shared cluster resources include CPU, memory, networking, and control plane resources. The cluster tenants can be software teams, applications, customers, or projects. This model is useful when organizations are looking for a solution that will help them optimize infrastructure costs, accommodate different types of users in the same cluster, host multiple application workloads, and reduce operational overhead and complexity. These scenarios will be elaborated on further down.

Multi-tenant Kubernetes can be implemented in two ways:
- Soft multi-tenancy, which doesn’t have very strict isolation between tenants, is aimed at preventing accidental interference, and is suitable for trusted tenants.
- Hard multi-tenancy, which assumes tenants cannot be trusted, enforces stricter isolation to protect tenants from malicious interference, and is suitable for both trusted and untrusted tenants.
Multi-tenancy vs multi-cluster deployments
Multi-tenancy within a single cluster requires additional work to achieve the right kind of isolation between workloads, while multi-cluster deployment models, by default, offer strict isolation at a cluster level. A multi-cluster model, as the name implies, is a strategy that consists of more than one Kubernetes cluster for specific applications (such as a cluster per application model) or environments (such as a cluster per environment model). That being said, a multi-cluster model presents challenges in the following areas:
- cost of managing multiple Kubernetes clusters
- complex administration and operational overhead
- achieving security compliance and consistency across clusters
- managing multiple application environments across multiple clusters
- observability of different Kubernetes clusters
- continuous delivery at scale
While there are multi-cluster management tools that help address these issues, in some cases, a multi-tenancy approach with individual Kubernetes clusters is more suitable. The next section will elaborate on these scenarios.
Use cases for multi-tenancy
Below are some use cases that strongly favor a multi-tenancy model.
- Managing cluster costs: Each cluster consists of a control plane and worker plane of nodes. Depending on the size and configuration of the underlying nodes, sharing these components lowers the cost of running a Kubernetes cluster when compared to running multiple clusters. Sharing a cluster across tenants also allows for applications to make use of the same cluster-wide resources, such as load balancers, ingress controllers, and service meshes, which can further reduce costs.
- Accommodating trusted and untrusted tenants: A Kubernetes cluster is a great way to share infrastructure with both trusted and untrusted tenants. For example, you can host applications that need to be accessed by internal teams such as software developers, system administrators, QA testers, as well as external parties that need access to workloads in your cluster, such as customers or third-party applications and tools.
- Reduce operational overhead and complexity: Optimizing a single Kubernetes cluster is arduous and time consuming. Carrying that process out at scale across a number of clusters requires even more effort. With a single cluster, you can reduce the management and complexity involved in optimizing the configuration for your cluster.
- Host multiple related or unrelated applications on a single cluster: In a case where you have multiple workloads, related or unrelated, that need a highly configurable and scalable platform to run on, a single Kubernetes cluster can accommodate such applications.
Multi-tenancy best practices
Multi-tenancy clearly poses some specific challenges at an administrative level, but following the practices described below will help you avoid them.
Namespace best practices
Namespaces operate like sub-divisions or folders within a cluster and allow for the management of access control, resource limits, and quotas. Best practices for Kubernetes namespaces include:
- Create a namespace template: Plan for the ongoing management of namespaces in your cluster. Namespaces in and of themselves aren’t much use—they need to be used in conjunction with other Kubernetes resources like RBAC, network policies, and resource quotas to enforce the isolated operation of each namespace within the cluster.
- Use a scalable naming convention: If you intend to use a shared cluster to host multiple tenants, it’s important to develop a good naming convention that will scale as your cluster grows and adds more divisions for additional applications. The main thing to consider here is to use a convention that makes it easy to understand the purpose of a namespace (ie <application-name-environment-name>).
- Attach labels to namespaces: Labels in Kubernetes are very useful for applying metadata that describes the purpose of resources. This is especially useful for easy retrieval of metrics when monitoring namespaces and applications, as well as to sort and filter through the relevant application data.
Role-based access control (RBAC)
The Kubernetes API server is like the gatekeeper for the rest of your cluster. All CRUD (Create, Read, Update, and Delete) operations go through this main component, whether the request originates from inside or outside of the cluster. With multiple tenants, the API server needs to be secured by enabling RBAC and implementing authorization policies to control the behavior of users and applications in the cluster. RBAC uses the rbac.authorization.k8s.io API group and has the following API objects:
- Role: This object is used to determine which operations can be carried out on which resources in a given namespace.
- RoleBinding: This object is used to determine which users or service accounts are authorized to execute operations on resources in a given namespace.
- ClusterRole: This object is used to determine which operations can be carried out on which resources across the cluster.
- ClusterRoleBinding: This object is used to determine which users or service accounts are authorized to execute operations on resources across the cluster.
The following are examples of roles with defined rules for API operations that are permitted, along with the rolebindings that attach them to specified subjects (users, in this case).
Resource distribution strategies
If you intend to use a shared cluster for your workloads, you need to implement proper resource distribution planning. Allowing your containerized applications to have unlimited access to the cluster’s resources could cause the following issues:
- node constraints or starvation
- performance issues across applications due to congestion
- difficulty planning for additional applications
- conflicts between teams deploying applications to the same cluster
You can manage resource usage across your workloads with resource quotas. Resource quotas can be used to limit how much CPU, storage, memory, and other resources can be consumed by each pod within a given namespace. They also allow you to limit the number of objects you can have for certain resources, such as pods, configmaps, secrets, services, and more.
Below is a basic example of a resource quota that can be applied to a namespace:
Networking best practices
In a Kubernetes cluster, all pods can communicate with each other by default, regardless of the node or namespace that the pod has been scheduled to. Each pod is assigned a unique IP address and is part of the Kubernetes network that dictates the behavior of pod communication.
This default behavior means that unrelated applications on a single cluster introduce security isolation risks. To manage or mitigate these risks, you can make use of network security policies.
Kubernetes network security policies are objects that allow you to control the network traffic to and from pods in your workloads at the IP address or port level (OSI layer 3 or 4). These policies create a more secure network in your cluster by segregating pod traffic from network flows that are necessary for your applications to function as expected.
The use of network policies requires the installation of a CNI plug-in that supports network policies. Examples include Calico, Weave Net, and Cilium.
Below is an example of a network policy that controls ingress traffic for all pods that have the label role: express-ap attached to them. This policy requires that incoming traffic to the relevant pods must come from within the namespace with the label tier: expressBackend.
To take advantage of network policies, you need to understand the primary fields that determine their functionality.
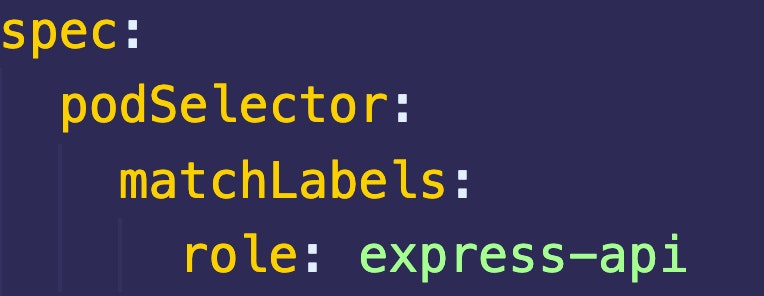
Pod selector
The pod selector (podSelector) determines which pods in a namespace the network security policy applies to. As mentioned above, without the use of a network policy, pods are not isolated, and are open to all network communication. If a network policy specifies a pod, the pod will be isolated, and only open to traffic allowed by the network policy definition.
Ingress and egress
A network policy can apply to traffic that is either ingress, egress, or both.
- Ingress: Used to refer to network traffic coming from another source into the pod.
- Egress: Used to refer to network traffic going out of the pod to another destination.
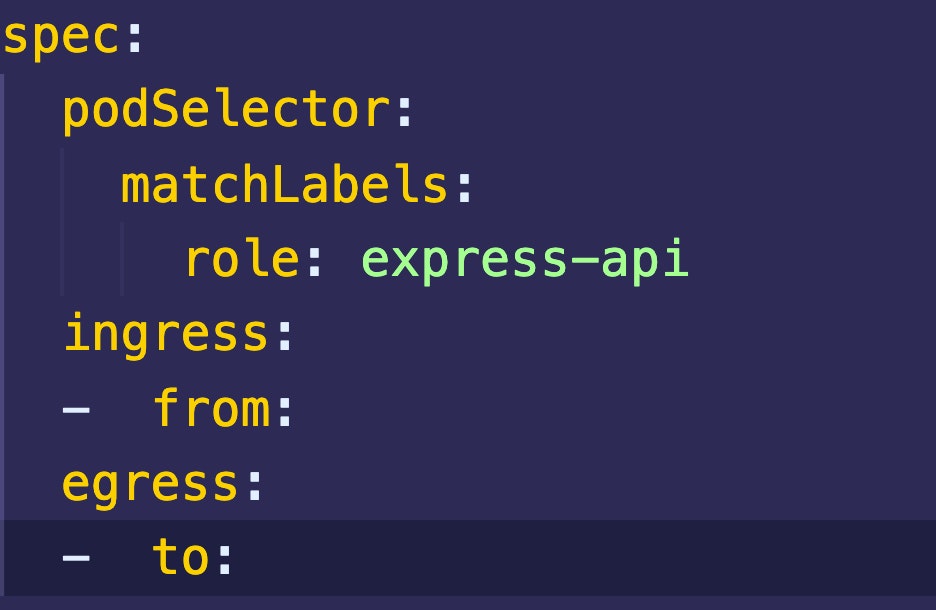
Both these fields, ingress and egress, have a set of to and from properties that determine what traffic is allowed.
- From: The
fromfield specifies what incoming traffic is allowed. - To: The
tofield specifies what outgoing traffic is allowed.
From/to rules
podSelector: This field selects pods to allow traffic to or from.namespaceSelector: This field selects namespaces to allow traffic to or from.ipBlock: This field selects an IP range to allow traffic to or from.ports: This field is used to specify one or more ports that will allow traffic.
Final thoughts
Optimizing your cluster for multi-tenancy requires careful planning and the implementation of best practices. However, the practices described in this article are just the first steps on the journey to optimal multi-tenancy. Beyond this, you need a consolidated way to monitor your workloads, core metrics, significant Kubernetes events, and logs in your clusters.
If you're looking for a third-party, maintenance-free platform to monitor your clusters efficiently, take a look at Airplane. With Airplane, you can build Tasks (single or multi-step functions that anyone can use) and Views (React-based UIs) using code within minutes. Using Views, you can build a monitoring dashboard easily using Airplane's pre-built component library and template library.
To build your first internal monitoring dashboard using Views, sign up for a free account or book a demo.


