


Kubernetes has been the default choice for container orchestration since its debut in 2014. Its core features, like its ability to auto-deploy, scale, and manage containers, solve a wide range of deployment issues for cloud-native applications.
When you’re working with Kubernetes resources, like deployments, services, and pods, sometimes you need to customize them in order to fulfill your use cases, which otherwise would be difficult to achieve with the options available. This is where Kubernetes CustomResourceDefinitions (CRDs) can help you extend the Kubernetes API and achieve the desired result.
In this article, you’ll learn what Kubernetes custom resource objects are and how they can be used and created. You’ll also see a few resource customizations in action.
Use cases for custom resources
A resource in the Kubernetes API is an endpoint that persists a collection of a particular type of object. For example, several built-in objects, like pods and deployments, are exposed via an endpoint, and the API server manages their lifecycle. Kubernetes provides you with an option of extending your object using CRD so that you can introduce your API to the Kubernetes cluster per your requirement. Using CRD on Kubernetes, you are free to define, create, and persist any custom object.
It’s worth mentioning that CRDs themselves don’t contain any logic. The primary purpose of a CRD is to provide a way to create, store, and expose the Kubernetes API for custom objects.
Custom resources can be used in so many different scenarios and help extend the functionality of Kubernetes, object automation, and object creation using kubectl.
Extending Kubernetes functionality
In some cases, you can’t complete your projects with built-in Kubernetes resources, so you need a way to extend it and customize it. Suppose you are running a database or cache inside the Kubernetes cluster; in this instance, you have specific operational tasks, like creating a backup, restoring from an existing backup, and creating a cluster with some predefined set of server nodes. These tasks are often defined using CRDs and must be combined with a controller for it to take proper action after creating specific resources.
Not only that, in case of failure scenarios (i.e., MySQL instance is down), you can define the number of replicas you want using the CRDs. Then you can apply the Kubernetes operator pattern (i.e., utilizing a controller) on top of it to bring the system back online.
CRDs without controllers are just declarative objects.
Using Kubectl for object lifecycle management
You can easily handle the entire lifecycle of the custom object using kubectl CLI just like you do for the Kubernetes native objects, like Deployment, Pod, and ReplicaSet.
Enabling object automation
CRDs are often used by DevOps or cluster administrators to automate specific complex tasks. For example, if you’ve installed monitoring tools, like Prometheus, on Kubernetes, you know how hard it is to install all the components (i.e., Prometheus and Alertmanager) that are required for a proper setup. Instead, you can use Prometheus Operator, which utilizes CRDs to automate your cluster’s installation and quickly set up monitoring.
Understanding CRDs
To better understand CRD, let’s walk through an example that shows you how it can be used to improve your Kubernetes deployments.
To start, you’ll need to have a local Kubernetes cluster set up and kubectl CLI installed. In this example, you’ll be using minikube to demonstrate the creation of CRDs. You’ll spin up the local Kubernetes cluster by running the minikube start command.
Create a CRD
Let’s begin by creating a simple CRD. Following is the YAML manifest CRD you’ll use, which was pulled from the Kubernetes documentation, where you can find additional information.
Let’s try to break down the definitions of each field so that you can better understand the CRD since most of them look different when you compare them with built-in Kubernetes objects.
apiVersion: specifies that you’ll use theapiextensions.k8s.io/v1API.kind: specifies that you want to create aCustomResourceDefinition.name: specifies the name of the resource, which should be in<plural>.<group>form.group: mentions the group name for the API.versions: mentions the version to be used in the API URL. It can have values likev2orv1aplha.served: controls whether thisversionshould be enabled or disabled. You can only mark one version asstorage.schema: specifies a structural schema that you want to validate the CRD of using the openAPIV3Schema validation before you send it to the API server. Then you are also specifying that custom object fieldsspec.cronSpecandspec.imagemust be a string. The fieldspec.replicasmust be an integer.scope: specifies whether the custom object is namespaced or available cluster-wide. You’ve used theNamespacedscope, so it’s only available to the namespace that you’ll use during the creation of the CRD. The default is cluster-scoped.pluralandsingular: specify the plural and singular name of the CRD.kind: specifies the type of the custom object.shortNames: specifies the short string that you can use in the CLI.
The next step is to create the CRD using the kubectl apply -f crd.yaml kubectl command. You’ll get the following response after the CRD creation:
Now you can verify it using the kubectl api-resources | grep crontab kubectl command. This command prints the supported API resources on the server. After using it, you should see the following output:
| NAME | SHORTNAMES | APIVERSION | NAMESPACED | KIND |
|---|---|---|---|---|
| crontabs | ct | stable.example.com/v1 | true | CronTab |
Create a custom object
So far, you’ve created a blueprint of your custom object, but this CRD itself is not helpful unless you create a custom object using the kind cronTab that you’ve defined in the CRD.
To create the custom object, you’ll use the following YAML manifest:
You’ll create the custom object using the kubectl apply -f my-crontab.yaml command. After the creation, you can run the kubectl get crontab command for verification and you should see the following output:
$ kubectl get crontab
| NAME | AGE |
|---|---|
| my-cron-object | 10s |
Further, you can view the raw YAML using the shortname ct you initially defined in the CRD:
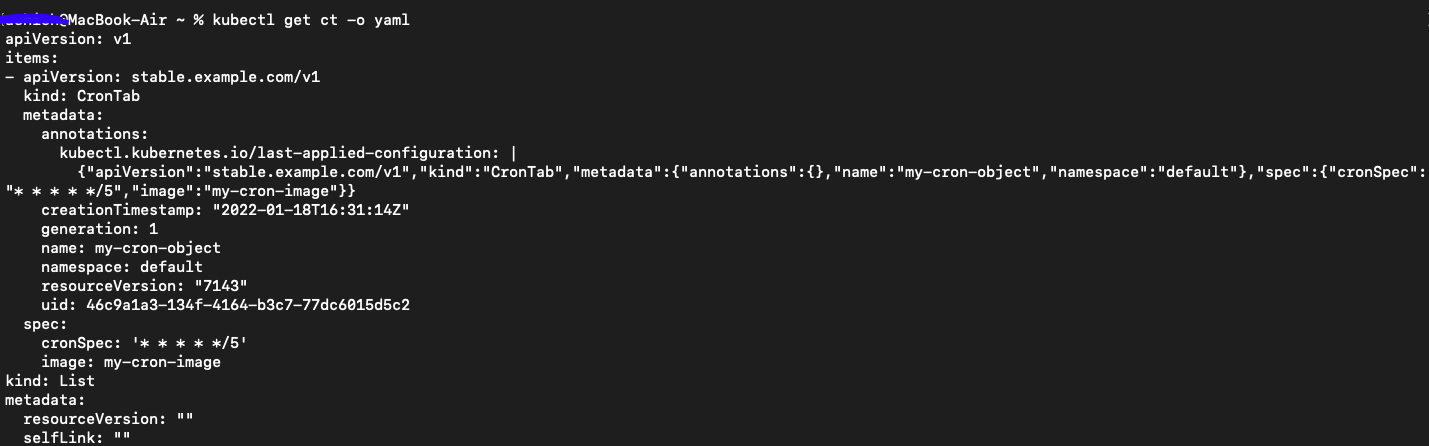
ctIt’s a good practice to add some validation before you create your custom resource object. Kubernetes itself won’t do any validation, and you would have to add this validation when you manually define your CRD. You can describe validation constraints using OpenAPI Specification.
You’ve used OpenAPI Specification in the preceding example, but let’s use the following code snippet to understand this functionality:
In the above example, you add a new environmentType field which accepts only the three predefined values in the enum. If you try to create a custom resource for this CRD with values other than what you defined, it will throw an error.
After providing the correct value, the validated custom resource of kind CronTab can be stored to etcd, the Kubernetes cluster persistent storage you use for other core Kubernetes objects.
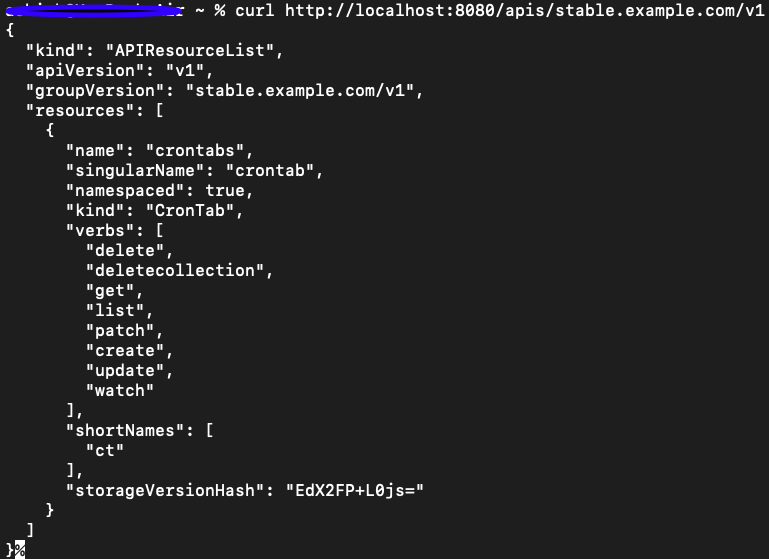
Even though you’ve used kubectl to manage the lifecycle of the custom resource, you have the option to use the REST clients, like curl or wget, to access the REST API of the custom resource:
Now you’re done and can do your cleanup using the following command:
As you can see, you can delete or remove the custom object the same way you do with other built-in Kubernetes objects. If you try to get details about the custom object, you’ll be greeted with an error.
Final thoughts
In this article, you learned how to extend the Kubernetes API using the CRD. You can easily manage custom objects created using the CRD the same way you handle built-in objects, but without as much effort.
CRDs aren’t useful unless you combine them with a controller to use them as a declarative API so that the current state and the desired state are always in sync.
If you're looking for a platform that streamlines your ability to monitor your applications, then consider Airplane. Airplane is the developer platform for building custom internal tools. You can connect to various resources and APIs to use with Tasks, which are single or multi-step functions, and Views, a React-based platform for building internal UIs quickly. Airplane also offers strong built-ins, such as job scheduling and audit logs.
To build your first engineering workflow using code, sign up for a free account or book a demo.


