


Kubernetes controllers are the powerful means by which the platform regulates itself to ensure it maintains the desired conditions. The cluster state in Kubernetes is defined by resource definitions, written as manifest files, that specify the internal behavior of the cluster. The controllers make sure that the cluster reflects what has been declared by the created resource definitions.
On the surface, this seems straightforward. However, there are a number of inner mechanisms in controllers that enable them to carry out the specified tasks to achieve the desired state.
This article will explore the internal architecture of controllers, some of the different types of controllers that exist within the Kubernetes cluster, and how to extend Kubernetes features through the use of custom controllers.
The basics of controllers
The Kubernetes control plane consists of a core component known as the kube-controller-manager. This component is responsible for running different types of controllers that maintain the overall desired state of the cluster. All the controllers are packaged and shipped in the kube-controller-manager, which is a single daemon.
As mentioned above, resources (or objects) in Kubernetes are defined by manifest files that specify the desired state. When resources are deployed, the appropriate controllers ensure that the cluster’s existing state is updated to match the desired state. Each controller is a control-loop that watches the shared state of the cluster via the API server. Based on information about the deployed resources, the controllers will make changes to move the current cluster state toward the desired state.
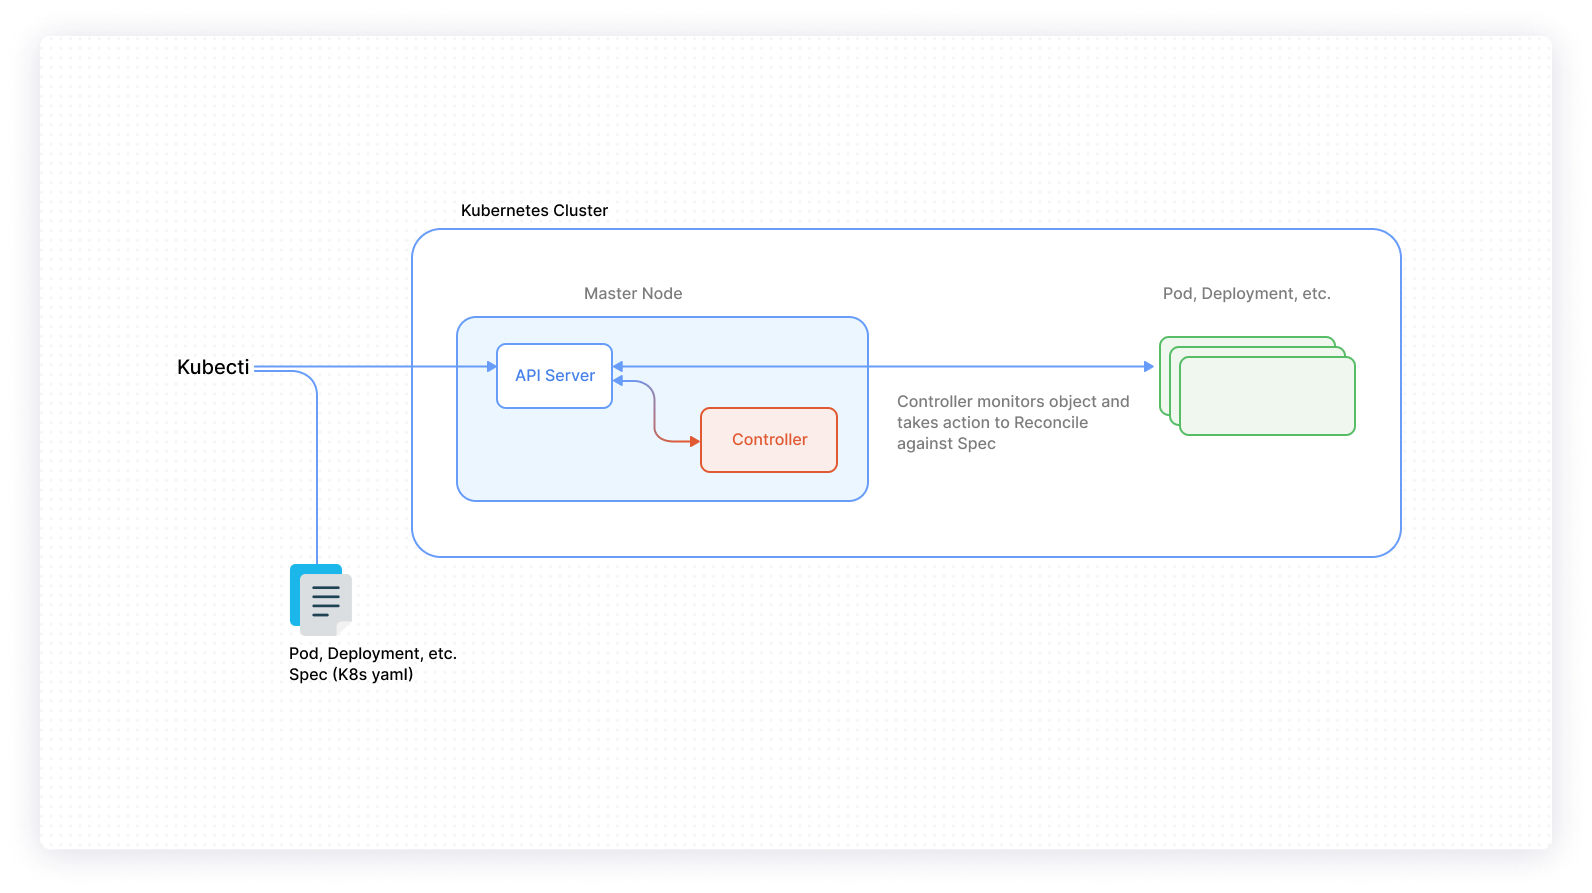
Controllers keep track of what workloads are running, the nodes that they’re running on, the resources available to those deployed workloads, and the policies around how they should behave.
Below is a basic example of a controller loop implementation:
Controllers have two main components: the Informer/Sharedinformer and the Workqueue. Through these components, controllers regulate and maintain the cluster state.
Informer overview
The process of checking actual vs. desired state involves the controller communicating with the API server to fetch object information. The number of calls made to the API server from controllers will increase exponentially with an increased number of deployed Kubernetes objects. This is both expensive and taxing on the system. Informers address this issue by retrieving object data and storing it in the local cache of the controller. The Informer then watches for any create, modify, and delete events that occur afterward.
However, this model does have a shortfall. There are instances where multiple controllers may be watching a single object, in which case each controller will update its own local cache. This can lead to memory overhead and several cache data stores that will potentially be out of sync with each other in terms of the object data. This is where the Sharedinformer comes in.
Sharedinformer overview
A Sharedinformer, as the name implies, is used so that the cache data store is shared among all the controllers. This solves the problem presented by multiple controllers observing and updating one resource or object in the cluster.
Workqueue overview
A Sharedinformer cannot track the activities of each controller (because it’s shared), and thus it relies on an external queuing system. There are different types of queues that are supported. Examples include the rate-limiting queue, the delayed queue, and the timed queue. When an object or resource is changed, the Resource Event Handler puts a key into the Workqueue. Keys have the following format, resource_namespace/<resource_name. If no namespace, resource_namespace, is provided, then the key will simply be resource_name.
Types of controllers
There are different types of controllers that enable you to configure behavior on your Kubernetes cluster. Below is a list of the main controllers, click to drop down to that section below.
Replicaset
A Replicaset ensures that a specified number of Pods is running at any point in time. If you define that there should be five Pods running, the Replicaset will make sure that this happens. If there are any excess Pods, they get deleted and vice versa. This means that new Pods are launched when there’s a failure, deletion, or termination that results in a lower number of Pods than what has been declared in the Replicaset. In most cases, you will define the Replicaset in a Deployment.
Deployment
A Deployment controller is used to run a Pod at a desired number of replicas. These Pods have no unique identities. The Deployment can specify the configuration over a standalone Pod and a Replicaset, such as what deployment strategy to use. For example, if you are upgrading an application from v1 to v2, you might consider one of the following approaches:
- Upgrade with zero downtime
- Upgrade sequentially one after the other
- Pause and resume upgrade process
- Rollback upgrade to the previous stable release
Regardless of the approach, a Deployment will help achieve this. Instead of having to create three manifest files to declare the Pod definition, the number of Pod replicas that are needed, and the preferred upgrade strategy, you can use one Deployment manifest file.
Daemonset
A Daemonset ensures that all or some nodes inside the cluster run a copy of a Pod. It is the right controller for the job of deploying one Pod per node. Once you submit the Daemonset spec (or manifest file) to the API server, then you only have one Pod scheduled on each node. Daemonsets are also used for deploying one Pod per subset of nodes. First, you need to tag the nodes with labels and use those labels inside the Daemonset manifest file. However, nodes are always added and removed from the cluster. Let’s assume a node is being added to the cluster. The Daemonset controller on the Master node monitors that node as added to the cluster, then deploys the Pod on a newly created node. When the node is deleted, the Pod is also deleted and garbage collected.
To delete the Daemonset Pods from every node where it is deployed, all you need to do is delete the Daemonset that is responsible for the deployments.
Statefulset
Deployment controllers are suitable for managing stateless applications. Statefulsets, on the other hand, are useful when running workloads that require persistent storage. They keep unique identities for each Pod they manage and use the same identity when Pods need to be rescheduled. If you are running database management systems as part of your workload, Statefulsets would be a good choice to maintain the state of the Pods as well as to manage through different life cycle events, such as scaling and updates.
Job
A Kubernetes Job is a controller that supervises Pods for carrying out certain tasks. They are primarily used for batch processing. As soon as you submit a Job manifest file to the API server, the Pod will kick in and execute a task. When the task is completed, it will shut down by itself. So this is referred to as a Run-to-completion Job. Kubernetes will not automatically delete these Pods; it must be done manually.
When you submit a Job manifest file to the Kubernetes API server, it will create one or more Pods depending on the config in the manifest file. Once a Job is scheduled, the controller on the Master node will wait for the Pod to be successfully terminated. This means containers will return an exit code 0. Then the controller will take the Pod off the radar. So when the Job completes, no more Pods are created, but Pods are not deleted either. Keeping them allows you to view the logs of completed Pods to check for errors, warnings, or other diagnostic output. The Job object also remains after it is completed so that you can view its status. When you delete the Job using kubectl, all the Pods associated with that Job will be deleted.
There are some Jobs with a long-running durable execution. Before the execution completes, there is a chance that the Pod may fail. In that case, the Job controller restarts or reschedules if a Pod or node fails during execution onto another healthy node.
Cronjob
A Cronjob controller doesn’t differ much from the Job controller. The main difference is that it runs based on a user-defined schedule. The schedule is detailed using cron syntax, and the Cronjob controller will manage the automatic creation of a Job based on the schedule. In addition, you can specify the number of Jobs to run concurrently, as well as the number of succeeded and failed Jobs to retain for logging and debugging purposes.
Custom controllers
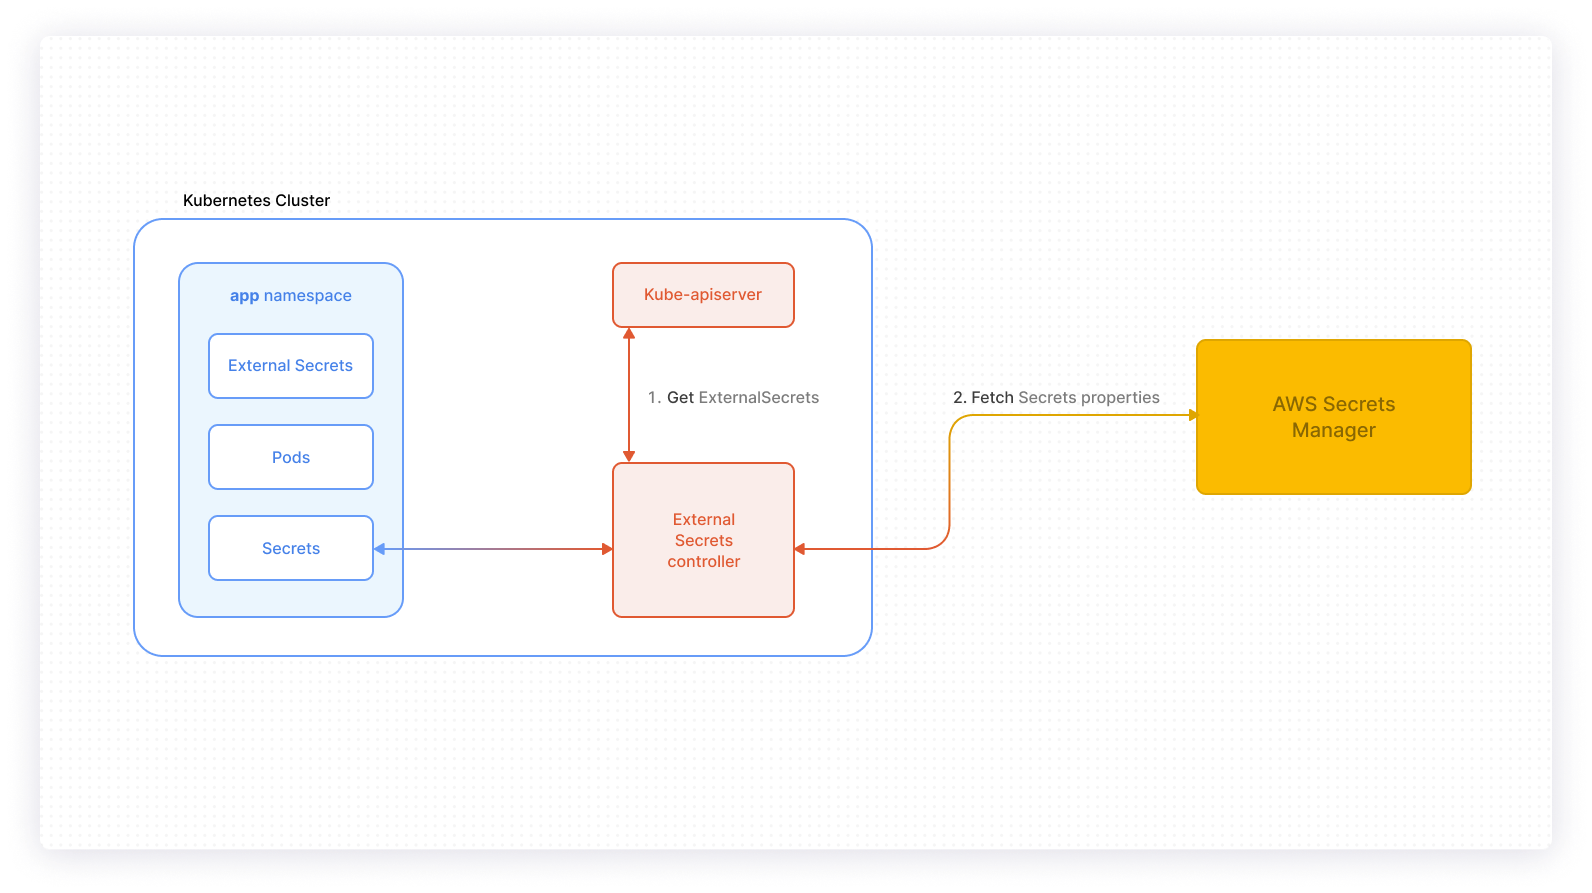
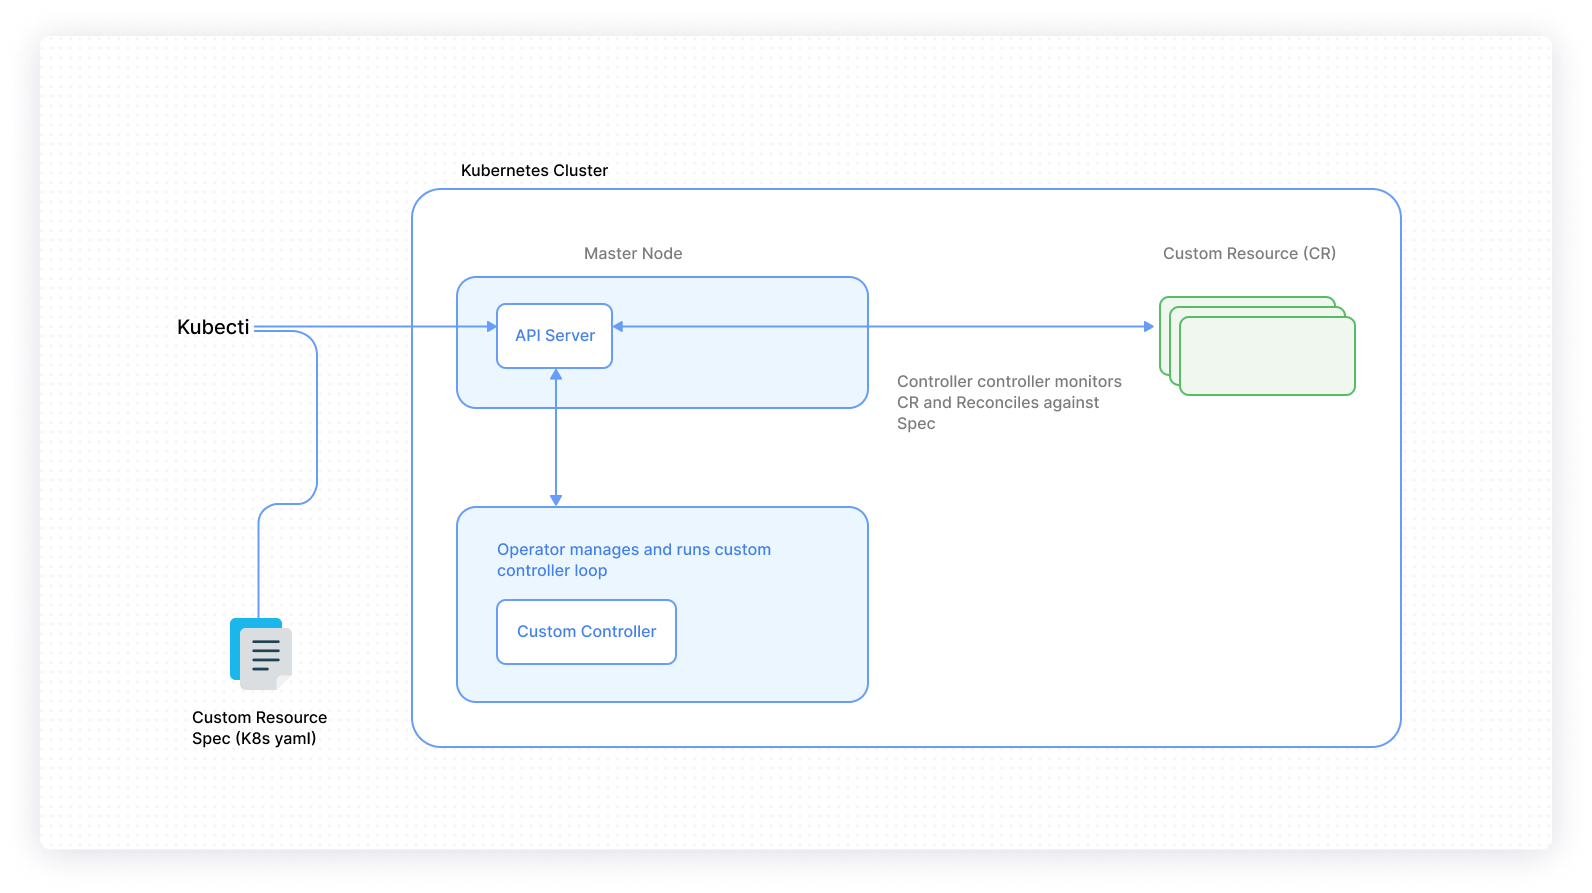
One of the things that makes Kubernetes so powerful is its extensibility. Software developers can create custom controllers to extend existing Kubernetes functionality to achieve some desired behavior. For example, if your application in a Kubernetes environment requires secrets stored in an external management system like AWS Secrets Manager, a custom controller that manages this process will be useful. In fact, there is a custom controller that does this very job called the kubernetes-external-secrets. It extends the Kubernetes API by adding a Custom Resource Definition object and a custom controller to activate the object’s behavior. Custom controllers enhance your Kubernetes platform and add new desired features.
Writing custom controllers can be intimidating. You might have already figured out additional functionality you would like to add to your cluster but are still wondering if you have to write your controller in Go. After all, Kubernetes was written in Go, and the language already has a complete client library working with Kubernetes (client-go). Be reassured that controllers don’t have to be written in Go. Some of the other programming languages that you can use include Python, Haskell, Java, Ruby, .NET, and a Bash script. You simply need a program that will make HTTP requests to the cluster API server. The custom controller mentioned above (kubernetes-external-secrets) is written in JavaScript.
Custom controllers will fulfill the same core functionality of monitoring resources and acting upon any changes that are detected when they occur. Controllers can observe any field in resource definition, but metadata, annotations, and ConfigMaps are the best to use for detecting configuration changes.
It is important to understand the different patterns that you will use when constructing the Informer for your custom controller. The three patterns are as follows:
Listwatcher - This combines a list function and a watch function for a selected resource in a specified namespace, and it’s useful when you want the controller to focus on a particular resource.
Resource Event Handler - This is where notifications are handled by the controller for changes on a specific resource. Resource changes include the creation of a new resource, modification of an existing resource, and deletion of an existing resource.
ResyncPeriod - This is used to define the frequency with which the controller will verify the existing state and match it to the desired state.
Conclusion
Kubernetes controllers are collectively a core component within the cluster architecture, and integral to the self-regulating power of the platform. Kubernetes comes with different types of built-in controllers that define the behavior of your cluster. Understanding the different controllers helps software developers to know which controllers to make use of depending on their use case. Beyond this, software developers can extend the native features or functionality of their cluster by creating custom controllers that will help meet cluster requirements.
If you're looking to monitor your Kubernetes clusters effectively, try using an internal tooling platform like Airplane. With Airplane, you can build internal dashboards that help you monitor your clusters efficiently.
If you're interested in trying it out, sign up for a free account or book a demo.


