


Kubernetes lifecycle events and hooks let you run scripts in response to the changing phases of a pod’s lifecycle. The framework can be used to record new container creations, send notifications to other parts of your infrastructure, and perform cleanups after a pod is removed.
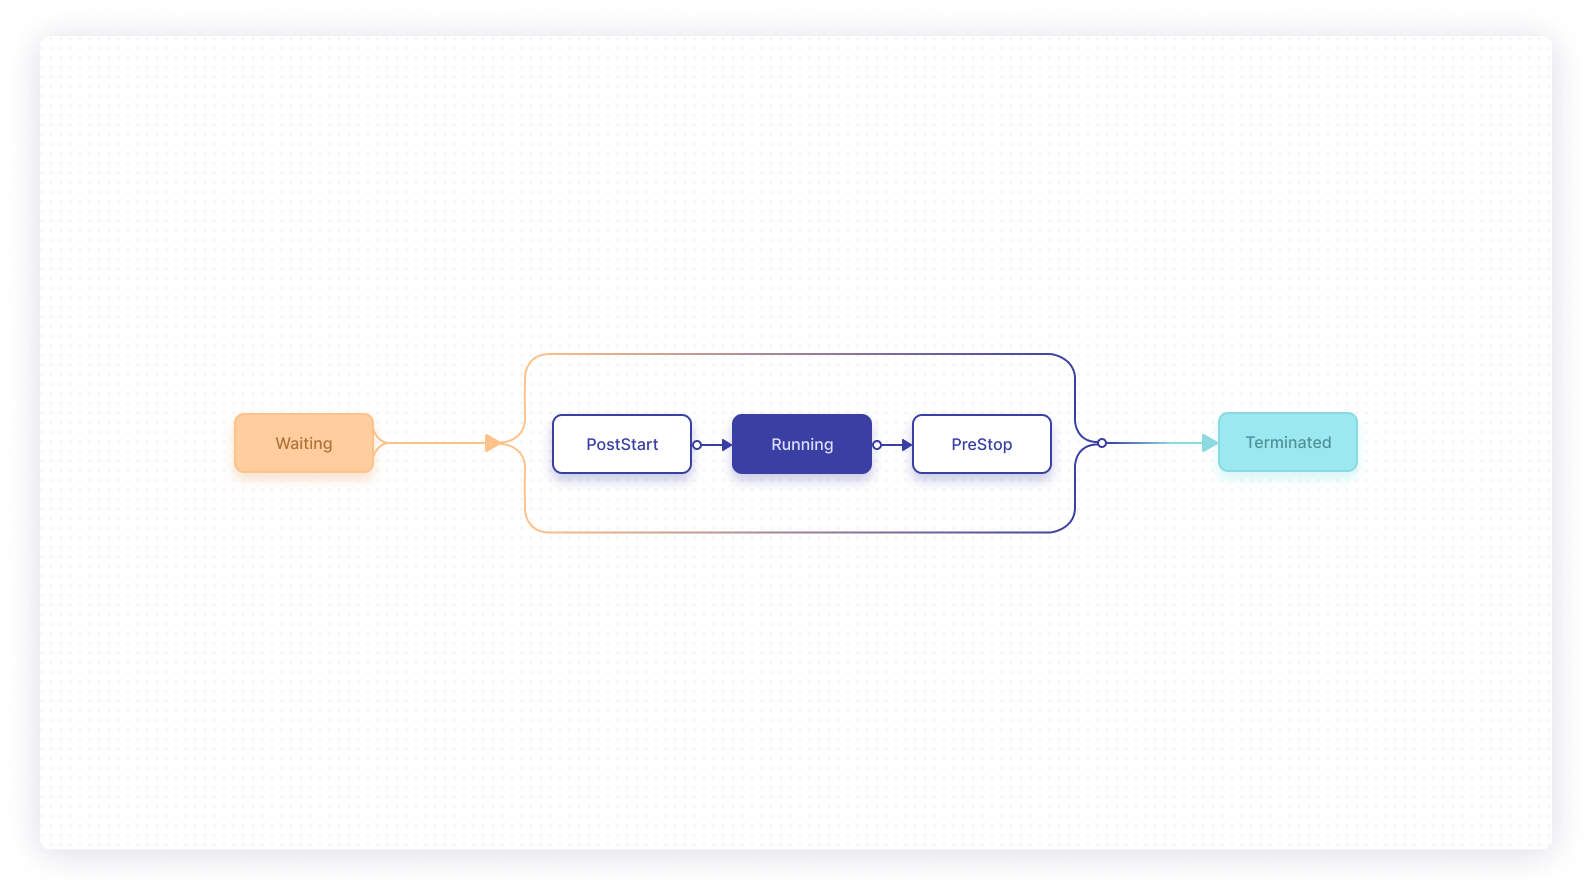
Utilizing the built-in hooks is the best way to be informed when a pod’s lifecycle changes. Events are issued by the kubelet worker process in real-time as the state of each container evolves. Containers move through three distinct phases: Waiting, Running, and Terminated. Hooks let you plug code in at the transition points before and after Running.
In this article, you’ll learn about how hooks are executed, when they can be useful, and how you can attach your own scripts to your Kubernetes containers. You’ll also look at some of the issues you might face when configuring your hook handlers.
What are hooks for?
The primary purpose of lifecycle hooks is to provide a mechanism for detecting and responding to container state changes. The surfaced events track each container’s progress through its linear lifecycle. Before starting to use hooks, it’s important to understand what each of the three lifecycle phases means.
- Waiting: The container is preparing to start, but is not currently running. This is most commonly seen when the node is pulling the container image needed to start the container.
- Running: These containers are actively executing. Containers are usually in this state for most of their life—they’re the operational workloads within your cluster.
- Terminated: Terminated containers are end-of-life instances that are now stopped. They either exited after running to completion, or terminated prematurely due to a failure.
Being able to track transitions between these phases gives you more insights into the status of your cluster. Registered hook handlers run within the container, so they can prepare or clean up its environment as it moves in and out of the Running state.
As hooks are managed by Kubernetes, they’re guaranteed to be executed, even in a failure scenario. Your hooks will still run if a container becomes Terminated because Kubernetes evicted its pod. You can reliably handle terminations due to resource constraints and cluster-level errors using lifecycle event handlers.
Available hooks
Kubernetes currently supports two container lifecycle hooks, Poststart and Prestop. They sit on either side of the Running lifecycle phase.
Here’s how they work.
Poststart
The Poststart hook is called immediately after a container is created. This occurs as it transitions into the Running phase after its Waiting period.
Poststart is normally used to configure the container, set up dependencies, and record the new creation. You could use this event to check that a required API is available before the container’s main work begins. Kubernetes will not change the container’s state to Running until the Poststart script has executed successfully.
As the event fires after container creation, the container’s [ENTRYPOINT script may run before your handler gets called. The handler blocks management of your container until it completes, but is executed asynchronously relative to your container. This means the container will be operational while Kubernetes waits for your handler to finish.
Prestop
The Prestop hook is called during a container’s termination sequence. The container will still be running at the time the event fires, and will enter the Terminated state after your hook handler executes. In the meantime, the container will show as Terminating.
Kubernetes includes safeguards to ensure faulty hook handlers don’t indefinitely prevent container termination. A grace period applied to each pod defines the maximum execution time of Prestop handlers. Kubernetes will kill the container if it’s been Terminating for longer than the grace period, even if a Prestop hook is running.
There’s another important “gotcha”, too. Prestop is only called when a container is terminated due to a Kubernetes API request or a cluster-level management event. Examples include pod deletion commands you’ve issued and Kubernetes-triggered evictions due to resource contention. The hook will not be invoked when a container is stopped because its pod successfully exited and became complete. You can’t currently clean up after finished jobs using your hook handlers.
Hook handlers
Handlers are the second foundational component of the lifecycle hook system. There are two different types, Exec and HTTP.
An Exec handler runs a command within the container. This can be any executable process that’s available inside the container’s filesystem. Resources consumed by the command will count against the container like any other process.
HTTP handlers make an HTTP request against a URL exposed by the container. This gives you an alternative to launching a standalone process when you want to interact with an existing application component. Only GET requests are supported; if you need more advanced functionality, use the Exec handler to run a utility such as curl or wget instead.
Whichever handler you use, it’s best to keep your scripts as short and simple as possible. Long-running hook handlers will slow down container starts and stops, reducing the agility and efficiency of your cluster. If your handlers are likely to take more than a few seconds to run, it could be best to incorporate handler implementations into your container images, instead.
A different approach must also be used if you need a guarantee that your handler will only be called once. On rare occasions, Kubernetes may call handlers more than once for a single event. This may happen if, for example, a node’s kubelet process restarts midway through hook delivery. Handlers should be idempotent to avoid the possibility of any issues caused by this.
Failed hook handlers cause their container to be killed. In the case of Poststart, it means the container will never enter the Running state. A failed Prestop hook will be less serious, as the container would have terminated anyway. Kubernetes will not retry hooks or repeat event deliveries upon failure. This extends to treatment of fundamental issues such as the URL for an HTTP hook becoming unreachable—the hook will be treated as failed, and the container will be killed.
Adding container lifecycle hooks
Now let’s use the available lifecycle hooks to respond to container creations and terminations. Hook handlers are attached to containers via their lifecycle.postStart and lifecycle.preStop manifest fields. Add the correct field for the hook you want to use. Nest an exec or http section within to configure your handler.
Here’s an example that applies hook handlers to a container running the NGINX web server. The implementation of the Poststart hook is trivial—it writes a file containing the time it was fired. The Prestop hook is used to gracefully stop NGINX when the container’s about to terminate, allowing it to finish serving existing clients. As this may take some time, the pod’s termination grace period is set to thirty seconds. This gives the combination of the preStop hook and the regular container termination process up to thirty seconds to complete.
Apply the manifest to your Kubernetes cluster using a tool like kubectl:
Check the pod is Running:
$ kubectl --namespace demo get pod hooks-demo
| NAMESPACE | NAME | READY | STATUS | RESTARTS |
|---|---|---|---|---|
| demo | hooks-demo | 1/1 | Running | 0 |
If the pod’s Running, the container must be, too! The Poststart script will have executed, so you can get a shell to the container and inspect the file that was created:
Here’s another example that makes an HTTP request to the container’s /startup URL upon creation:
Debugging failed hooks
Things can become difficult when a hook handler fails or behaves unexpectedly. Kubernetes doesn’t directly log what happens inside your handlers. Failures will be reported as FailedPoststartHook and FailedPrestopHook events you can view on your pods. The event’s message will describe what went wrong.
Here’s a pod that tries to use a non-existing command as a Poststart hook:
Applying this manifest to your cluster will create a faulty container that never starts Running. It’ll be repeatedly restarted on a back-off loop each time the Poststart script fails. View the container’s events to see what’s causing the problem:
$ kubectl --namespace demo describe pod hooks-demo
<omitted>
Events:
| TYPE | REASON | AGE | FROM | MESSAGE |
|---|---|---|---|---|
| ---- | ------ | --- | ---- | ------- |
| Normal | Scheduled | 30s | default-scheduler | Successfully assigned demo/hooks-demo... |
| Normal | Created | 10s (x2 over 11s) | kubelet | Created container hooks-demo |
| Normal | Started | 10s (x2 over 11s) | kubelet | Started container hooks-demo |
| Warning | FailedPoststartHook | 10s (x2 over 11s) | kubelet | Exec lifecycle hook ([broken]) for Container "hooks-demo" in Pod "hooks-demo" failed - error: command 'broken' exited with 126: , message: "OCI runtime exec failed: exec failed: container_linux.go:380: starting container process caused: exec: \"broken\": executable file not found in $PATH: unknown\r\n" |
| Normal | Killing | 10s (x2 over 11s) | kubelet | FailedPoststartHook |
| Warning | Killing | 10s (x2 over 11s) | kubelet | Back-off restarting failed container |
The event log shows that the container was created and started successfully. The procedure went awry when the broken Poststart hook was executed. The handler’s failure to complete caused the container to be killed, entering a back-off loop that, in this example, is doomed to perpetual failure. The references to x2 over 11s in the log indicate multiple occurrences of each event due to the retry looping.
Final thoughts
In this article, you’ve looked at what Kubernetes container lifecycle hooks are and detailed some of the reasons they’re used. You’ve also seen how you can add hook handlers to your containers using the lifecycle.postStart and lifecycle.preStop manifest fields.
The available hooks let you respond to changes in a container’s lifecycle as they occur. They remove the need to set up custom tooling around your cluster and inside your containers to do things like to make new creations wait for dependent services or perform cleanups upon termination. With both shell-based and HTTP hook handlers available, you’ve got the flexibility to add the extra behaviors you need.
If you're looking for a way to monitor your Kubernetes clusters efficiently, check out Airplane. Airplane is the developer platform for internal tooling. You can transform scripts, queries, APIs, and more into powerful workflows and UIs.
With Airplane, you can build a monitoring dashboard that helps track and troubleshoot your Kubernetes clusters. Airplane is code-first, so everything you build can be version controlled, integrated into your existing codebase, and integrated with third parties.
Sign up for a free account to get started and build your first monitoring internal tool within minutes. Book a demo if you'd like to learn more.


