


Autoscaling is a technique used in cloud computing to dynamically adjust computational resources, such as CPU and memory, more efficiently depending upon the incoming traffic of your application. Autoscaling is one of the core features of container orchestrator tools like Kubernetes.
Imagine having an application deployed and running on Kubernetes; you’re not sure of the scaling requirements, and you end up paying a lot more for the resources you don’t even use. Kubernetes autoscaling can help here by utilizing resources efficiently in two ways:
- Decreasing the number of pods or nodes when the load is low.
- Increasing it when there’s a spike in traffic.
Here a few specific ways autoscaling optimizes resource use:
- Saving on cost by using your infrastructure or a cloud vendor.
- Increasing the uptime of your workloads in cases where you have an unpredictable load.
- The ability to run less time-sensitive workloads once you have some free capacity because of autoscaling in low-traffic scenarios.
In this article, we’ll cover a high-level overview of the autoscaling feature provided by Kubernetes. We’ll also explore how autoscaling works and how you can configure it.
What is autoscaling? HPA, VPA, and cluster autoscaler
Autoscaling was first introduced in Kubernetes 1.3. When we talk about autoscaling in the Kubernetes context, in most cases, we ultimately scale pod replicas up and down automatically based on a given metric, like CPU or RAM.
We can achieve this by using Horizontal pod autoscaler (HPA). Autoscaling capabilities offered by HPA are applicable at the pod level, too. But you can autoscale your Kubernetes worker nodes using cluster/node autoscaler by adding new nodes dynamically. Managed Kubernetes offerings such as GKE by Google already offer such autoscaling capabilities, so you don’t have to reinvent the wheel and worry about its implementation.
In most cases with managed Kubernetes instances such as GKE, you specify a minimum and a maximum number of nodes, and the cluster autoscaler automatically adjusts the rest. Google has sort of won the Kubernetes battle among the cloud vendors by introducing Autopilot. GKE Autopilot is a hands-off approach to managed Kubernetes instances where Google manages every part (control plane, nodes, etc.) of your Kubernetes infrastructure.
Let’s discuss three different autoscaling methods offered by Kubernetes.
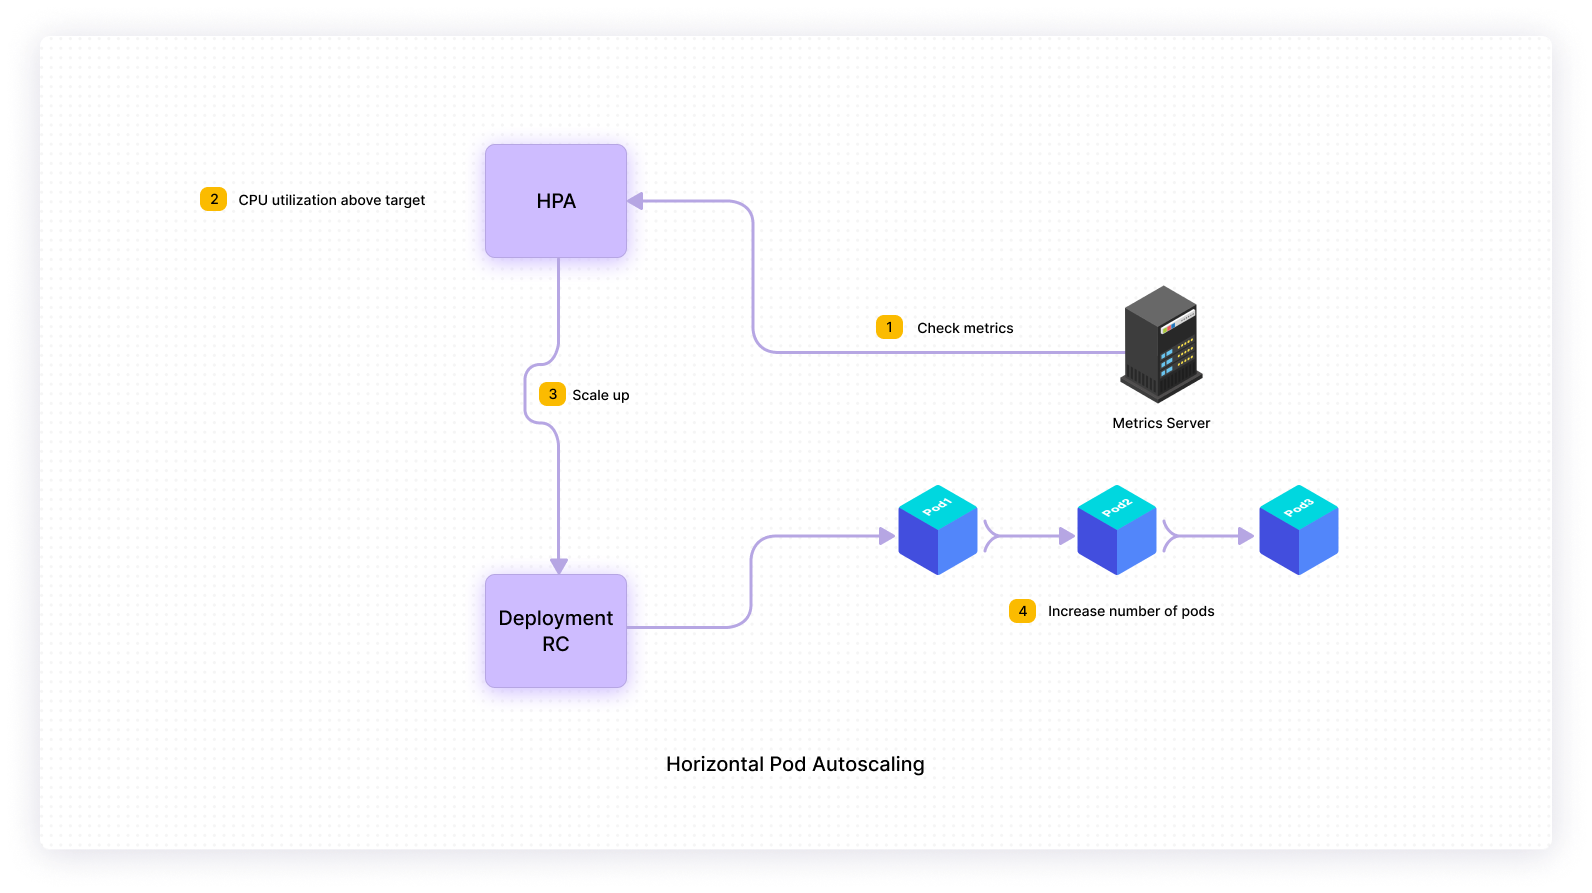
Horizontal pod autoscaler (HPA)
This method can also be referred to as scaling out. In this method, Kubernetes allows DevOps engineer, SRE, or your cluster admin to increase or decrease the number of pods automatically based upon your application resource usage. With HPA, you typically set a threshold for metrics such as CPU and memory and then scale up or down the number of pods running based upon their current use against the threshold that we set.
The following diagram represents a high-level overview of Horizontal Pod Autoscaler.
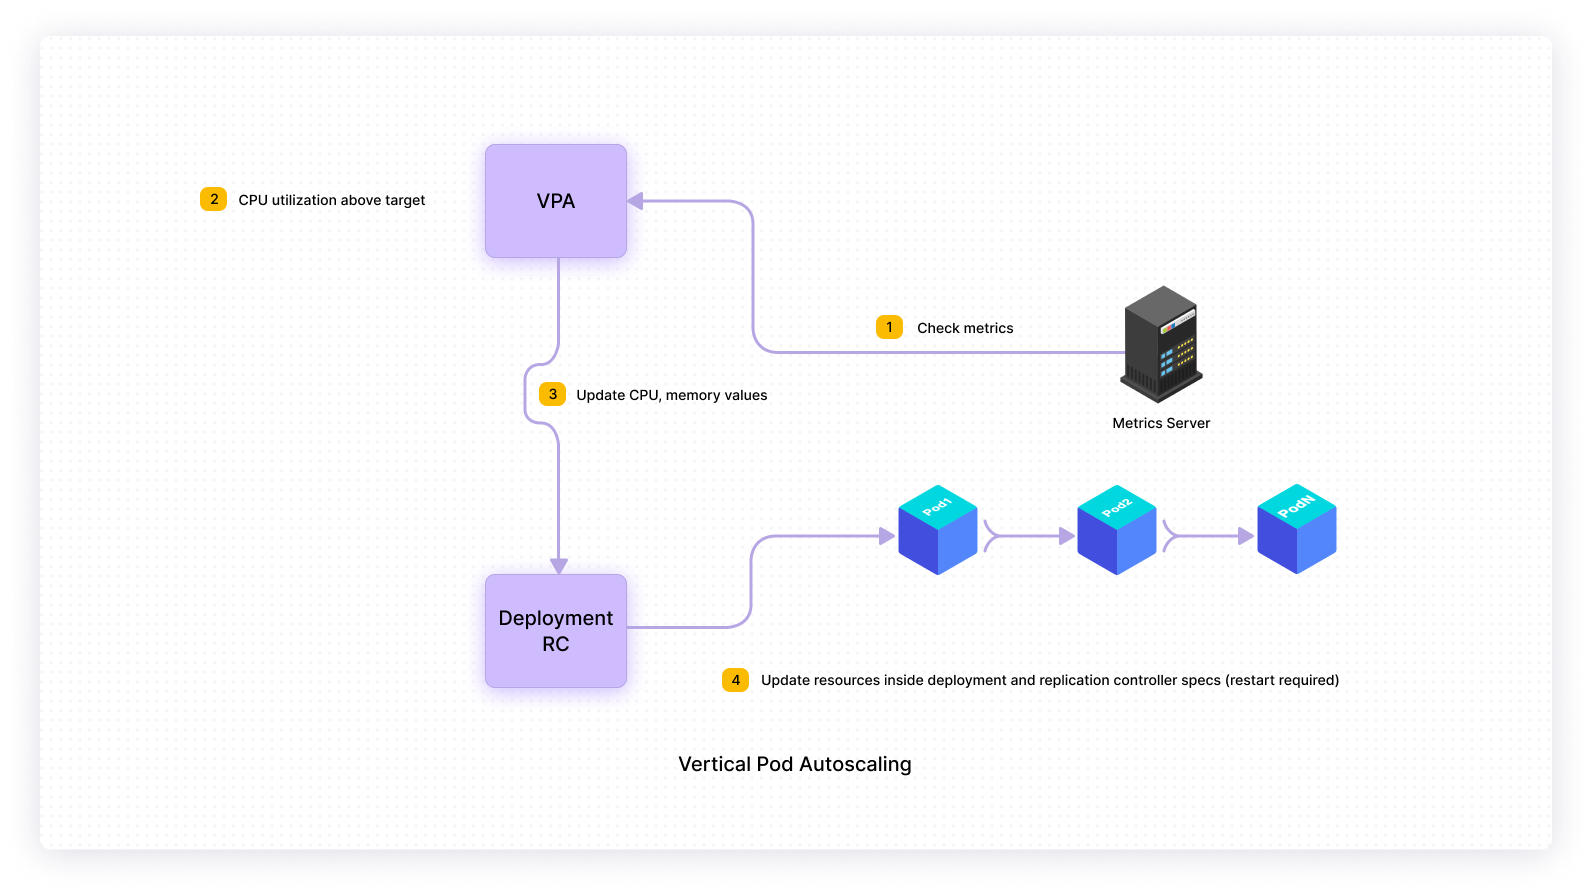
Vertical pod autoscaler (VPA)
This method can also be referred to as scaling up. Typically with vertical scaling, we throw more resources such as CPU and memory to existing machines. In the Kubernetes context, Vertical Pod Autoscaler recommends or automatically adjusts values for CPU and memory. VPA frees you from worrying about what value to use for CPU and memory requests, and limits for your pods.
The following diagram represents a high-level overview of Vertical Pod Autoscaler.
Cluster autoscaler
This method typically comes to your rescue when pods cannot be scaled to their maximum capacity because there are not enough nodes to handle the load. The cluster autoscaler will autoscale the cluster itself by adding new nodes to the cluster to handle the increased demand. It will also periodically check the status of pods and nodes and take the following action:
- If we cannot schedule pods because there are not enough nodes, then cluster autoscaler will add nodes up to the maximum size of the node pool.
- If node utilization is low and we can schedule pods on fewer nodes, then cluster autoscaler will remove nodes from the node pool.
The following diagram represents a high-level overview of Cluster autoscaler.

How does it work?
We first need to install metrics server on a Kubernetes cluster for autoscaling to work. Metrics server API plays an essential part in autoscaling, as the autoscaler (HPA, VPA, etc.) uses it to collect metrics about your pod’s CPU and memory utilization.
The autoscaler is defined as a Kubernetes API resource and a controller. The controller periodically scans the metrics server API and increases or decreases the number of replicas in a replication controller, or deployment, to match the observed metrics, such as average CPU utilization, average memory utilization, or any other custom metric to the target specified by the user.
The main difference between pod-scaling and node-scaling is that in pod-scaling, we scale in/out the number of pods (based on resource utilization, custom metrics, etc.), and in node-scaling, we add/remove nodes from the cluster to handle the increase/decrease in the demand.
You might ask which type of autoscaling method you should use, and the honest answer is it depends. It’s not like HPA is better than VPA or vertical scaling is wrong compared to horizontal scaling. Both are serving different purposes, and you’ll use them in different circumstances.
How to configure autoscaling
Let’s demonstrate Horizontal Pod Autoscaling for an application deployed to the local minikube Kubernetes cluster. You’ll use a Spring Boot REST application that returns a Hello world string in response from a /hello endpoint on access for demonstration purposes. The source code of the application is available here.
As explained earlier, first, you need to make sure that the metrics server is installed. You can run the following command to verify whether the metrics server is installed or not on minikube.
From the command’s output, it’s clear that by default metrics-server is not installed on minikube. Enable metrics-server using minikube addons enable metrics-server command, wait for a few minutes, and verify again. Now, from the following output, you could see that the metrics server is enabled and running.
kubectl get all -n kube-system
| NAME | READY | STATUS | RESTARTS | AGE |
|---|---|---|---|---|
| pod/coredns-558bd4d5db-9wdbv | 1/1 | Running | 0 | 4h4m |
| pod/etcd-minikube | 1/1 | Running | 0 | 4h4m |
| pod/kube-apiserver-minikube | 1/1 | Running | 0 | 4h4m |
| pod/kube-controller-manager-minikube | 1/1 | Running | 1 | 4h4m |
| pod/kube-proxy-pq7rk | 1/1 | Running | 0 | 4h4m |
| pod/kube-scheduler-minikube | 1/1 | Running | 0 | 4h4m |
| pod/metrics-server-77c99ccb96-9dcns | 1/1 | Running | 20 | 4h4m |
| pod/storage-provisioner | 1/1 | Running | 11 | 4h4m |
| NAME | TYPE | CLUSTER-IP | EXTERNAL-IP | PORT(S) | AGE |
|---|---|---|---|---|---|
| service/kube-dns | ClusterIP | 10.96.0.10 | <none> | 53/UDP,53/TCP,9153/TCP | 4h5m |
| service/metrics-server | ClusterIP | 10.104.154.58 | <none> | 443/TCP | 4h4m |
| NAME | DESIRED | CURRENT | READY | UP-TO-DATE | AVAILABLE | NODE | SELECTOR | AGE |
|---|---|---|---|---|---|---|---|---|
| daemonset.apps/kube-proxy | 1 | 1 | 1 | 1 | 1 | kubernetes.io/os=linux | 4h5m |
| NAME | READY | UP-TO-DATE | AVAILABLE | AGE |
|---|---|---|---|---|
| deployment.apps/coredns | 1/1 | 1 | 1 | 4h5m |
| deployment.apps/metrics-server | 1/1 | 1 | 1 | 4h4m |
| NAME | DESIRED | CURRENT | READY | AGE |
|---|---|---|---|---|
| replicaset.apps/coredns-558bd4d5db | 1 | 1 | 1 | 4h4m |
| replicaset.apps/metrics-server-77c99ccb96 | 1 | 1 | 1 | 4h4m |
You can also rerun the kubectl top node command to see if you’re now able to make calls to the metrics-server API or not.

Everything looks great so far. The Kubernetes manifests for deployment, and service for your Spring Boot application looks as follows:
Now containerize and deploy the Spring Boot application to the local minikube Kubernetes cluster. You can use the kubectl get all command to verify the status of deployment.

To access the application, use the minikube service hello-world command and use the URL given in the output for verification.
Okay, so your applications seem to be working fine. Now the only thing pending is to create HPA using the following command.
You also need to generate some load to make sure that HPA increases the number of pods when the CPU utilization goes beyond the threshold of 50 percent. To generate artificial load, use the Apache Bench utility.
Open a new terminal and run the following command.
In this test, Apache Bench will make 1,000,000 requests with concurrency 100 to the embedded Apache tomcat server. While you’re stress testing, you also need to monitor deployment and HPA. Open a new terminal and run the command watch -n 1 kubectl get hpa,deployment.
The following is the output:
| NAME | REFERENCE | TARGETS | MINPODS | MAXPODS | REPLICAS | AGE |
|---|---|---|---|---|---|---|
| horizontalpodautoscaler.autoscaling/hello-world | Deployment/hello-world | 95%/50% | 1 | 3 | 2 | 53m |
| NAME | READY | UP-TO-DATE | AVAILABLE | AGE |
|---|---|---|---|---|
| deployment.apps/hello-world | 2/2 | 2 | 2 | 55m |
In the preceding output, you could see that CPU utilization was above the target 50 percent, and HPA automatically increased pod replicas to two from one due to increased load. To further validate this understanding, run the command kubectl describe hpa. In the output under Events, you should see the following Kubernetes events:
- HPA increased the number of pod replicas to two from one due to increased load.
- After you stopped the stress test, the number of pod replicas reduced to the default one as all metrics were below the target.
Events:
| Type | Reason | Age | From | Message |
|---|---|---|---|---|
| ---- | ------ | ---- | ---- | -------- |
| Normal | SuccessfulRescale | 9m20s | horizontal-pod-autoscaler | New size: 2; reason: cpu resource utilization (percentage of request) above target |
| Normal | SuccessfulRescale | 2m8s | horizontal-pod-autoscaler | New Size: 1; reason: All metrics below target |
CPU utilization and number of pods are back to normal.
| NAME | REFERENCE | TARGETS | MINPODS | MAXPODS | REPLICAS | AGE |
|---|---|---|---|---|---|---|
| horizongalpodautoscaler.autoscaling/hello-world | Deployment/hello-world | 0%/50% | 1 | 3 | 1 | 10m |
| NAME | READY | UP-TO-DATE | AVAILABLE | AGE |
|---|---|---|---|---|
| deployment.apps/hello-world | 1/1 | 1 | 1 | 13m |
Why do you want to use autoscaling?
Consider a scenario where you’re not using the autoscaling capabilities of Kubernetes. You end up needing to manually provision resources (and later scaling down) every time there’s a change in the demand. You either end up paying for peak capacity or your services fail because you don’t have enough resources available to handle the load. You might increase the number of pod replicas manually, but this trial-and-error approach may not be sustainable for the long term. It will also add to the frustration for users currently working with your application.
You can overcome these issues by using the autoscaling feature of Kubernetes.
Conclusion
Kubernetes autoscaling tackles infrastructure failure and helps you save costs since you won’t be paying for resources that you don’t need 24/7. It specifically applies to Kubernetes workloads where an application experiences spikes and lulls in demand.
If you're looking to automate health checks on your applications, or turn a collection of shared scripts into custom internal tools that anyone on your team can use, then try using Airplane. With Airplane, you can build powerful internal workflows and UIs from REST API calls, SQL queries, Javascript functions, Python scripts, and more. When combined with Airplane's React-based platform called Views, these scripts can function as admin panels, deployment dashboards, and more.
To build an internal dashboard to help manage and automate health checks, sign up for a free account or book a demo.


