


When it comes to exposing your Kubernetes workload to external traffic, creating ingresses or services such as NodePorts and LoadBalancers are the standard practices. Each of these functions differ in how they allow Pods to be accessed.
However, they don’t offer a secure and optimal model for debugging applications that you don’t want exposed to the outside world. Port forwarding, on the other hand, offers you the opportunity to investigate issues and adjust your applications locally without the need to expose them beforehand.
In this article, you will learn the fundamentals of port forwarding in the context of Network Address Translation and how this networking concept can be put into practice with Pods on your Kubernetes cluster. Lastly, you will provision an EKS cluster and deploy a basic application that will be exposed exclusively for your local access through port forwarding.
What is port forwarding?
Before getting into the details of port forwarding, it’s important to understand Network Address Translation (NAT) and the basics of how it works. NAT is the process of modifying IP addresses that pass through a router. This is a built-in functionality that conceals an entire IP address space. A computer or laptop that wants to communicate with servers on the internet will make a client request to a specific public-facing IP address.
That public IP address will then be converted or translated to a private IP address. In addition, every time you attempt to establish a connection to a server on the internet, you have to do so via a specific port. This is where port forwarding comes in.
Port forwarding is a part of NAT that redirects a single system’s IP address and port number to another system. It deals with a single IP address and port and is often used between hosts on the Internet and an individual host on a Local Area Network (LAN) or demilitarized zone (DMZ).
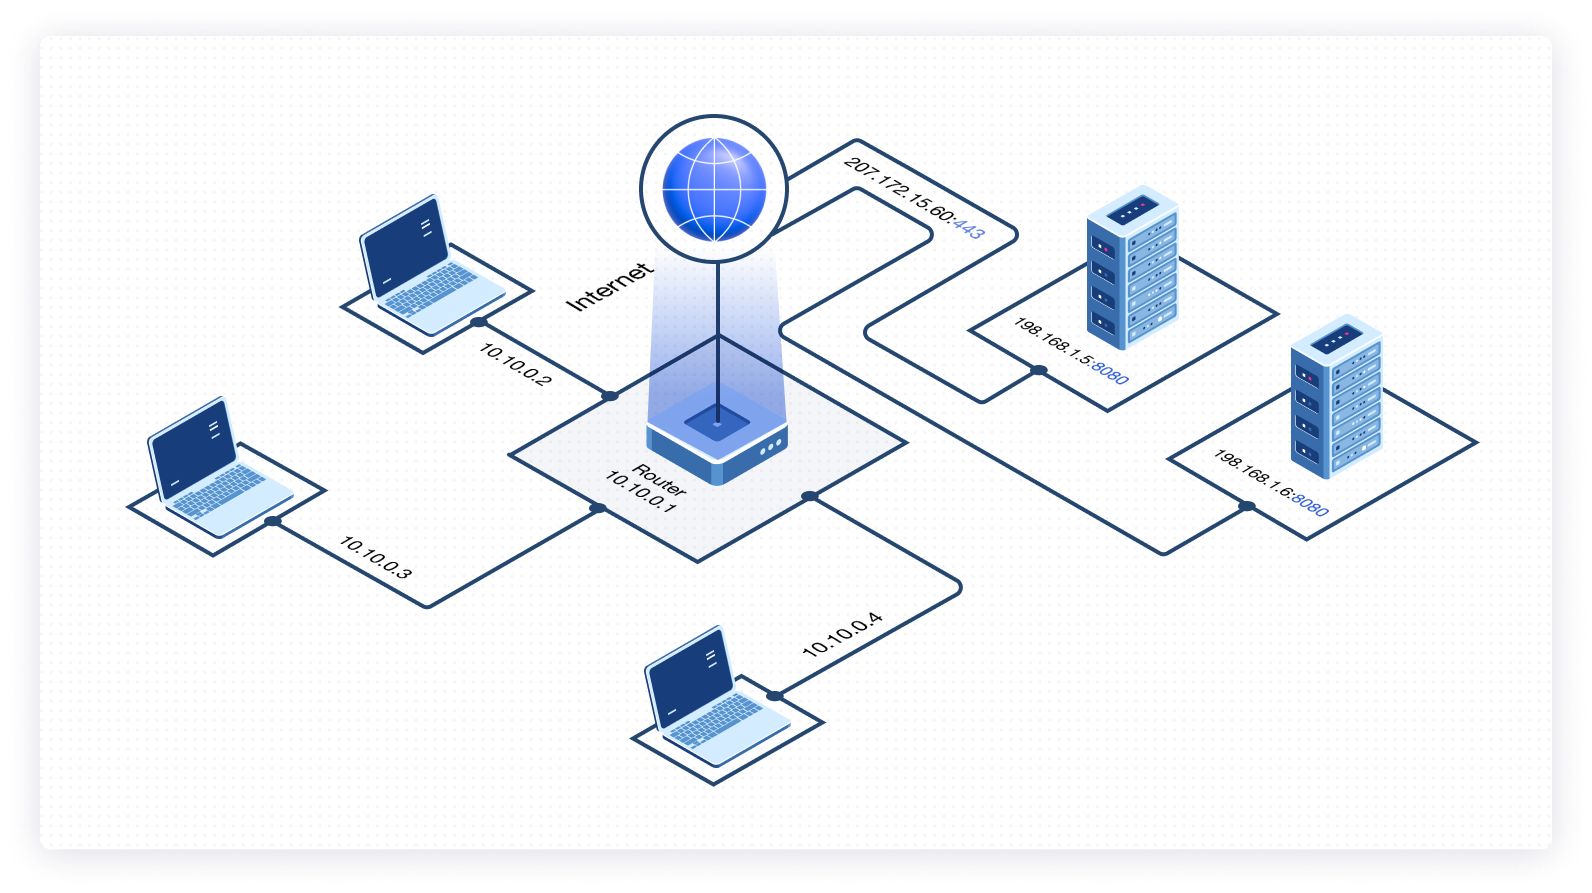
As the diagram above depicts, a client request made from a laptop to a web server on the internet will be sent to a public-facing address (207.172.15.60) on a specific port (443). The router will then redirect this request to a destination server (192.168.1.5) and the relevant port (8080).
Port forwarding in Kubernetes
At this point, you may be wondering how port forwarding works in the context of Kubernetes. You can use kubectl to set up a proxy that will forward all traffic from a local port that you specify to a port associated with the Pod that you determine.
This is especially useful when you want to directly communicate from your local machine to a given port on a Pod. Also, this is accomplished without you having to manually expose Services. Instead, you would simply use the kubectl port-forward command as demonstrated later on in this post.
One of the things that makes Kubernetes such a powerful platform is the way it abstracts a majority of the orchestration functions. Its declarative model makes it easy for operators to define the desired outcome while it takes care of the intermediary steps in an automated way. When it comes to port-forwarding, the process has to be carried out manually each time by entering the relevant command to establish a connection with the desired Pod on the relevant cluster.
It’s important to note that port forwarding is practical only when you are working with individual Pods. It cannot be utilized for Services. Port-forwarding in Kubernetes doesn’t require much effort because the kubectl CLI tool has a built-in functionality that makes the process possible with a single command.
To carry this out, you have to have kubectl installed on your workstation. Ensure that your local Kubernetes configuration is updated with the credentials to authenticate with the desired cluster. Once you are connected and using the relevant cluster context, you can run the port-forward command with kubectl specifying the name of the Pod, as well as the port number that traffic should be forwarded to.
The Kubernetes API server sets up an HTTP connection between your machine and the resource running on your cluster. Then you can debug within a specific Pod.
When running applications like databases in a Kubernetes cluster, you will make use of the Cluster IP Service to expose the application exclusively to internal traffic within the cluster. Database applications are a fitting use case when it comes to exposing Pods via port forwarding. Only authenticated users with the relevant permissions defined using RBAC should be able to interact with the API server using kubectl. This provides an added layer of security, allowing you to determine who is allowed to access certain Pods directly from their local machine.
The kubectl command to establish port forwarding is as follows:
You should see the following response or output to the above command:
To cancel or quit the kubectl command, you can simply press Ctrl + C and the port forwarding will end immediately.
In addition to this, you can use the kubectl proxy command to establish a direct connection from your local machine to your cluster’s API server. To expose the Kubernetes API on a specific port, run the following command:
The above command will give you the following response:
You can then head over to your browser and navigate to http://localhost:6443/api/v1/namespaces/default/pods to view a list of all running Pods in the default namespace of your Kubernetes cluster.
Testing on a live Kubernetes cluster
In this section, you will provision an Amazon EKS cluster in AWS, before deploying a single replica of a basic Node.js application. Once the Pod is running, you will establish a direct connection to it from your local machine using the kubectl port-forward command. After that, you will run the kubectl proxy command to expose the Kubernetes API server on your machine to list all of the Pods in the default namespace of your EKS cluster.
The EKS cluster will be provisioned using Terraform, which is a IaC tool that will be used to create infrastructure in the AWS environment. All the source code for the following demonstration is available in this public repository.
To carry out the next steps, you will need to make sure you fulfill all of the following prerequisites:
- Create an AWS account if you don’t already have one
- Ensure that your AWS profile is configured with the AWS CLI on your local machine
- Terraform installed
- kubectl installed
Provision EKS cluster
Once you have cloned the repository and met the necessary requirements outlined above, you can proceed to run the following command from the root level of the cloned repository:
You will then be prompted to give a name to your cluster and to type out the AWS profile that should be used to create the cluster. After giving your responses, an execution plan with the details of all the infrastructure to be provisioned will be displayed. You can then type, ‘yes’ for the infrastructure to be provisioned. This may take a few minutes.
Once the cluster has been created, you can update your kube config file with the newly provisioned cluster’s details with this command:
Finally, you can ensure that your kube config has been updated with the correct context and that your cluster is running as expected.
Port forwarding on EKS cluster
The next step is to deploy a Node.js application to your cluster, and then expose a Pod for local accessibility. This approach will allow you to access and interact with internal Kubernetes cluster processes from your localhost.
Deploy the node.js application
The command below will be used to create a Pod in the EKS cluster that just got provisioned.
Set up port forwarding with kubectl
Once the pod has been created and is running as expected, you can then proceed to set up port forwarding with the kubectl port-forward command, with the port that you want to expose locally for traffic from the application.
After getting the expected output, you can open your browser and navigate to http://localhost:8080/test. You should then see the following response.

Conclusion
In this post, you learned what port-forwarding is and how it fits into NAT. More importantly, this post covered how port forwarding can be used in the context of Kubernetes to achieve secure local exposure of Pods running on your cluster. Port forwarding is simply one way to access your Pods.
As mentioned above, port forwarding is a useful method for testing accessibility, debugging, and other investigative tasks on your Pods in Kubernetes. It is not meant to be used for exposing applications to external traffic from end users. Services and ingresses are designed to specifically fulfill the purpose of Pod accessibility for external users in a more advanced way.
If you are looking to streamline your debugging processes and monitor your Kubernetes clusters in an efficient manner, you can use Airplane to do so. Airplane is the developer platform for building custom internal tools. With Airplane, you can build powerful UIs and workflows fit for your engineering use cases and debugging needs. Airplane also offers strong built-ins, such as job scheduling, permissions setting, activity logs, and more.
To build your first engineering workflow, sign up for a free account or book a demo.


