


Each resource inside a running Kubernetes instance is assigned an IP address that’s used as the basis for communication. However, the resources are ephemeral, and change when a new Kubernetes resource is created. Moreover, resources like pods can have multiple instances, each with a different dynamic IP.
This means that if you want to communicate with a given resource, a robust framework is required. This issue is addressed by Kubernetes Services. A Kubernetes Service groups a set of resources and links them using network policy. Resources can also be logically linked using selector.
kubectl expose helps you to expose your resources by creating a service, and will create different services to serve different use cases. For example, if you’re debugging your application from an external environment by sending mock HTTP requests to your pods, this is made possible by exposing the pods and interacting with them using a NodePort service.
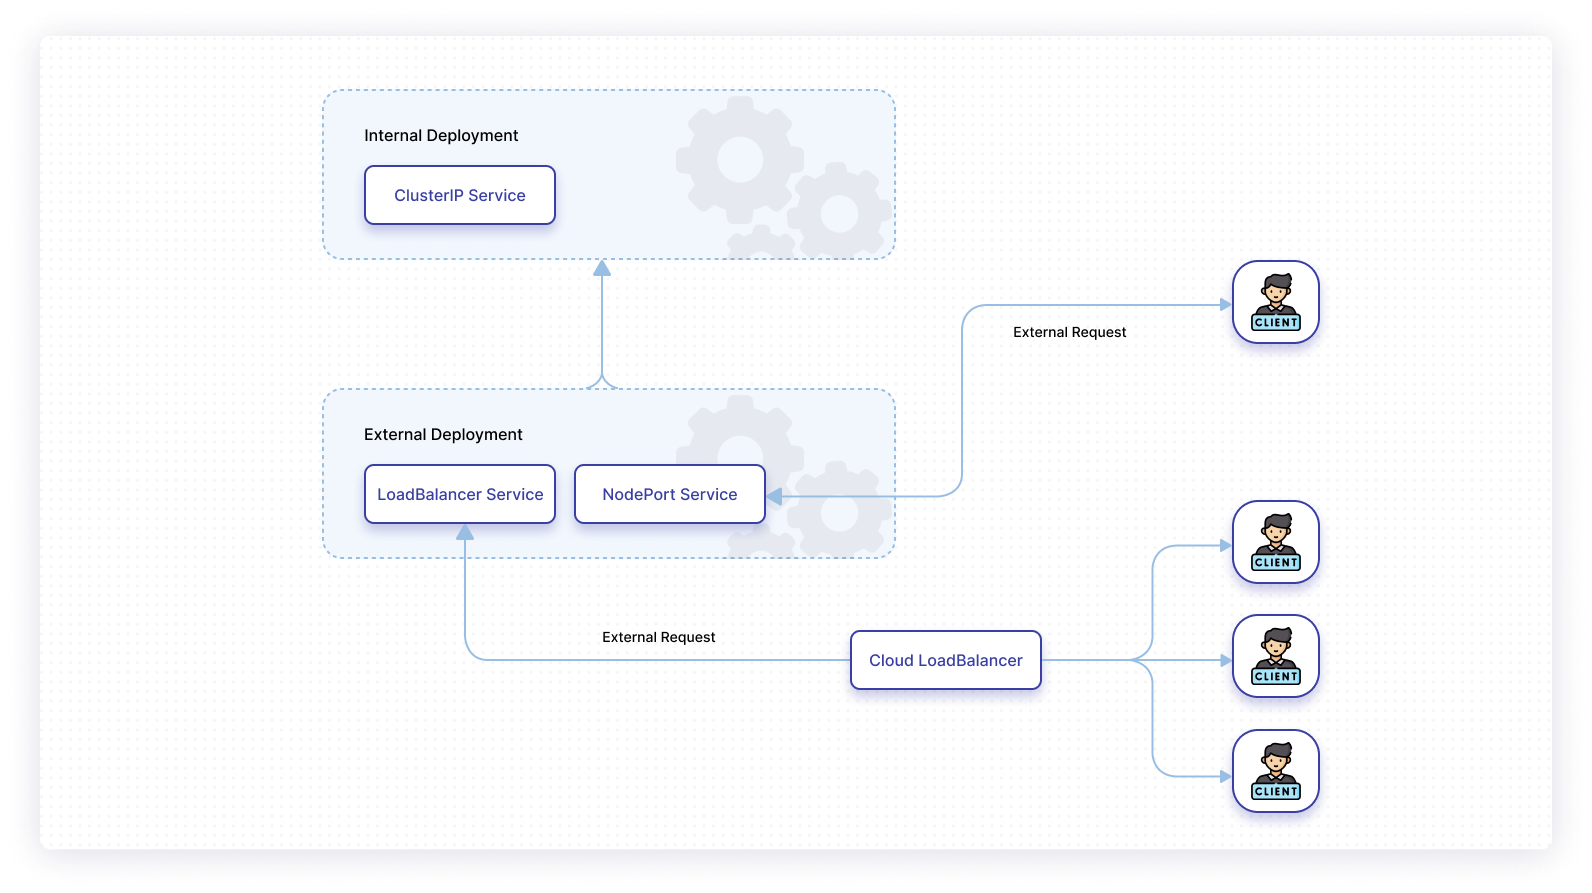
Similarly, pods can be exposed internally to other pods in a cluster using a ClusterIP service. This might be required for accessing an internal engine that processes your data and returns results that you don’t want exposed externally. Another important use case is when you’re deploying your application to a cloud platform, and you have a huge number of pods. Exposing the whole deployment using the LoadBalancer service can help to distribute the incoming traffic across the available and healthy pods in the deployment.
In this article, you’ll learn how to expose your pods with the kubectl expose command in different practical scenarios, and will be provided with code samples and configurations that you can run on your local machine using minikube and kubectl. You’ll also learn about best practices to follow when using the kubectl expose command.
What is kubectl expose?
kubectl is a command-line tool that helps an end user to interact with the Kubernetes cluster by way of the Kubernetes API. Each action in Kubernetes is undertaken by the control plane, and the instructions for these actions come in through the Kubernetes API server. The API server validates the incoming request, transforms the data, and sends it to the control plane. The control plane maintains the DNS and networking information of Kubernetes resources, and interacts with them using an IP address. Having a service allows you to group the resources under a single IP address.
When the kubectl expose command is run, it takes the name of the resource, the port, the target port that should be used to expose, the protocol over which to expose, and the type of the service. It sends this data using a REST request to the Kubernetes API server, which then instructs the control plane to make the service and assign an IP to it.
The Kubernetes resources that can be exposed using a service are pods, deployments, replica sets, and replication controllers. kubectl expose uses selectors to expose the resources to a given port.
Use cases for kubectl expose
When deploying data-intensive applications, it’s a common practice to use internal containers that do concurrent processing as a way of ensuring that a single pod doesn’t take all the CPU and memory utilization that is available to it. This distribution of load might require you to interact with internal pods, for which you’ll need an internal IP address. This is the ideal use case for ClusterIP. The internal pods are deployed and exposed, and the resultant IP is used by the main pods to interact with them. Thanks to kubectl expose, you only need to provide the IP of the service and not of the pod. If an internal pod becomes unhealthy and inactive, a new pod with a new IP will be created, but because of the selector, it will be mapped to the same service.
The pods run on nodes. In a network where there are multiple nodes, each node will have a unique, stable IP address and, like any physical machine, you can interact with the IP and port. This is the purpose of the NodePort service, which is responsible for exposing your resources externally. The application’s port needs to be mapped with the port of the node, and kubectl expose gives you the option to configure it. For example, if you have a container serving on port 8000, you can expose it on port 80 of your node using the kubectl expose option --target-port.
In an application with a high number of active users, the traffic must be evenly distributed among the available pods. This is handled by the LoadBalancer service. Without load balancing, a pod’s finite resources will become overwhelmed, and the pod will inevitably go down.
Using kubectl expose | example
To demonstrate the kubectl expose command, you’ll use minikube to spin up a local Kubernetes cluster. kubectl has been configured to point to the default namespace:
To follow along with the section below, you’ll need to have your kubectl command configured to point to the Kubernetes cluster and namespace of your choice.
Start by creating two deployments that need to interact with each other. For this example, you’ll look at a basic use case where you need to make the deployments interact internally. Note that the curl command can be used to call an IP service from inside a container.
To create the internal deployment with two pods of nginx:latest image, run the following command:
This will be accessible only from inside the cluster, and you can see the running pods in internal-deployment using kubectl get.
To make an external deployment with three pods of the nginx:latest image, run the following command:
This deployment will be available from outside the cluster.
You can see the available set of pods using the kubectl get command:
| NAME | READY | STATUS | RESTARTS | AGE |
|---|---|---|---|---|
| external-deployment-6c9f8d8dcc-47xgw | 1/1 | Running | 0 | 16m |
| external-deployment-6c9f8d8dcc-8qkmm | 1/1 | Running | 0 | 16m |
| external-deployment-6c9f8d8dcc-9k8wj | 1/1 | Running | 0 | 16m |
| internal-deployment-666749b99-fz6lp | 1/1 | Running | 0 | 16m |
| internal-deployment-666749b99-pltxl | 1/1 | Running | 0 | 16m |
You can see there are three pods with the prefix of “external-deployment” and two pods with the prefix of “internal-deployment”.
Expose the internal-deployment using ClusterIP:
This will create a service for internal-deployment. The service is named internal-service, and is on the target port of 8008. As you can see, the type of IP is ClusterIP over TCP protocol, which is the default of the kubectl expose command:
To access the pods with ClusterIP, you can run a BusyBox curl container, then run nslookup for the internal service. If the service is discoverable, this confirms that the pods are available from inside the cluster:
You can then run nslookup internal-service, and you’ll see the following output:
You can exit the pod using Ctrl+D, or by running exit in the console.
To expose the external deployment as a NodePort service, you can specify the type as NodePort in kubectl expose:
After this, you can see the details of external-service using the following command:
This is exposed as an external service.
Finally, you’ll create a LoadBalancer service that will help demonstrate how load balancing works. You can expose the pods from the external deployment using this load balancer. The IP address for the load balancer can be given as the actual IP of the computing service hosting the load balancer. As minikube doesn’t have a cloud provider, it provides a way to set up a load balancer tunnel using the following command:
This simulates the load balancer of a cloud provider. Now you can expose the service as a LoadBalancer type. The same set of resources can be exposed using multiple services:
To see the details of the lb-service, run the following command:
When the requests are routed to the LoadBalancer ingress point, the requests are distributed according to the load of the resource. For multiple-node clusters, this is scaled at the node level, and then the load is distributed across pods. This handles the excess traffic while maintaining pod health and ensuring balanced resource utilization.
The overall abstraction of the section looks like this:
Best practices for kubectl expose
If you have a set of IPs available, you can expose the resources as a NodePort by providing the IP in option --external-ip. It is essential to understand the networking concepts when dealing with Kubernetes services. The load balancers in production are given an IP, which can be provided using the option --load-balancer-ip. This will be the ingress point, and needs to be specified when using it in the production environment.
In Kubernetes, it’s generally preferred that you use deployment files. In the examples above, the kubectl create command is used with different parameters. However, having the deployment details in a file and a directory is a best practice that is widely followed for good reason.
Maintaining the files is easier than deploying with lengthy CLI commands or scripts. Kubectl expose uses the flag -f to include the resources using the deployment file. You can also group the resources in a file using the flag -R recursively.
Final thoughts
In this article, you learned how to create ClusterIP, NodePort, and LoadBalancer services using kubectl expose. You also explored the details of the kubectl expose command in practical scenarios. These use cases resemble real-world scenarios, and address how services interact with each other. Finally, you looked at some of the best practices to follow when using kubectl.
If you're looking to build multi-step workflows to help manage your applications, you should try using Airplane. Airplane is the code-first platform for building internal tools. You can transform scripts, queries, APIs, and more into powerful workflows and UIs within minutes.
The basic building blocks of Airplane are Tasks, which are single or multi-step functions that anyone can use. Airplane also offers Views, a React-based platform for building custom UIs.
To try it out yourself and build your first workflow within minutes, sign up for a free account or book a demo.


