


The flexibility of Kubernetes, the leading open-source platform for managing containerized applications and services, is not limited to its portability or ease of customization. It also has to do with the options available for deploying it in the first place. You can use K3S, kops, minikube, and similar tools to deploy a basic cluster. However, if you’re looking for a tool that’s both simple and powerful starting point, kubeadm is the best choice.
kubeadm not only allows you to bootstrap a Kubernetes cluster with ease, but also allows you to configure and customize cluster components. This article will walk you through deploying a Kubernetes cluster using kubeadm.
What are the use cases for kubeadm?
The power of kubeadm lies in the fact that it can interact with both the core components of the cluster—such as the kube-apiserver, kube-controller, kube-scheduler, and etcd backend—as well as other components, like kubelet and the container runtime. This flexibility makes it the ideal choice for many use cases. For example:
- Automate the creation of clusters using scripts or tools like Ansible.
- Knowing how to use kubeadm is required for the CKA and CKS exams, making it a must for novice users who want to learn how to initialize and configure a Kubernetes cluster.
- Since kubeadm can be used for both local and remote clusters, it’s an ideal tool for both test and production environments.
Implementing kubeadm
As detailed in the documentation, you’ll need the following to bootstrapping clusters with kubeadm.
- One or more instances running Linux OS, preferably Debian or Red Hat based distros. For the purposes of this tutorial, we will use two virtual machines running Ubuntu 20.04 LTS, one for the control-plane node and one for the worker node.
- At least 2 GB of RAM for each instance; however, 4 GB is recommended to ensure that your test environment runs smoothly.
- The node that will serve as the control plane should have at least 2 vCPUs. For this tutorial, both nodes will use 2 vCPUs.
- Full network connectivity between the nodes that make up the cluster, using either a public or private network.
- A unique hostname, MAC address, and
product_uuidfor each node. - Traffic allowed through your firewall using the ports and protocols described in the documentation.
- Disabled swap memory on each node; otherwise,
kubeadmwill not work correctly.
In addition to the prerequisites above, you’ll need a version of kubeadm capable of deploying the version of Kubernetes you require. You can find more information about Kubernetes’ version and version-skew support policies in the documentation. For this tutorial, you will install Kubernetes v1.23.
Last but not least, this tutorial will also require a user with administrative privileges (sudo user) to avoid executing commands as root.
Creating a sudo user
Connect via SSH to the control-plane node and create a user by executing the command below. In this example, the user is called containiq, but you can use any name that suits your needs.
Add the new user to the sudo group with the command:
Change to the new user with the following command:
Before proceeding to the next step, update the operating system by running the command:
Disabling swap memory
To ensure that the node does not use swap memory, run the following command:
This command performs two operations. First, it disables swap memory, then it comments out the swap entry in /etc/fstab, which ensures that swap will remain disabled after each reboot.
Setting up unique hostnames
As explained in the documentation, you need to ensure that each node in the cluster has a unique hostname, otherwise initialization will fail. For this tutorial, the control-plane node will be called primary, and the worker node worker.
In the control-plane node, use the following command to change the hostname:
Next, edit /etc/hosts to match the chosen hostname:
The file should look similar to the following:
# /etc/hosts
| 127.0.0.1 | primary |
# The following lines are desirable for IPv6 capable hosts
| ::1 | primary ip6-localhost ip6-loopback |
| ff02::1 | ip6-allnodes |
| ff02::2 | ip6-allrouters |
Once the changes have been saved, restart the node:
You must follow the same procedure explained for the primary node in the worker node. That is to say, assigning a unique hostname (in this case, worker), disabling swap memory, and creating a sudo user. Once you have completed this, you can continue with the next steps, where you’ll install the operating-system-level packages required by Kubernetes on each node.
Installing Docker engine
In order to work, Kubernetes requires you to install a container runtime. Available options include containerd, CRI-O, and Docker. For this test environment, you will install the Docker container runtime using the procedure described in the official documentation.
Start by installing the following packages on each node:
Add Docker’s official GPG key:
With the key installed, add the stable repository using the following command:
Once the new repository is added, you’ll only have to update the apt index and install Docker:
All that remains is to start and enable the Docker service. To do this, use the following commands:
Before proceeding to the next step, verify that Docker is working as expected.
The output should look similar to the image below.

Configuring cgroup driver
For the kubelet process to work correctly, its cgroup driver needs to match the one used by Docker.
To do this, you can adjust the Docker configuration using the following command on each node:
For more details, see configuring a cgroup driver.
Once you’ve adjusted the configuration on each node, restart the Docker service and its corresponding daemon.
With Docker up and running, the next step is to install kubeadm, kubelet, and kubectl on each node.
Installing kubeadm, kubelet, and kubectl
Start by installing the following dependency required by Kubernetes on each node:
Download the Google Cloud public signing key:
Add the Kubernetes apt repository using the following command:
Update the apt package index and install kubeadm, kubelet, and kubectl on each node by running the following command:
The last line with the apt-mark hold command is optional, but highly recommended. This will prevent these packages from being updated until you unhold them using the command:
Blocking these packages ensures that all nodes will run the same version of kubeadm, kubelet, and kubectl. For more details about how to avoid updating a specific package, you can look at this Ask Ubuntu question.
In production environments, it’s common to deploy a specific version of Kubernetes that has already been tested instead of the most recent one. For instance, to install version 1.23.1, you can use the following command:
Regardless of the path you decide to take to install Kubernetes dependencies, you should see a message similar to the following when you finish installing the packages.
This message indicates that your cluster is almost ready, and just needs to be initialized. Before proceeding with the initialization, though, double check that you’ve followed all the steps described so far on both nodes: install Docker container runtime, configure cgroup drivers, and install kubeadm, kubelet, and kubectl.
Initializing the control-plane node
At this point, you have two nodes with kubeadm, kubelet, and kubectl installed. Now you initialize the Kubernetes control plane, which will manage the worker node and the pods running within the cluster.
Run the following command on the primary node to initialize your Kubernetes cluster:
If you have followed the steps in the tutorial, you should see a message similar to the following:
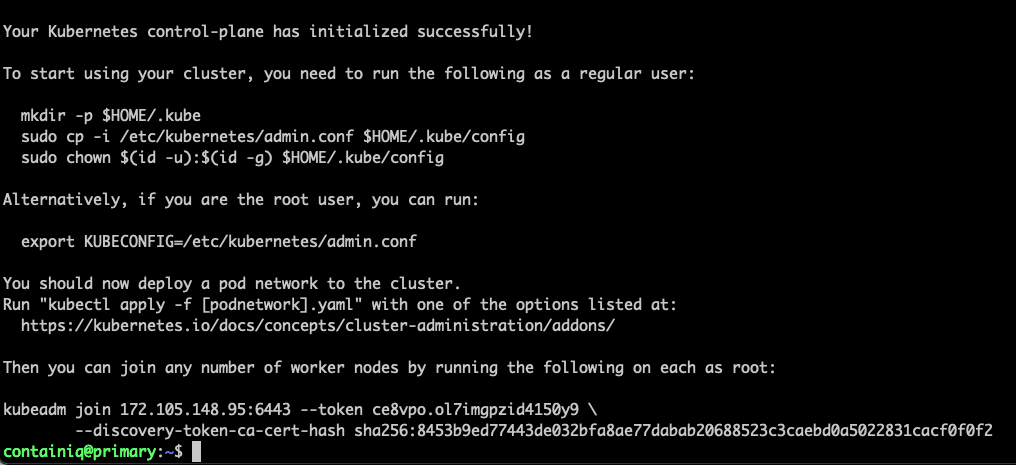
Behind the scenes, kubeadm init has configured the control-plane node based on the specified flags. Below, we will discuss each of them.
--apiserver-advertise-address: This is the IP address that the Kubernetes API server will advertise it’s listening on. If not specified, the default network interface will be used. In this example, the public IP address of theprimarynode,172.105.148.95, is used.--apiserver-cert-extra-sans: This flag is optional, and is used to provide additional Subject Alternative Names (SANs) for the TLS certificate used by the API server. It’s worth noting that the value of this string can be both IP addresses and DNS names.--pod-network-cidr: This is one of the most important flags, since it indicates the range of IP addresses for the pod network. This allows the control-plane node to automatically assign CIDRs for each node. The range used in this example,192.168.0.0/16has to do with the Calico network plugin, which will be discussed further in a moment.--node-name: As the name indicates, this is the name of this node.
Configuring kubectl
Kubectl is a command line tool for performing actions on your cluster. Before moving forward, you need to configure kubectl. To do this, run the following command from your control-plane node:
Alternatively, you can copy the admin.conf file created when you ran kubeadm init to $HOME/.kube/config on your local machine, which will allow you to use kubectl from it.
Installing calico cni
In most implementations, a container network interface (CNI) is used so the pods can accept traffic directly, which keeps network latency as low as possible.
Calico is used in this example because it’s one of the most feature-rich CNIs currently available. However, Kubernetes is compatible with other CNIs such as Flannel. Keep in mind that some CNIs require a specific --pod-network-cidr value. You can find more details about Kubernetes network plugins in the documentation.
To install Calico, use the following command:
Before you can use the cluster, you have to wait for the pods required by Calico to be downloaded. To verify that the installation has been successful, run the following commands:
The output should be similar to the following:

Managing components with kubeadm
As you have seen, kubeadm init allows you to bootstrap a Kubernetes control-plane node using a series of command line flags. However, kubeadm also allows you to use a configuration file for this purpose, and some features that allow kubeadm to manage Kubernetes components are only available as configuration file options.
You can also customize different Kubernetes components using the kubeadm API. To do this, you can run the kubeadm init command with the flag --config <PATH TO CONFIG YAML>.
Alternatively, you can customize each kubelet by passing a directory with patch files to override the flags used during the deployment of the control-plane node. This can be useful in some use cases, such as nodes using a different distro or different network configuration.
To find more information about the options available in kubeadm, the best resource is the documentation. For more details on how to configure Kubernetes using kubeadm, you can look at the kubelet configuration documentation.
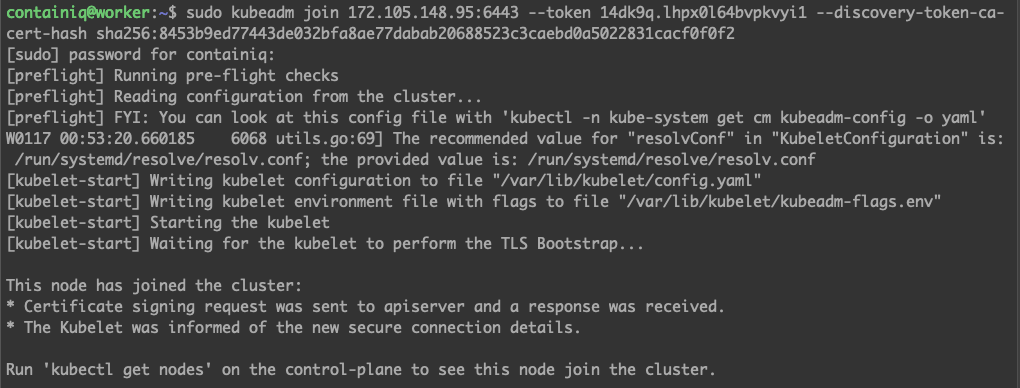
Setting up the worker node
During the initialization of the control-plane node, the information necessary to join the worker node(s) was displayed. However, you can display it again using the following command from the primary node:
It should look similar to the following:
You’ll need to copy the command, connect via SSH to your worker node, and execute the command from there. Once you run the kubeadm join command, you should see output similar to this:
A quick way to confirm that the node has correctly joined your cluster is to use the following command from your primary node or your local workstation:
You should see something similar to:

Testing the cluster by running an application
In order to make sure that your Kubernetes cluster is operating as expected, you can use a demo application.
Create a new namespace called yelb:
Change the context to the newly created namespace:
Deploy the application using the following command:
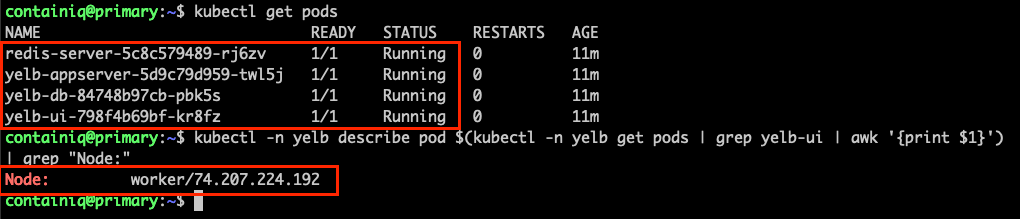
Confirm that all pods are running before continuing:
Run the following command to verify that the yelb UI is running on the IP address of the worker node:
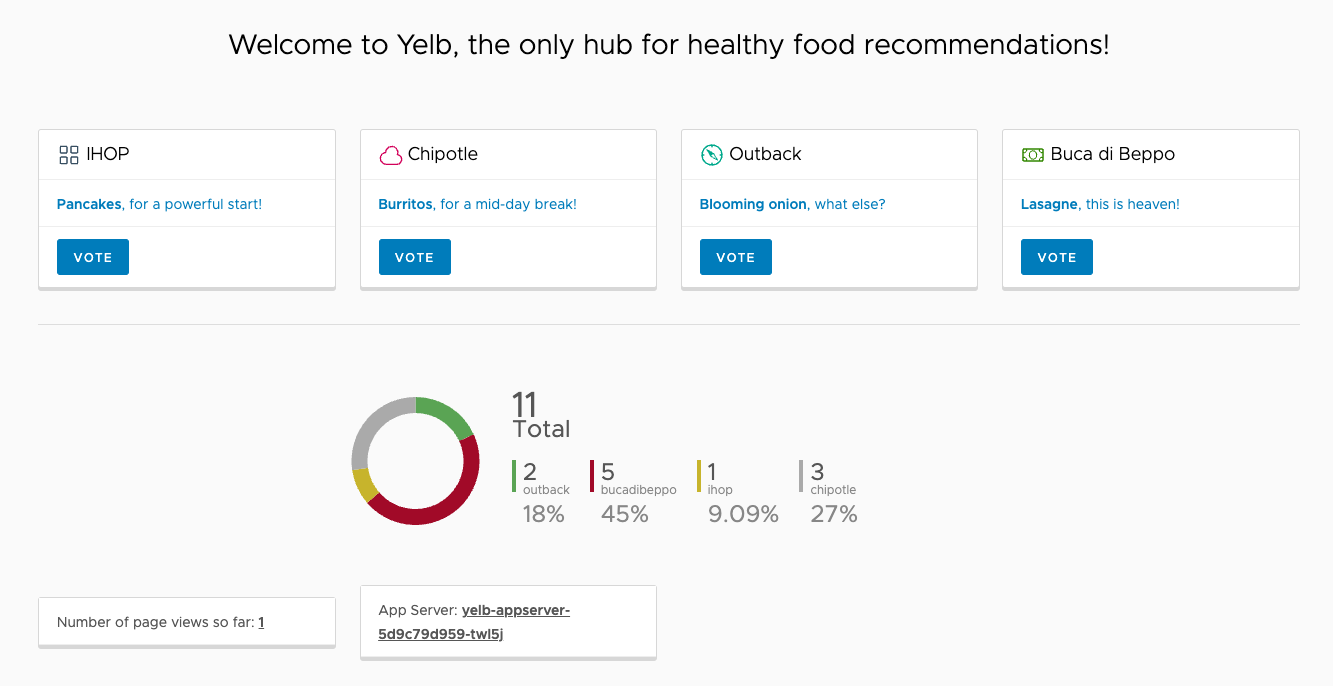
The output should be similar to the following:
Now that the demo application is running, you can use your browser to interact with it. In this example, the address of the application is http://74.207.224.192:30001. Remember to change the IP to that of your worker node.
Final thoughts
This tutorial has shown you the step-by-step procedure for bootstrapping a Kubernetes cluster using the kubeadm command line tool, as well as the most common configuration and customization options.
Once you've deployed your Kubernetes cluster using kubeadm, you may need to find a third-party solution to help you monitor them effectively. Consider using Airplane to do so. With Airplane, you can build powerful internal tools using scripts, queries, APIs, and more. Airplane Views allows you to build custom UIs that can help you monitor and troubleshoot your Kubernetes clusters in real time.
To build your first monitoring dashboard to help manage your Kubernetes clusters, sign up for a free account or book a demo.


