


Kubernetes has quickly become the open-source container orchestration platform par excellence around the world. No wonder. Kubernetes offers a level of flexibility and scalability that is hard to beat.
However, the flexibility of K8s to adapt to any use case from Edge nodes to Datacenters comes at a price. Managing the myriad of resources that Kubernetes handles is a daunting task. In this regard, the project has developed a web-based UI popularly known as the Dashboard, which greatly simplifies viewing and understanding what is happening in your cluster.
In this post, you’ll learn how Kubernetes’ built-in Web UI can make your life easier by giving you the ability to check resource usage in real-time, and consequently create, edit, scale, delete, or adjust those resources as needed.
Installing Kubernetes dashboard using kubectl
In order to install the Kubernetes Web UI, you’ll need:
- A Kubernetes distribution is already installed, either locally or on a remote server.
- Make sure you have Kubernetes Metrics Server installed on your cluster, as some distributions don’t come with it deployed by default.
- Have the kubectl command line tool installed and configured on your local machine.
For the purposes of this guide, I used the lightweight distribution, K3s since it comes ready to use with the Kubernetes Metrics Server configured.
Before starting the dashboard installation, verify that you can connect from your local machine to Kubernetes. To do this, use the following command:
kubectl cluster-info
You should see an output similar to the following:

The Kubernetes Web UI (Dashboard) can be deployed either using the recommended configuration that uses an HTTPS connection or the alternative method that uses an unsecured HTTP connection to communicate with your browser.
To deploy the Dashboard with the recommended configuration, use the following command from your local machine:
The output will confirm that all Dashboard components have been created correctly.

Give your cluster a few minutes to deploy the necessary pods. If you wish, you can check the status of the pods by running the command:
kubectl get pods -A
The output should be similar to this.

Securing access to the kubernetes dashboard
For security reasons, the recommended configuration gives the Dashboard ServiceAccount limited access to Kubernetes resources. This can prevent sensitive cluster data such as secrets or certificates from being exposed by accident.
That said, to leverage all Web UI functionality, you’ll need a service account with administrative (superuser) privileges, that is, a service account with the cluster-admin cluster role.
Using your preferred text editor, create an admin-user.yml file:
Create the new service account, admin-user, by applying the changes:
kubectl apply -f admin-user.yml
The terminal output should confirm the creation of the new service account as well as its role binding.

Accessing the Kubernetes dashboard
The recommended way to access the Kubernetes Dashboard is through Bearer Tokens. This allows for great flexibility in managing permissions.
To get the Bearer Token of the ServiceAccount admin-user run the following command.
As soon as you execute the instruction, the Bearer Token of the service account will be printed on the console. It’s a long output similar to the one shown below.

Copy the Bearer Token to a safe place as you’ll need it shortly. Now, from your local machine, expose the Kubernetes Dashboard running the command:
kubectl proxy
If you have followed the procedure described in this tutorial, a message will appear in the terminal indicating that the WebUI is available at 127.0.0.1:8001. For security reasons, the Dashboard will only be accessible from the machine running the kubectl proxy command. Keep this in mind, especially if Kubernetes is installed on a remote server.
Once the proxy is active, you can access the Web UI pointing your favorite browser to the following address:
You should see a screen similar to the one shown below.
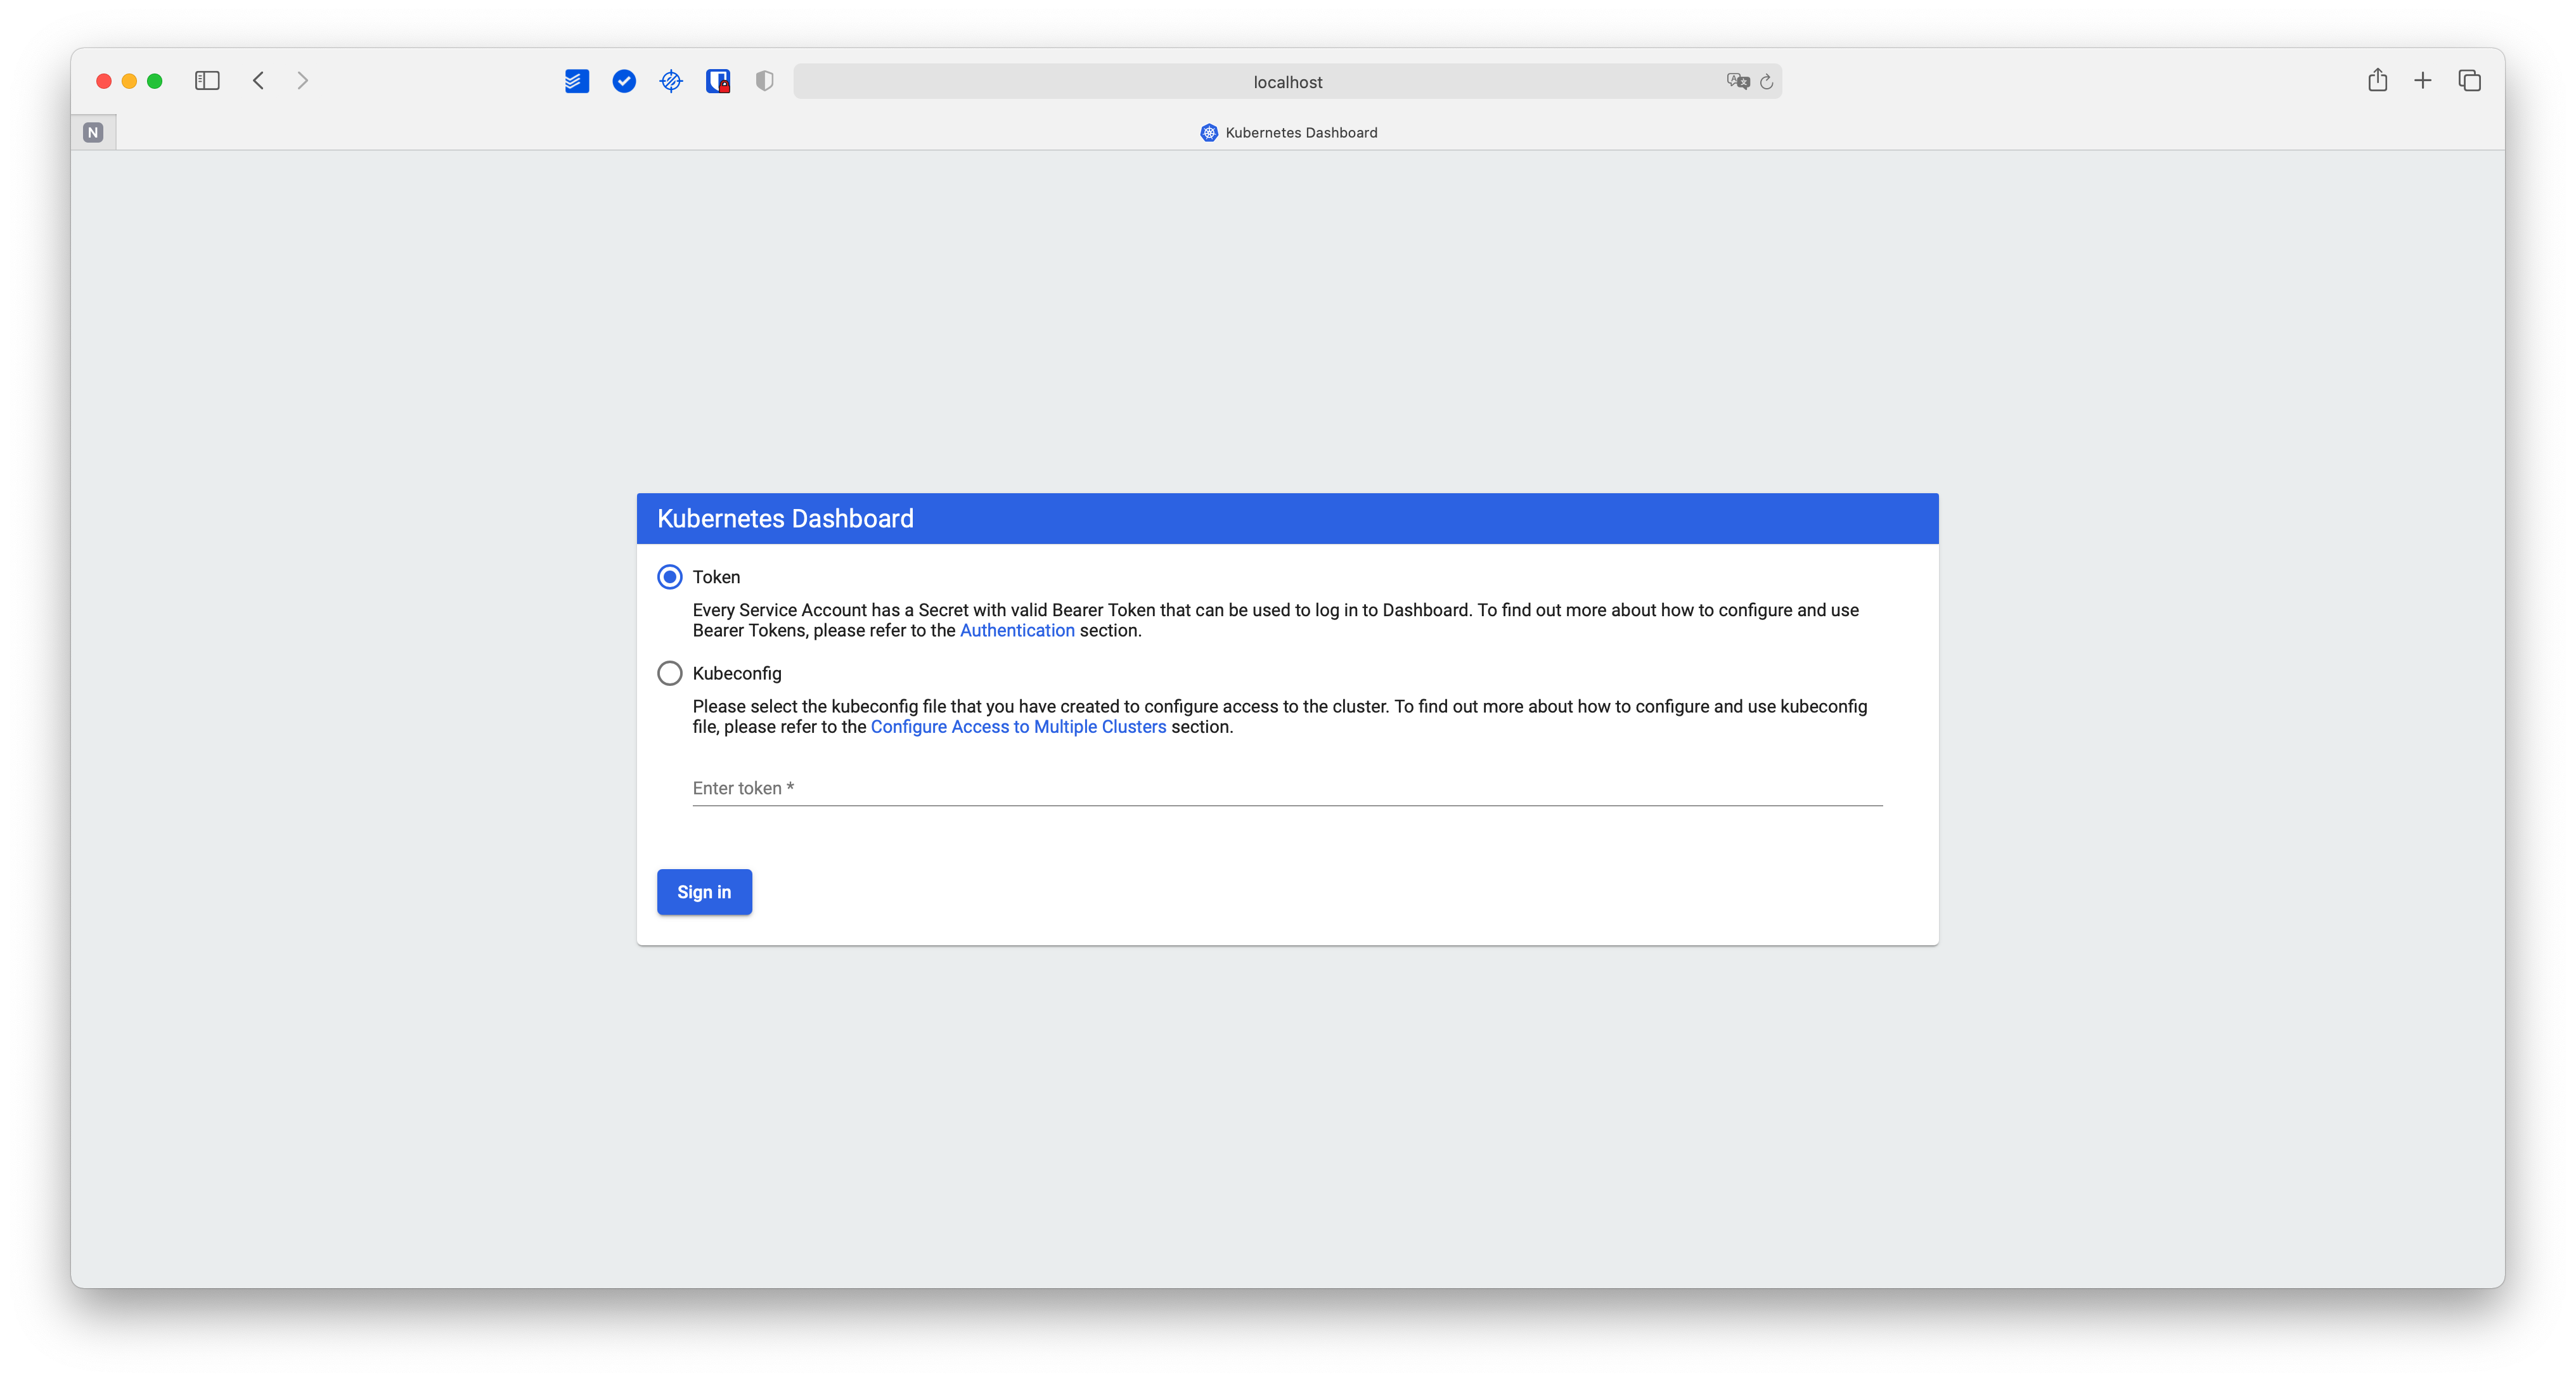
Enter the admin-user Bearer Token and click the Sign in button to continue. You’ll be presented with the Kubernetes Dashboard “Overview” screen.

Using the Kubernetes web UI dashboard
Out of the box, the Dashboard doesn’t seem to have much to show. This is because there is no pod running in the default namespace at the moment. However, if you go to the drop-down list on the left side menu and select “All namespaces” you will get an idea of the information that the Web UI can make available to you.
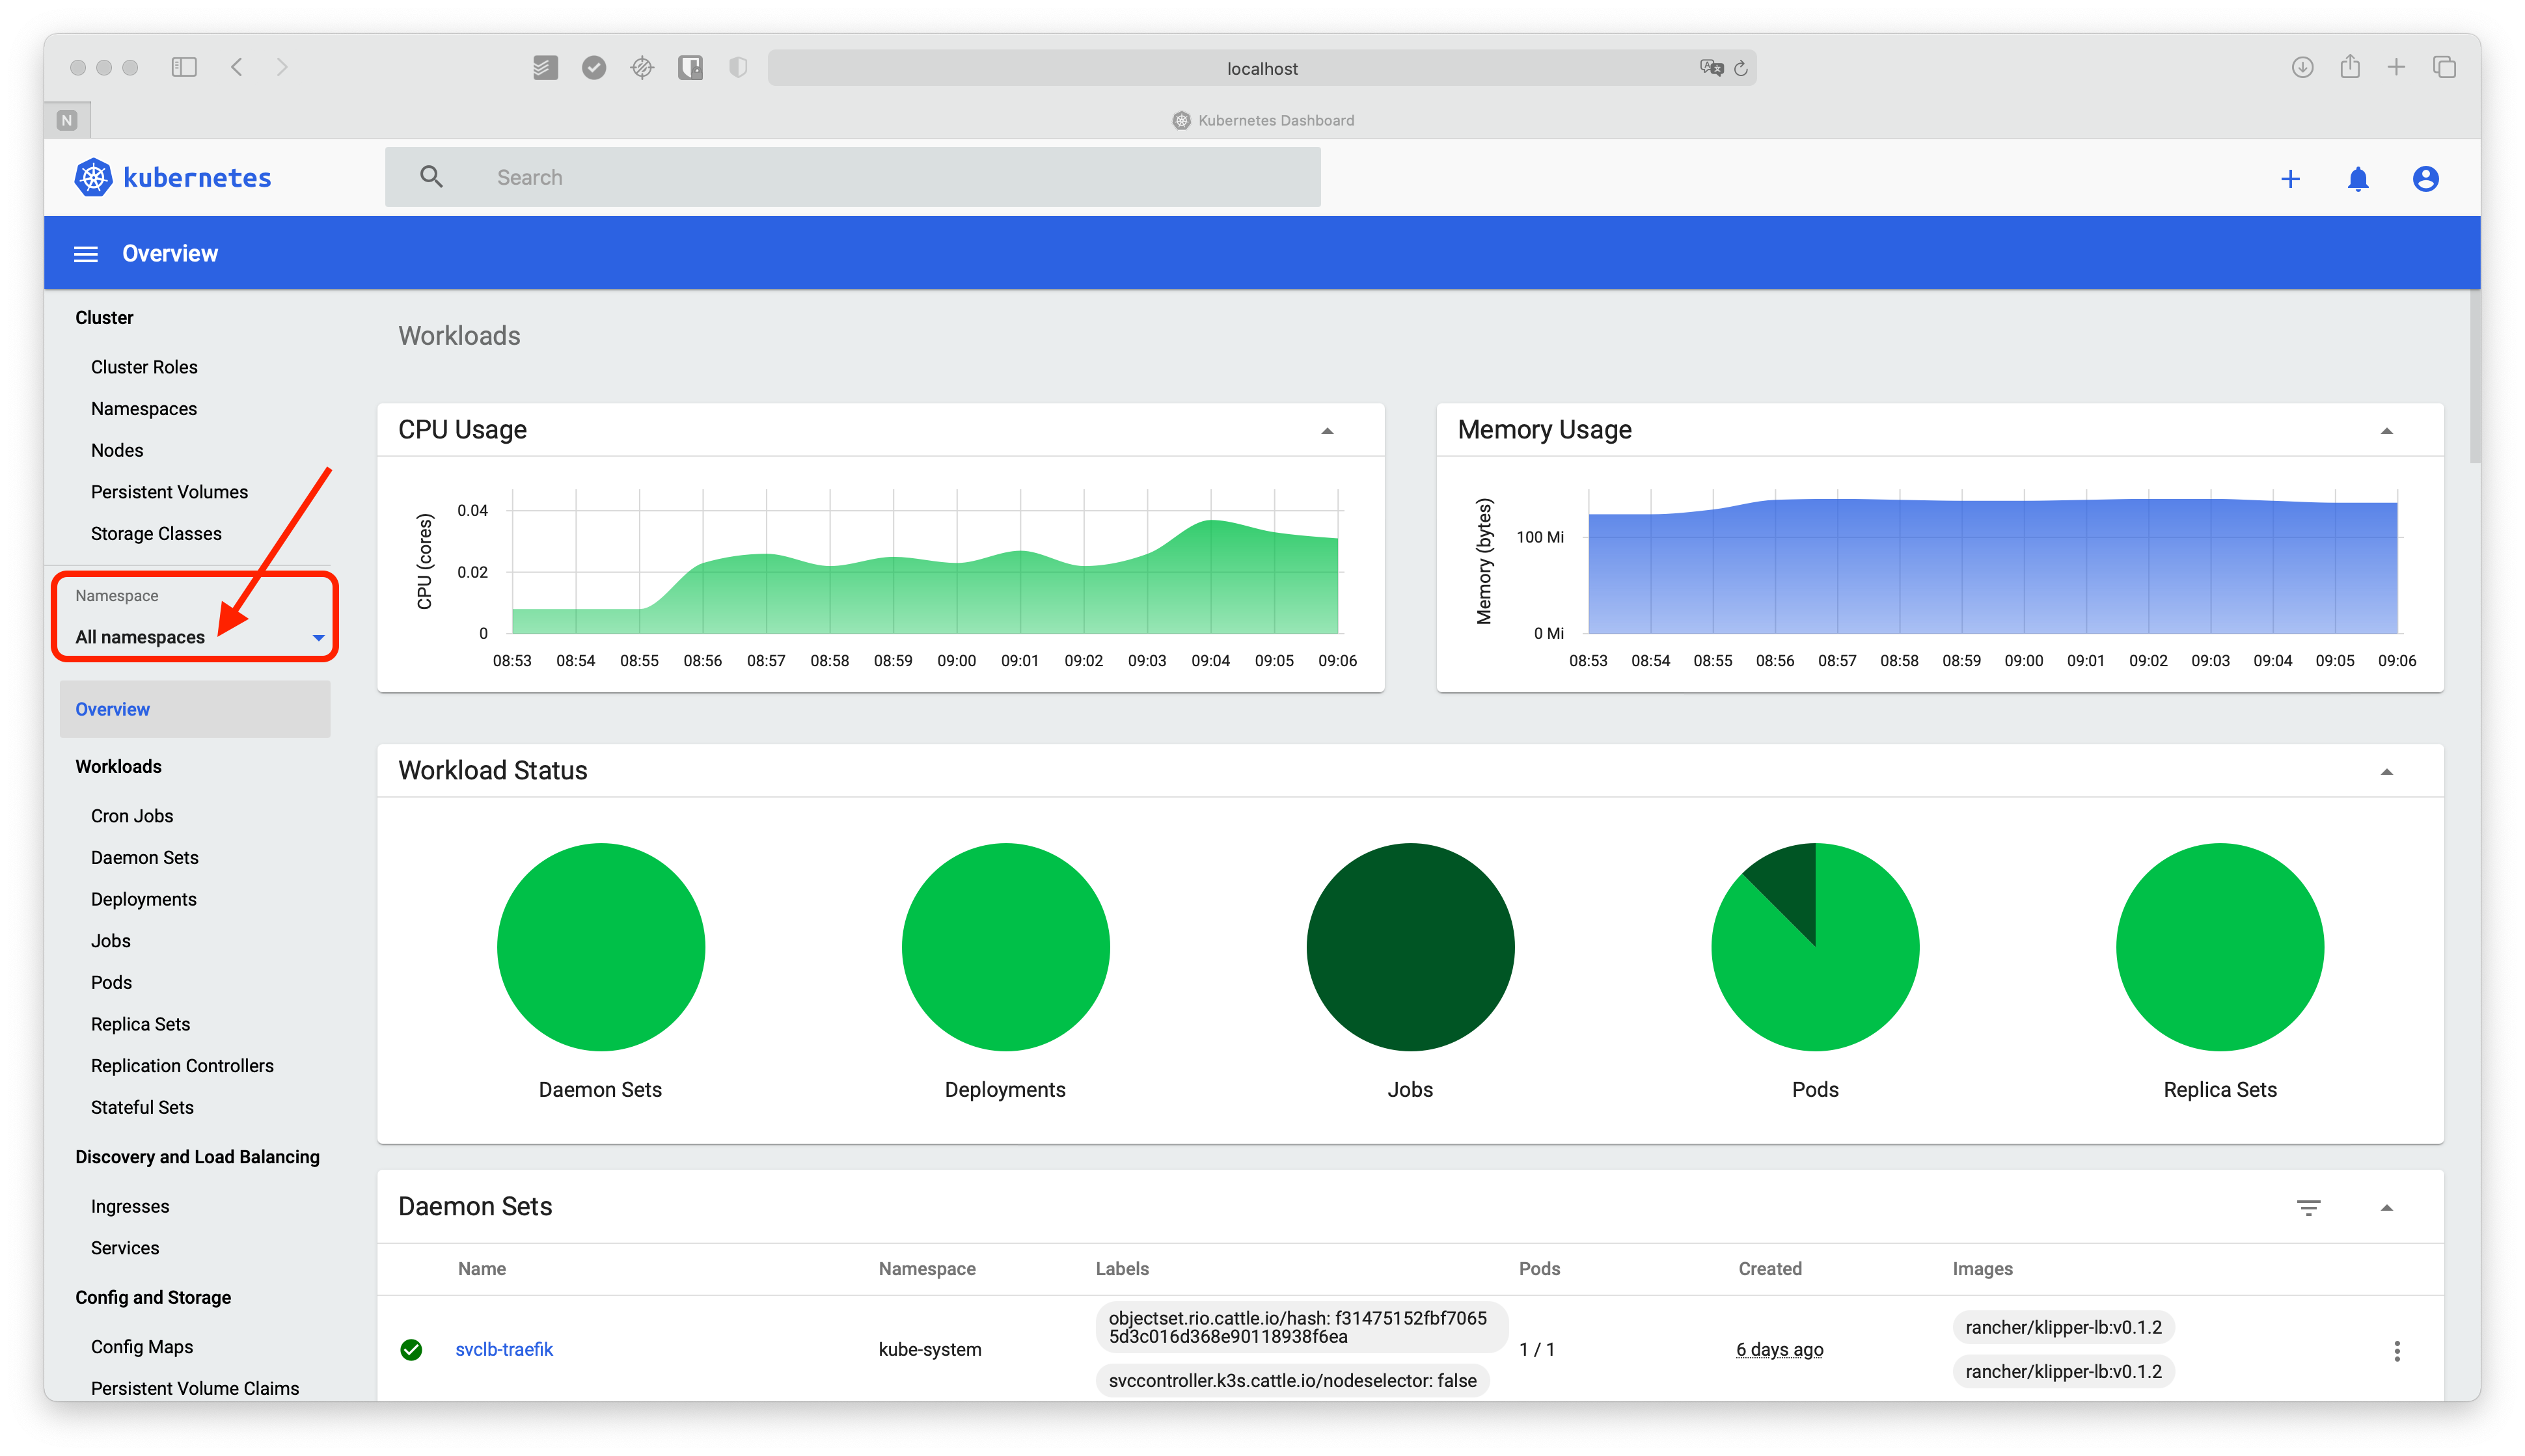
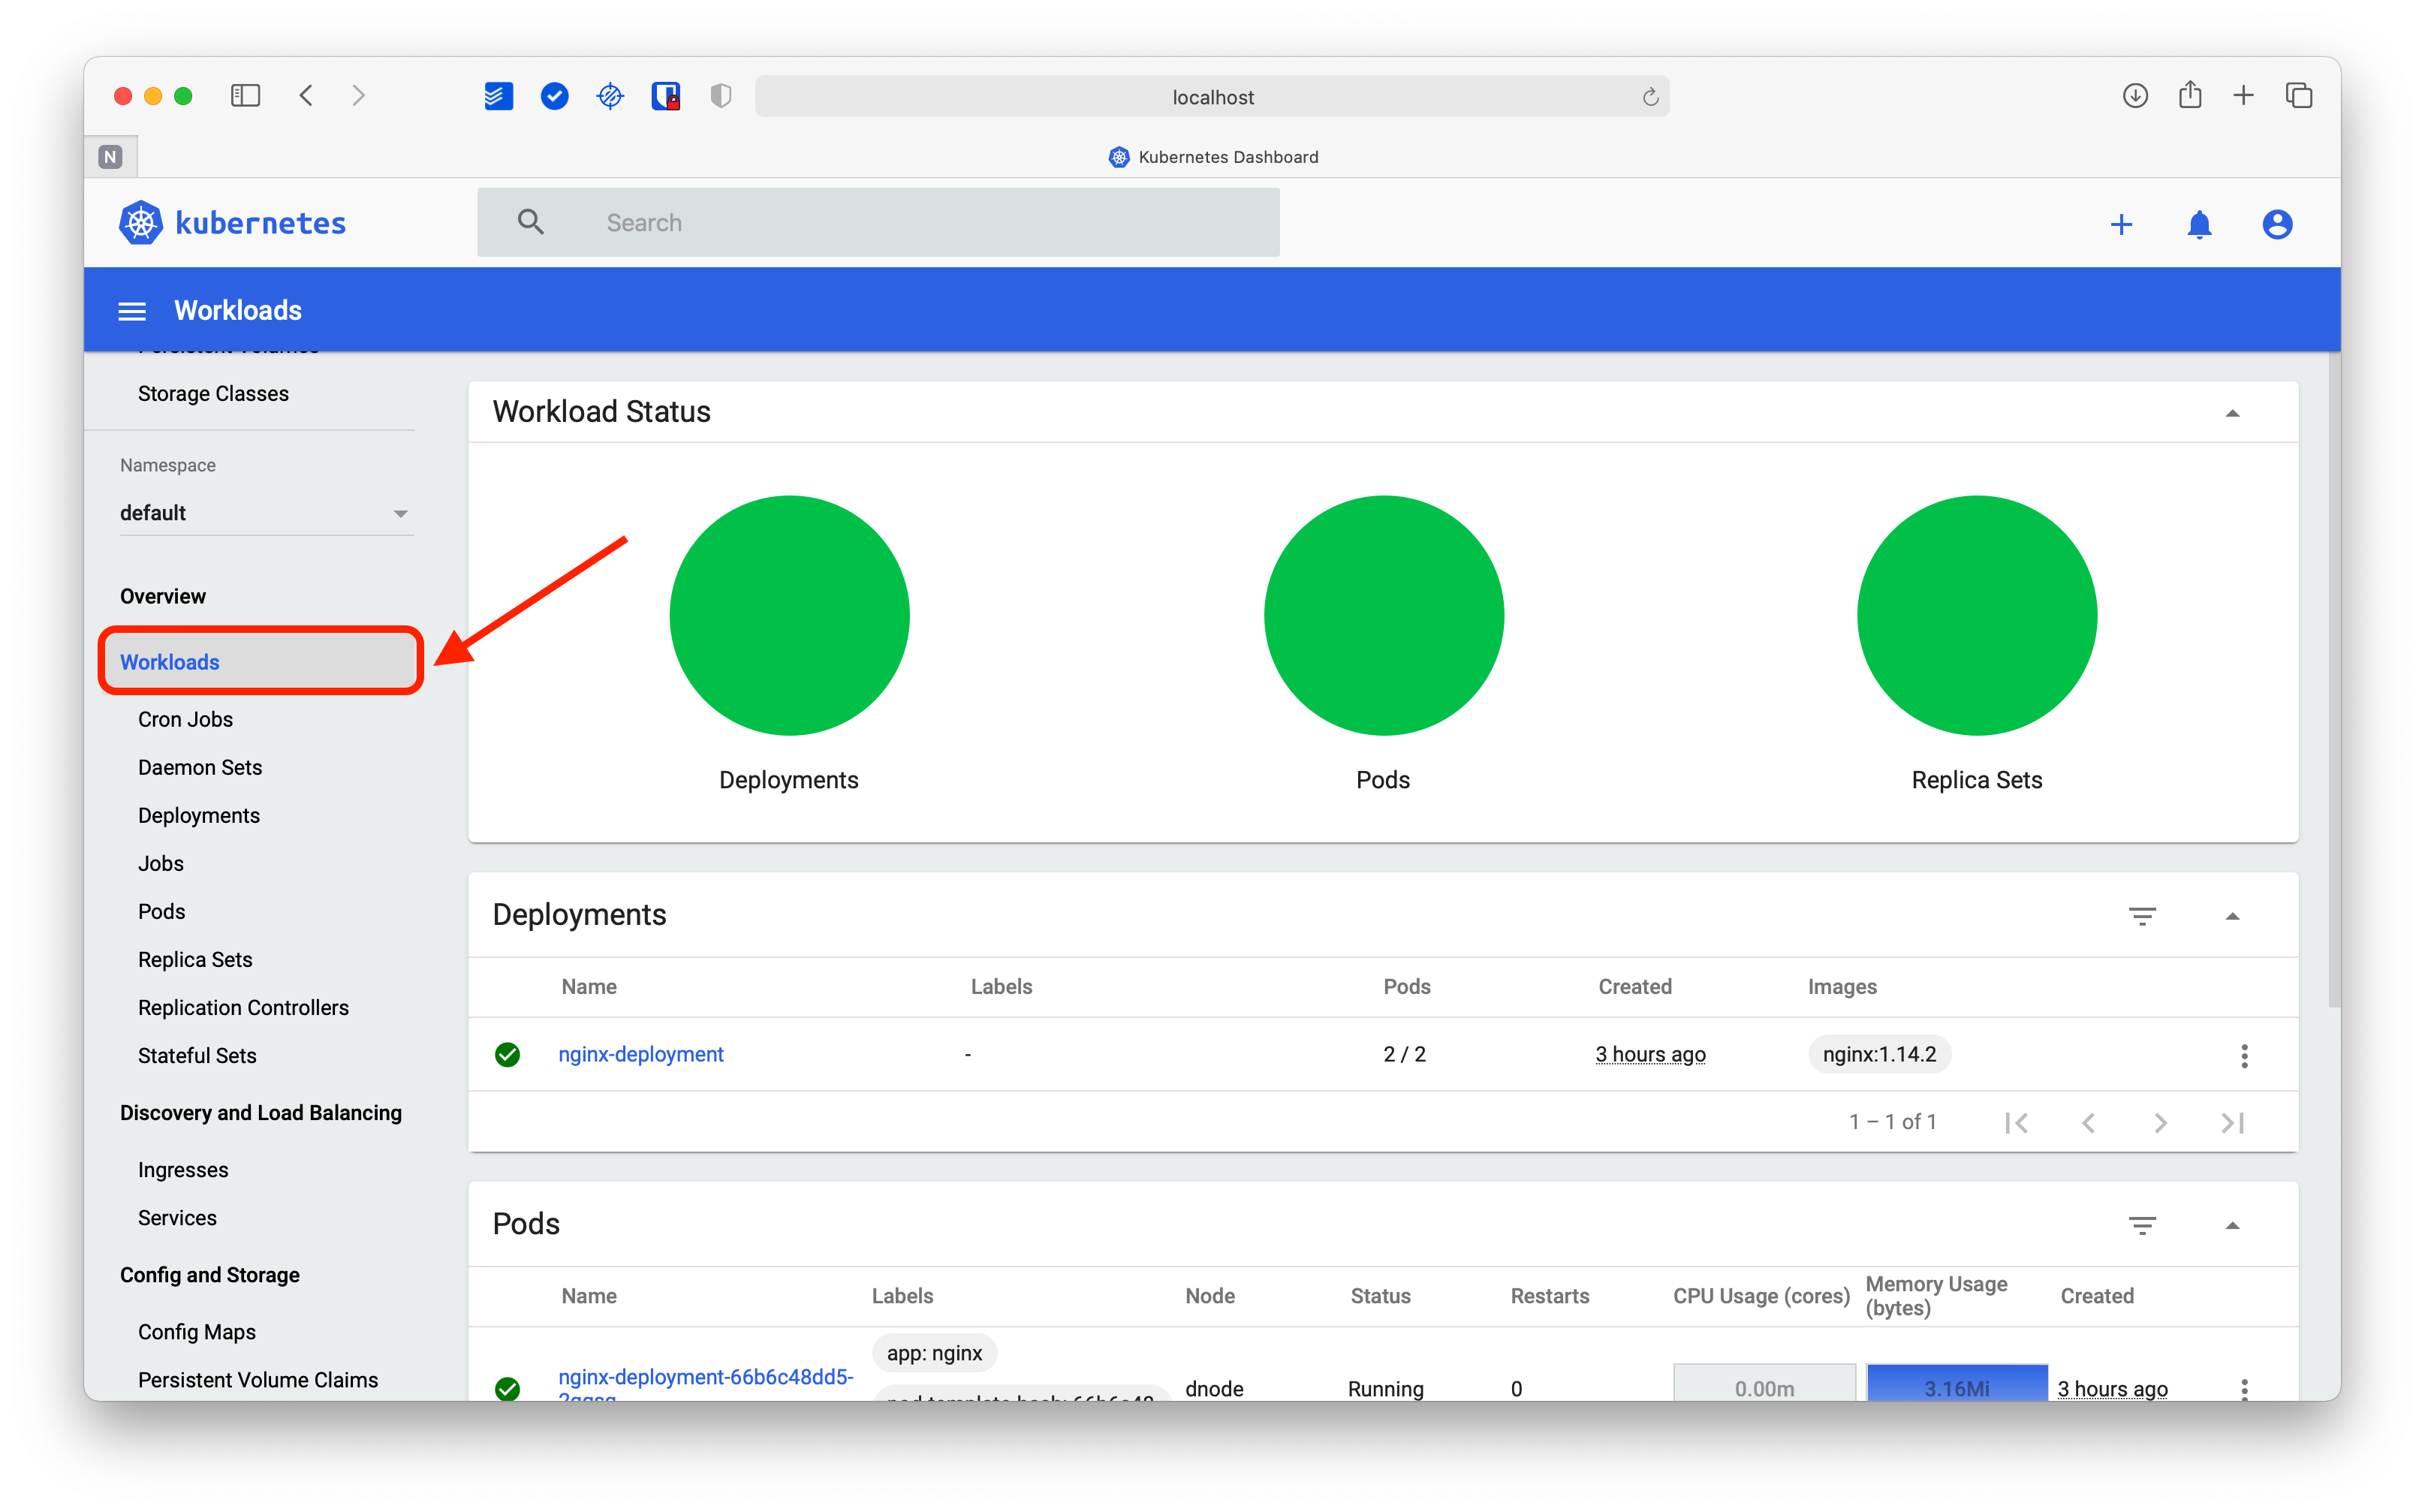
In the upper portion, you can see the CPU and memory usage of the cluster in real-time, while just below, you can see the Workload Status of the DaemonSets, Deployments, Pods, and more.
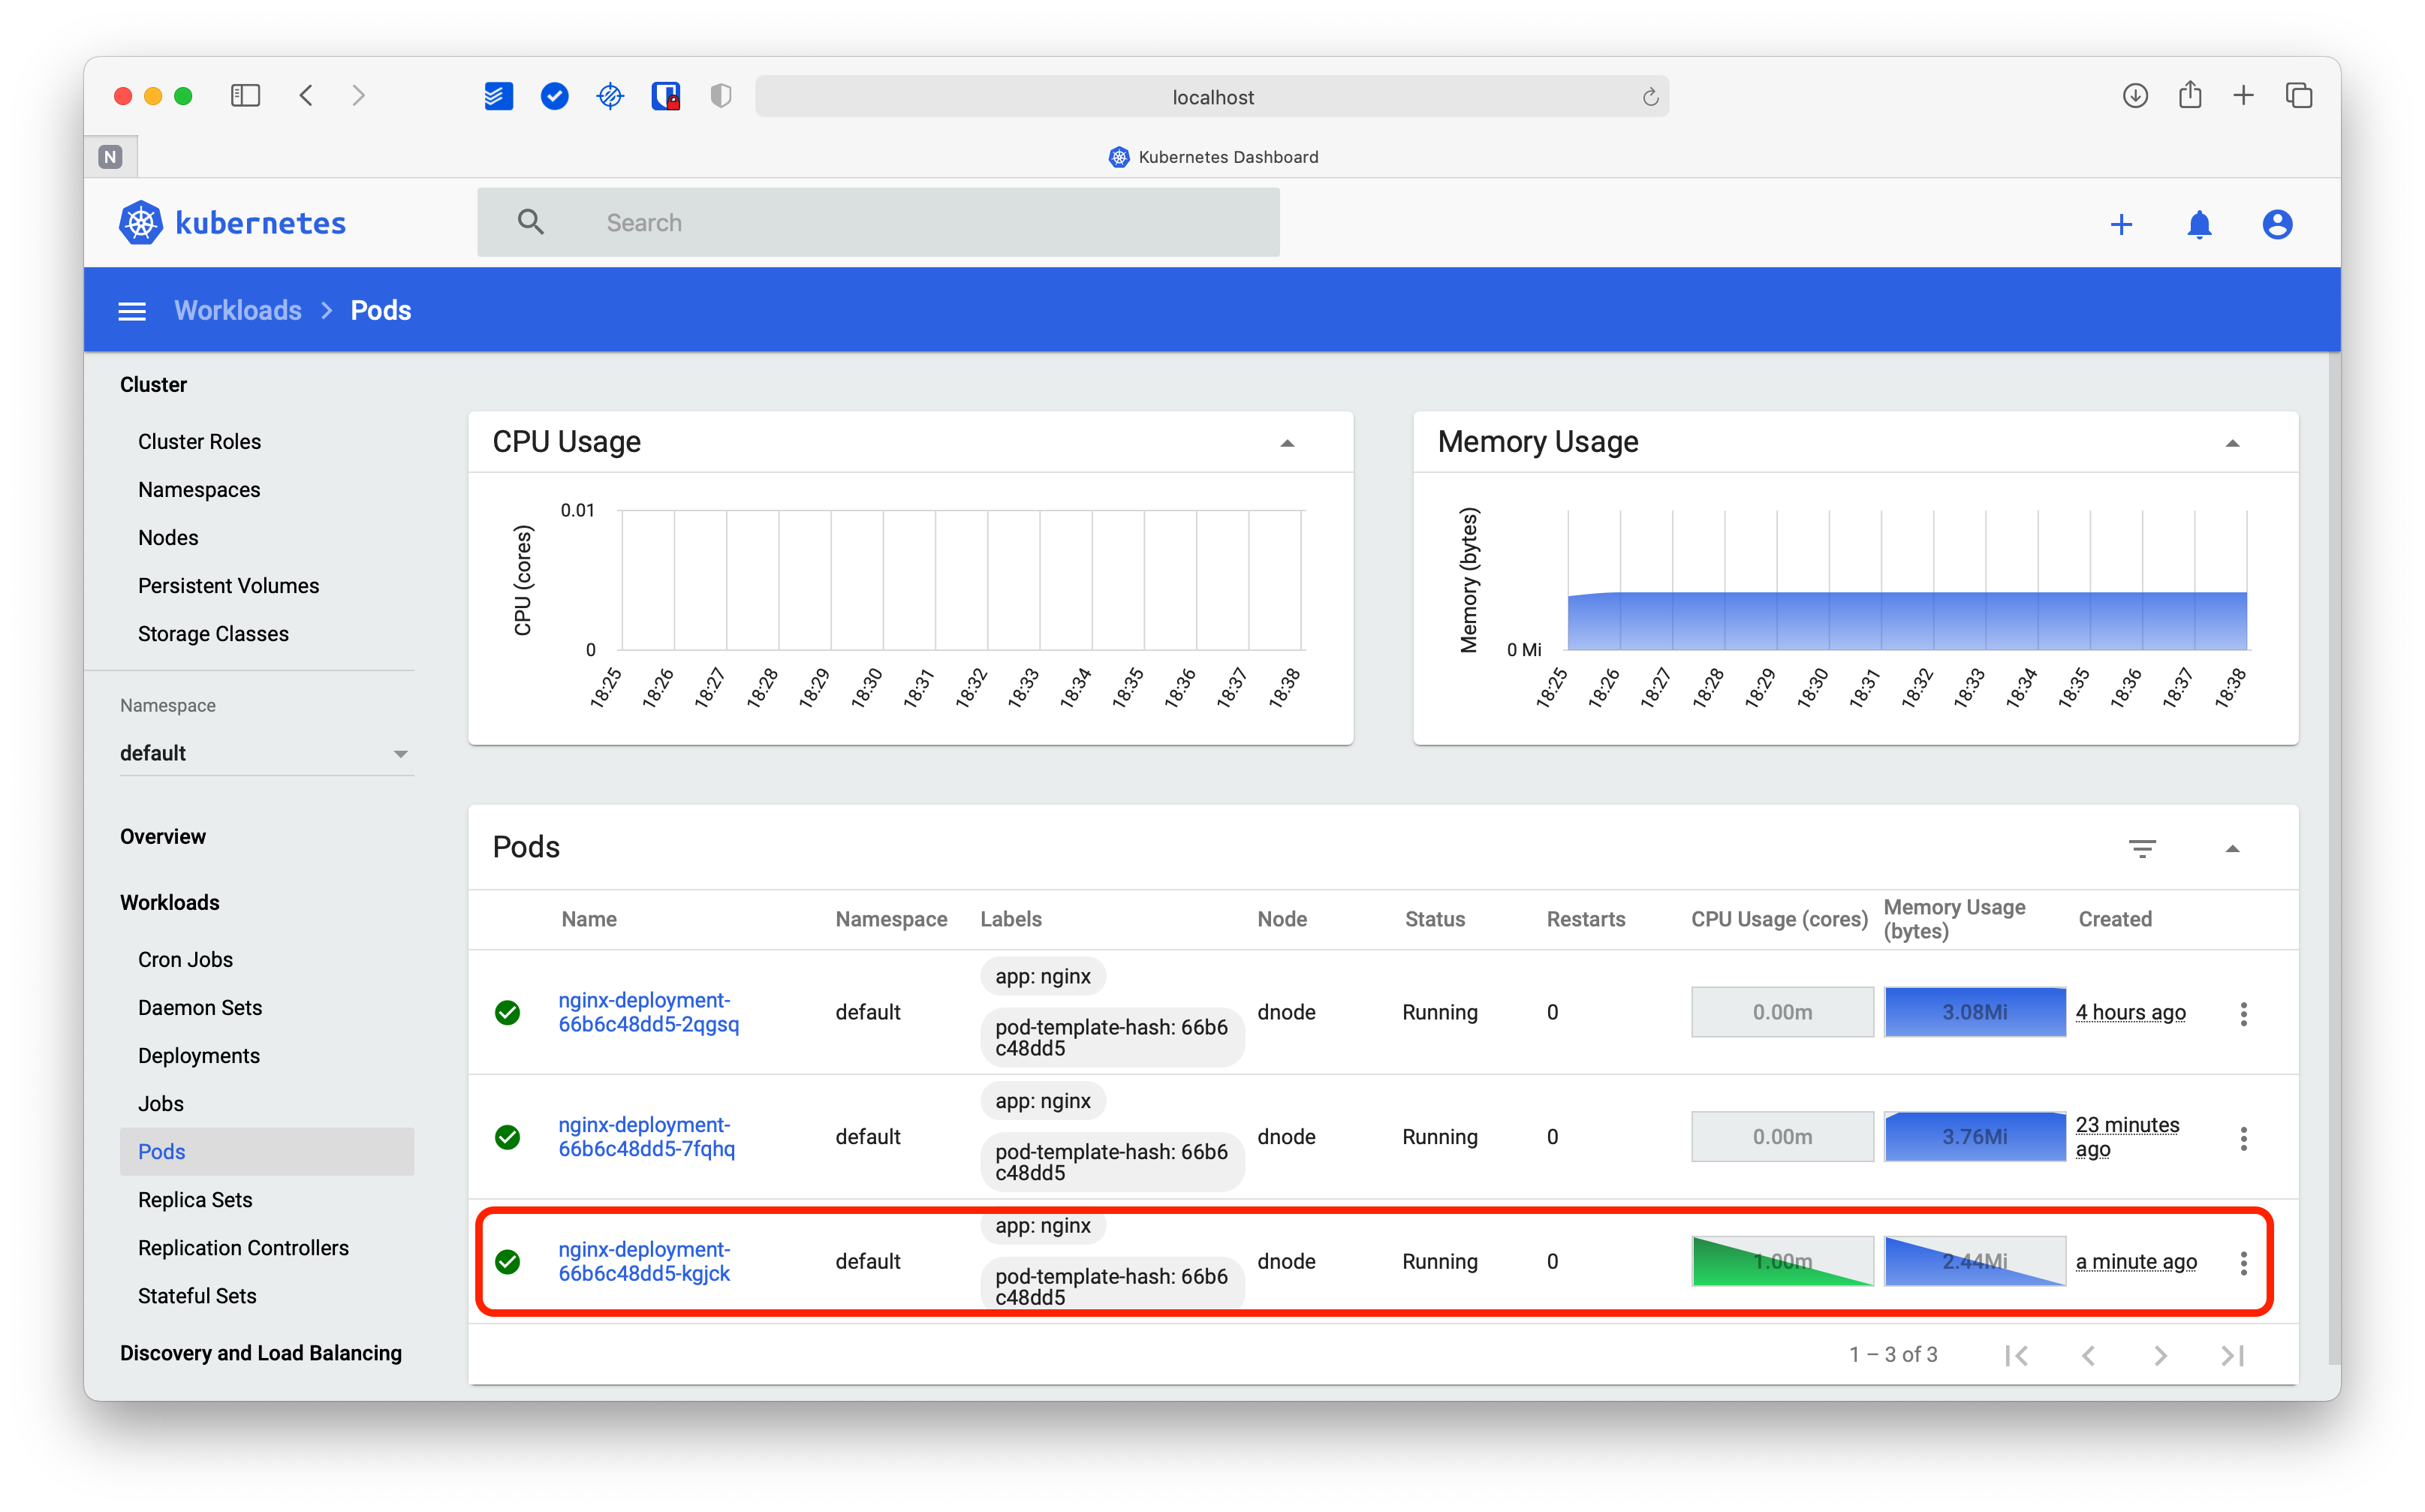
If you scroll down, you will notice that each workload has its own section with more details. For instance, if you want to check all running pods you can do so by checking the respective section.
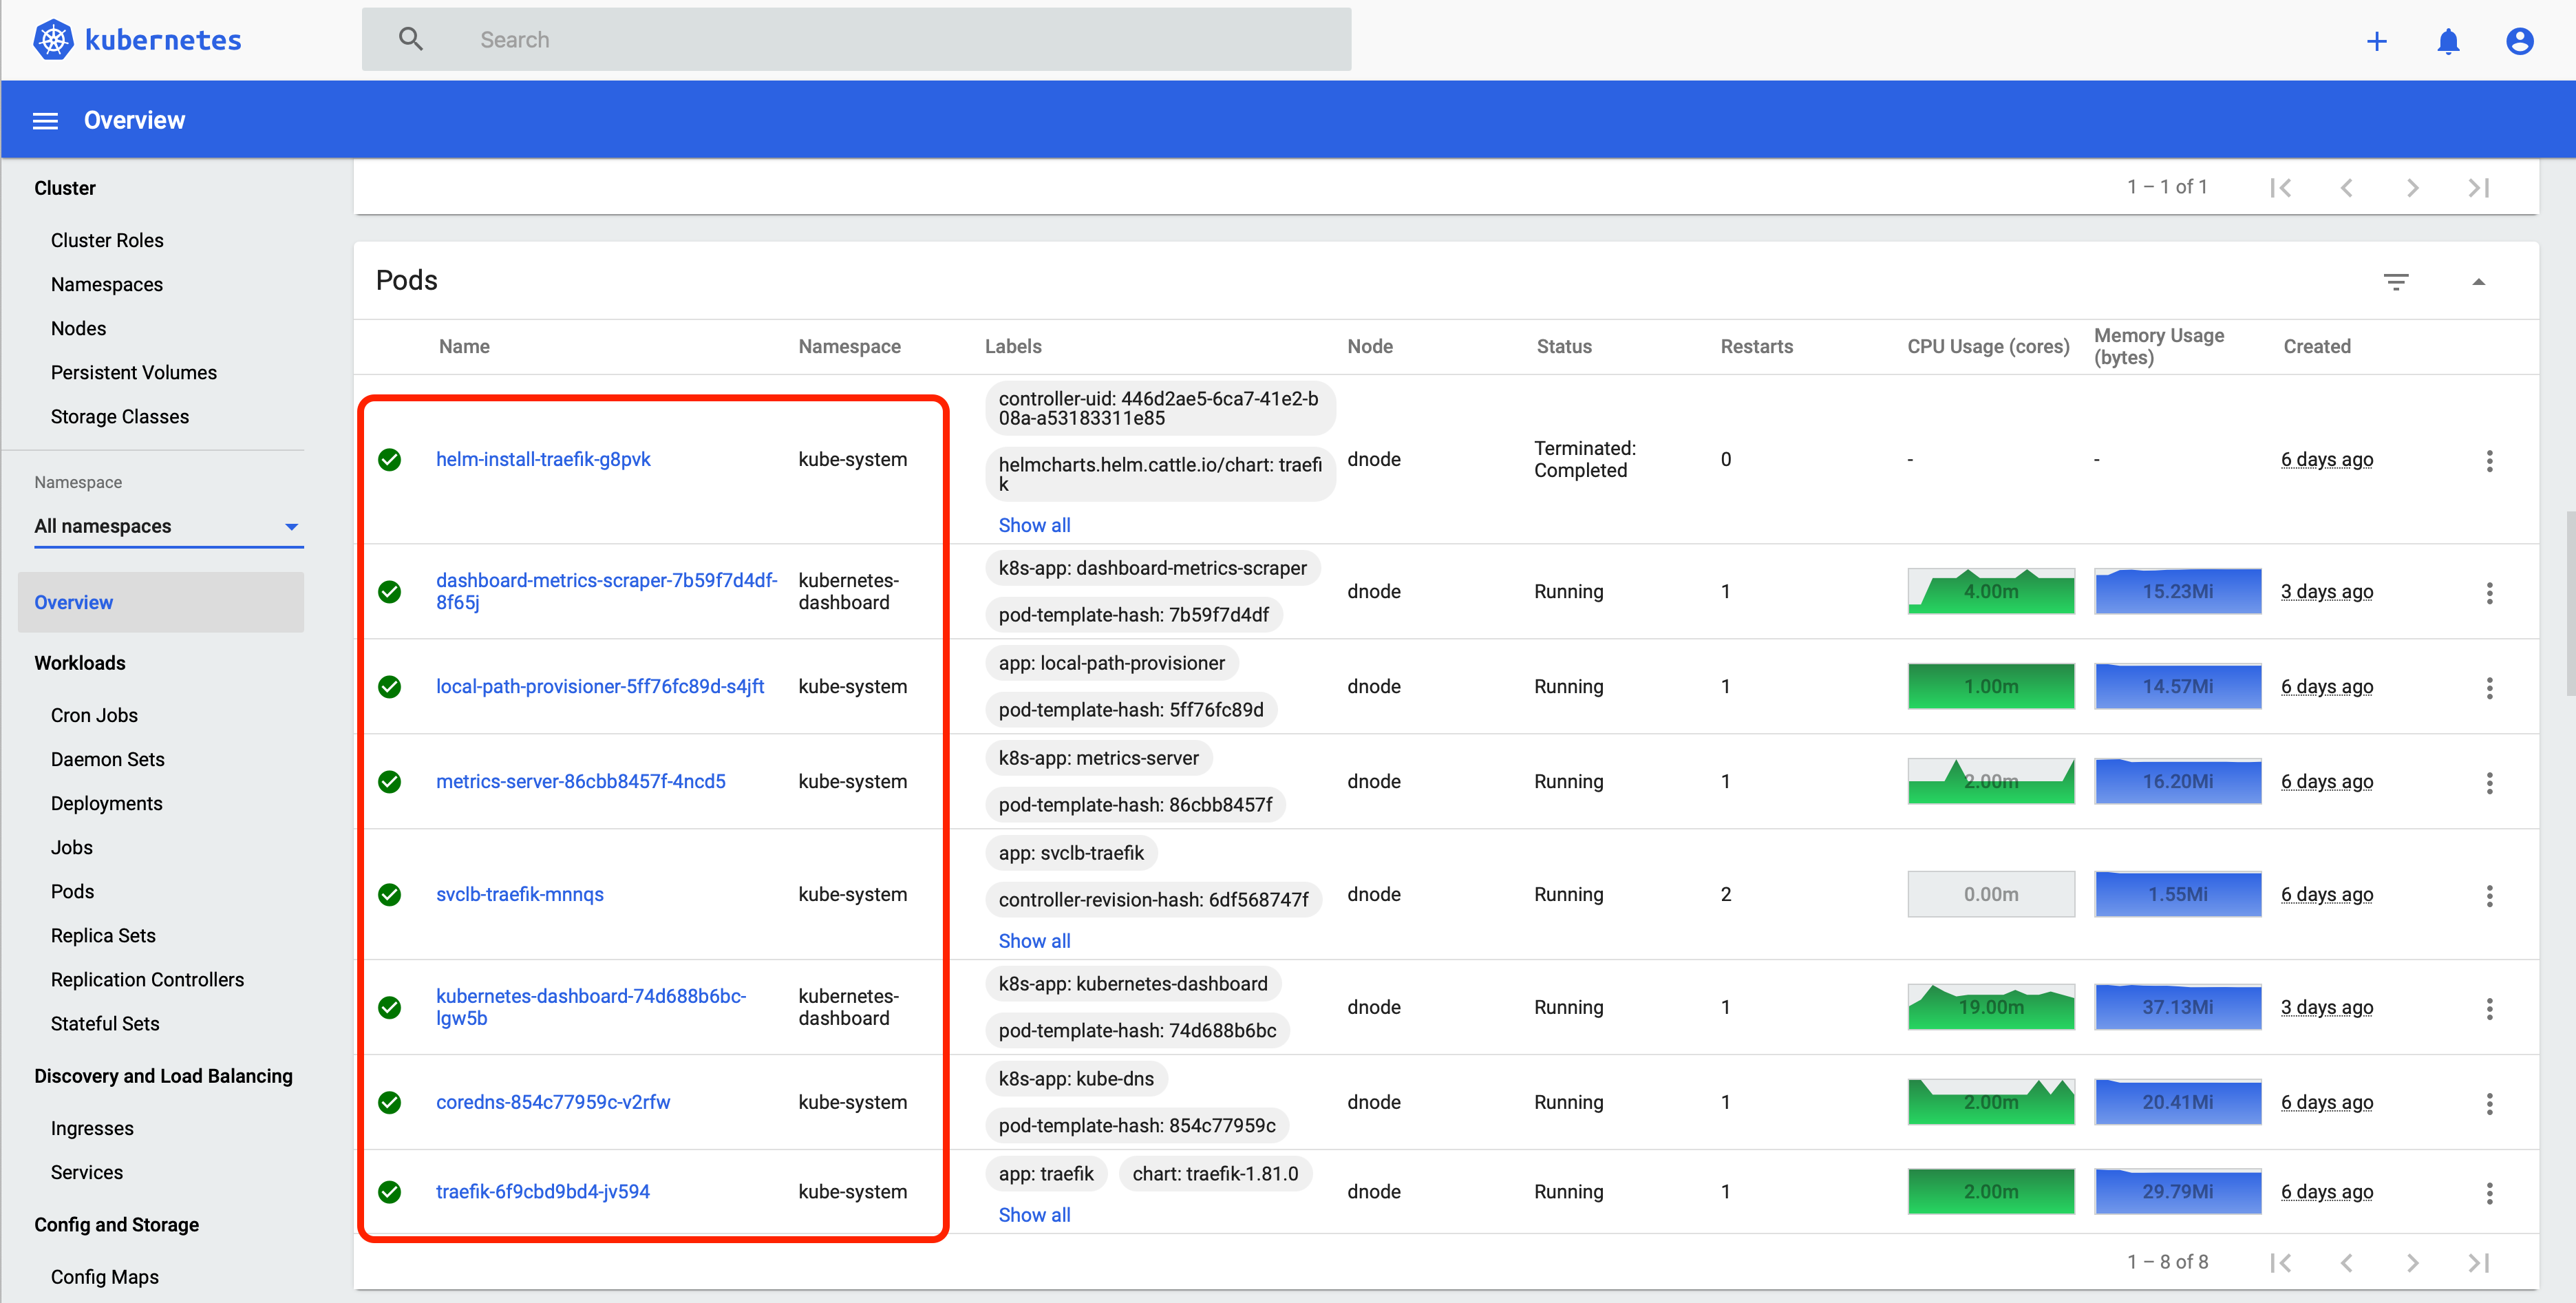
You could say that this section is the equivalent of the kubectl get pods -A command you ran earlier. Furthermore, in addition to the convenience of checking the relevant pod information, this view gives you additional information such as CPU and memory usage per pod.
This is just a small part of the potential of the Kubernetes Dashboard. However, before reviewing in detail the different views, options, and settings offered by this amazing tool, let’s talk a bit more about security.
Hardening dashboard authentication
The Dashboard is basically a graphical version of the kubectl command-line tool. This leads to serious security implications, so it’s advisable to give the Dashboard the same importance as any kubectl users. In other words, you should enforce the same security practices, including proper roles and authentication.
In the previous section, you created the service account admin-user and granted it cluster-wide administrative rights. For learning purposes, this type of account provides a convenient solution for accessing all resources. However, if you work in a development team or want to use the Web UI in production, an account with such privileges represents a huge security risk.
Creating a restricted user account
To illustrate this point, you’ll create a restricted account that only has privileges to view resources. In that sense, you can repeat the procedure used when creating the admin-user from the terminal. However, since you have a fully functional Web UI, why not take advantage of it?
First, select the kubernetes-dashboard namespace from the drop-down menu on the left. Then, click on the “+” symbol at the top right to create a new resource.

This will give you access to a window where you can paste the content of the resource you want to create.
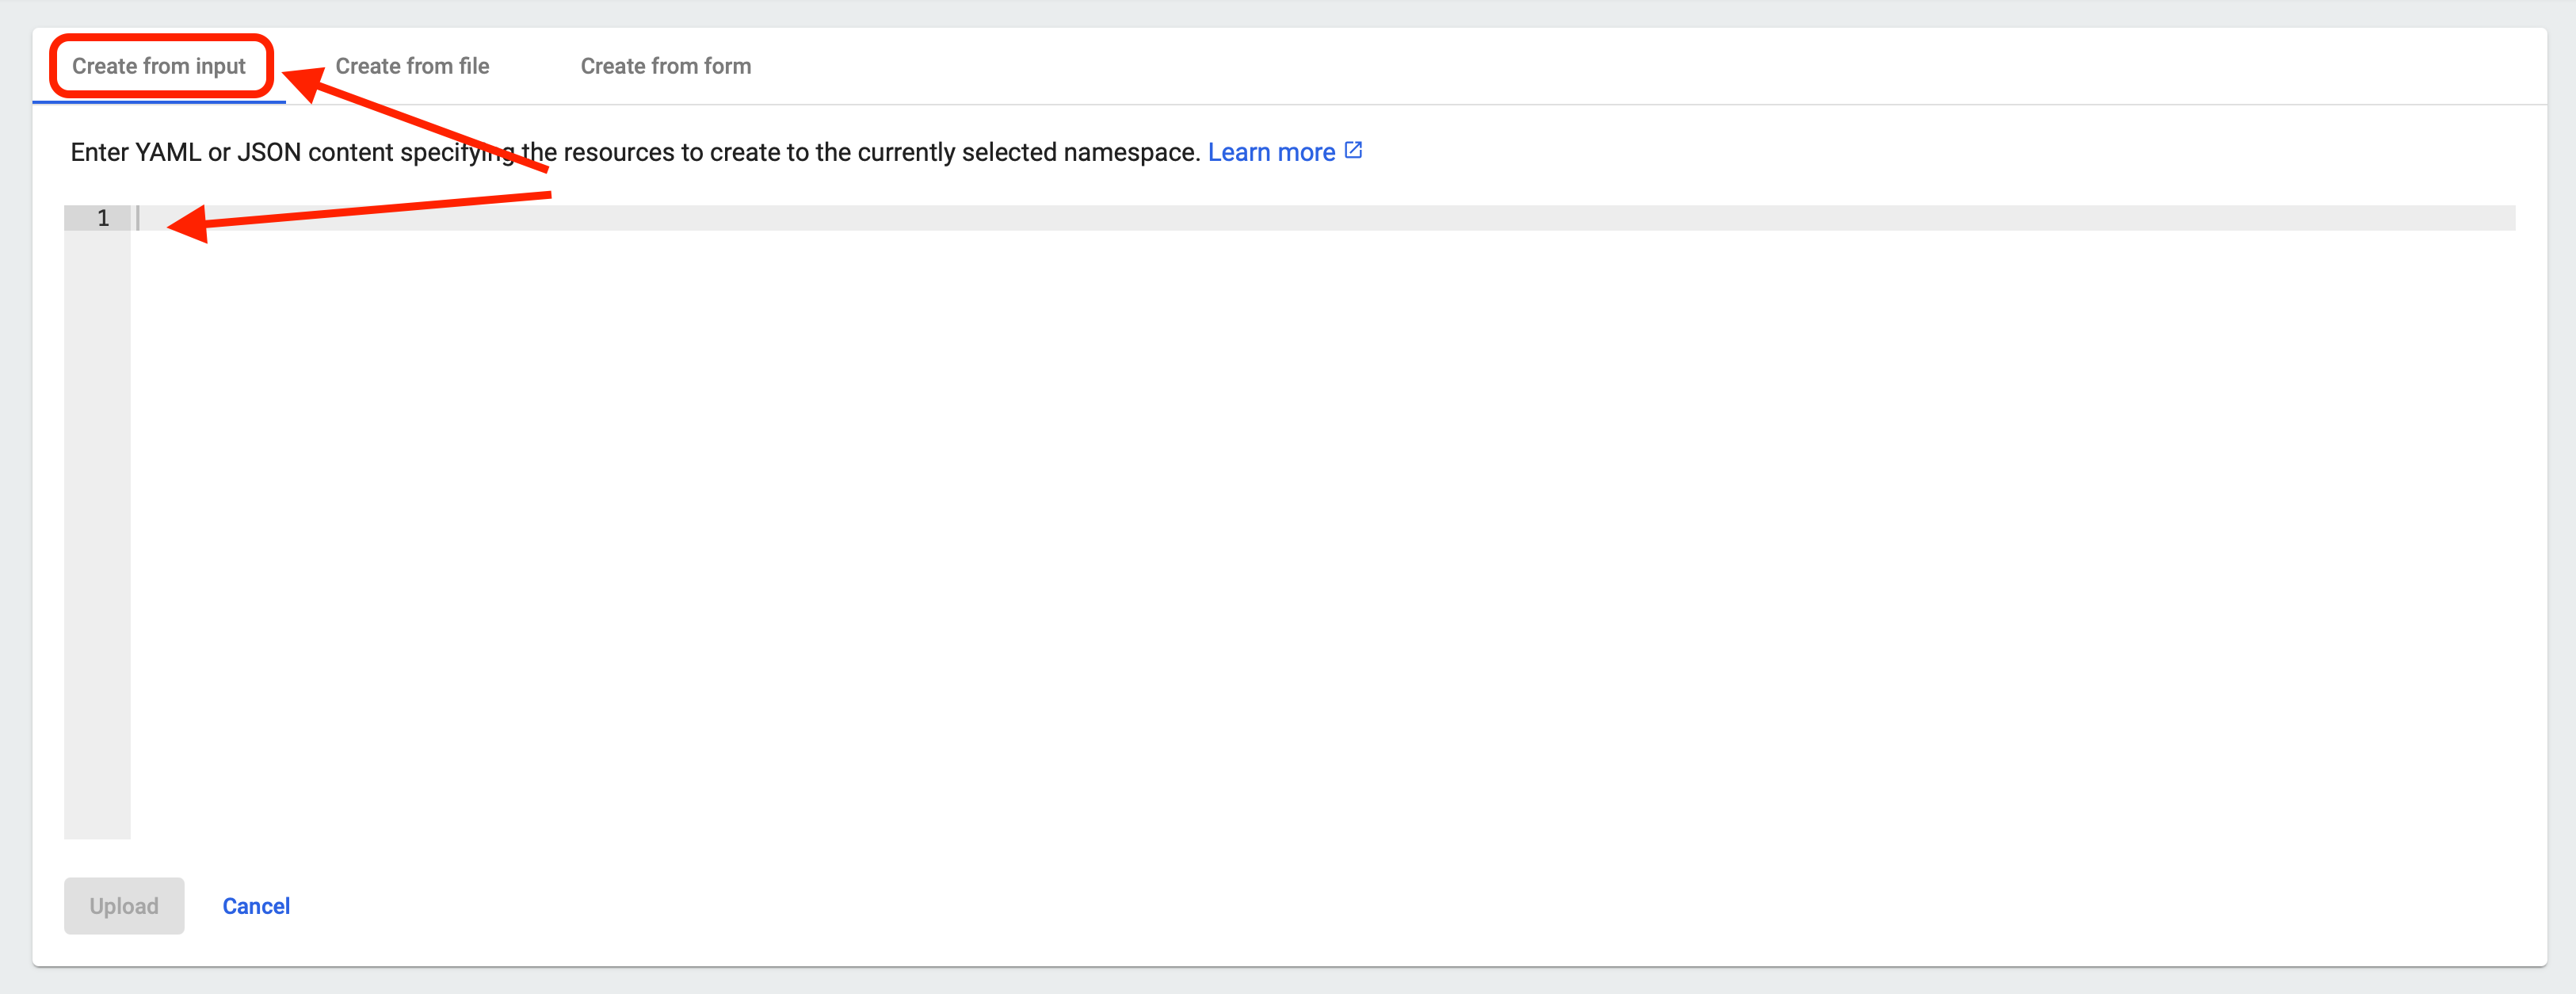
In this case, copy and paste the following content.
Once you have pasted it, click on the “Upload” button at the bottom left.
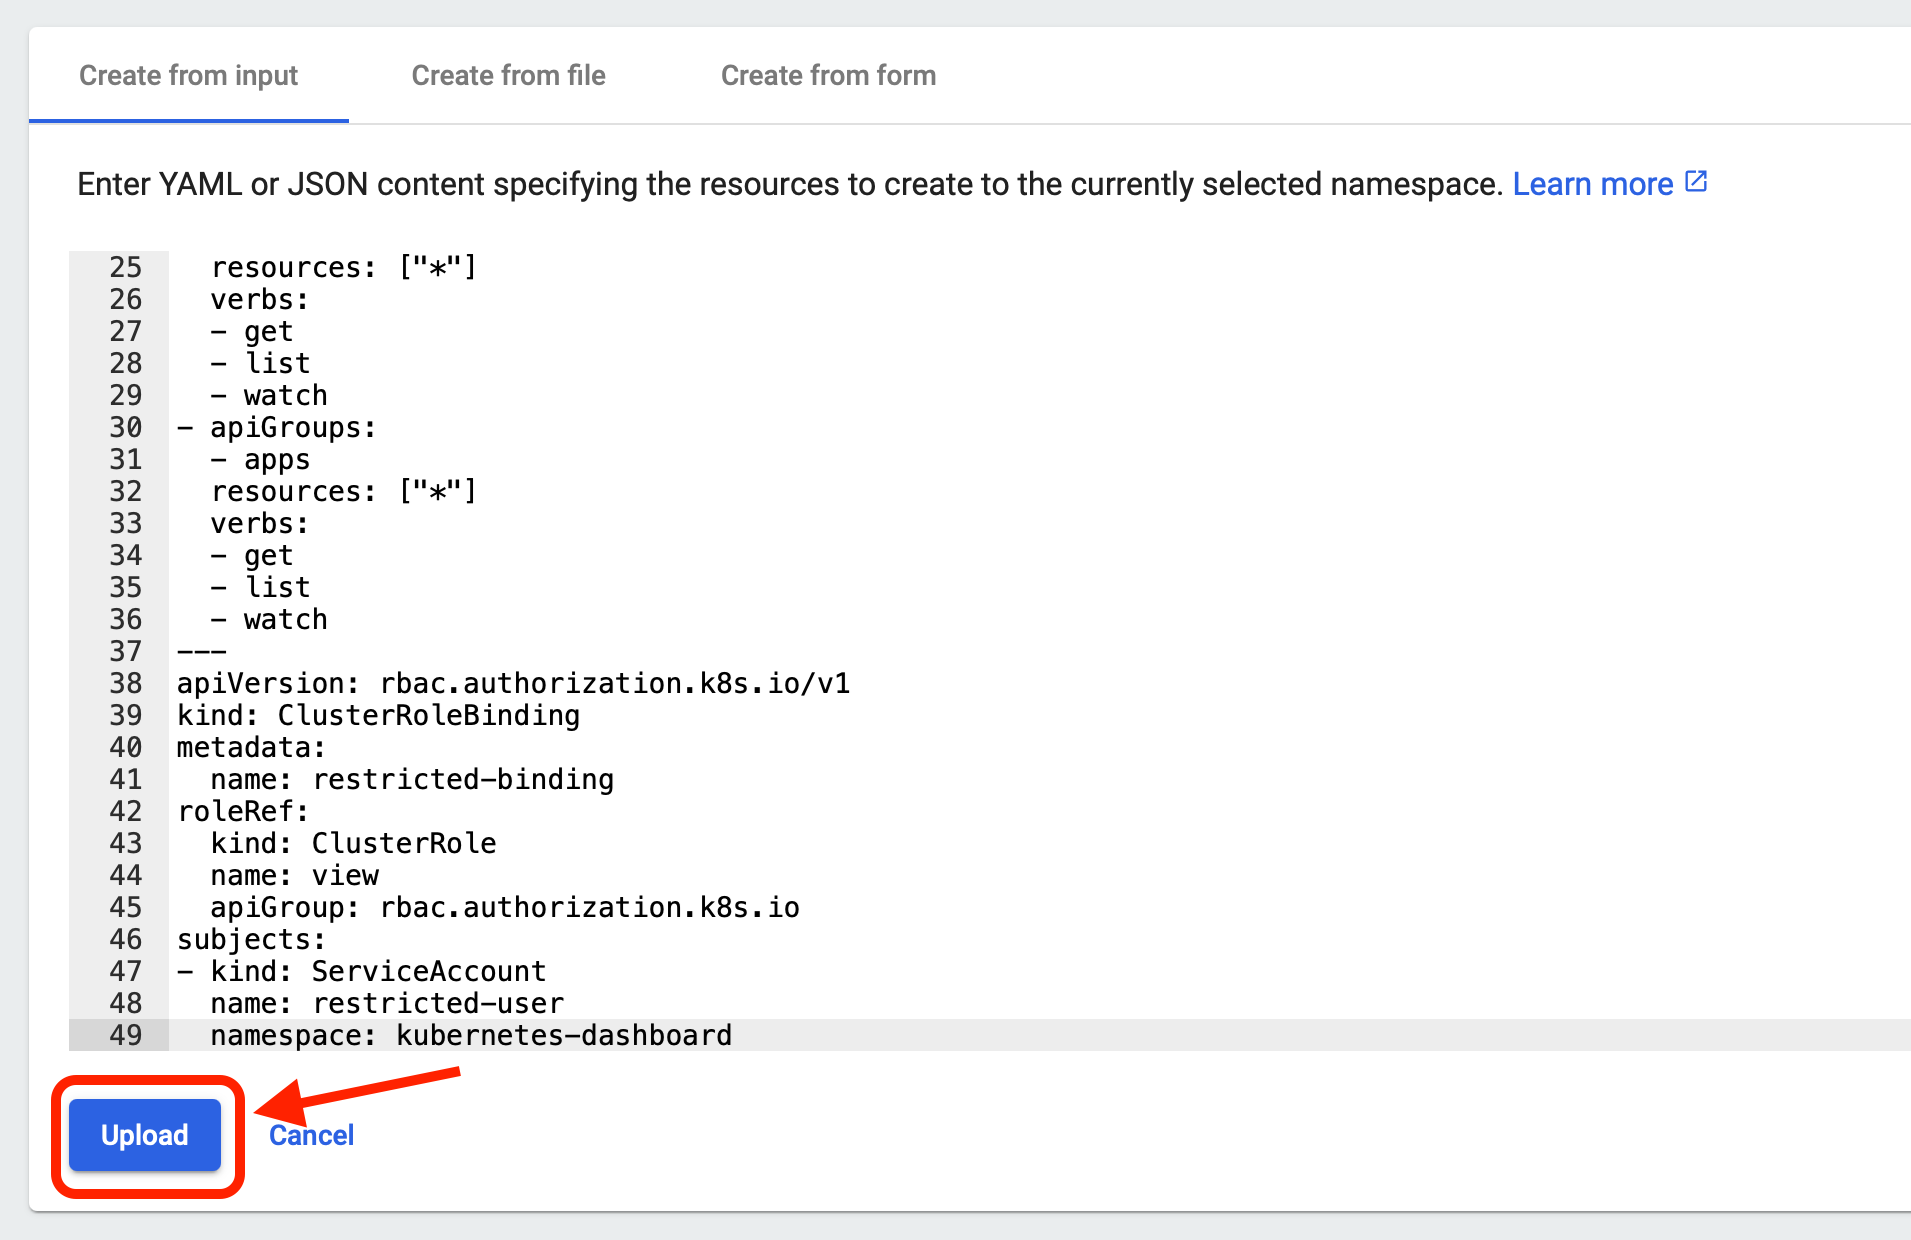
If there is no syntax error (remember that YAML files are very sensitive to indentations), the window will close without displaying any message. Note that through the Web UI you can also create resources using a file or a form.
Once the restricted-user service account is created, you only need its Bearer Token to access the Dashboard. Again, you can get the token from the terminal or you can use the Dashboard.
To obtain the Bearer Token, go to “Secrets” in the Config and storage section.
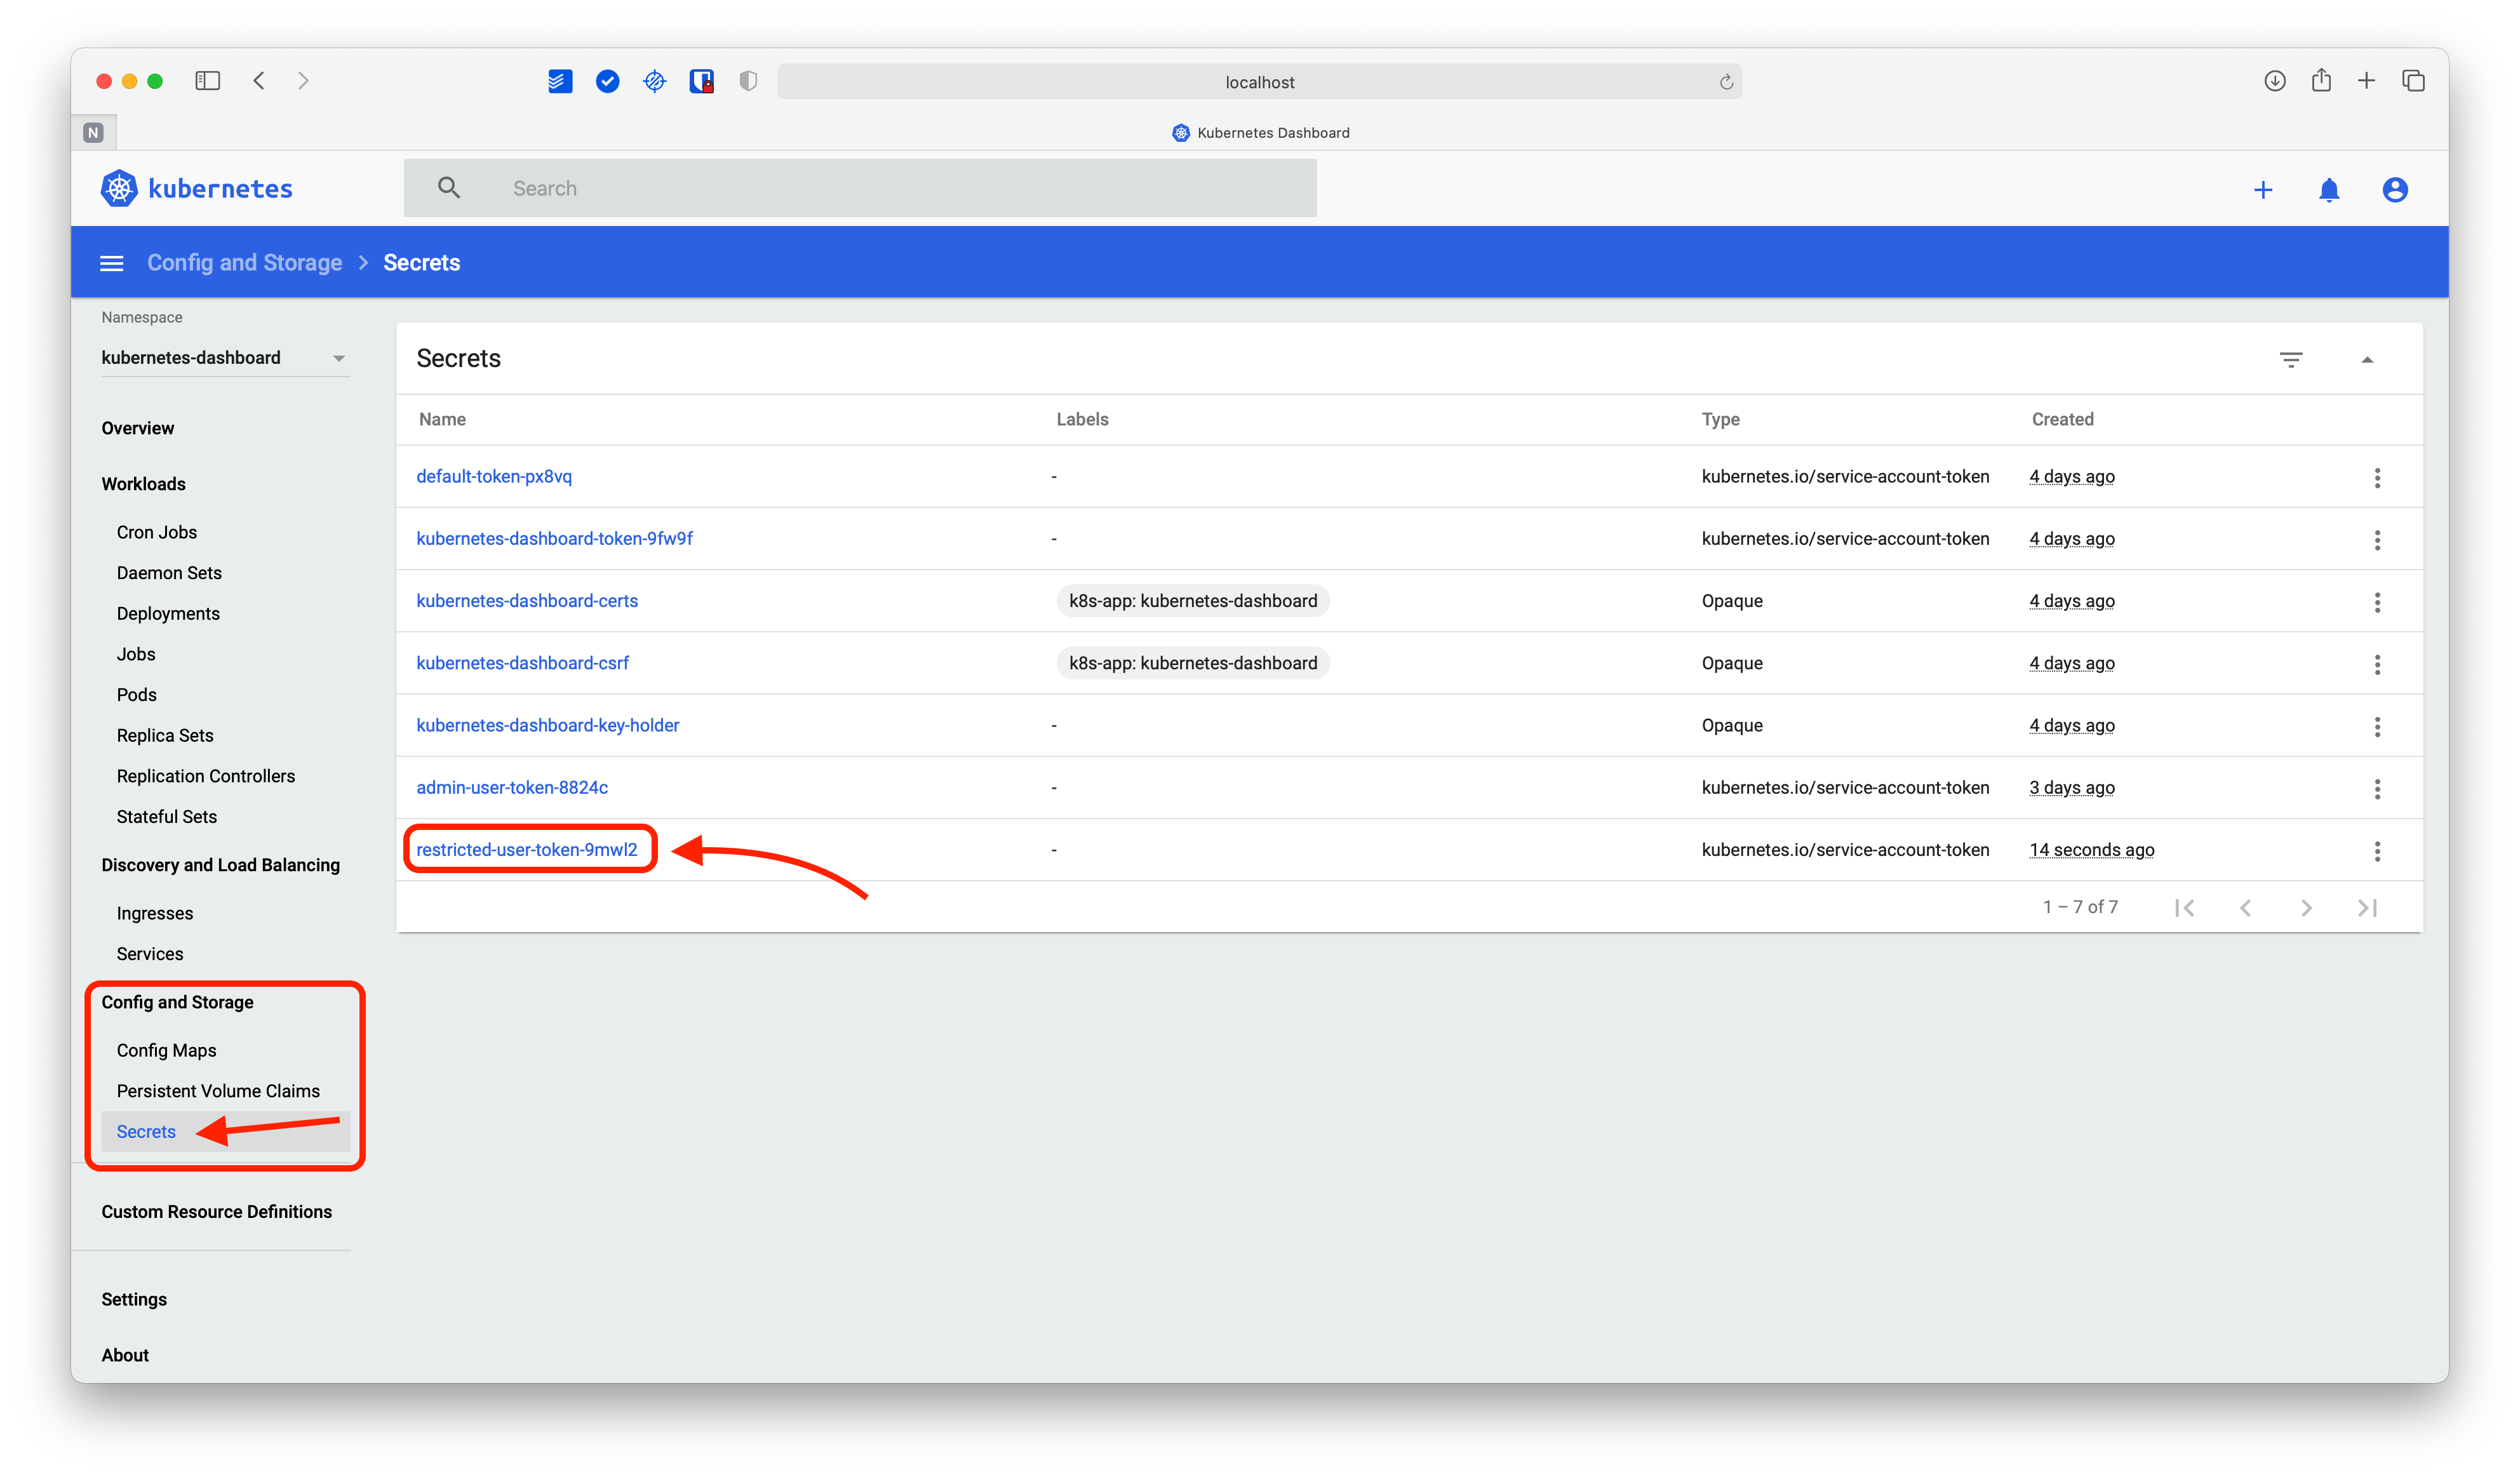
Here you can see that the respective token has been created for the restricted-user service account. Click on the secret to view its contents.
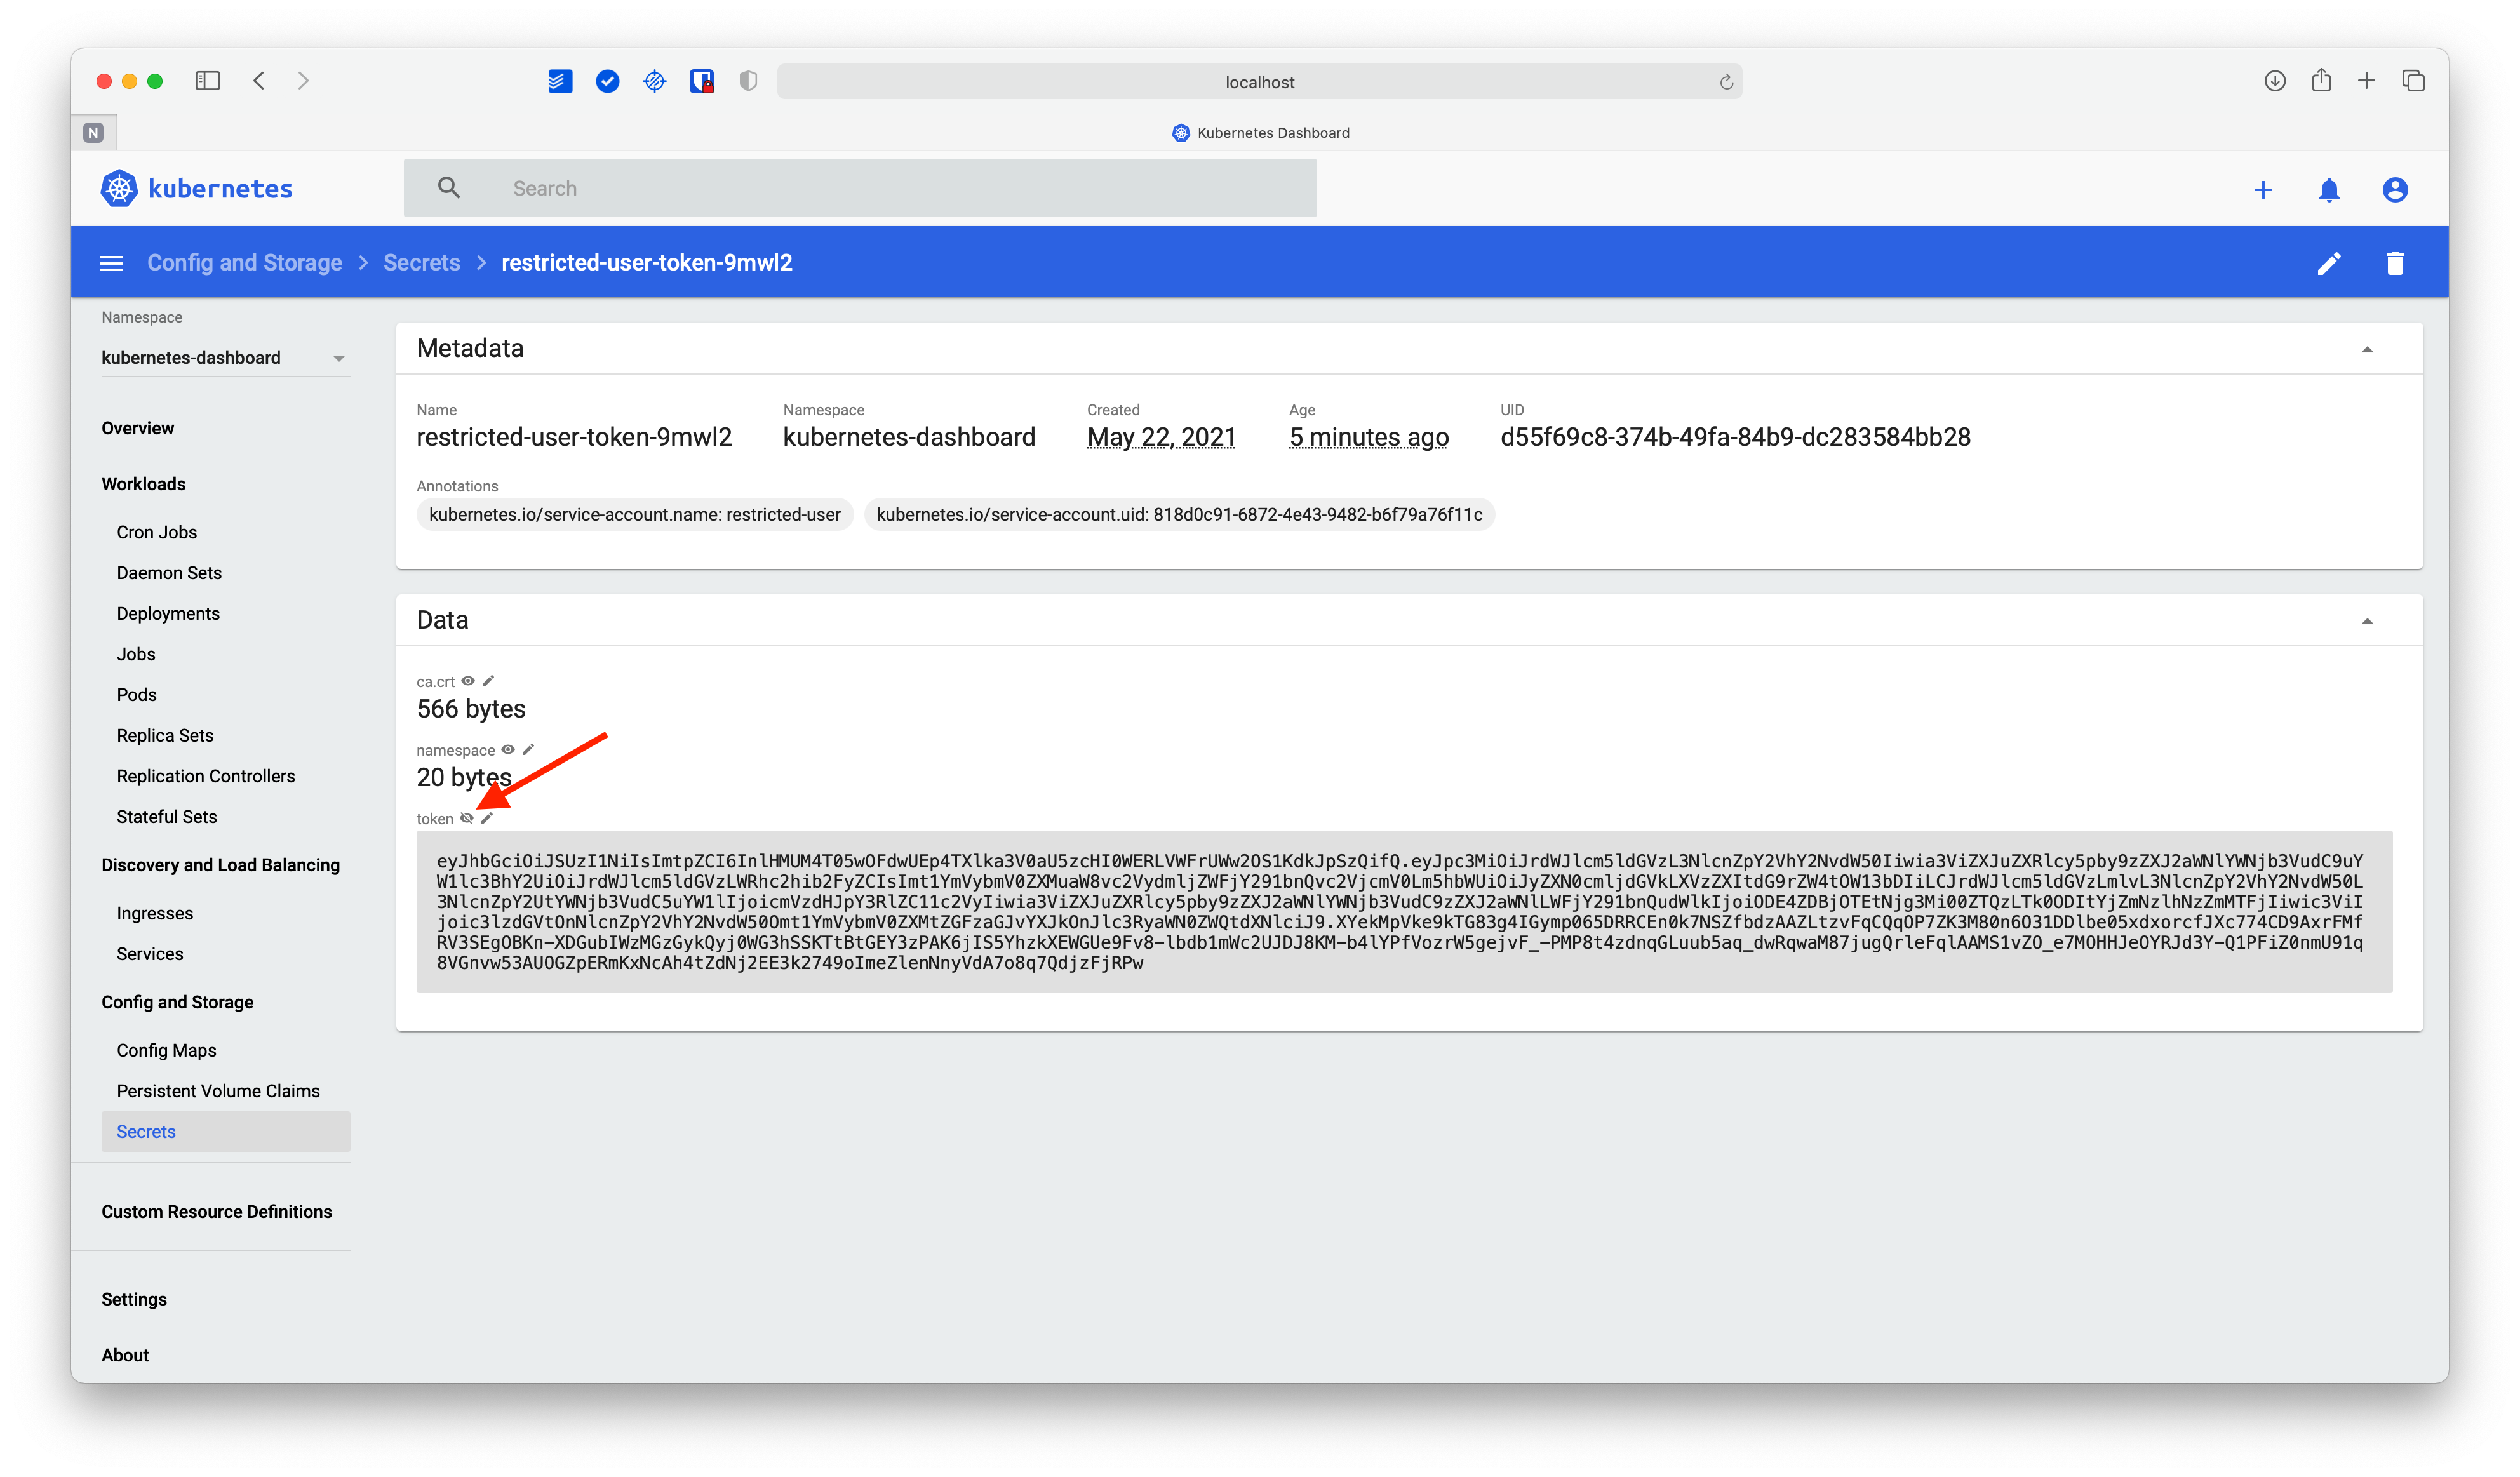
For security reasons, you must press the button indicated in the image to display the Bearer Token value. Copy this value, as you will need it soon.
Logging in as a restricted user
In order to use the new ServiceAccount, you must exit the Web UI. To do so, click on the user icon in the upper right corner and then click on "Sign out.”

This will take you back to the initial login screen. Use the restricted-user Bearer Token to log in.
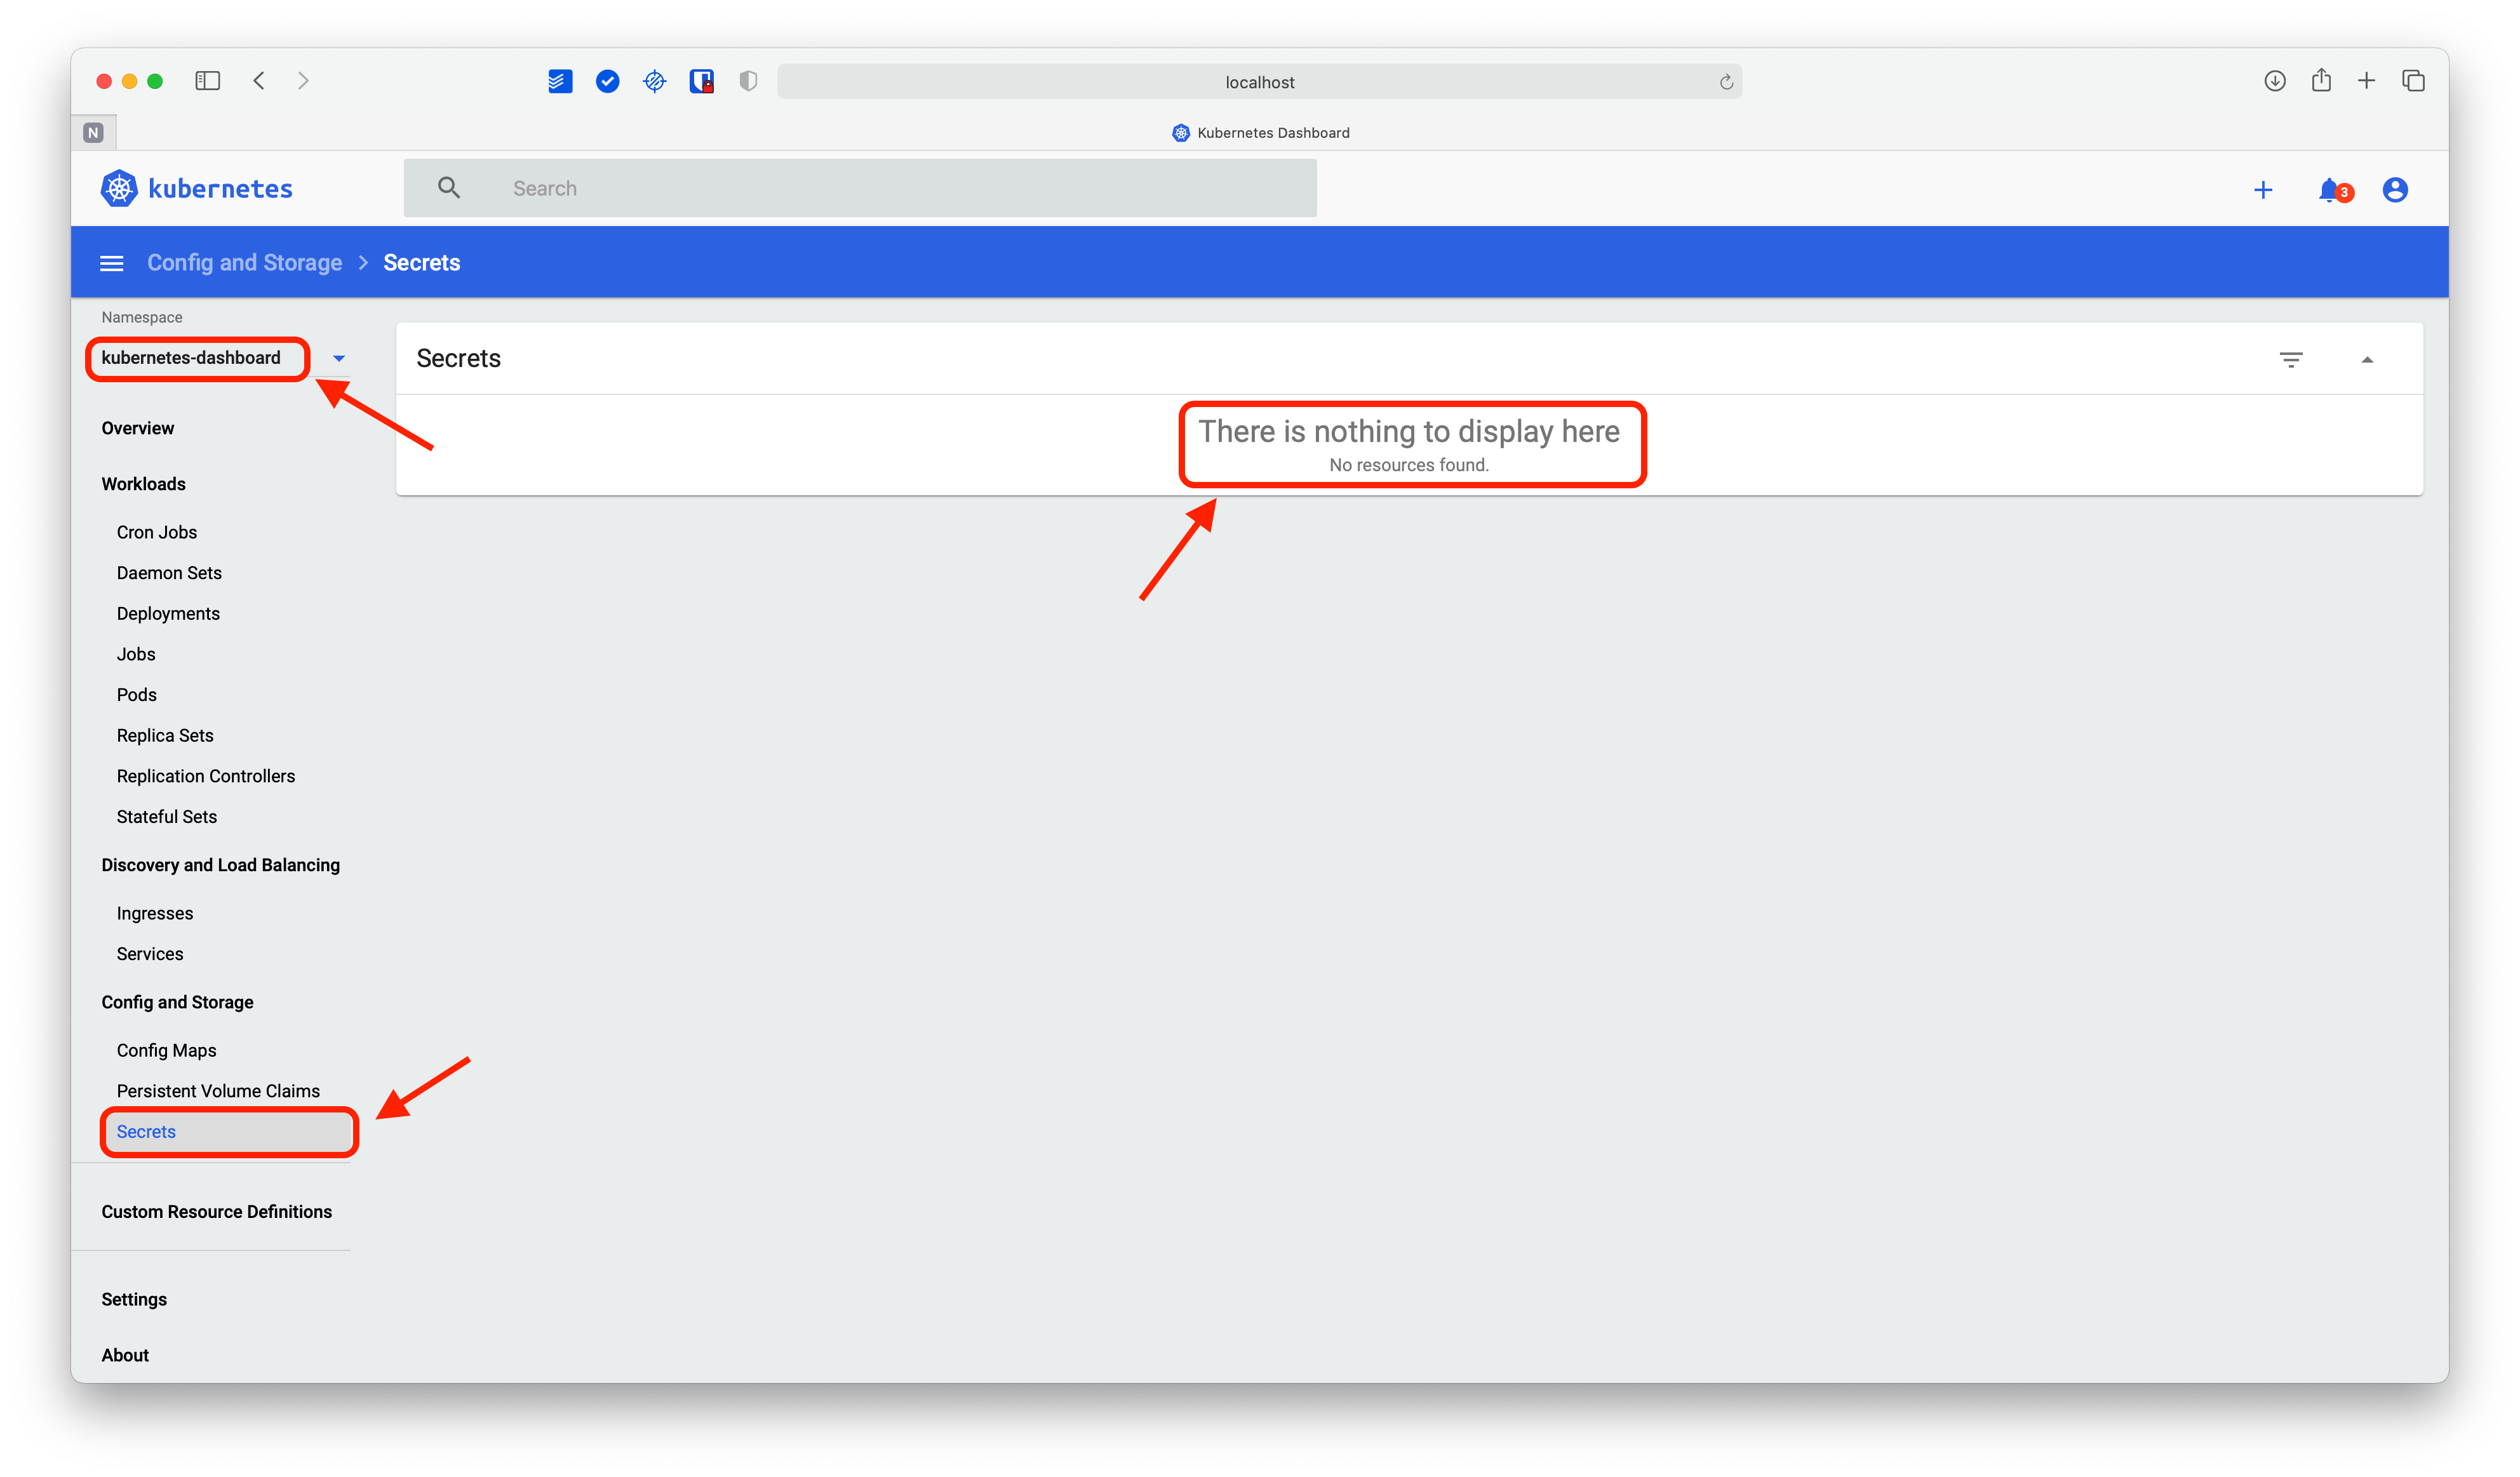
At first glance, you will not notice much difference with respect to the admin-user. However, if you select the kubernetes-dashboard namespace and try to view the Bearer Tokens, you will notice that you do not have sufficient permissions to view them.
Not having access to the secrets is a good thing, but what if instead of checking the secrets you go to the Config Maps section?
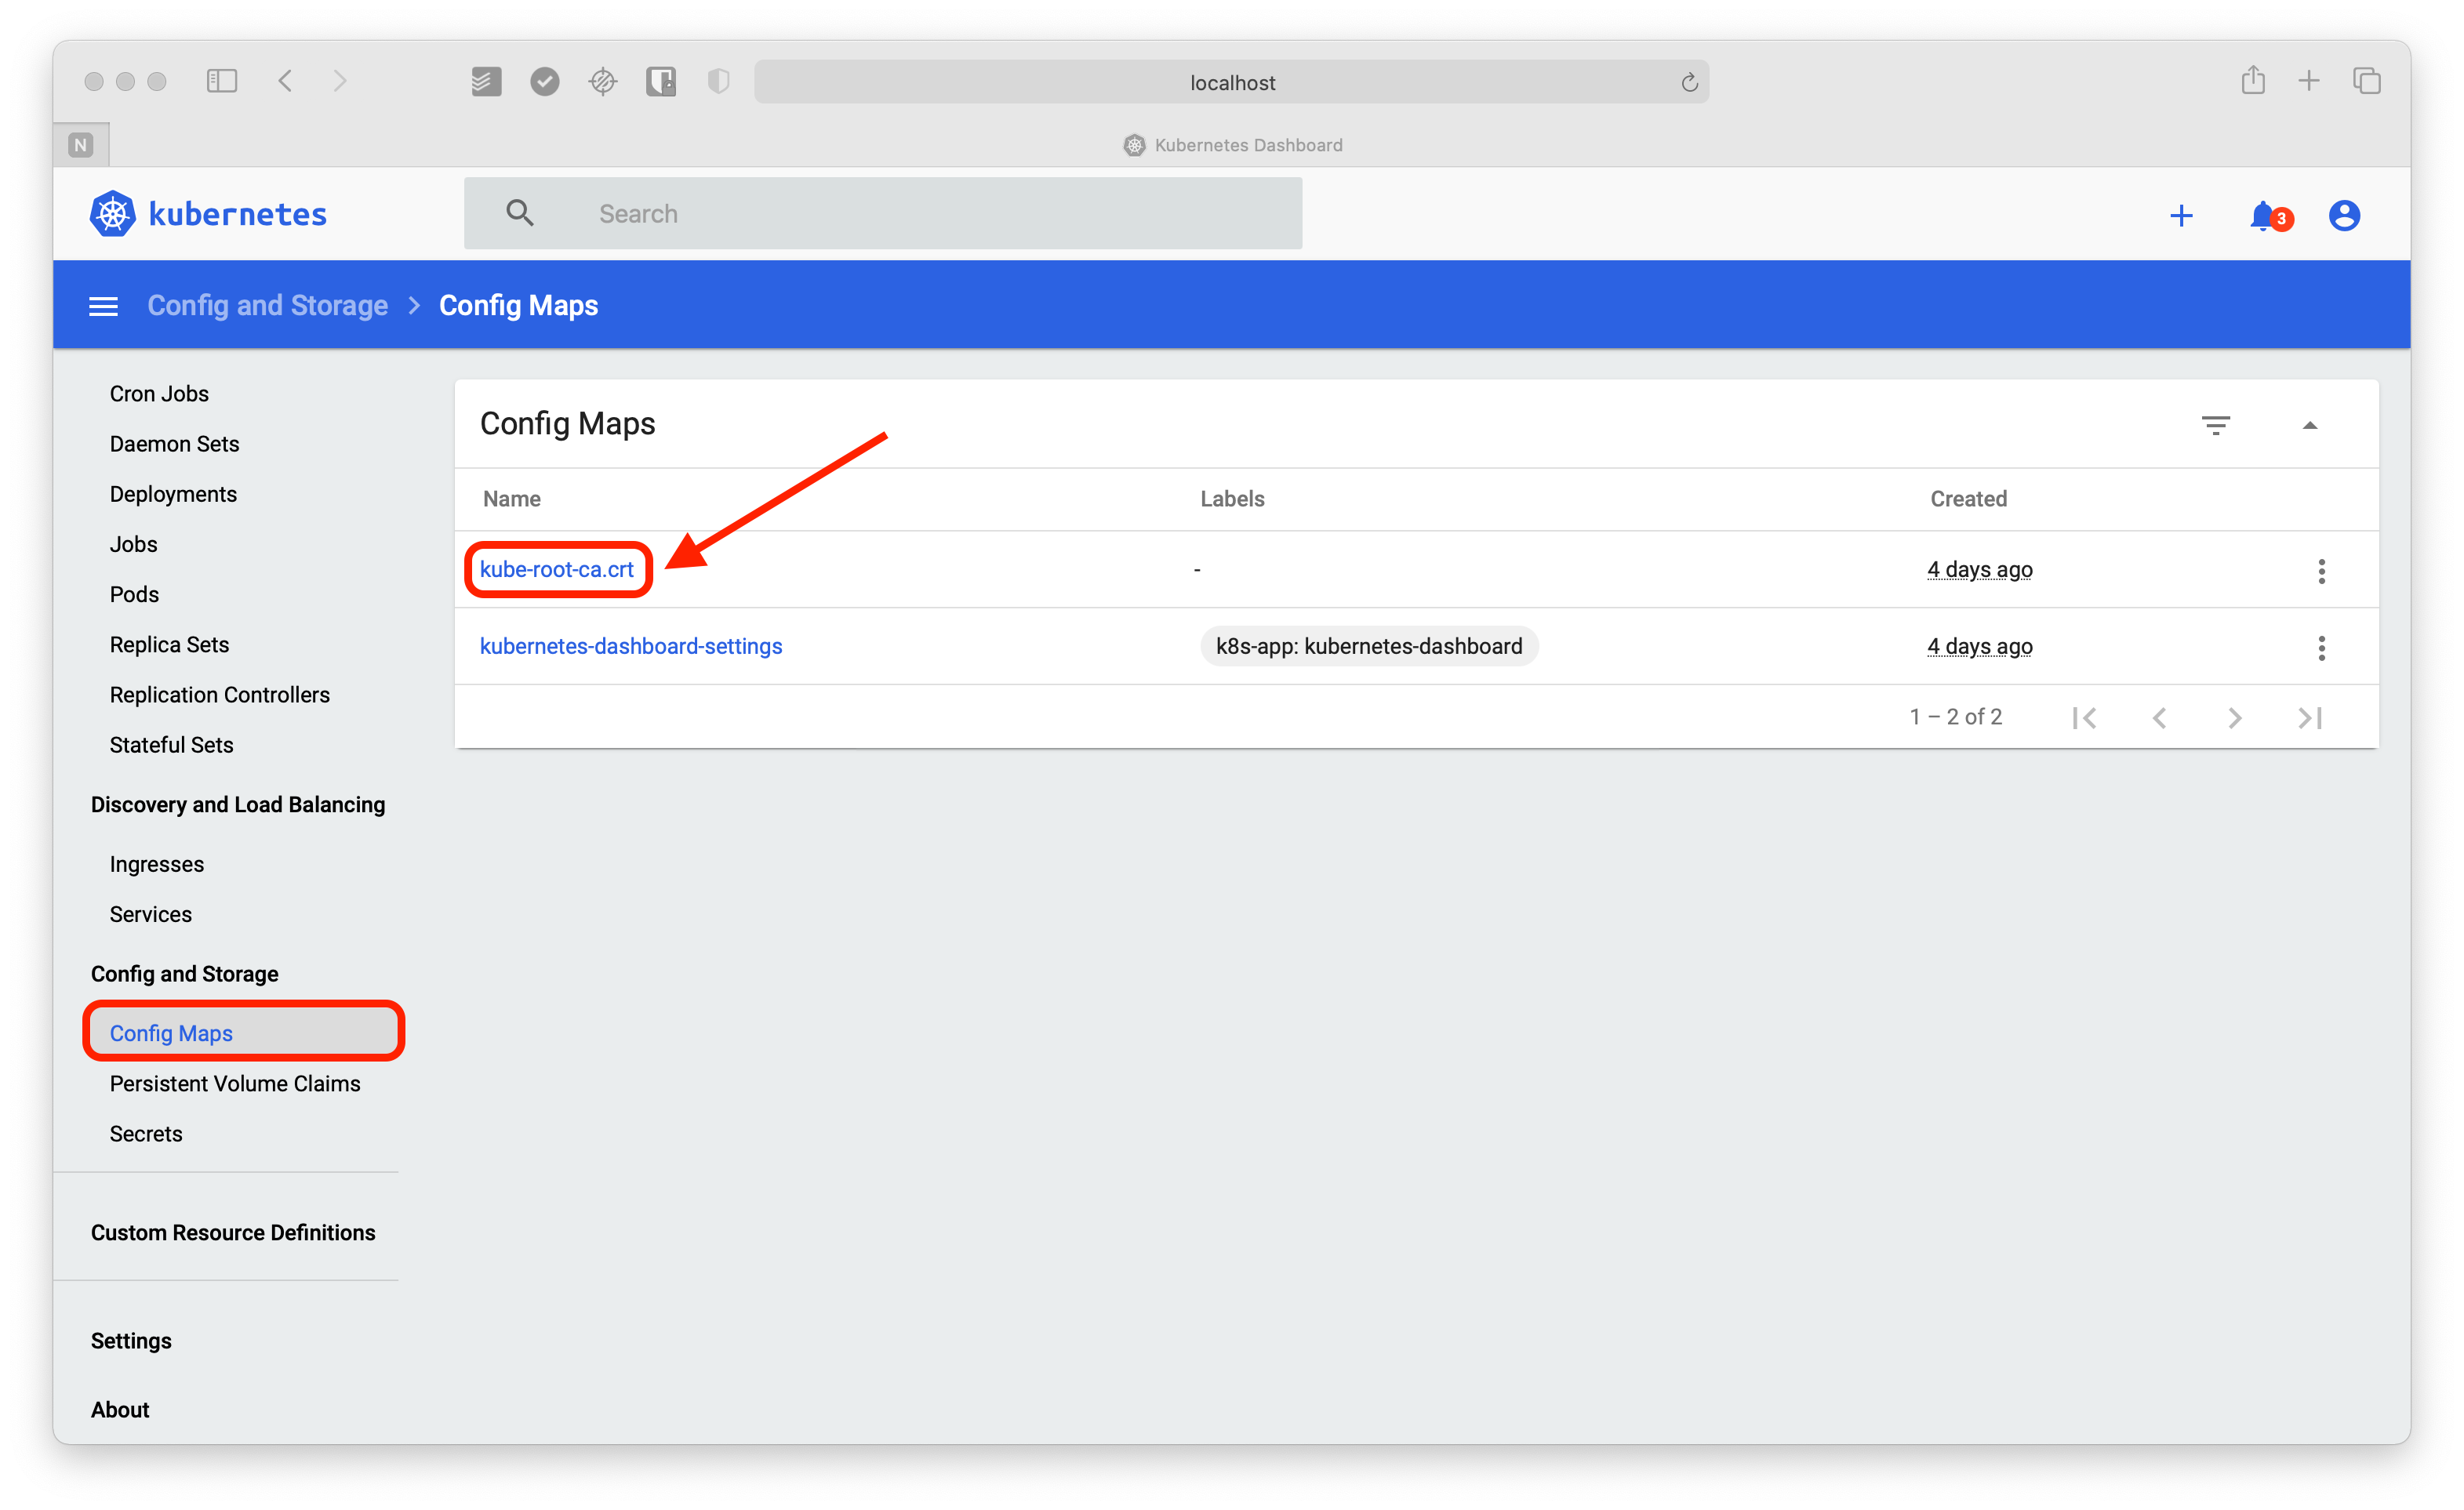
The “restricted” user has access to the Certificate Authority, thus can take full control of the cluster in the blink of an eye. This has to do with the rights that were granted to the restricted-user ServiceAccount.
As you can see, from a security point of view, the Kubernetes Web UI uses the same principles that you are already familiar with. The flexibility offered by the Role-Based Access Control (RBAC) mechanism of the Kubernetes API makes it easy to control the privileges of each user.
You can create as many service accounts as you need and assign each one the permissions you deem appropriate, whether cluster-wide or limited to a particular namespace. The crucial point is to apply the same best practices that you would normally use with kubectl users. In other words, grant each user the strictly necessary permissions to carry out their work.
For further reference on how to manage Kubernetes API Access Control, read the k8s RBAC documentation.
Navigating through the Kubernetes dashboard
At this point, you already have an idea of the benefits of the Kubernetes Dashboard. However, you may be wondering, what else can I do with it? The goal of this section is to show you what you can do with the Web UI, as well as some of the best practices to get the most out of it.
The Kubernetes web UI overview screen
Login with the admin-user service account using the corresponding Bearer Token. This will bring you back to the initial Web UI screen in the default namespace.
On the left-hand side, you have the familiar menu, which is divided into several sections:
- Cluster
- Namespace
- Overview
- Workloads
- Discovery and load balancing
- Config and storage
- Custom Resource Definitions
- Settings
- About
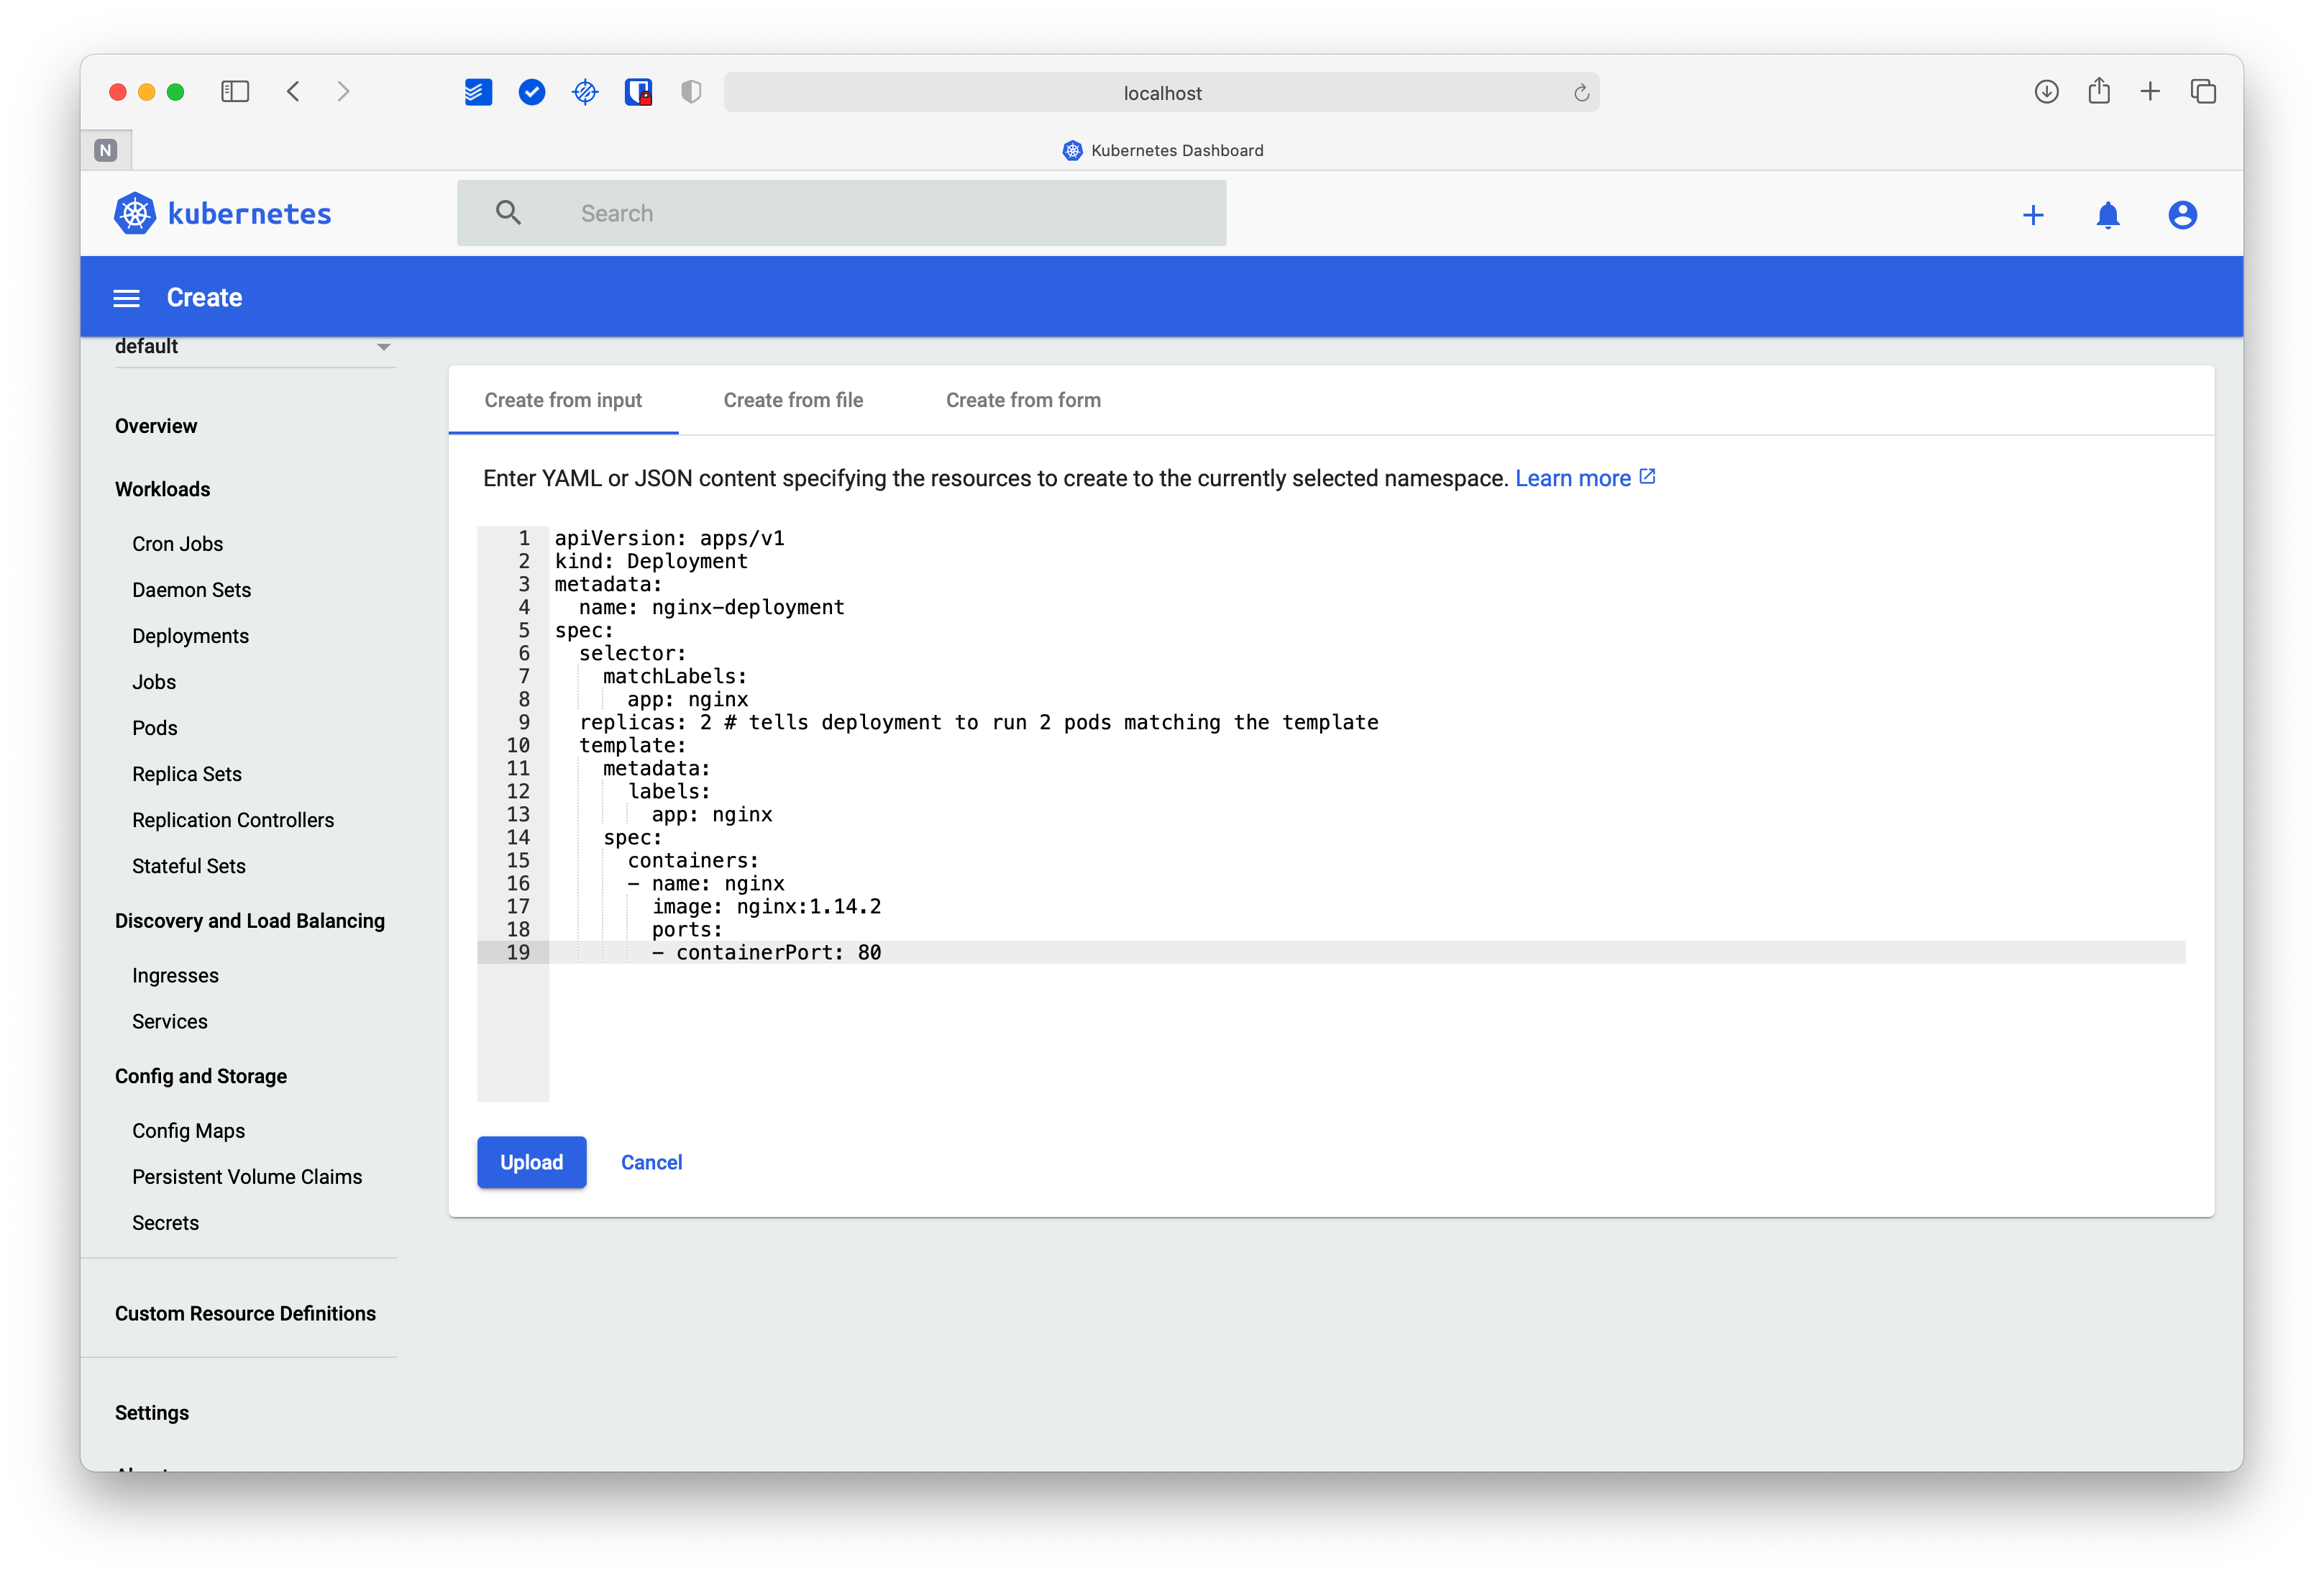
To simplify the Dashboard walkthrough, deploy an Nginx pod. Click on the “+” sign in the upper right corner and paste the following content:
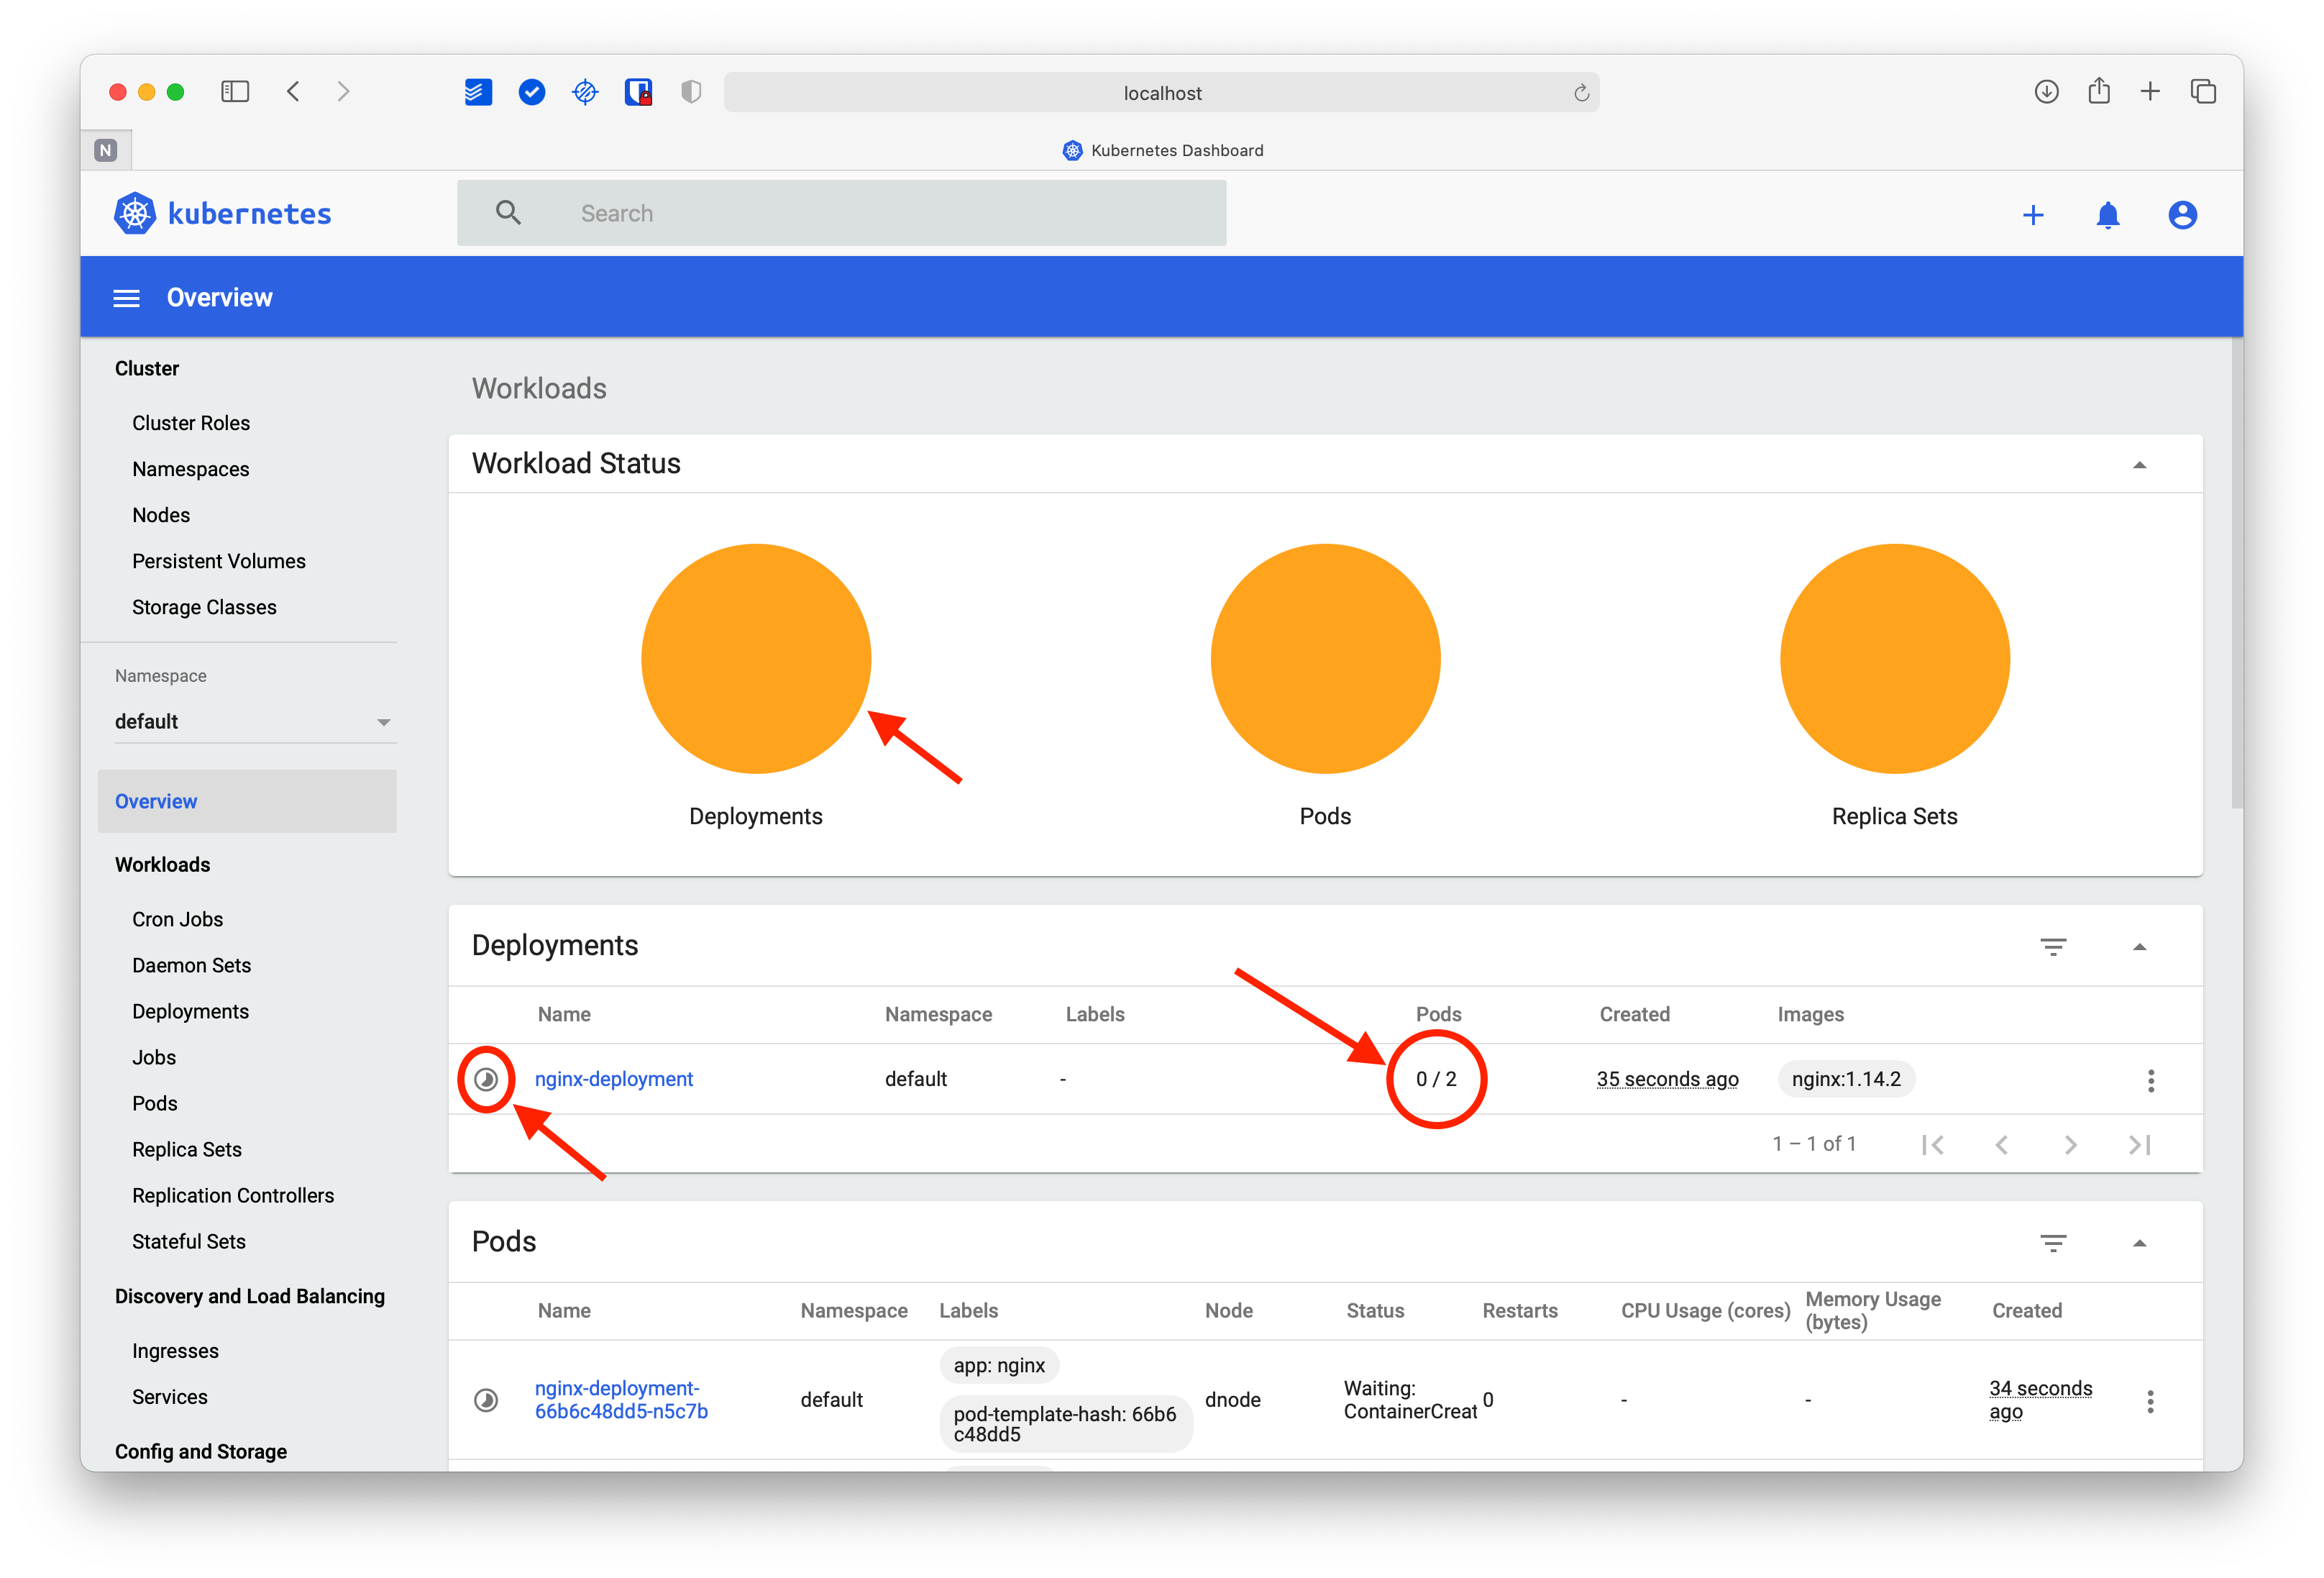
After pressing the “Upload” button, you will notice that the Overview screen will show you the progress of the pod deployment.
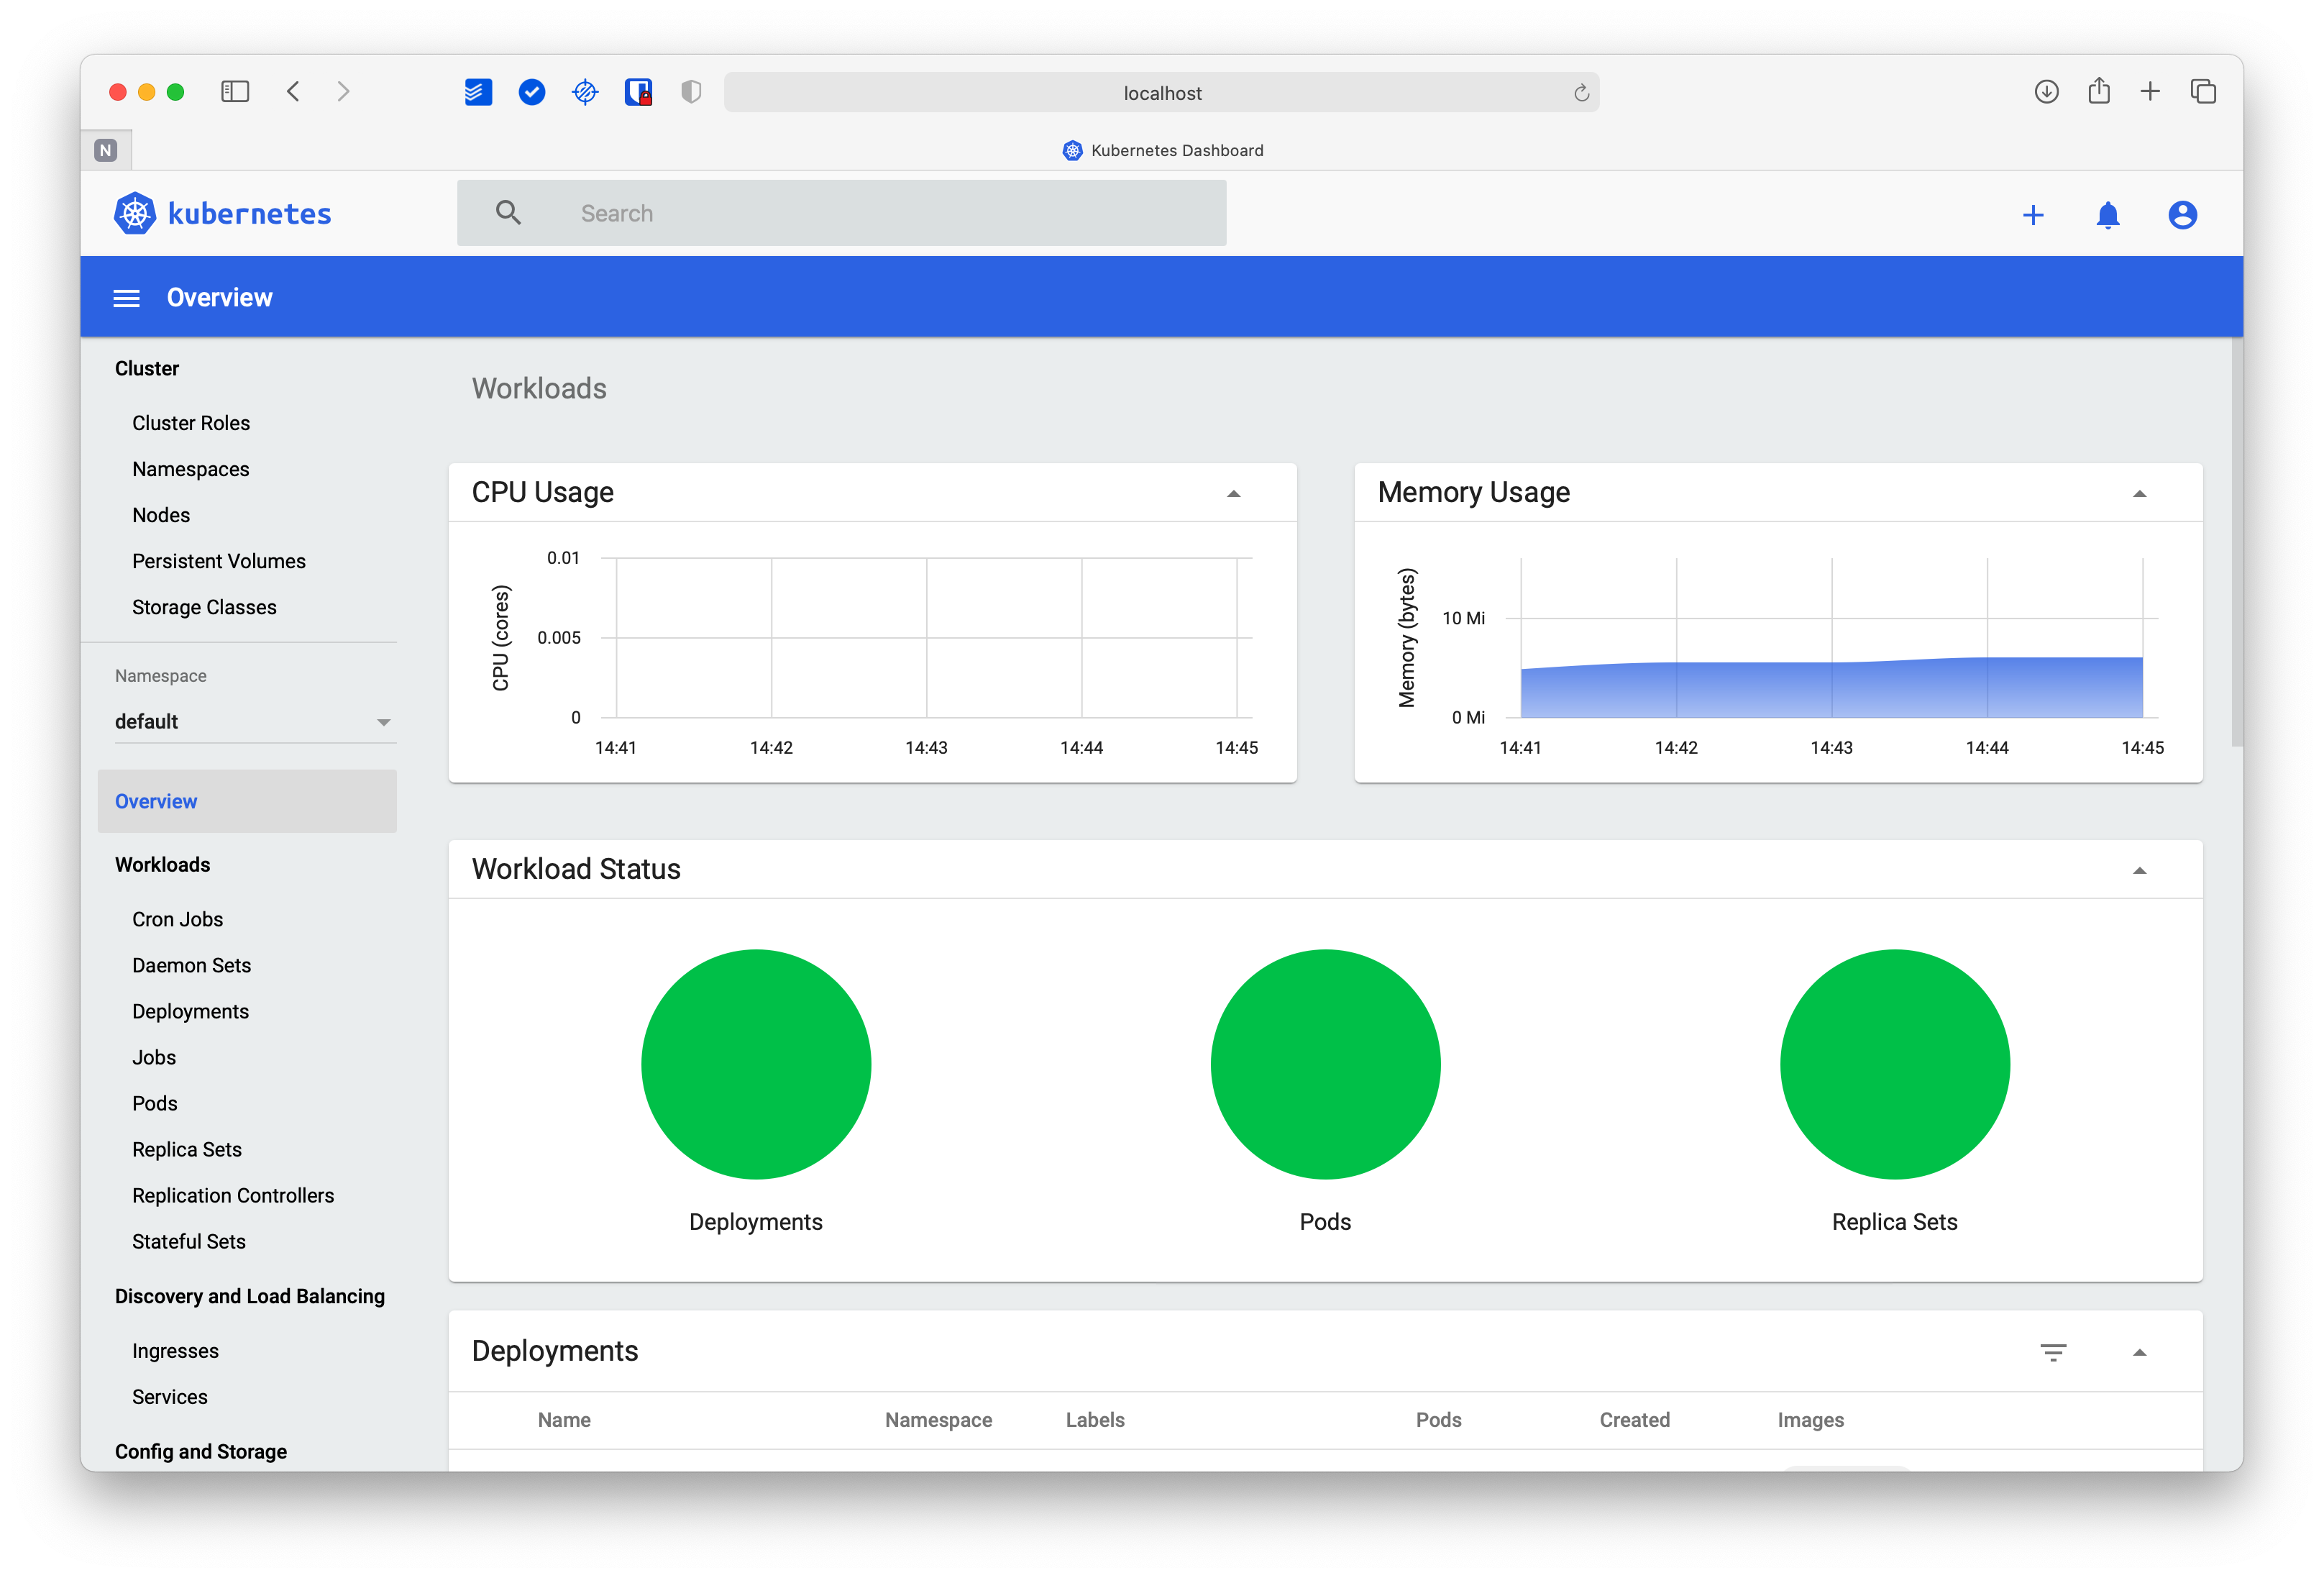
Once the deployment is complete, the screen will update to show additional information, such as CPU and memory usage in the default namespace.
If you scroll down the Overview screen, you will notice that all relevant information is available: the workload, deployments, pods, ReplicaSets, services, config maps, and even secrets. As the name suggests, the Overview screen gives you a bird’ eye view of the selected namespace (or all namespaces if you wish).
You can think of the Overview screen as the sum of all the individual views. From here, you can access all namespace resources, review the contents of each of them, modify them, or delete them.
Cluster view
The Overview screen is an excellent starting point for managing namespace resources. However, when it comes to system-wide resources, the most convenient way to manage them is through the Cluster view.
Unlike the Overview screen, the Cluster view is divided into several sections:
- Cluster Roles
- Namespaces
- Nodes
- Persistent Volumes
- Storage Classes
When you click on the Cluster menu, you get a visualization of all these sections together.
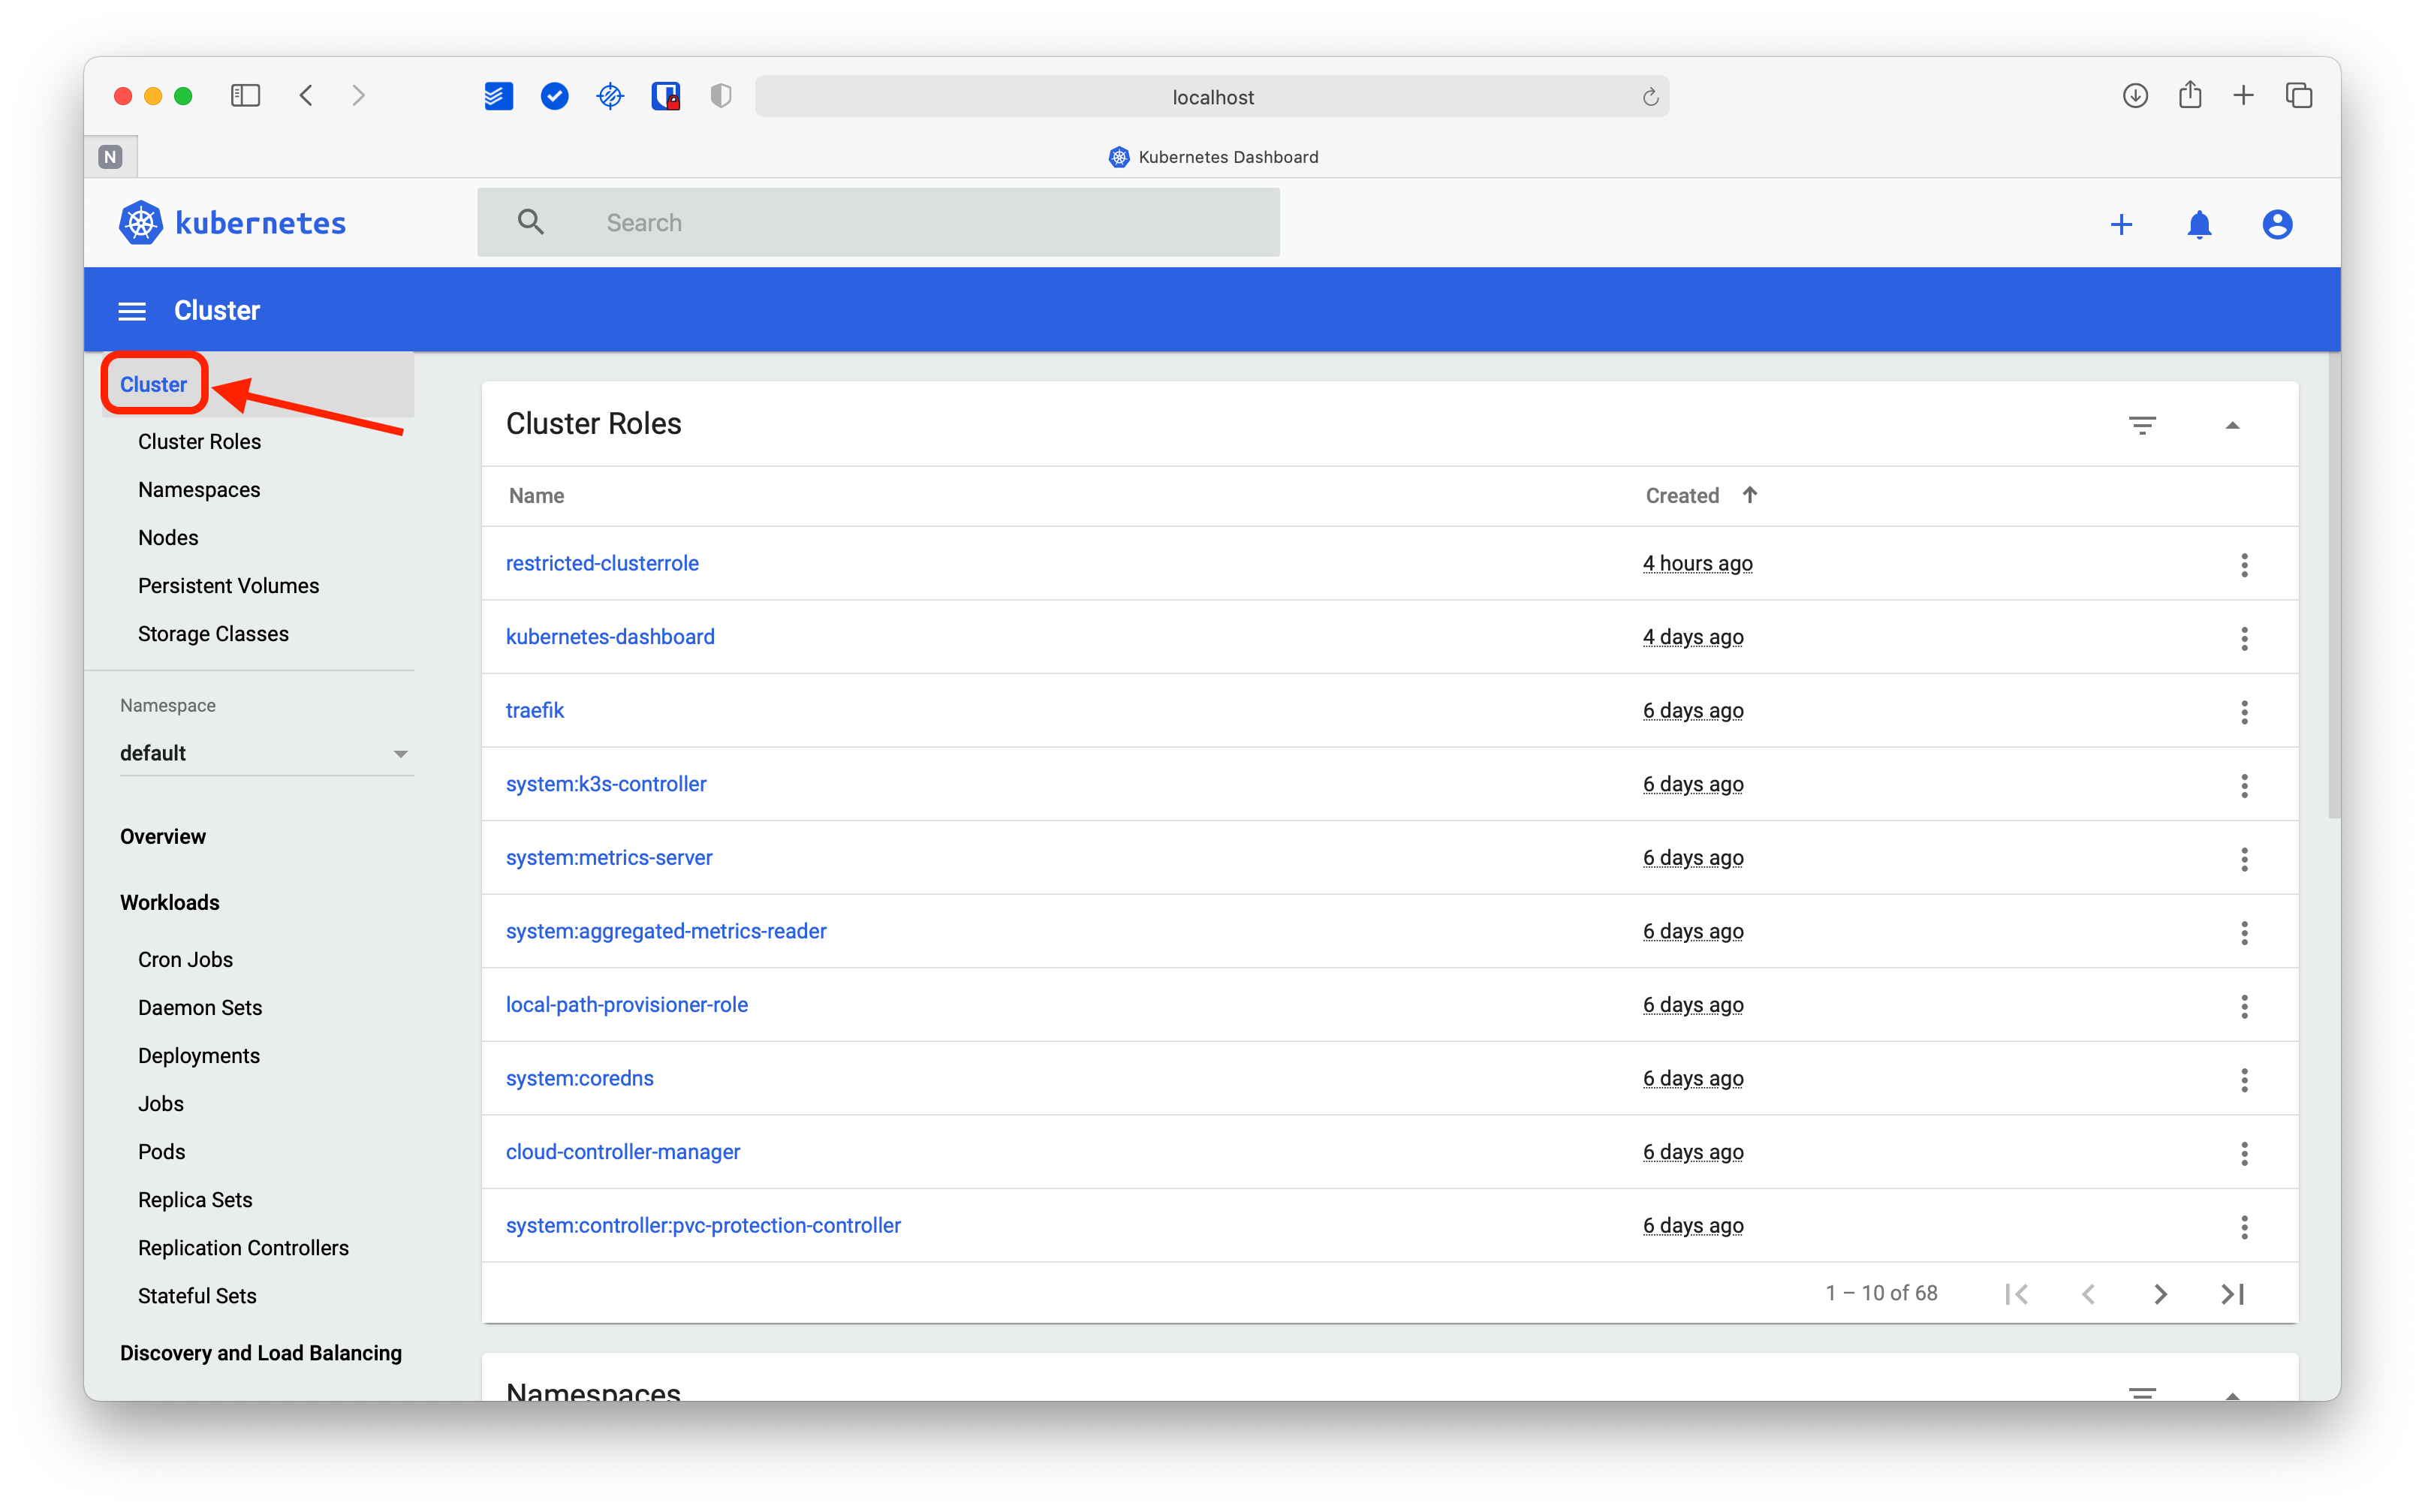
However, if you click on Cluster Roles, you will notice that only that section becomes visible.

As you can see, navigating through the Kubernetes Web UI is intuitive and predictable. Each section on the left is divided into subsections that make it easy to visualize active resources. So, for example, if you need an overview of all the resources in the cluster, you can click on the Cluster section, but if you only want to see the namespaces, you can click directly on that view.

As you can imagine, in any of the views you can click on the link corresponding to each resource. For instance, click on the default namespace to access its information.
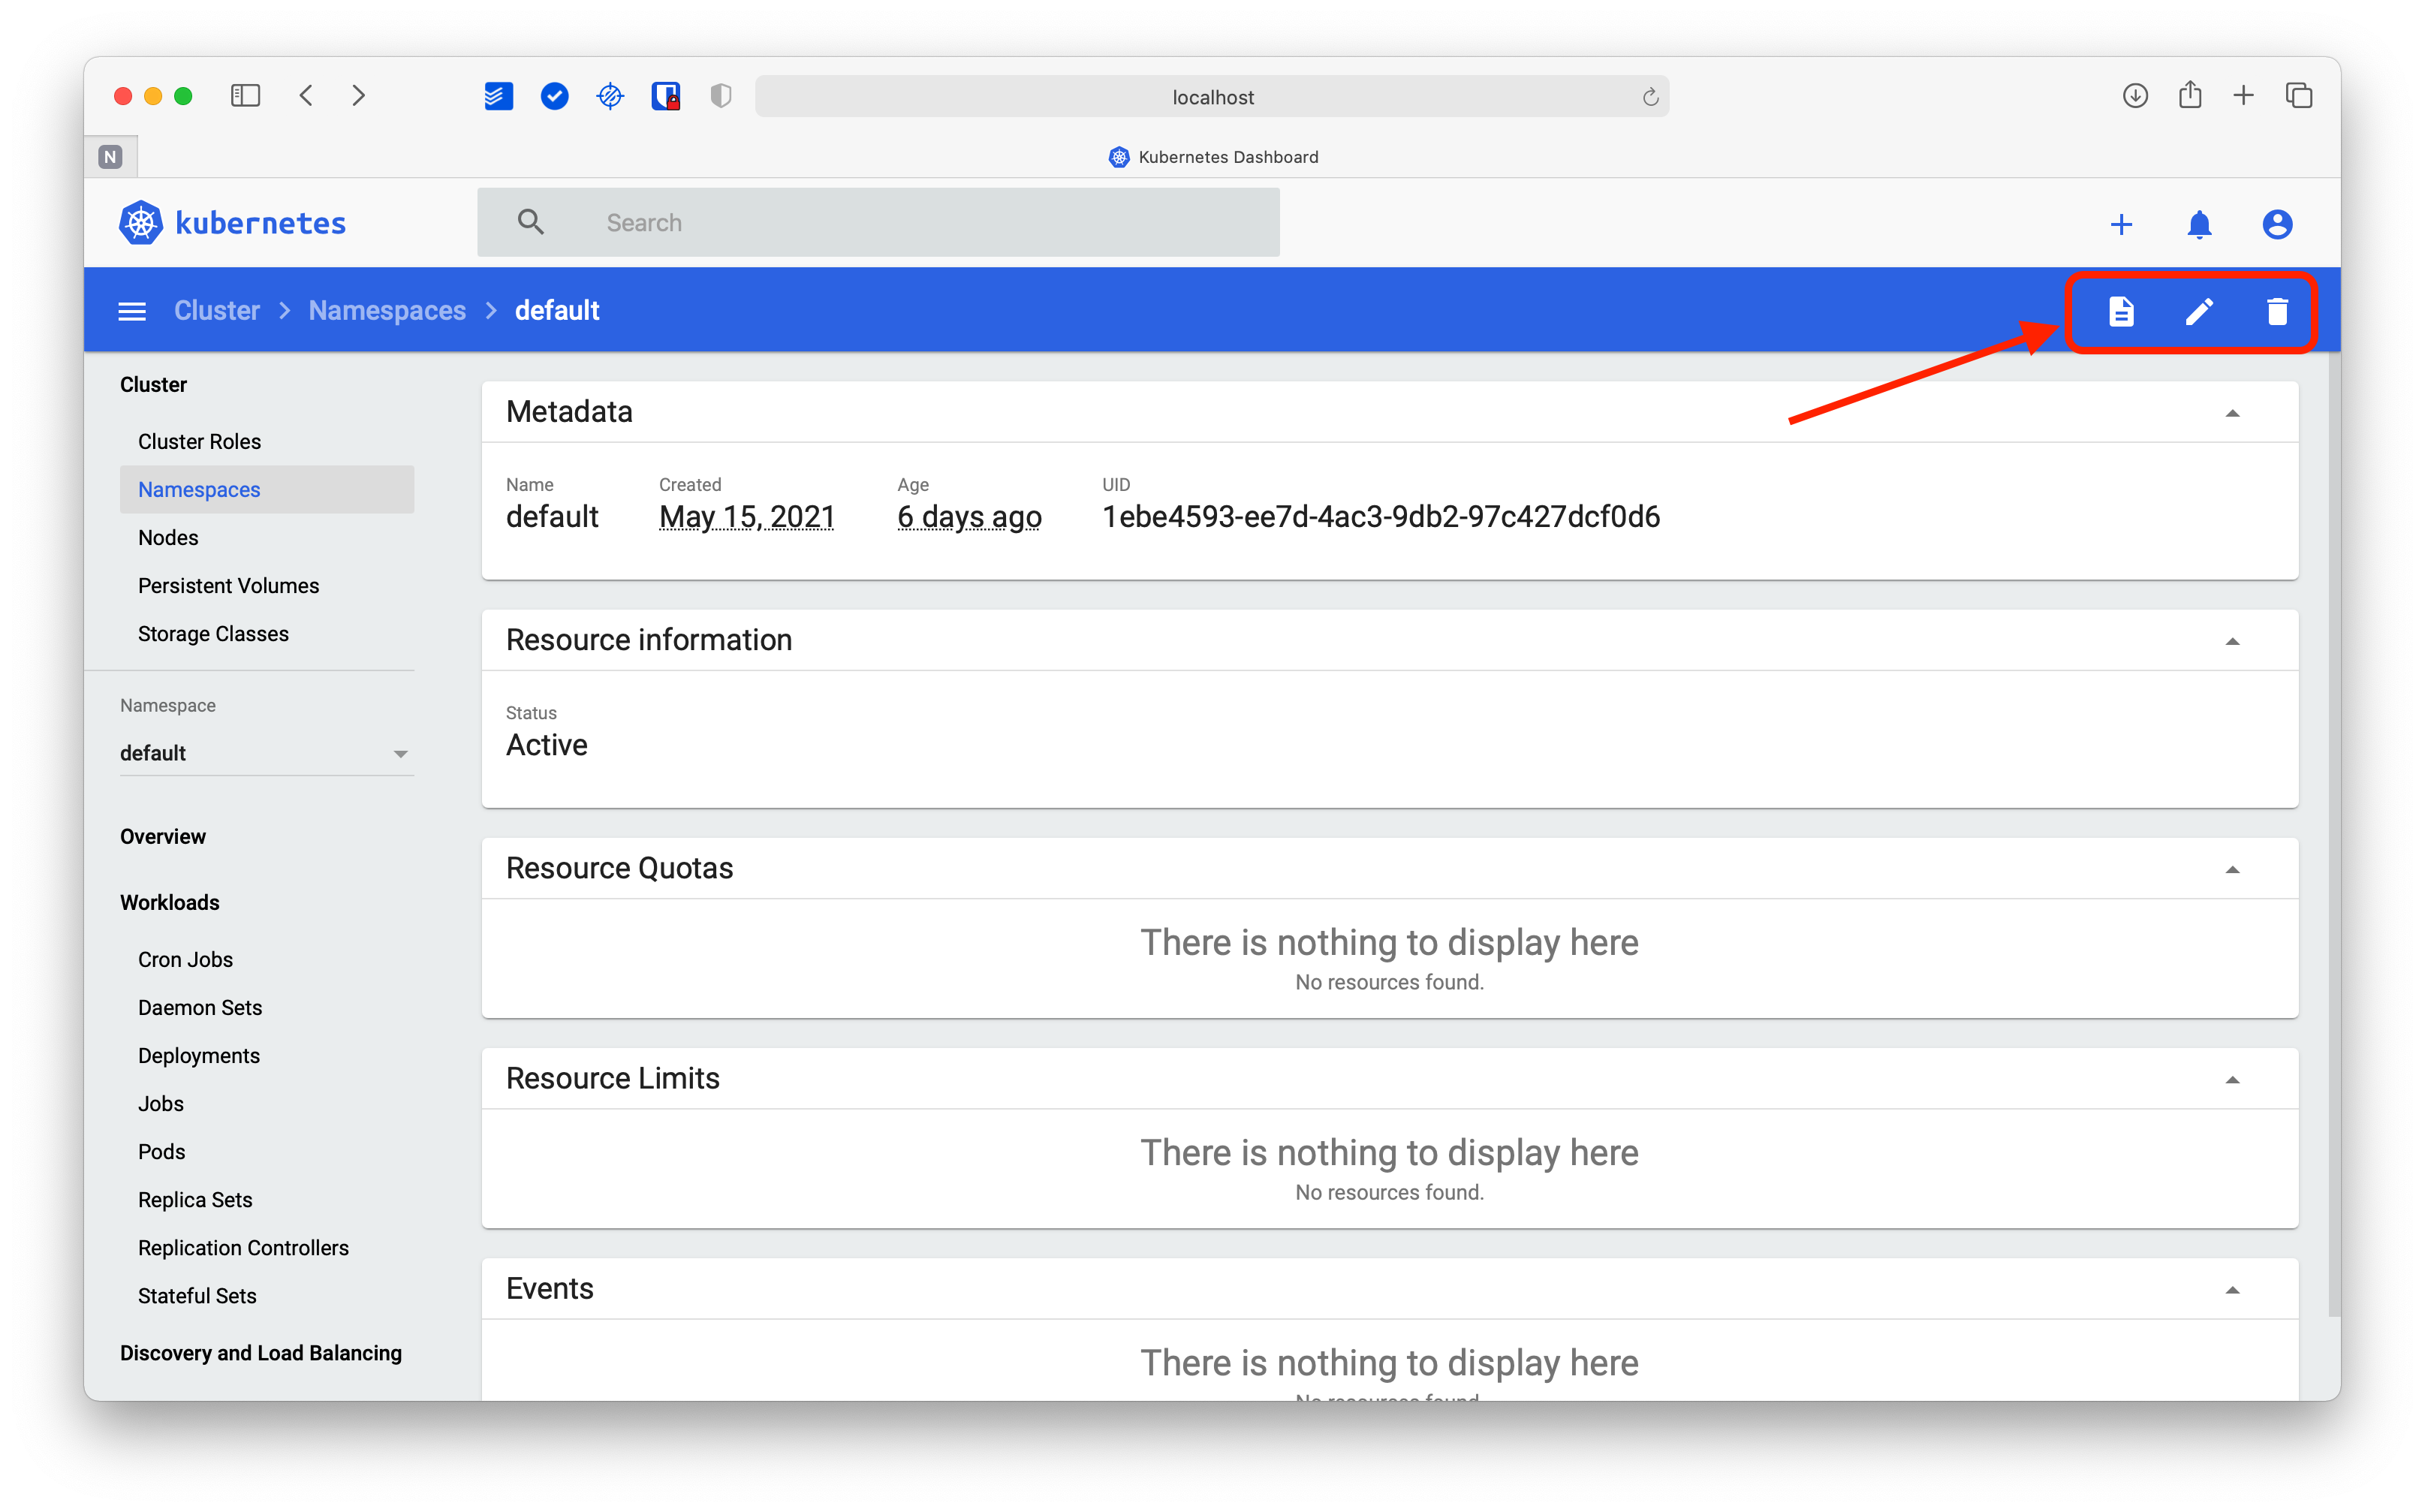
At the top right, you will see three icons. The first one will take you to the Overview of this namespace, the second one allows you to edit the resource, and as you can imagine, the trash will delete it.
In principle, all views offer similar options. Some offer graphics and additional information. Others just show links to k8s resources.
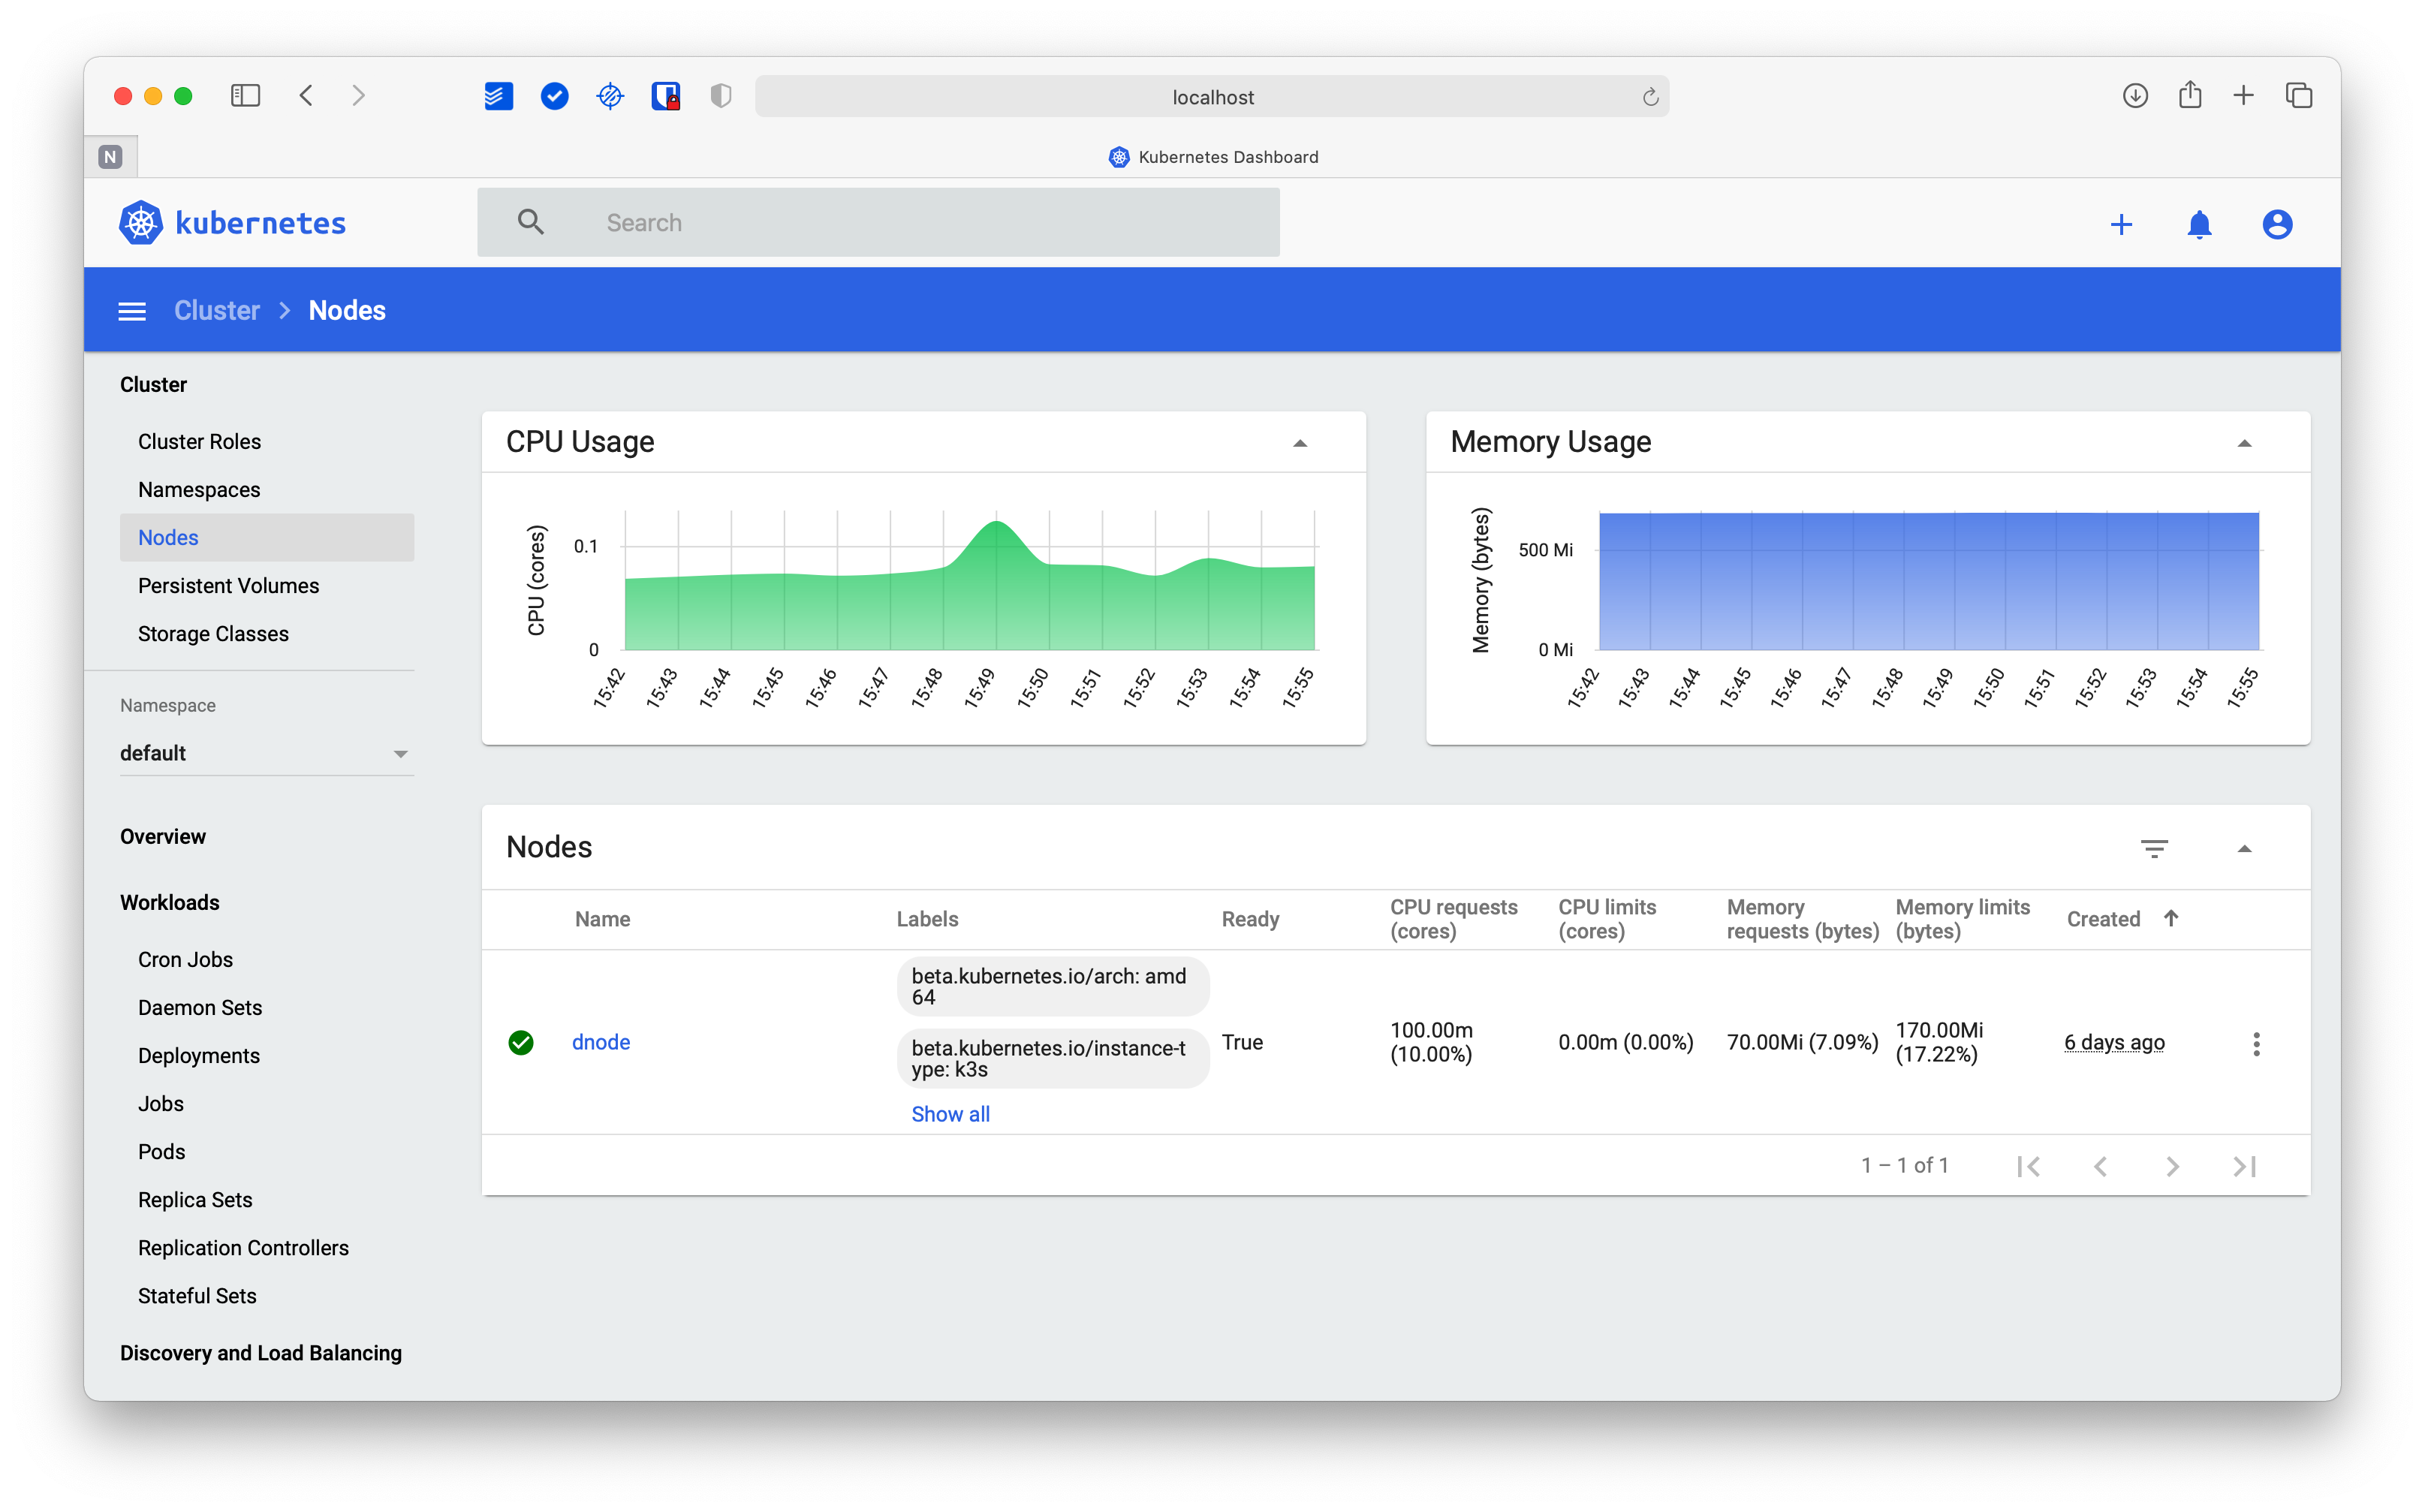
Thus we have the view for the cluster nodes:
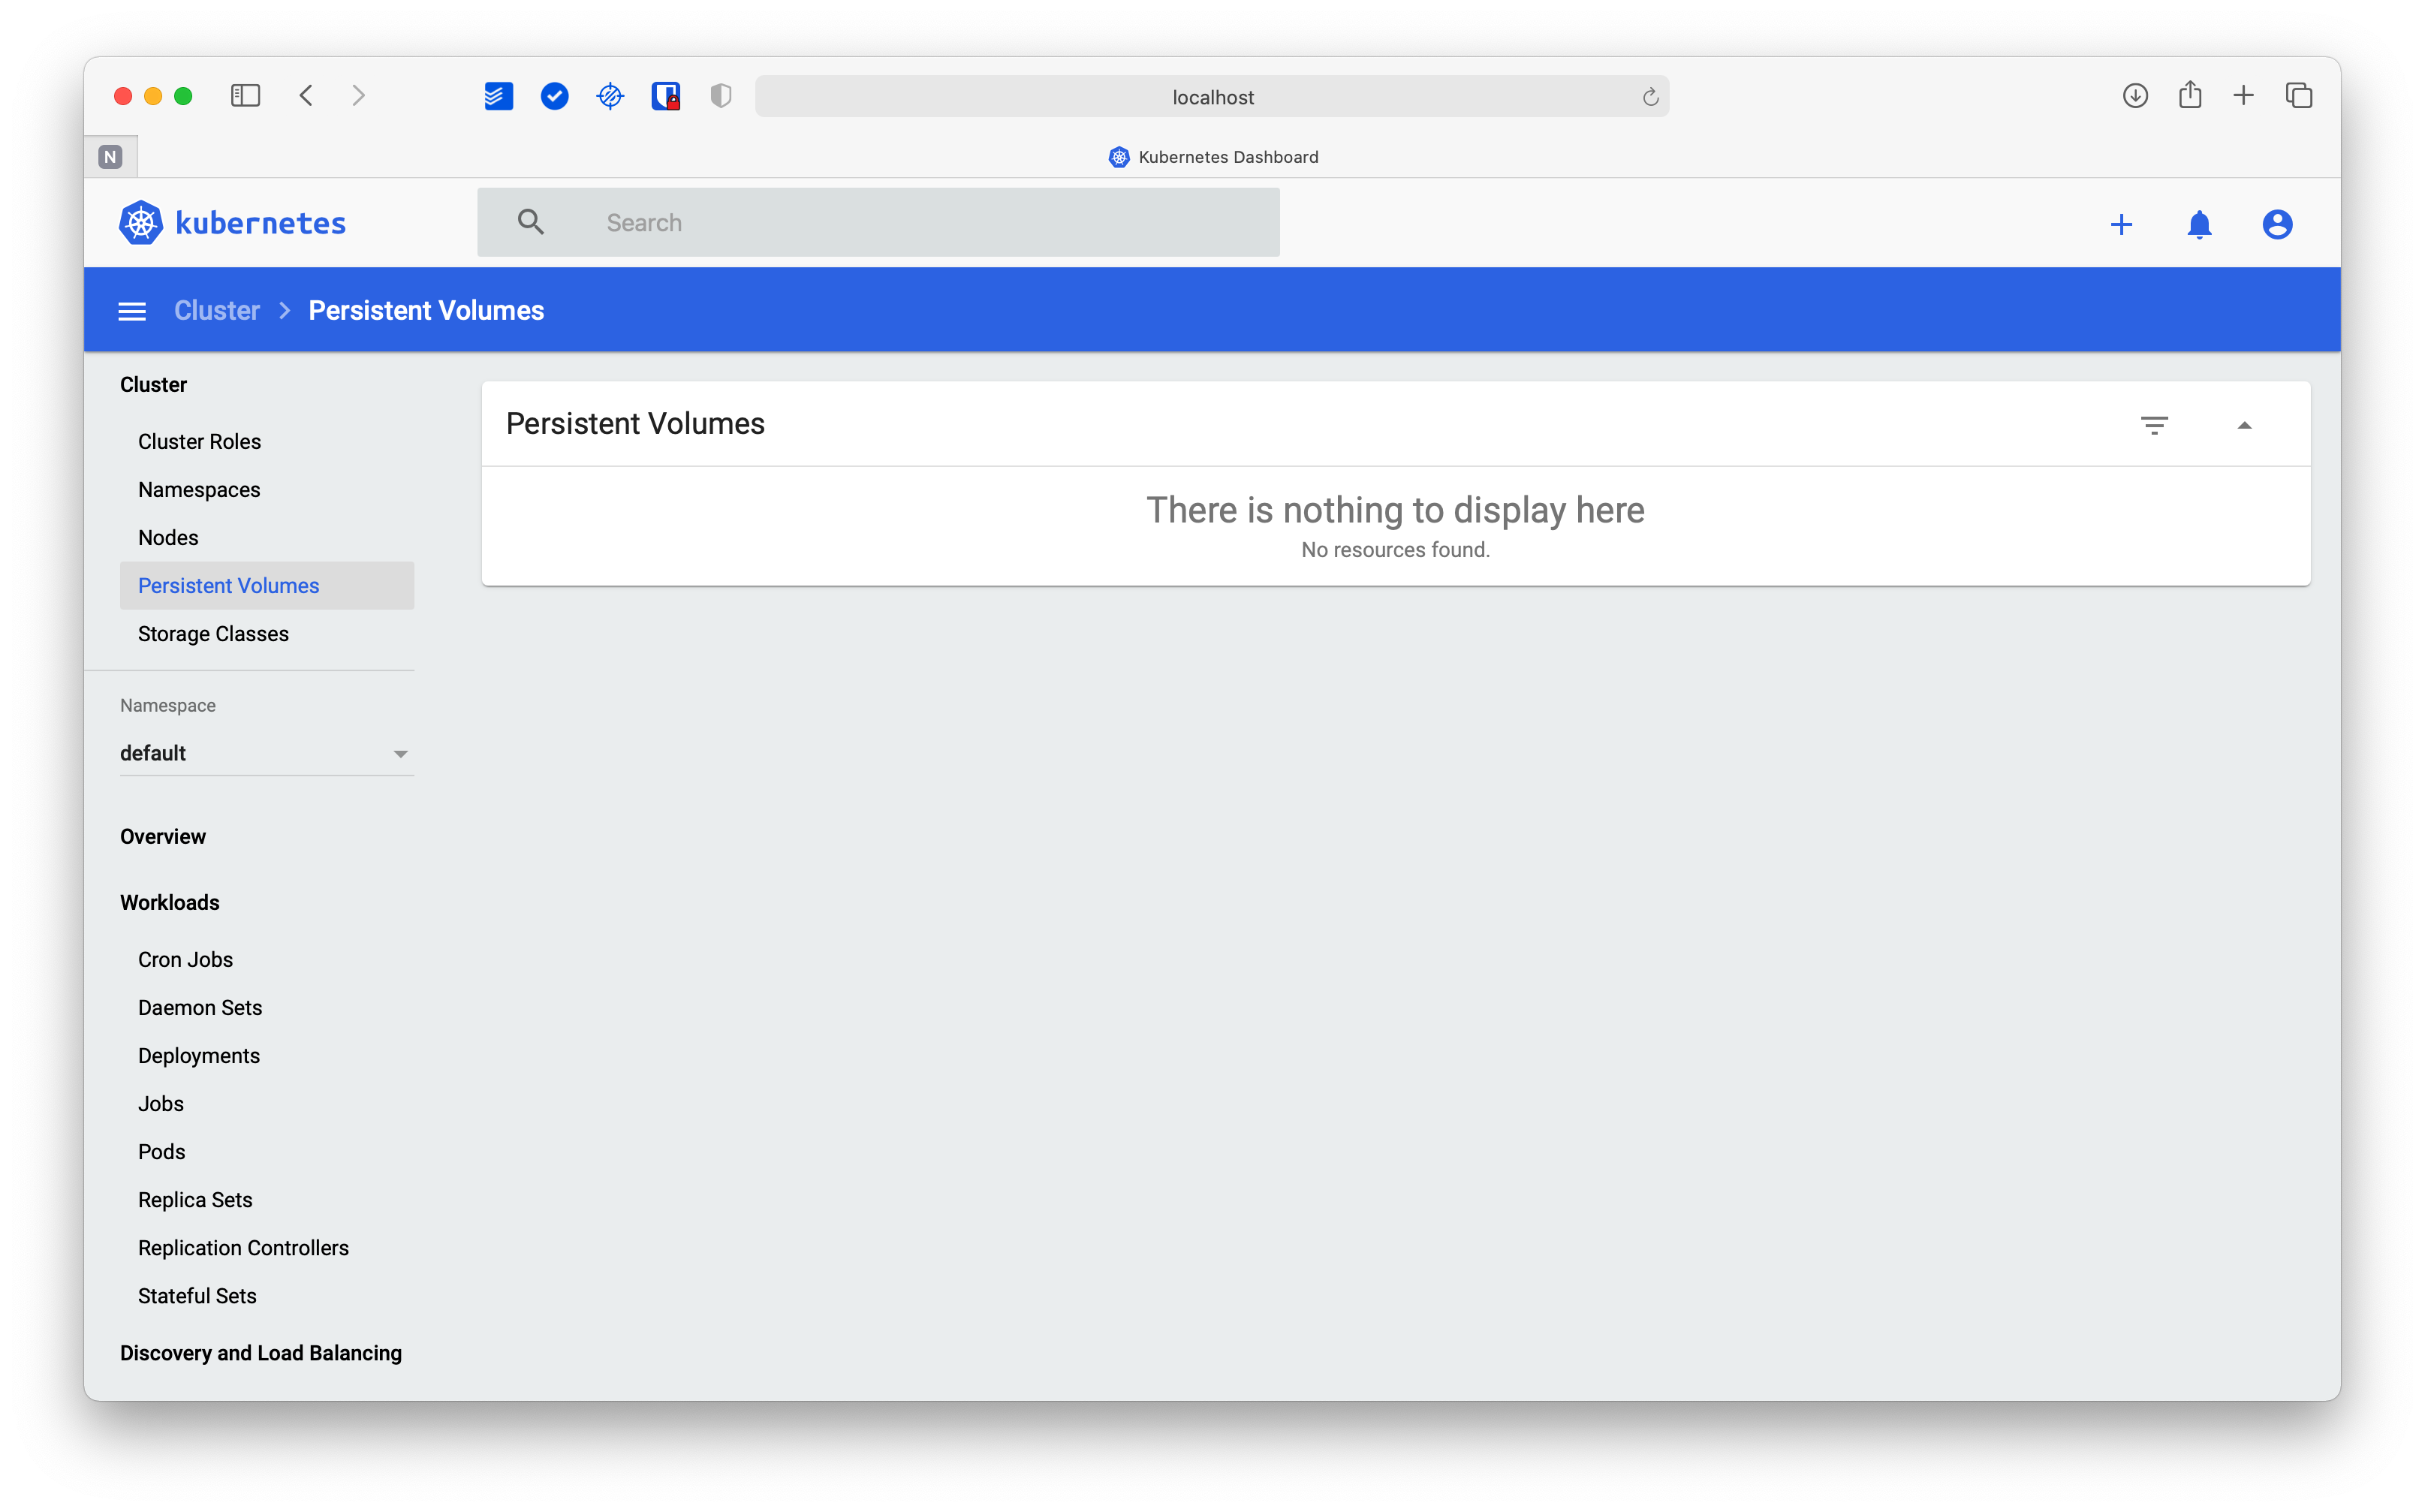
And the “Persistent Volumes” view, which in this case has nothing relevant to show:
And finally, the Storage Classes view:
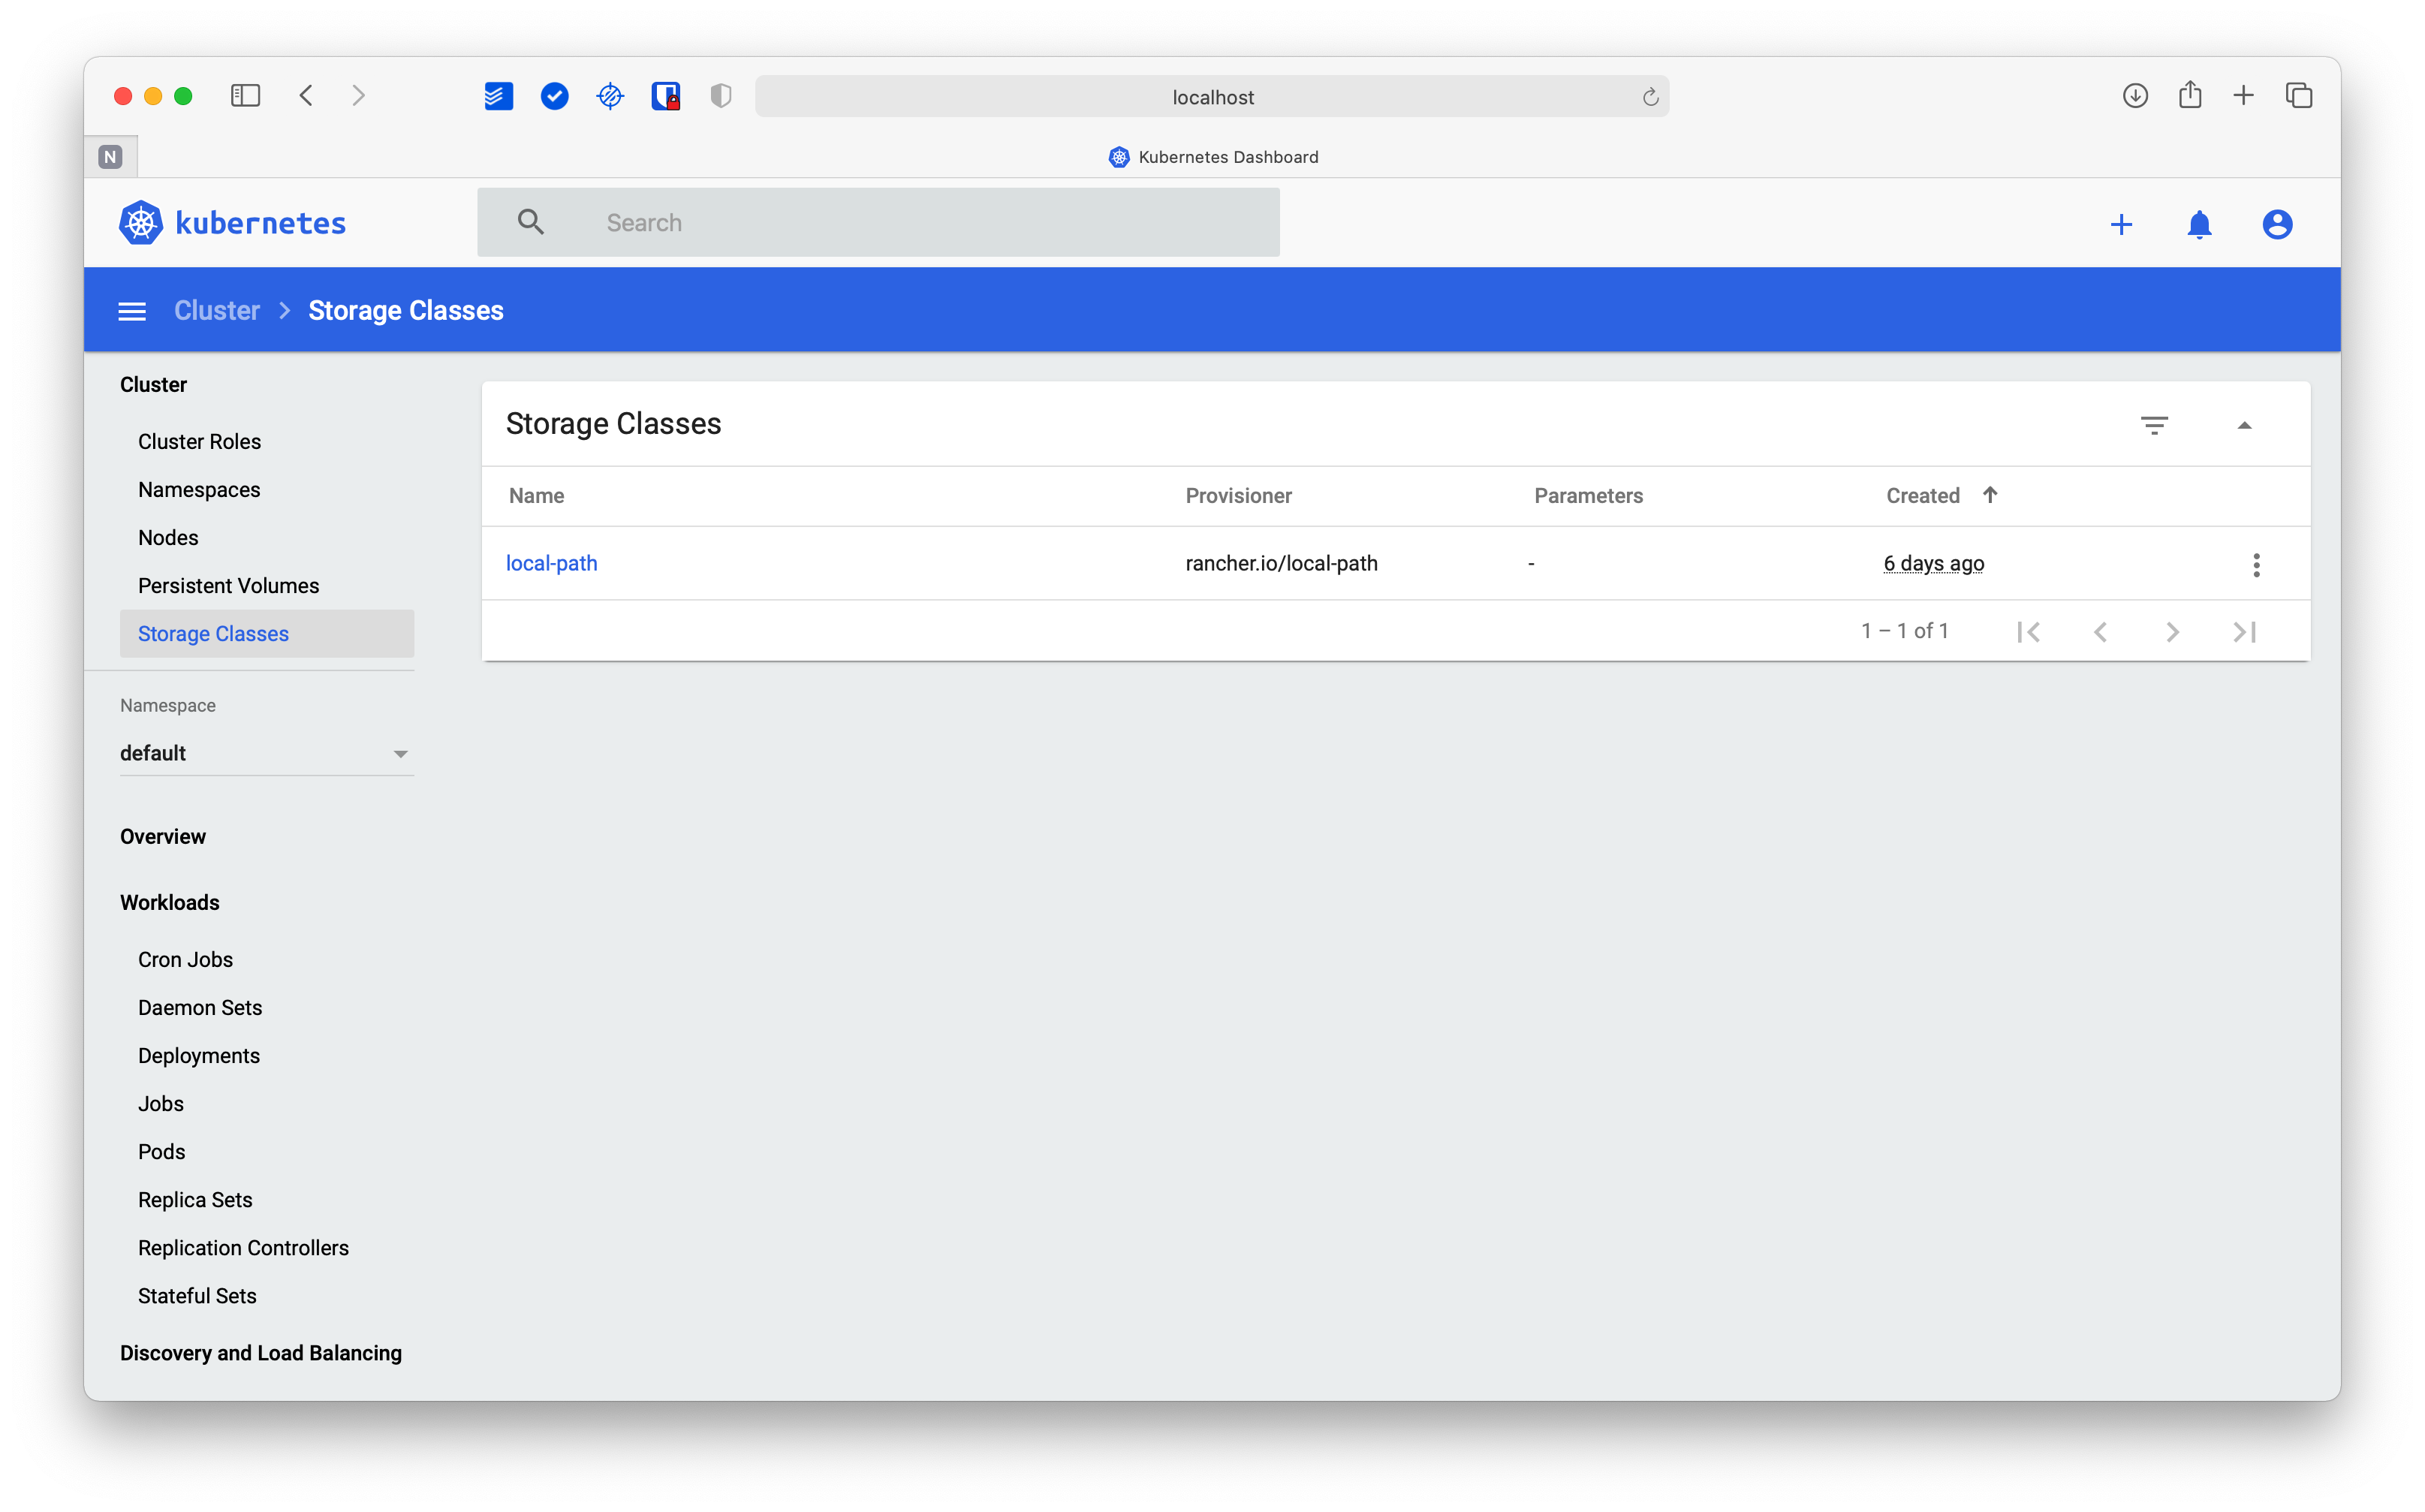
In each view, you can apply filters, sort rows, or even collapse charts if you wish. Simply put, you have all the cluster information just a click away.
Workloads view
There is no doubt that one of the most useful sections of the Web UI is the Workload view. From there, you can perform most of the administrative operations of your cluster.
As in the case of the Cluster view, this section is divided into subsections for each type of resource, which aims to achieve more efficient management of them. In the case of the Nginx deployment, there are no cron jobs, daemon sets, jobs, replication controllers, or stateful sets to display. So to show you the functionality of the Dashboard, we are going to focus on the remaining resources.
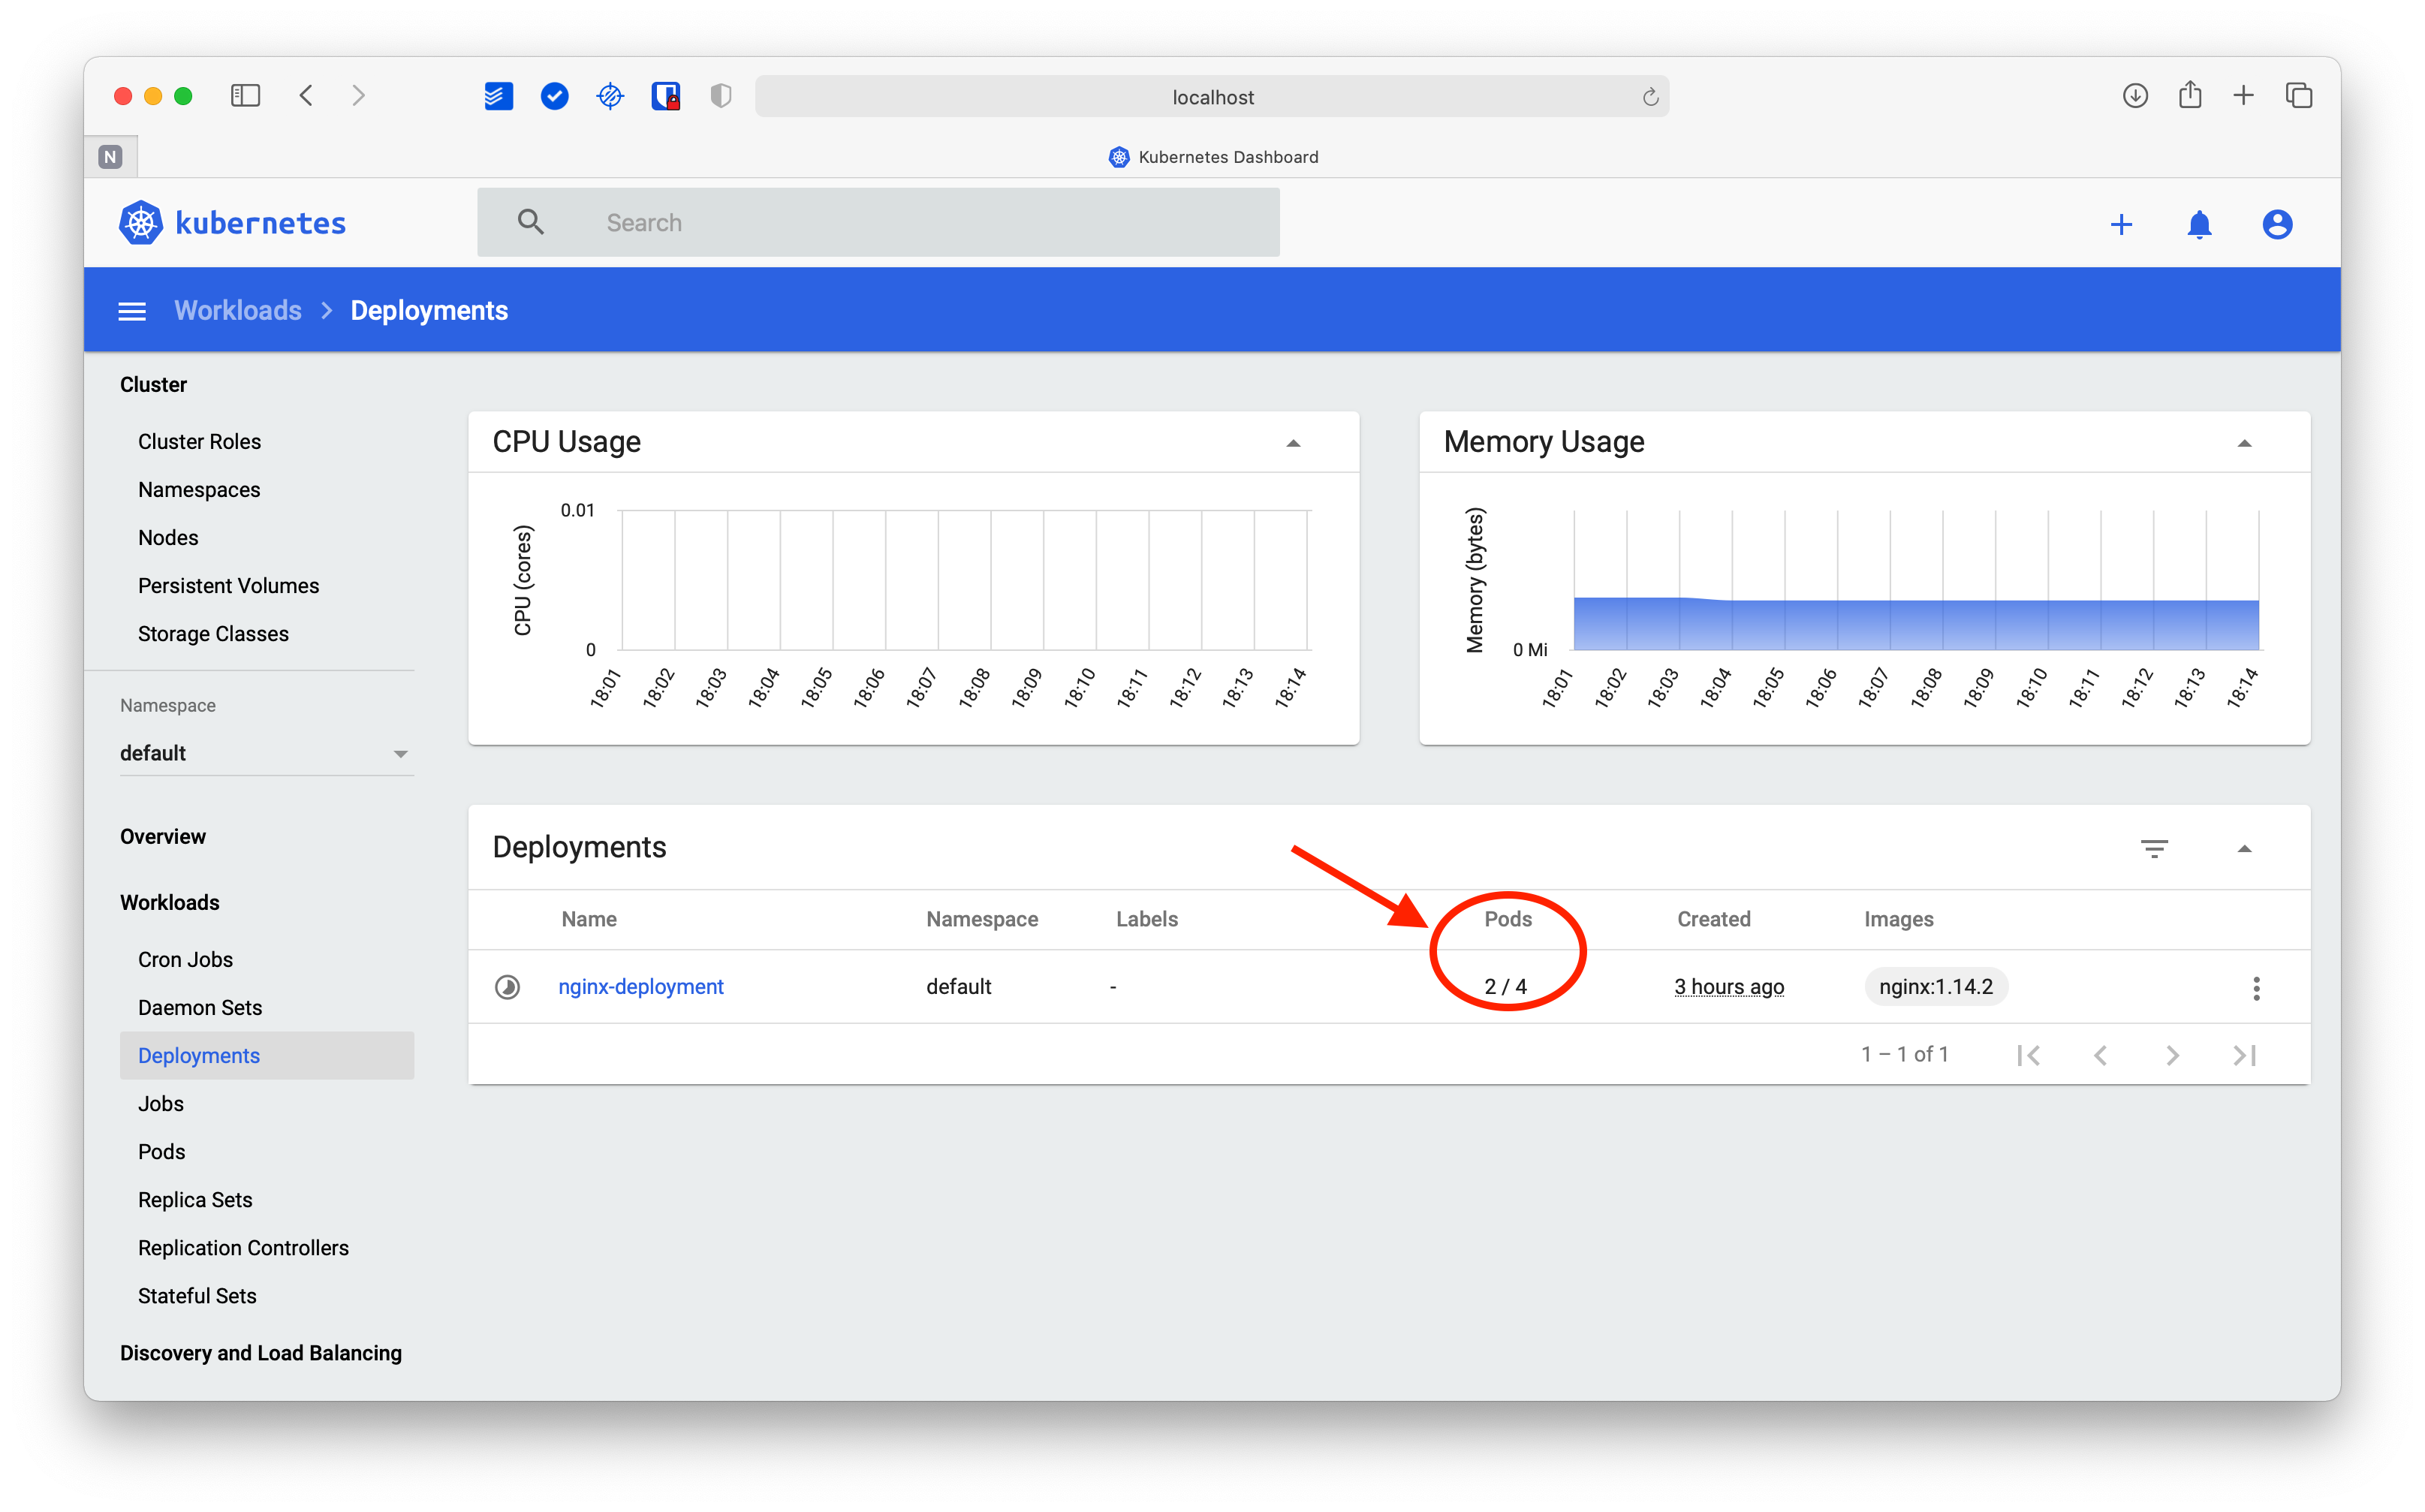
Let’s start with one of the most important views, Deployments.
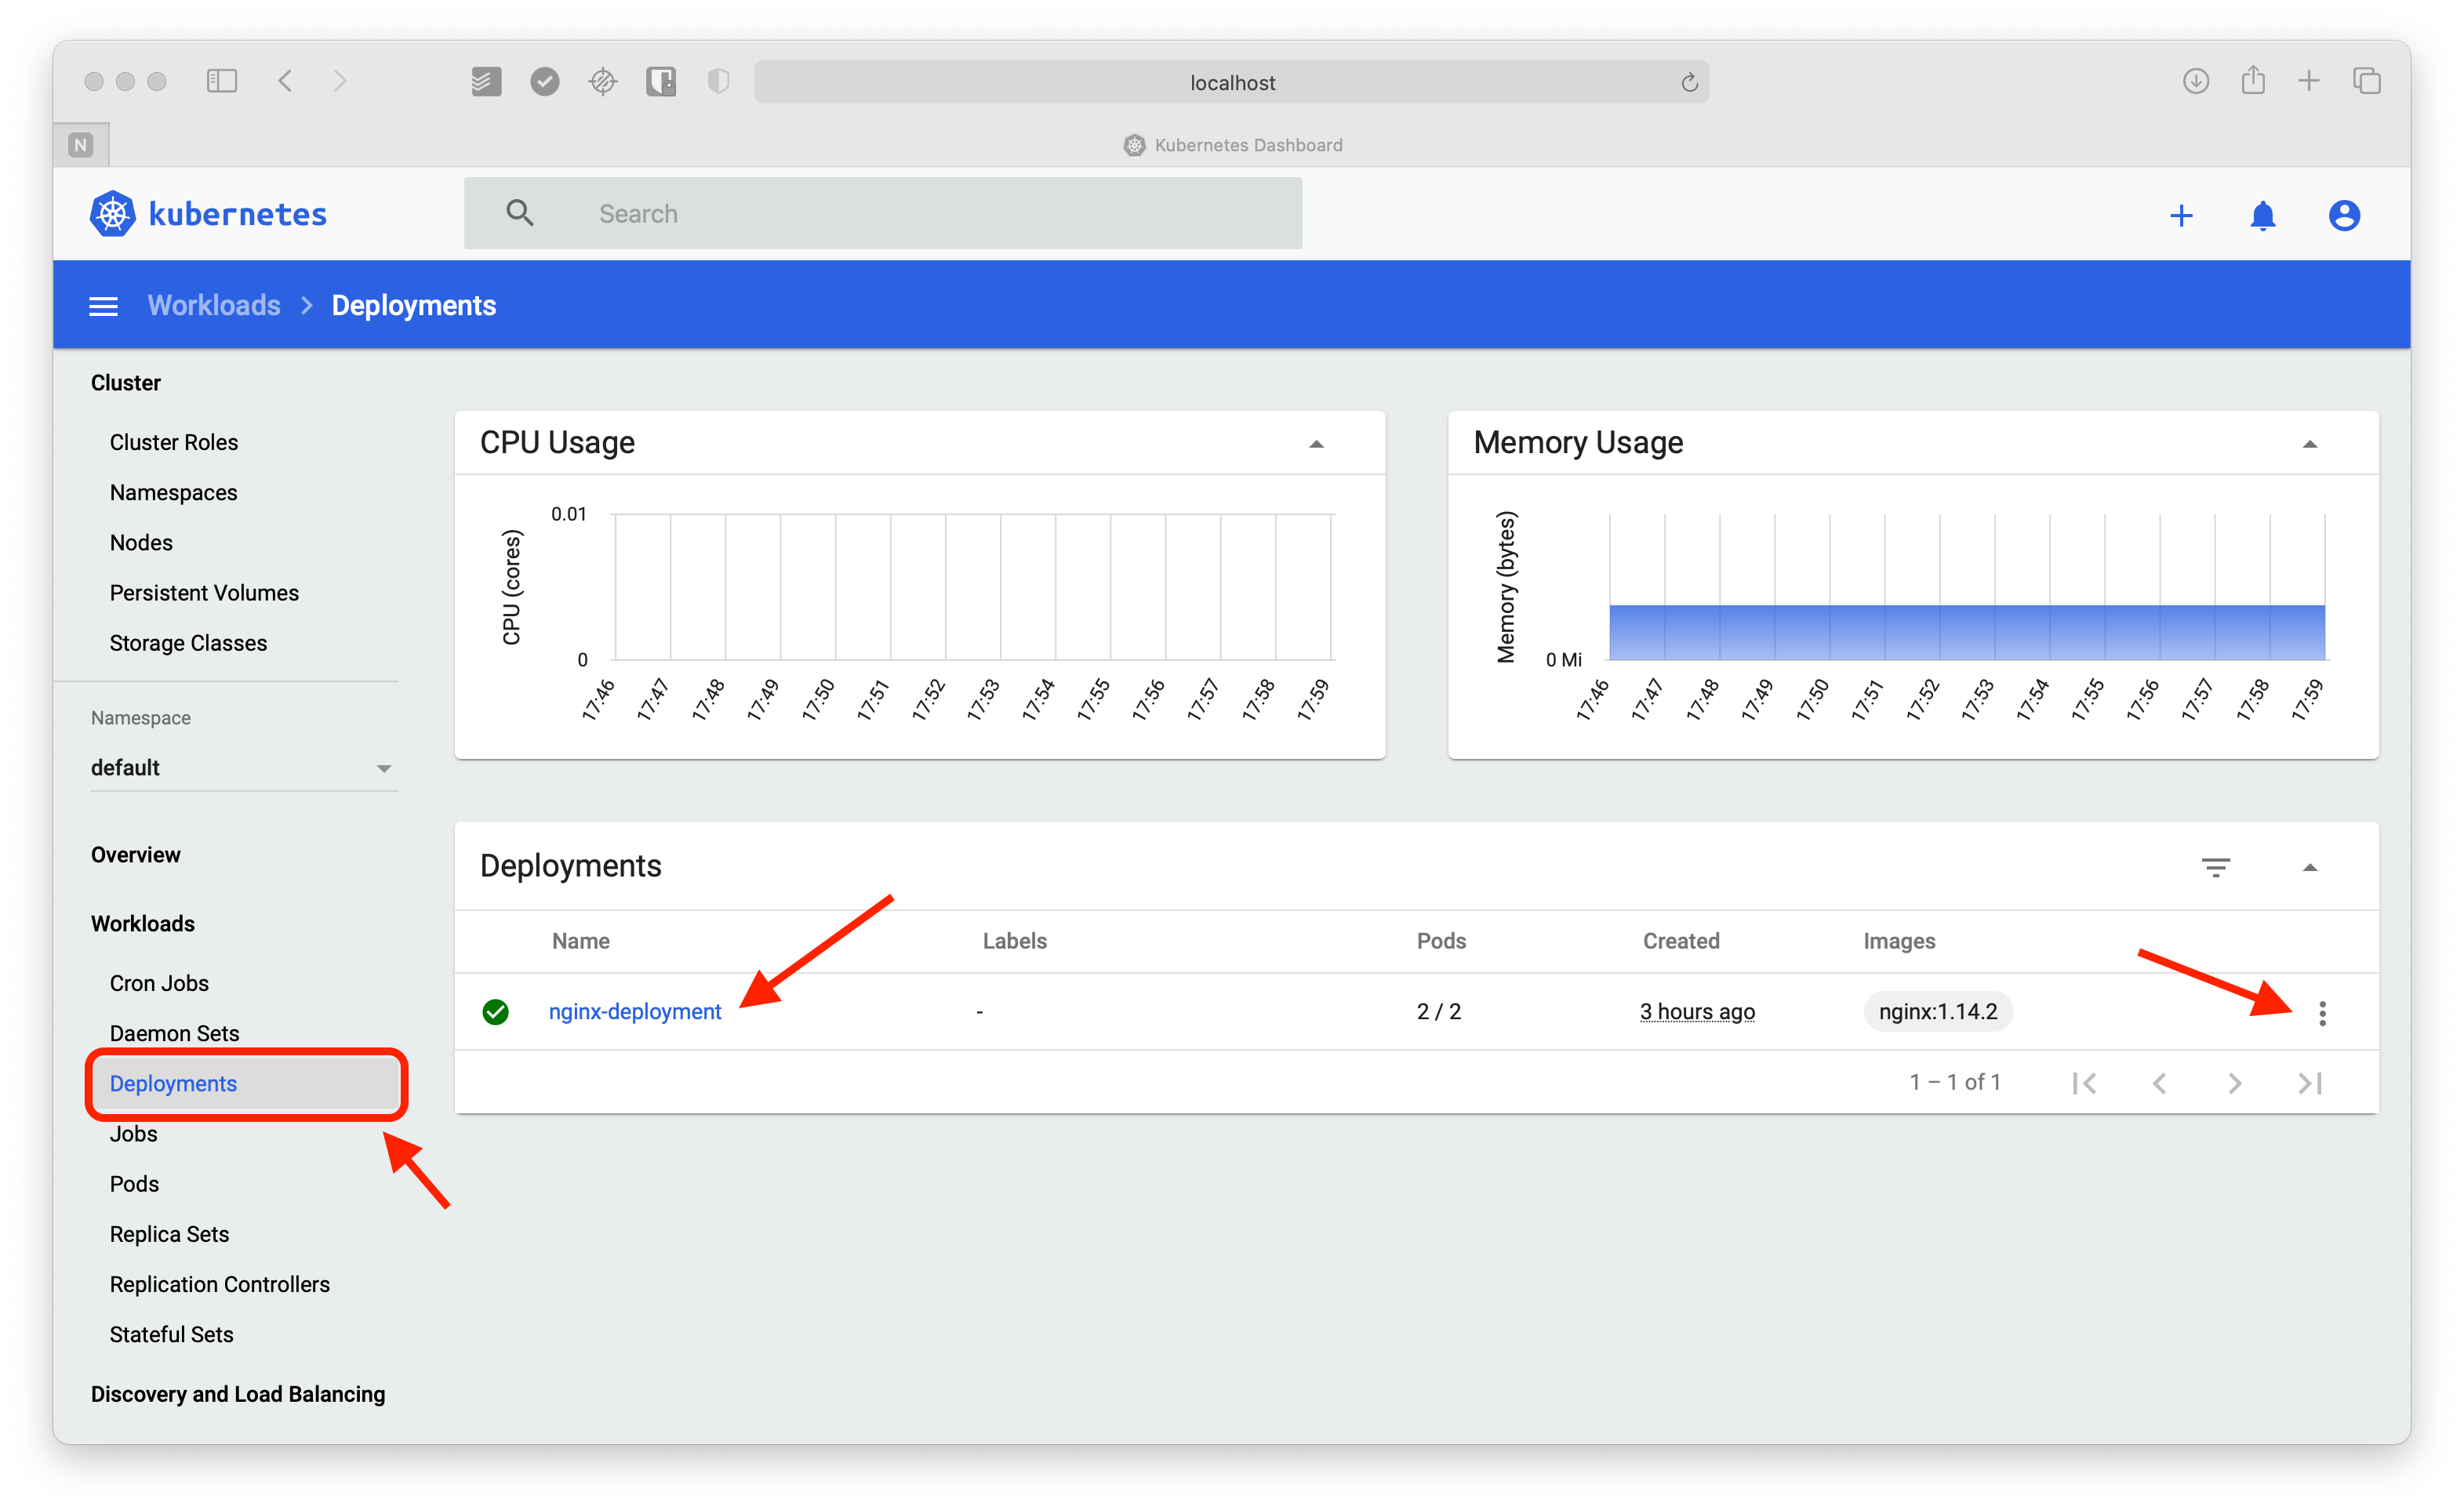
In this view, there are two graphs at the top showing the CPU and memory usage in real-time, while below are listed the deployments in the selected namespace.
Note that on the right side of the Nginx deployment is a kebab menu, also known as the three dots menu or three vertical dots menu, which allows you to perform additional actions.
In this case, the Kubernetes Dashboard allows you three specific actions: scale the deployment, edit it, or delete it. Try to scale the deployment by clicking on the corresponding action.
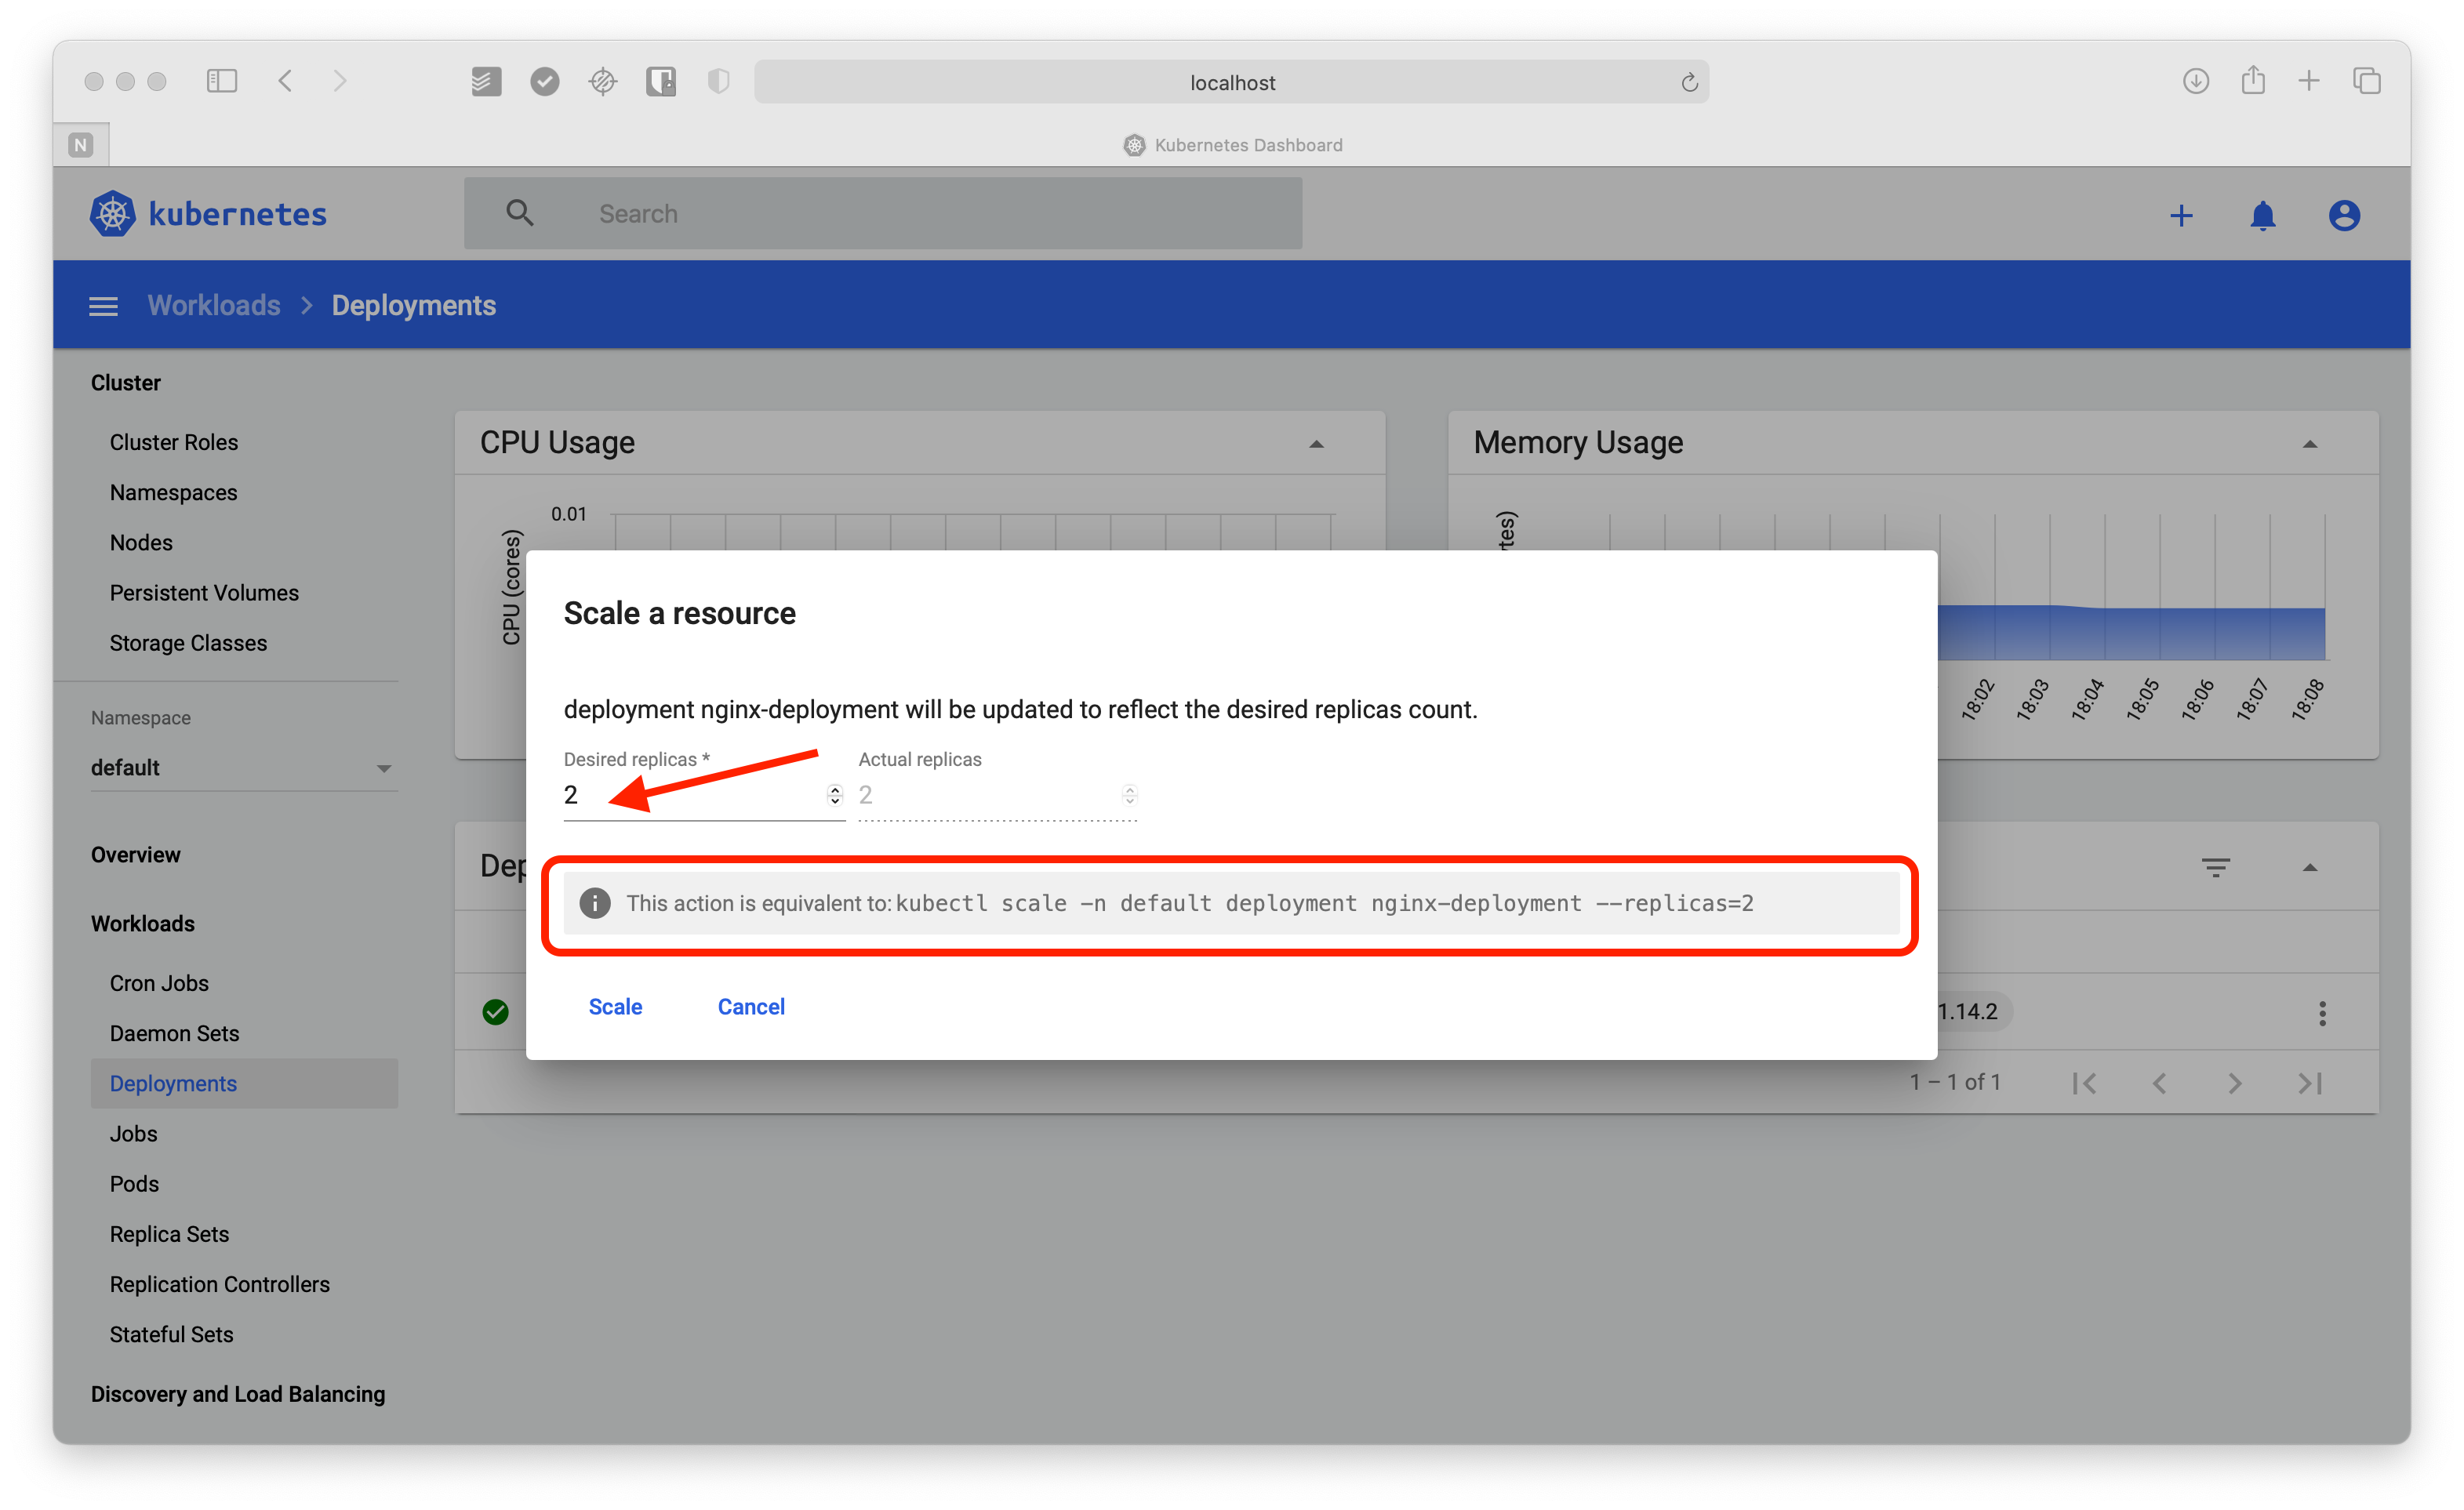
The pop-up window is quite explicit. You can enter the number of desired replicas in the corresponding box and click “Scale” to proceed. Note that at the bottom, there is a message that will show the equivalent command to run with kubectl.
Enter “4” in the Desired replicas field and execute the command. The next screen will show you the course of the action.
Alternatively, you can use the action menu to edit the deployment in the format of your choice, YAML or JSON, and update the resource. Edit the Nginx deployment and change the replicas to “3” as shown in the image below.
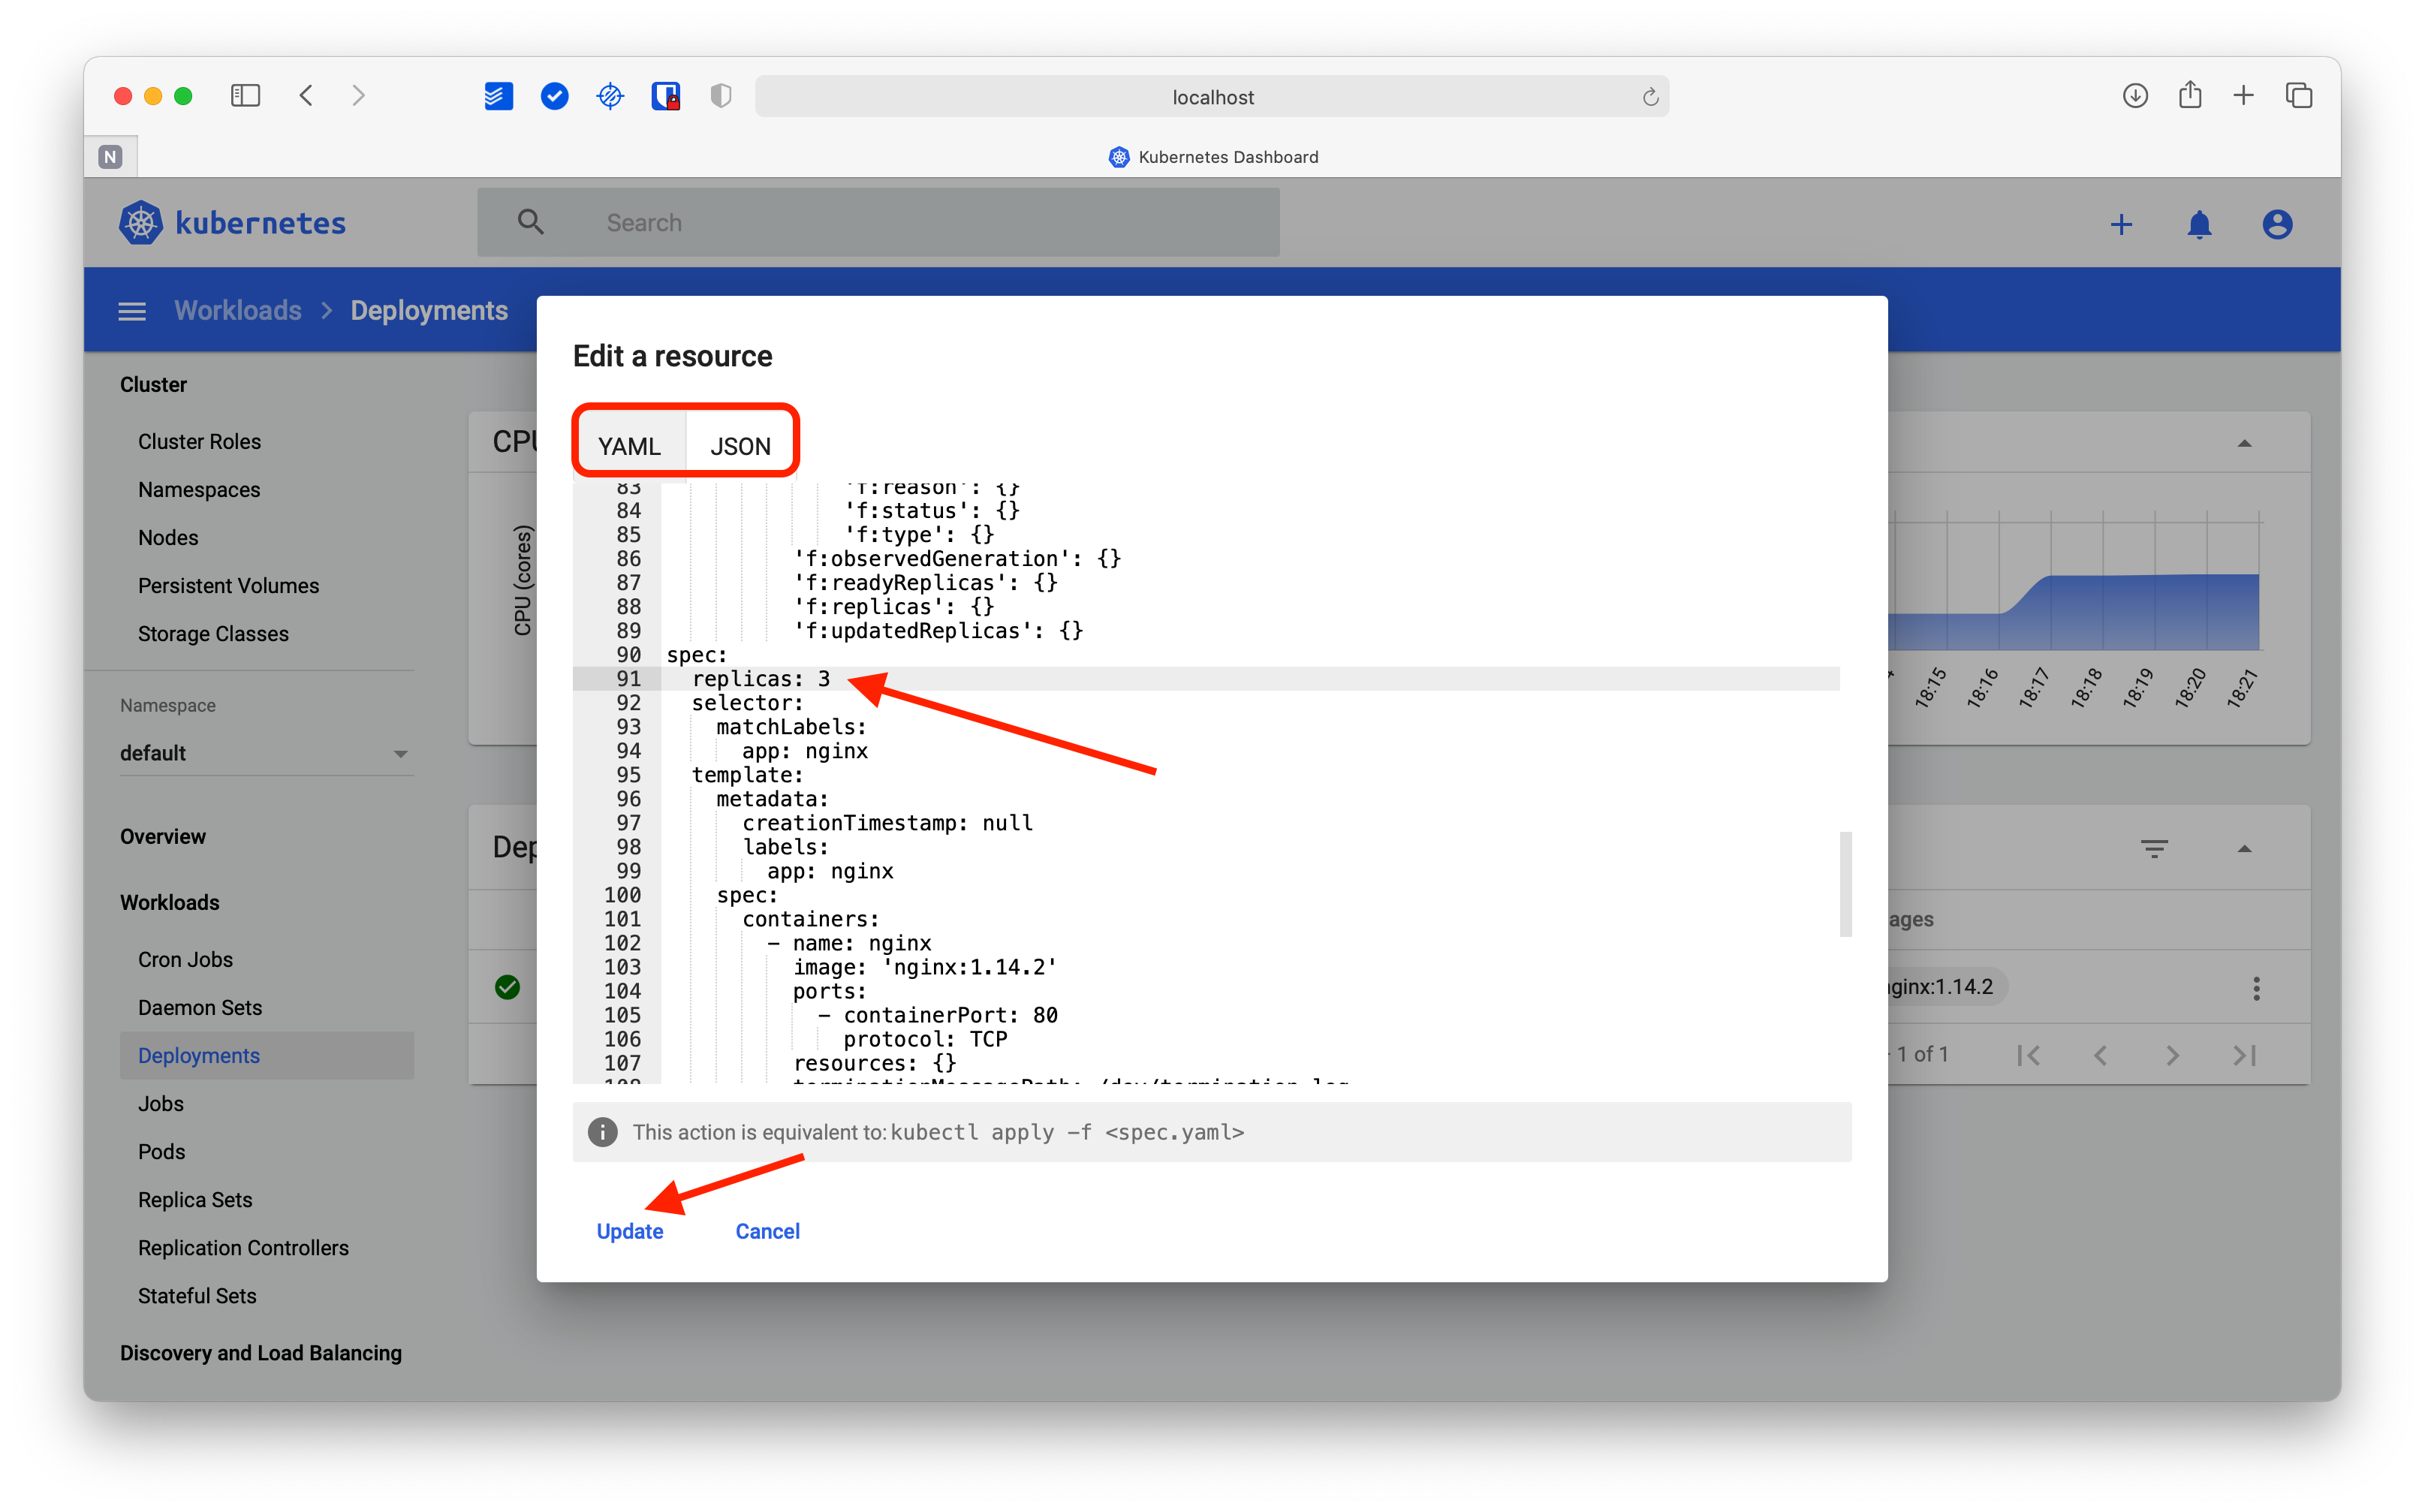
As you can see, in a matter of a minute, you have scaled the deployment using two different methods. This same procedure can be used to edit any cluster resource to which you have access.
The action menu can change dynamically depending on the resource you are working on. To check it, go to the Pods section and click on the three-dot menu of one of the pods.
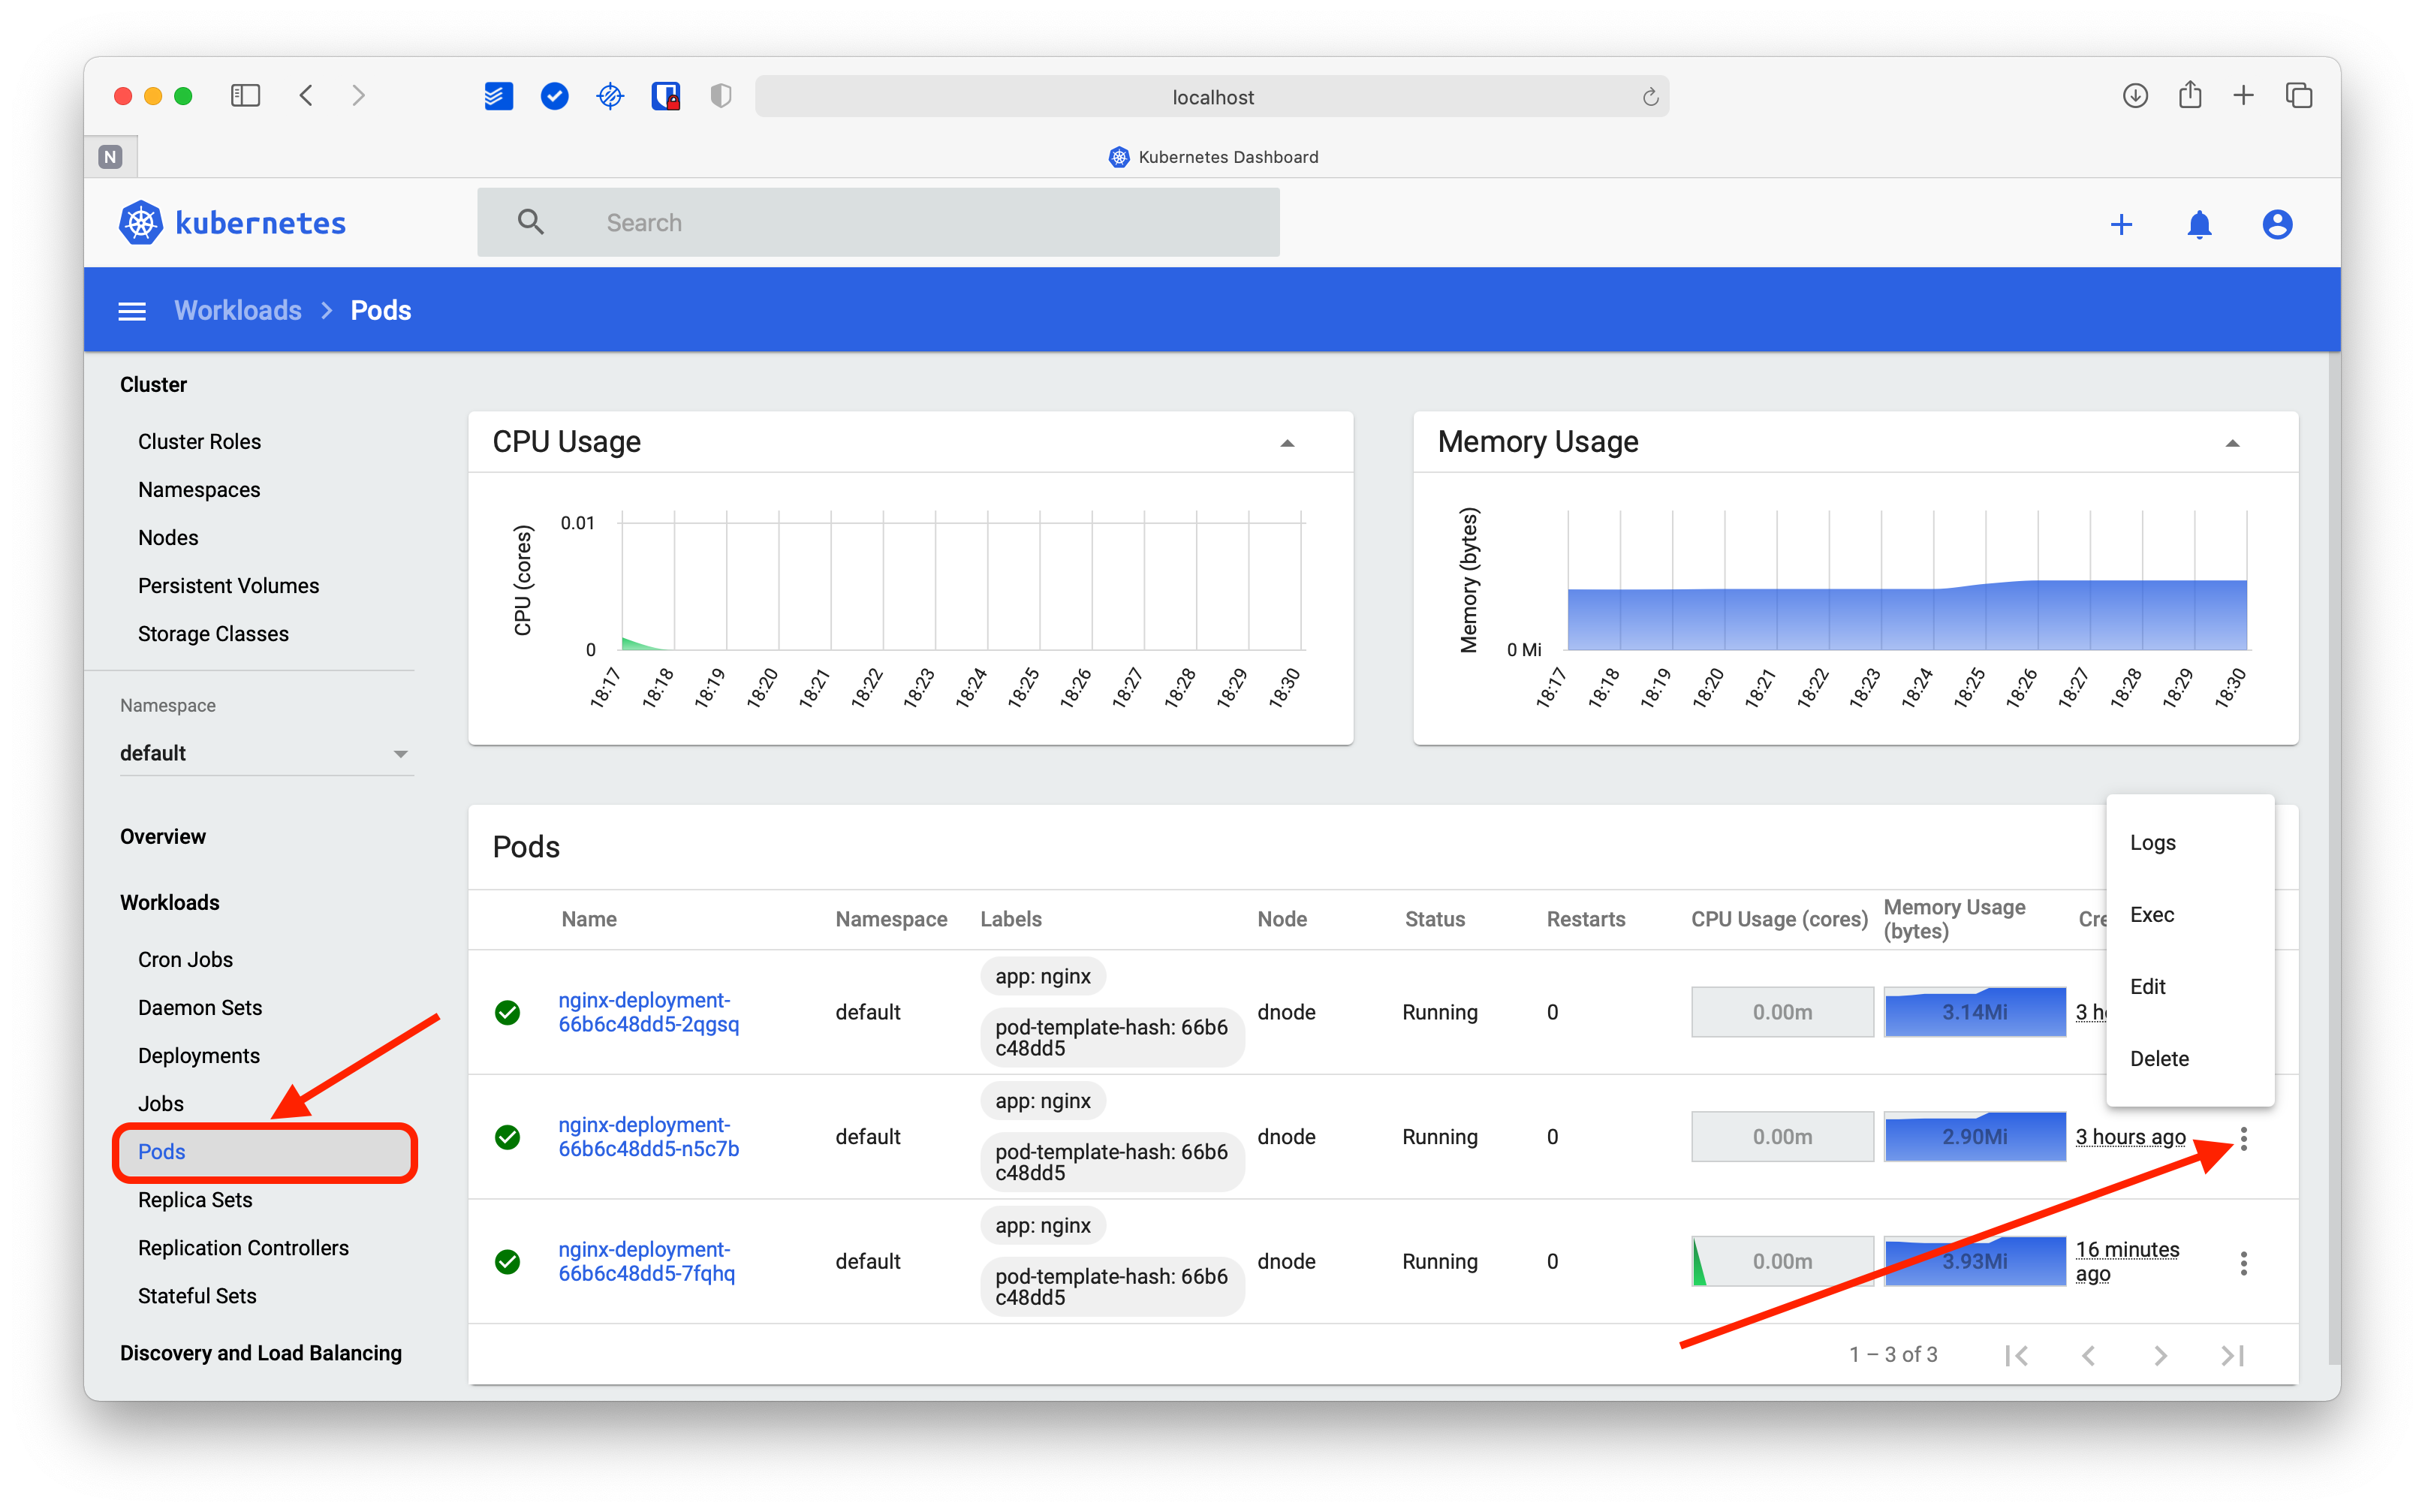
In this case, the menu allows you to view the logs of each pod, execute a command within the pod (Exec), edit the pod, or delete it. Try the latter by selecting a pod at random and choosing the Delete option. A confirmation message will appear, along with the equivalent command in kubectl.
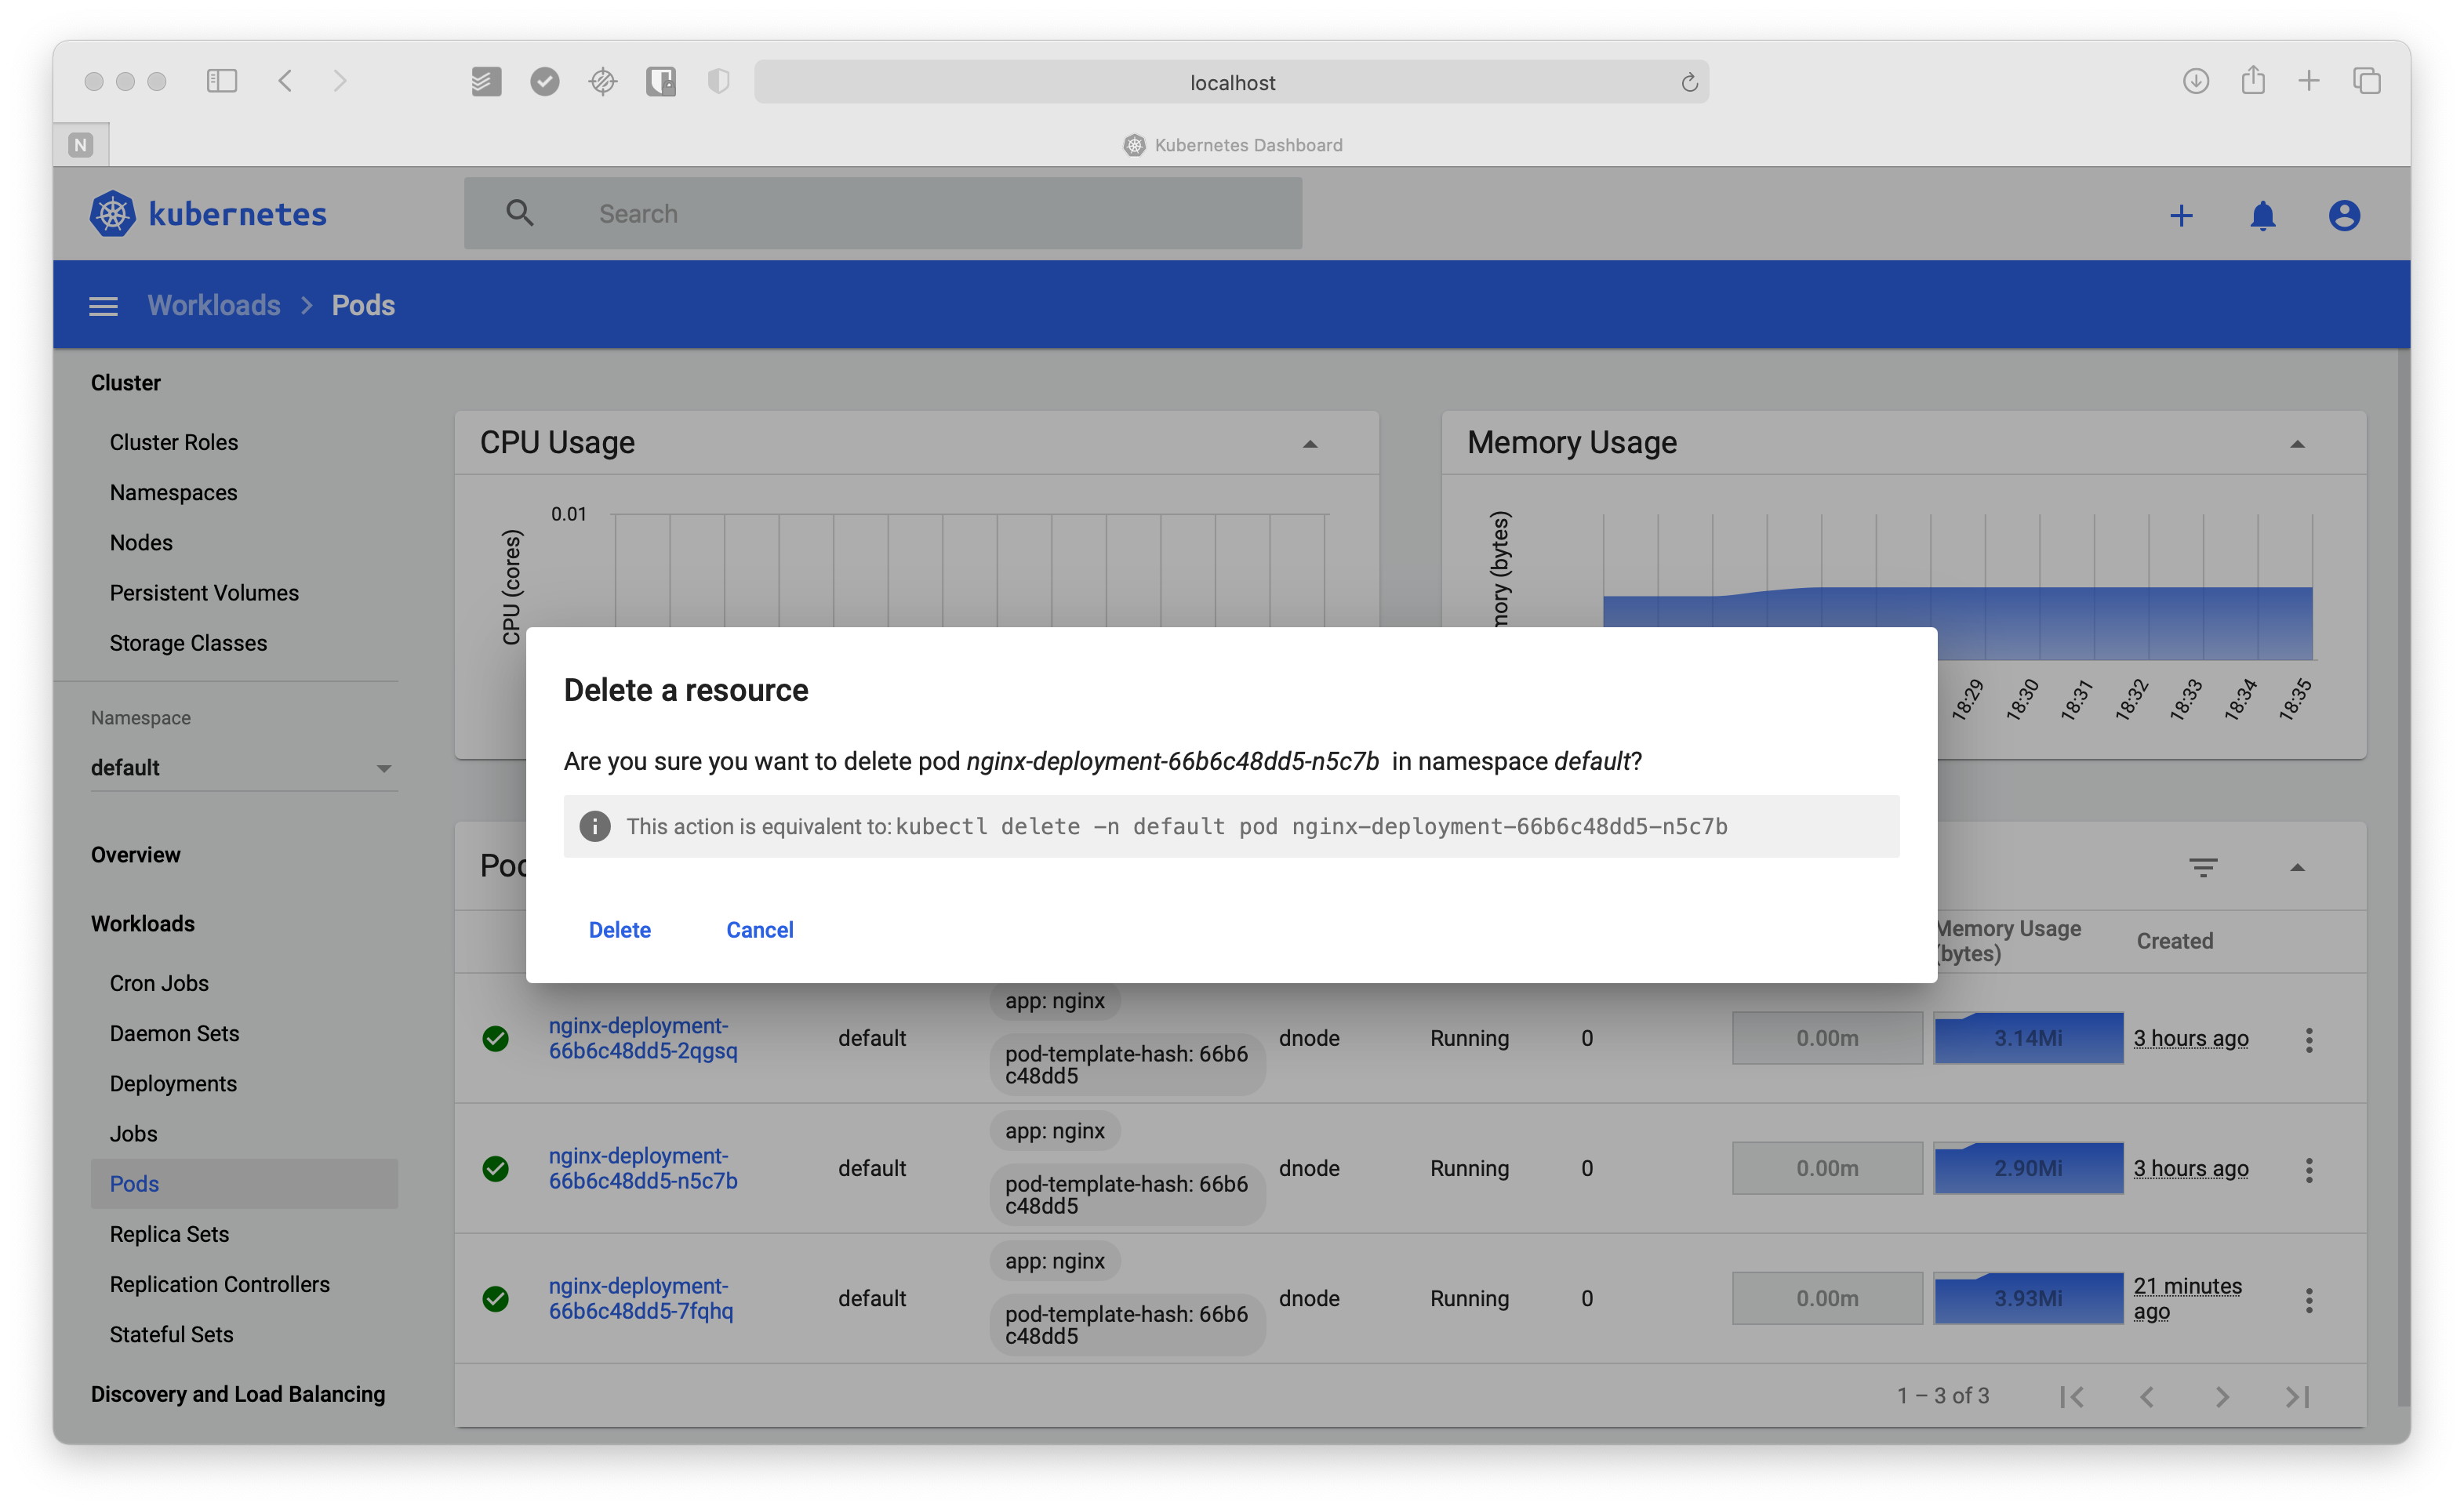
For a moment, you will see the selected pod destroyed while a new one is deployed to replace it. After a few seconds, you will see the new pod running as expected to fulfill the replica set of the deployment.
You can check the recent events by going to the Replica Sets section and clicking on the name of the running resource (Nginx in this case).
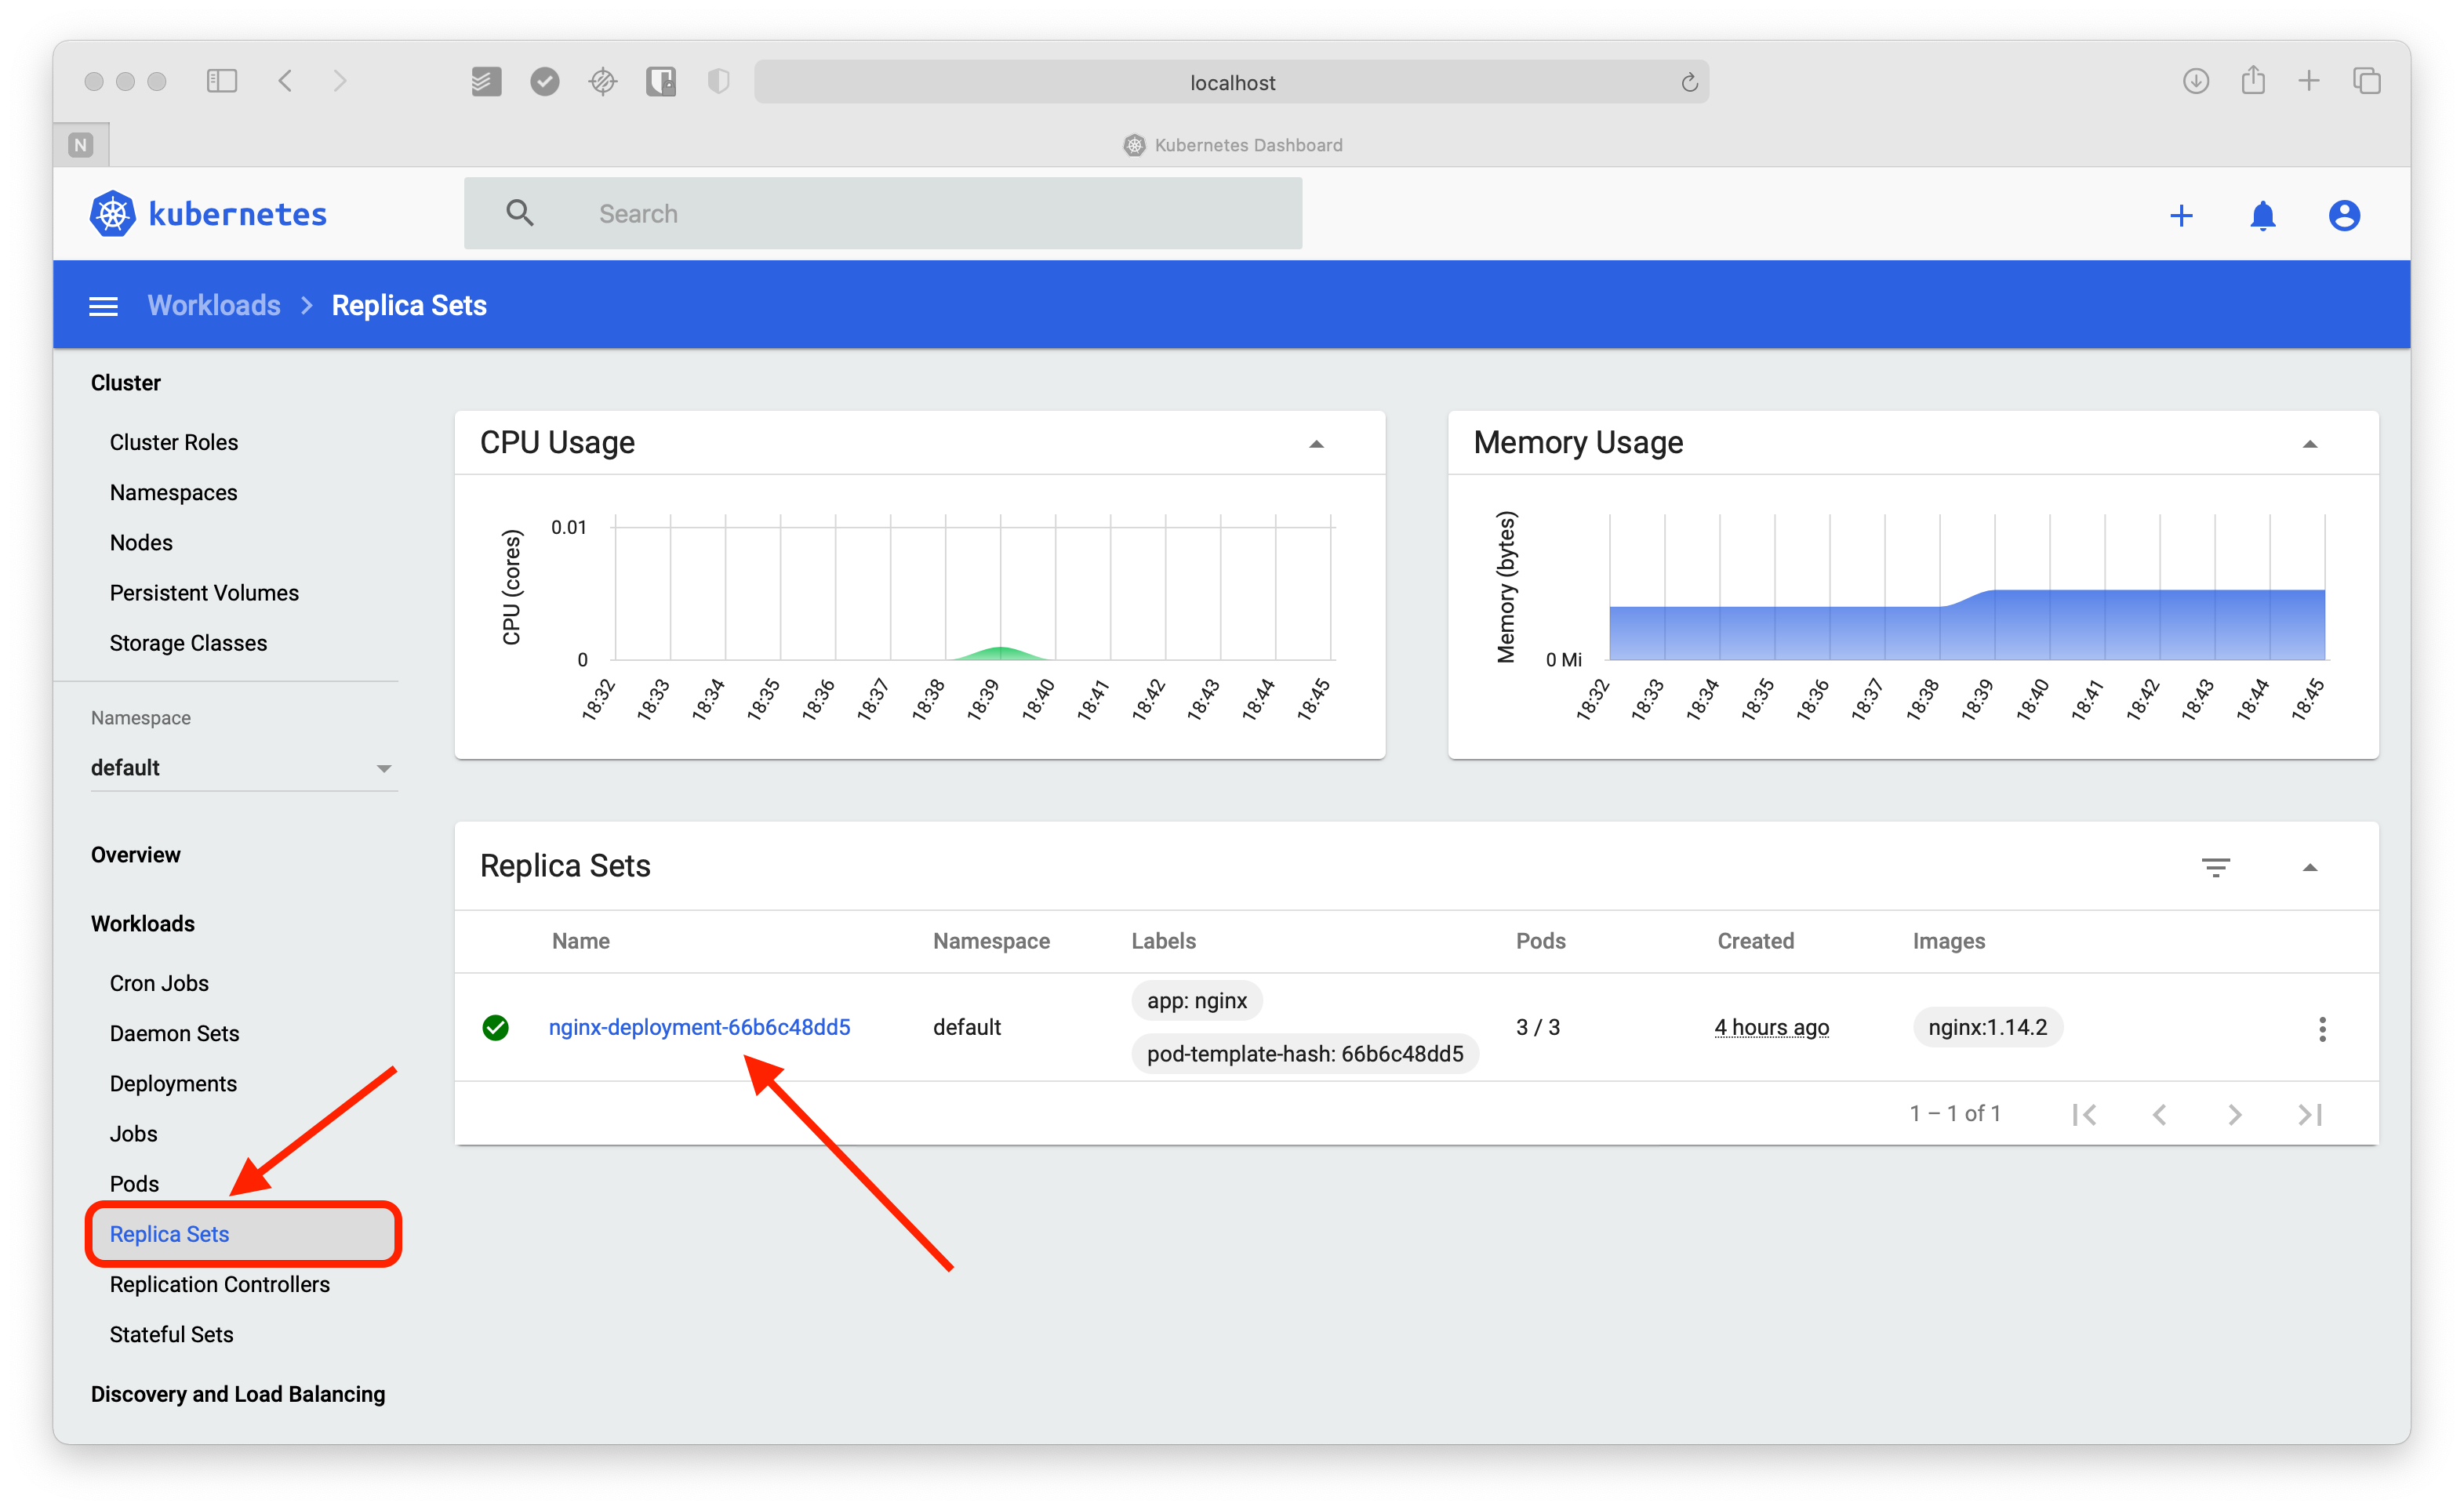
If you scroll down, you will see the Events section where you can see all the operations you have recently performed. Additionally, at the top, you will have four icons. From left to right, the first one allows you to view the logs, the second one allows you to scale the resource, the third one allows you to edit it, and the last one allows you to delete it.

Up to this point, you have seen how the Kubernetes Dashboard allows you to perform administrative tasks in a comfortable and fast way. You can edit resources, scale pods, delete resources, view logs, and more. Best of all, the principles you’ve learned in the Workloads section apply to all resources.
Discovery and load balancing
Since there is only a single deployment in the default namespace, the Discovery and Load Balancing view only shows the Kubernetes API.
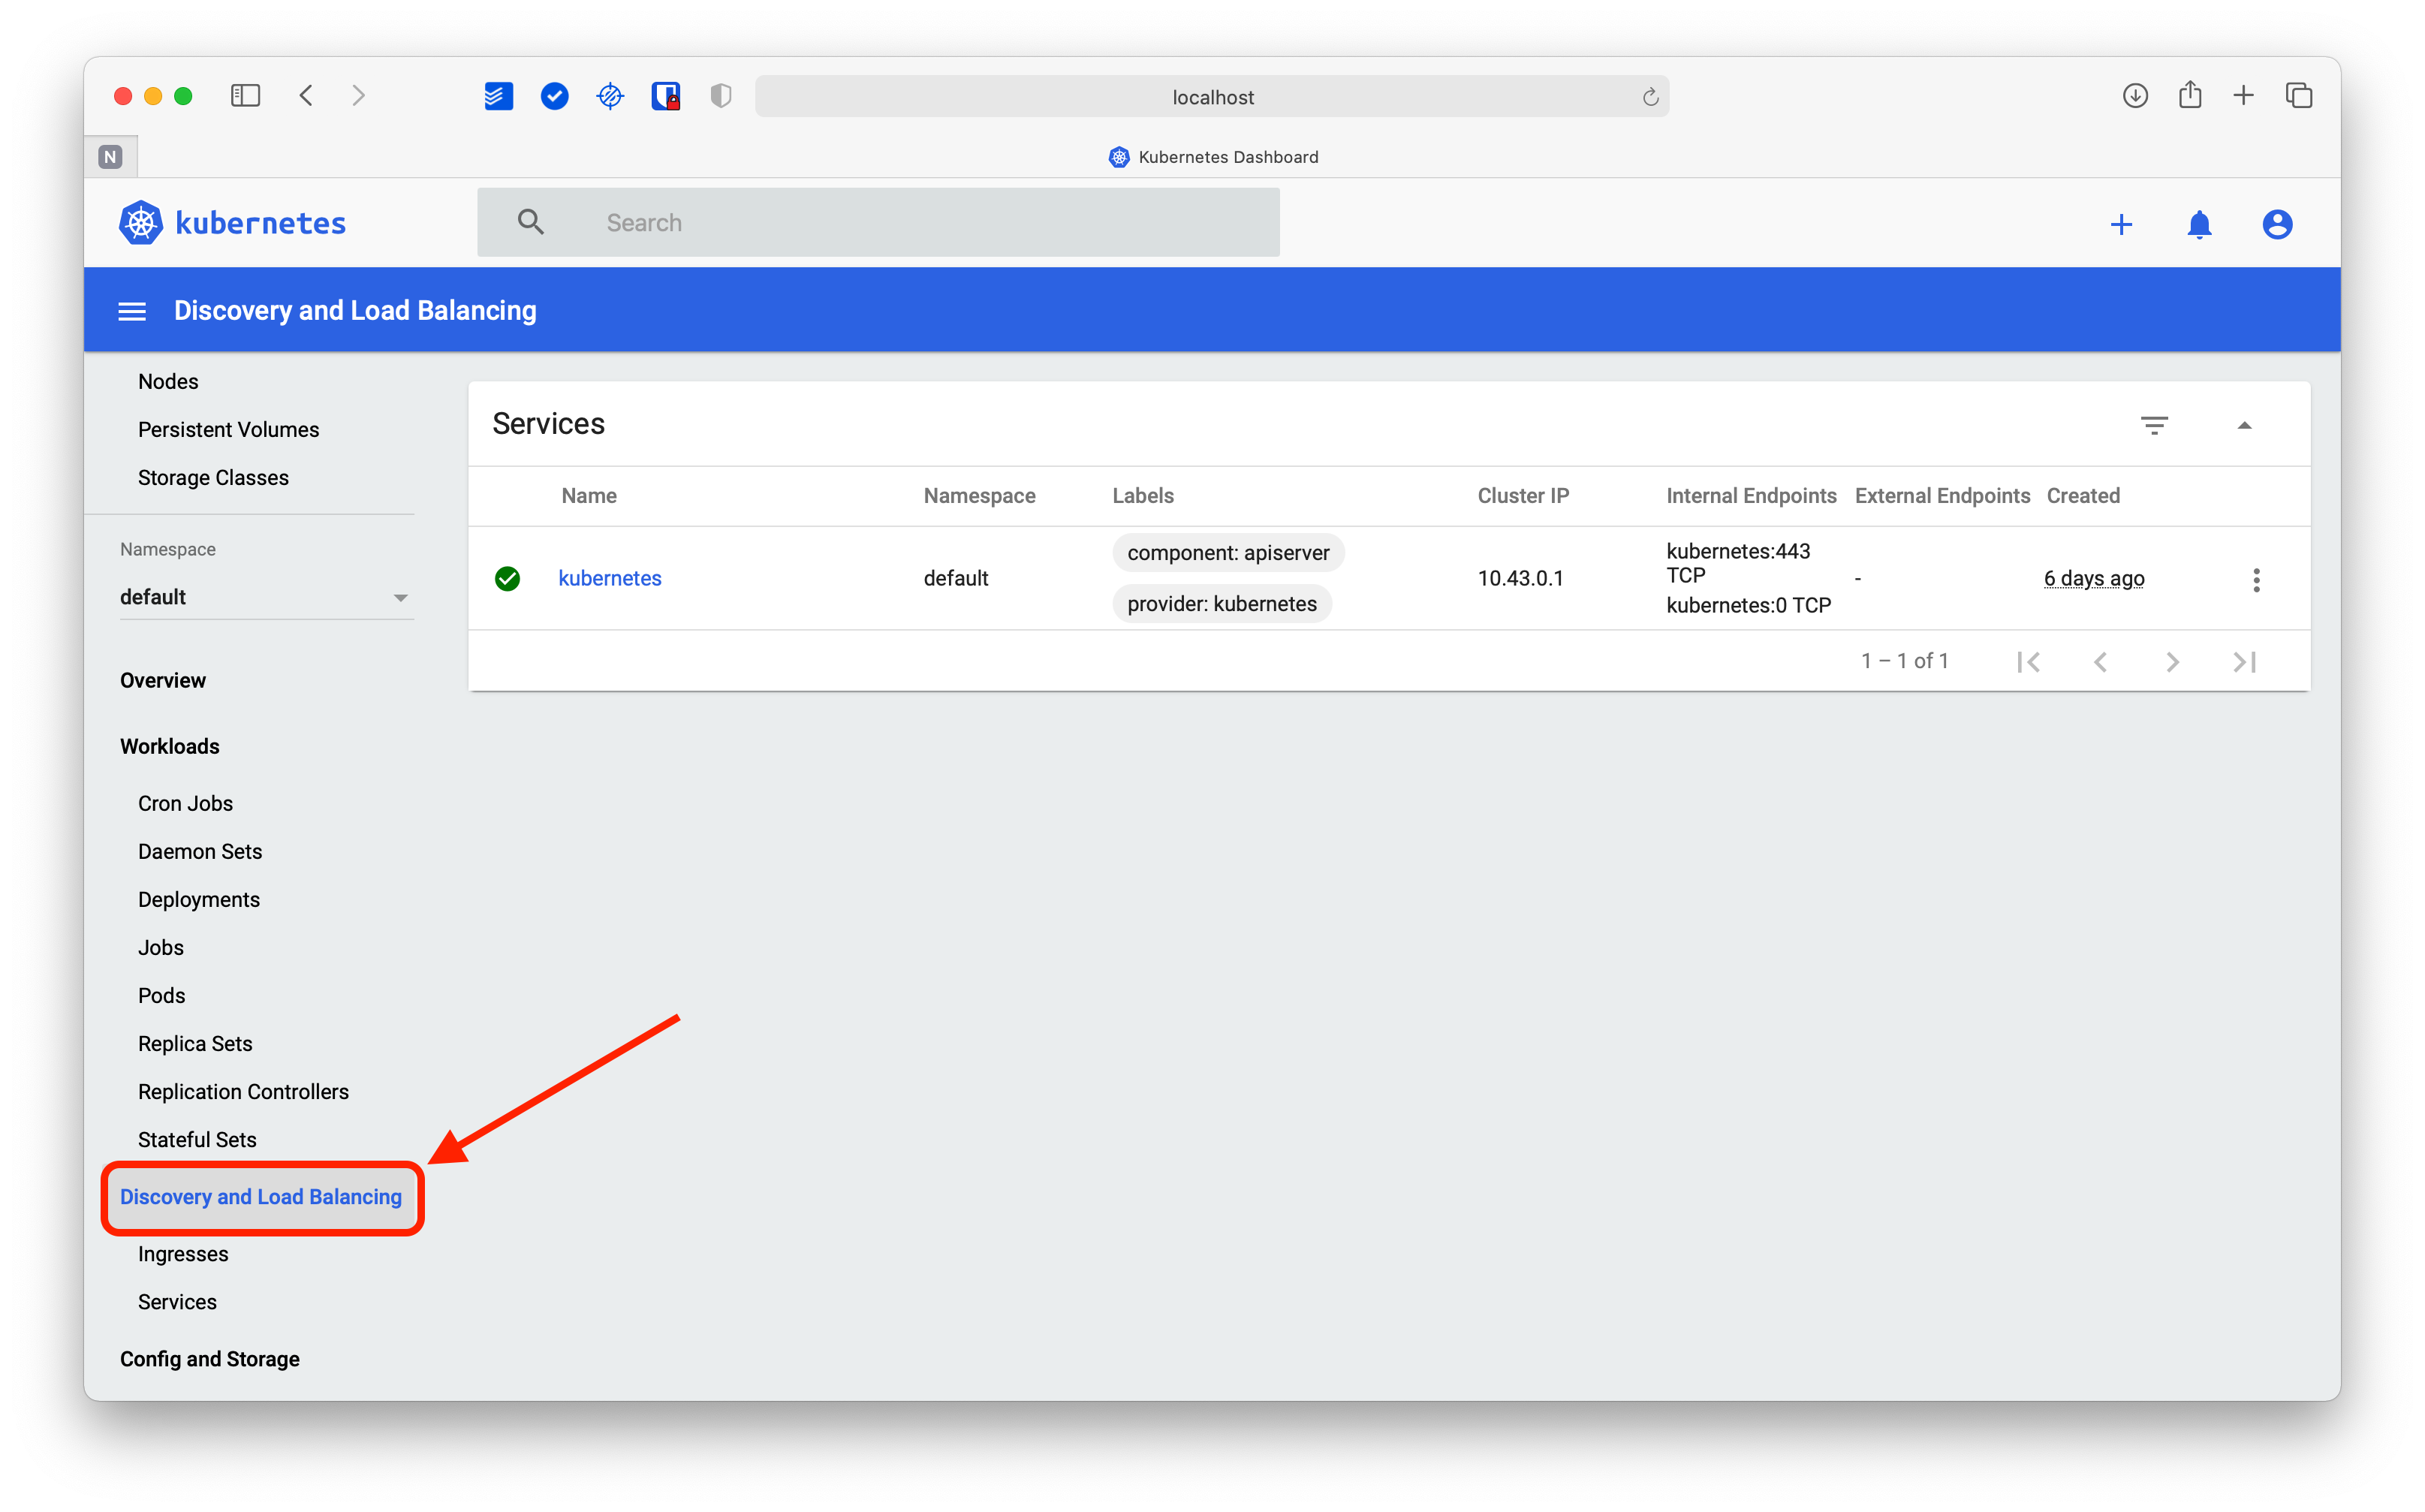
The only possible actions on this resource are to edit or delete it, which would not be a good idea for the cluster.
In this regard, it’s necessary to remember that the service account admin-user has the necessary permissions to perform any action. This will be a point to keep in mind in a moment when reviewing the Config and storage view.
Config and storage
Of all the sections, this may be the most sensitive of all. Here you can review, edit and even delete secrets and certificates. Needless to say, it is a bad idea to grant a service account rights to manage these resources unless it is strictly necessary.
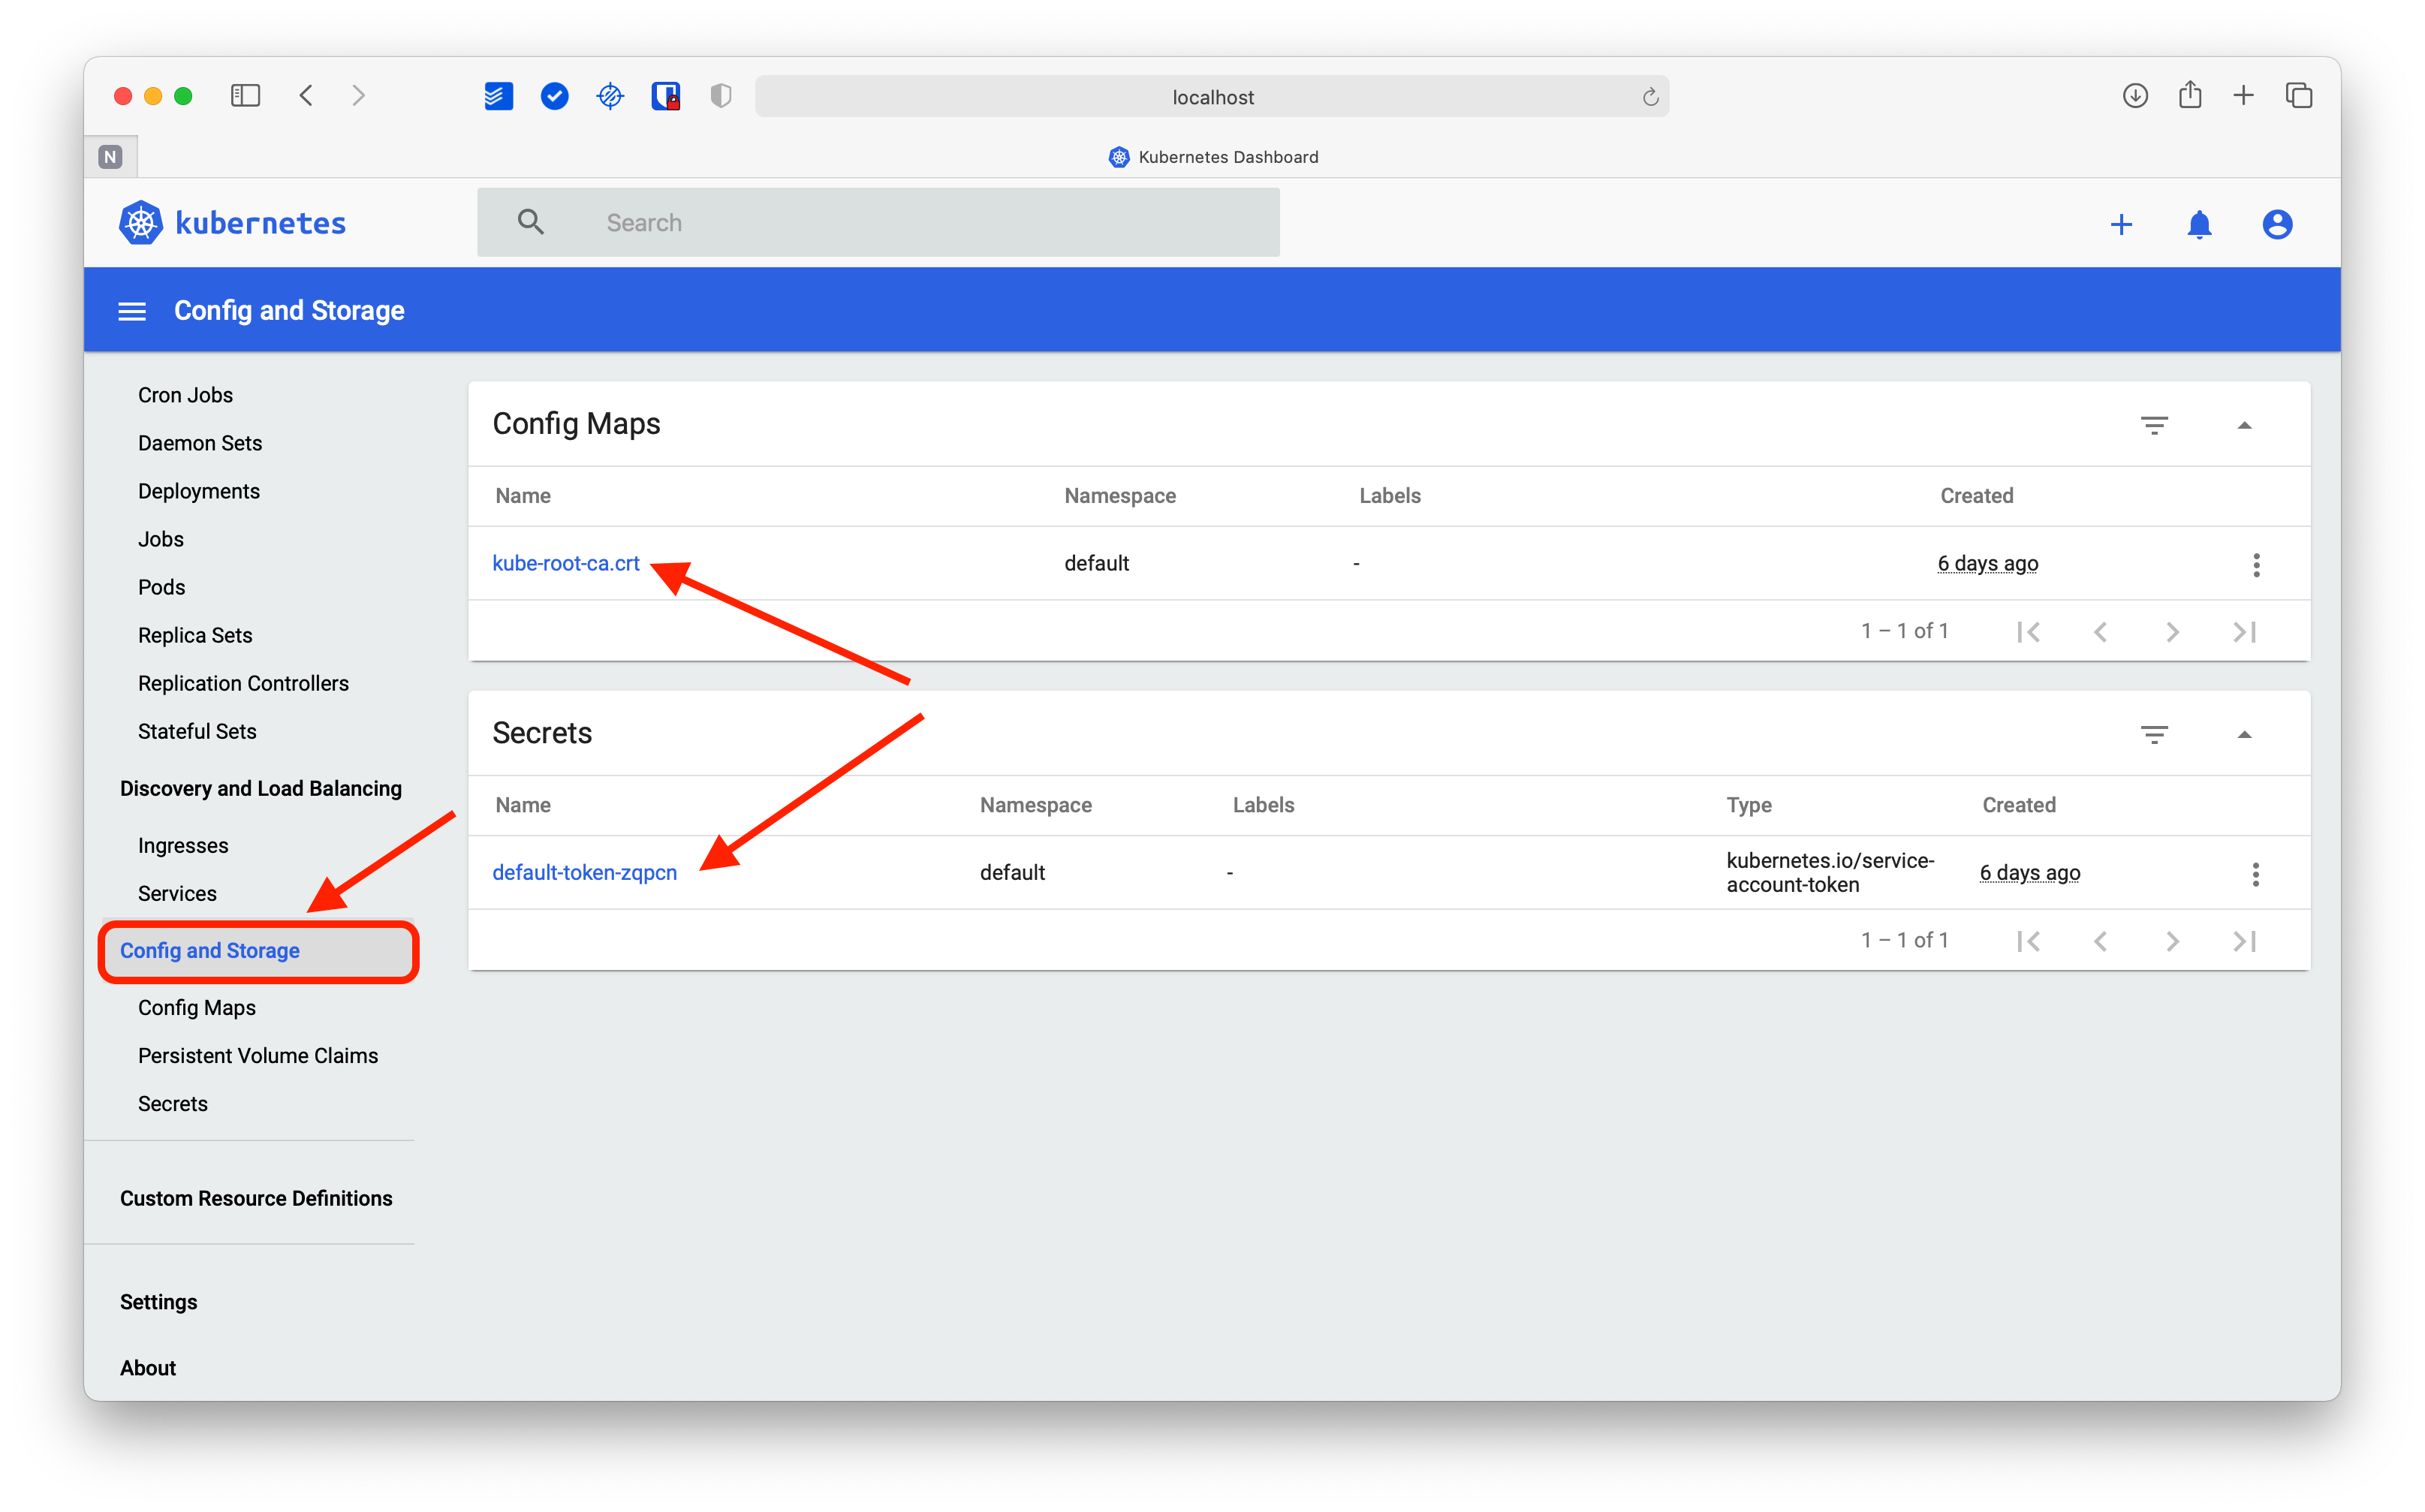
If you click on the Certificate Authority link under Config Maps, you can check it for yourself.

Any user who has access to this certificate can grant permissions to new users. For this reason, it is a best practice to keep access to this information restricted.
Alternatives to k8s dashboard
The advantages of having a graphical interface to visualize information and manage the Kubernetes cluster are undeniable. For this reason, teams have been building alternative Kubernetes dashboards for the past few years.
Among the two most popular options are Prometheus, which leverages the power of Grafana, and Portainer, a UI used to manage Docker containers that recently added support for Kubernetes. Each brings advantages and disadvantages depending on your specific needs.
For example, Prometheus is infinitely flexible and powerful for visualizing all kinds of data. It can adapt to many different use cases and functions, but its configuration is more complex than the native Kubernetes Dashboard.
Portainer offers an intuitive interface that, like the Dashboard, allows you to manage cluster resources. It is relatively easy to install (you can deploy it using Helm), and it adds an additional layer of software to guard against possible attacks.
Conclusion
The web-based Kubernetes dashboard is both powerful and easy to install. It’s not perfect, but it provides an alternative to the terminal for common cluster operations and status updates. The unique feature of the Dashboard is its data visualization views, which can’t be replicated in the kubectl command-line tool.
While you could monitor the behavior of your Kubernetes cluster using the Web UI, the absence of purpose-built alerting mechanisms means you get little actionable insights regarding your cluster’s health and performance.
This is where new age platforms come into play. When you need an alerting and monitoring system in place for your Kubernetes cluster, third-party tools, like Airplane, provide dashboard capabilities that help you monitor metrics and events easily, allowing you to stay one step ahead of potential issues. Use Airplane Views to build a monitoring and metrics dashboard quickly. Airplane also offers pre-built component and template libraries that make it easy to get started.
To test it out and build your first monitoring and metrics dashboard, sign up for a free account or book a demo.


