


Redis defines itself as an “open-source, in-memory data store used as a database, cache, and message broker.” Due to its speed, it’s unsurprising that it enjoys such market popularity.
Speed is obviously essential to contemporary development. Kubernetes, a popular platform for container orchestration, helps development teams stay competitive with their release schedules by facilitating automation for continuous integration and deployment (CI/CD).
This article explores how to set up the Redis cluster on Kubernetes so you can make the most of the speed from these two giants.
Setting up your Redis cluster
Before you go much further, you should have a Kubernetes cluster up and running. This article makes use of Redis version 6, and the code is tested on the Linode Kubernetes Engine (LKE).
Follow the step-by-step instructions here, and your Redis cluster will be ready without any trouble.
1. Create a namespace
By default, all the Kubernetes components such as pods, services, ConfigMaps, etc. are placed in the default namespace. A namespace is like a folder in the OS. Keep in mind that placing all components in one namespace can create confusion; creating a new namespace will help you manage the pods and services more efficiently.
So create a namespace for a Redis server setup:
Then, get the namespace list:
| NAME | STATUS | AGE |
|---|---|---|
| default | Active | 31d |
| kube-node-lease | Active | 31d |
| kube-public | Active | 31d |
| kube-system | Active | 31d |
| redis | Active | 6d13h |
2. Define a storage class
A storage class links to a provisioner, which is a plugin that can reserve disk space or purchase volumes to your cloud provider on your behalf.
The pod in the Kubernetes cluster does not store the data permanently. Rather, the data created inside the pod is deleted whenever the pod is deleted or restarted. To store the data permanently, Kubernetes offers volume and persistent volume.
This article uses persistent volume for the purposes of the demo with local storage (a file system folder). You can skip this section if you have some other storage provisioner.
Create a storage class, which points to the local storage, using the following manifest code:
Copy the above code and paste it into a file named sc.yaml. Execute the file using the following command:
The storage classes are created globally in the Kubernetes cluster. Thus, there is no need to mention the namespace while executing the manifest file for the storage class. However, for the pods and services, you must mention the namespace while executing the manifest files.
Now that the local storage class is created, you can see the list of available storage classes using the following command:
| NAME | PROVISIONER | RECLAIMPOLICY |
|---|---|---|
| linode-block-storage | linodebs.csi.linode.com | Delete |
| linode-block-storage-retain (default) | linodebs.csi.linode.com | Retain |
| local-storage | kubernetes.io/no-provisioner | 31d |
3. Create a persistent volume
Persistent volumes (PVs) are used to create a storage size. In this demo, you will create a Redis cluster with three pods (one master and two slaves). Therefore, create three PVs.
If you have dynamic storage provisioning permission, you can skip this section.
The following code creates three PVs using the local storage provisioner:
Copy and paste the code into a file named pv.yaml. Execute the file with the following command:
With three PVs now created, get the PVs list:
| NAME | CAPACITY | ACCESS MODES | RECLAIM POLICY | STATUS |
|---|---|---|---|---|
| local-pv1 | 1Gi | RWO | Retain | Available |
| local-pv2 | 1Gi | RWO | Retain | Available |
| local-pv3 | 2Gi | RWO | Retain | Available |
Because this demo claims the PV using the volume claim templates of pod definition, you don’t need to create PVCs separately.
4. Create the ConfigMap
The ConfigMap in the Kubernetes cluster is a key-value store. You can use the config information of Redis in the Kubernetes cluster as a ConfigMap. Get the full code of the ConfigMap manifest here.
There are a couple important things to note here.
First, change the password of master and slave with your desired password, which is needed for authentication.

Keep your master and slave passwords the same; you will need to set up the failover of the master pod. If the master pod dies or restarts, then any slave pod will be made the master using. Using the same password will ensure easy communication between master and slave.
Second, do not hard code the slaveof value. That’s a placeholder for the master instance address. You need to generate this value on the fly due to the master failover. This value is set dynamically on the StatefulSet deployment section.
Get the ConfigMap code and save the code in a file named redis-config.yaml. Deploy the ConfigMap in the Redis namespace using the following command:
Get the ConfigMap list in the Redis namespace:
| NAME |
|---|
| redis-config |
5. Deploy Redis using StatefulSet
StatefulSet is a Kubernetes object used to deploy stateful applications such as MySQL, Oracle, MSSQL, and ElasticSearch. You can use the Deployment object if you are planning to deploy stateless applications such as PHP, Jave, or Perl.
The StatefulSet offers ordered pod names starting from zero and recreates the pod with the same name whenever the pod dies or crashes. A pod can fail at any time. The persistent pod identifier uses this feature (recreating the pod with the same name) to match existing persistent volume (storage volume attached to the failed pod) to the newly created pod.
These features are needed when you deploy the stateful application. Therefore, use the StatefulSet controller to deploy the Redis cluster:
Save the above code in a file named redis-statefulset.yaml and execute using the following command:
Now, get the list of running pods under the Redis namespace:
| NAME | READY | STATUS | RESTARTS | AGE |
|---|---|---|---|---|
| redis-0 | 1/1 | Running | 0 | 3d |
| redis-1 | 1/1 | Running | 0 | 3d1h |
| redis-2 | 1/1 | Running | 0 | 3d1h |
Now three pods are up and running: redis-0, redis-1, and redis-2. The redis-0 pod will act as master, and the other pods will act as slaves.
Do note that it is possible that you will receive the following error you when you create the StatefulSet for Redis:
The code used for Redis StatefulSet will look for a PV. If you have dynamic provisioning, then the code itself will automatically create the three PVs. If you don’t have dynamic provisioning, then create three PVs with the same access mode in the volume claim template to resolve the error.
6. Create headless service
You cannot directly access the application running in the pod. If you want to access the application, you need a Service object in the Kubernetes cluster. Create a headless service for a Redis pod using the following code:
Headless service means that only internal pods can communicate with each other. They are not exposed to external requests outside of the Kubernetes cluster.
Save the previous code in a file named redis-service.yaml and execute the code with this command:
Now get the list of running services under the Redis namespace:
| NAME | TYPE | CLUSTER-IP | EXTERNAL-IP | PORT(S) |
|---|---|---|---|---|
| redis | ClusterIP | None | <None> | 6379/TCP |
The service endpoints for each Redis pod are given below:
Now you can access the Redis pods using the above endpoints with Redis client utility tools.
7. Check replication
You created a Redis cluster with one master and two slaves. The pod redis-0 will act as master and the pods redis-1 and redis-2 will act as slaves. Check the logs of the master pod, and you can see the replication and synchronization with the slave pods:
Redis Master and Slave In Sync
The above diagram shows the master pod in sync with two slave pods. The pod IP address will change whenever it is deleted and recreated, so don’t stick to the IP addresses of the pod.
Alternatively, you can use the describe command to get more details about the pod:
Get the replication information using the following command:
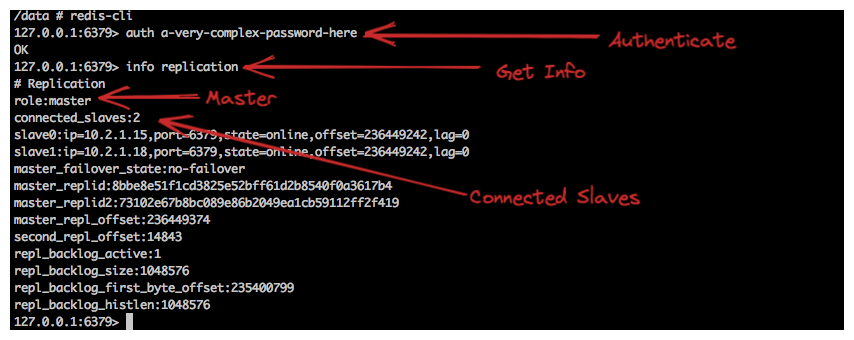
This screenshot shows how many slaves are connected with the master, as well as the slave’s IP address and other information.
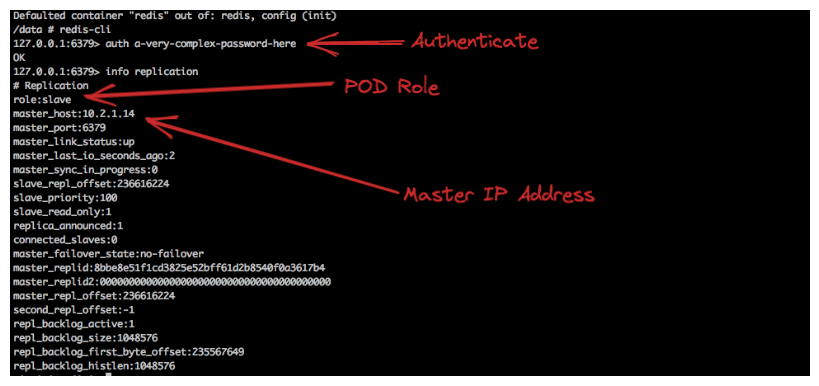
Likewise, you can check the slave pod’s log and see the successful connection between master and slave:
8. Test replication
You have successfully created the Redis cluster. Now it is time to test the replication. Note that you are able to write data on the master pod only; slave pods are used for reading purposes only. So, log in to the master pod and create some key-value pair data. Then check if the same data is replicated in the slave pods.
Enter into the master pod:
Connect to Redis using the Redis CLI:
Authenticate yourself using the master password:
You’re authenticated with the Redis master instance, but as of now, you don’t have any data. Create some key-value pair data using the following command:
Now get the key-value pair list:
Now log in to the slave pods and check to see if they show the same three data.
Enter into the slave pod redis-1:
Connect to Redis using the Redis CLI:
Authenticate yourself using the slave password:
Get the key-value pair list:
This shows the same three data you created on the master pod. Repeat the same steps for slave 2 by changing the name to redis-2 in the exec command to enter into the pod and check the data.
Final thoughts
Deploying stateful applications in the Kubernetes cluster can be tedious and time-consuming. Whenever you deploy a stateful application cluster, the master pod is only allowed to write data. This is because you can’t handle data sync if multiple pods are allowed to write data. The master pod will push the data change to slave pods and will always remain in sync. This approach ensures that data is replicated across all pods smoothly. The slave pods, then, are used for data retrieval purposes only. As a standard procedure, the first pod will be assumed as master and other pods will be slaves. So, for a stateful application cluster, you need an ordered pod name.
However, pods are assigned a random name in the Kubernetes deployment. Also, to match the existing persistent volume to the newly created pod, the same pod name is required whenever a pod restarts.
The StatefulSet controller in the Kubernetes cluster will help you deploy a stateful application easily by providing an ordered number for each pod starting from zero, and by creating the same pod name whenever the pod dies or restarts. The feature offered by the StatefulSet controller is highly needed to set up a cluster environment for stateful applications.
Deploying stateful applications on the Kubernetes cluster is always complex. This article eases the complexity involved with deploying the Redis cluster.
If you’re looking for a simple way to interact with Redis once you’ve deployed it, you can build a simple Redis client in Airplane. Using the Docker image support in Airplane, you can build any tooling you need around specific Docker images, add a UI to make interacting with the tool even more straightforward, and quickly and easily deploy it to Airplane’s secure, maintenance-free platform.
To build a Redis client quickly and easily, sign up for a free Airplane account or book a demo.


