


Because containers created from images inherit all of an image’s characteristics including misconfigurations, malware, and security vulnerabilities, you need to analyze dependencies and packages defined in container images so that you shift security left. This means you can act before threats are deployed to your production pipeline.
In this article, you’ll learn the thirteen best practices for scanning container images. By following these procedures, you’ll be able to build more secure containers and avoid a security liability.
The 13 best practices for image scanning discussed here will, when implemented, enable you to check and fix vulnerabilities in your container images.
1. Use the CLI first to scan locally
Security scanning using the docker scan command is part of your Docker tooling. You can scan images by running the scan command using the image ID or name.
In addition, Docker has integrated with Snyk to help scan official images, which makes it easier to scan images locally and immediately after build.
The following is an example Snyk scan report showing three vulnerabilities with medium severity and twenty-one with low severity.
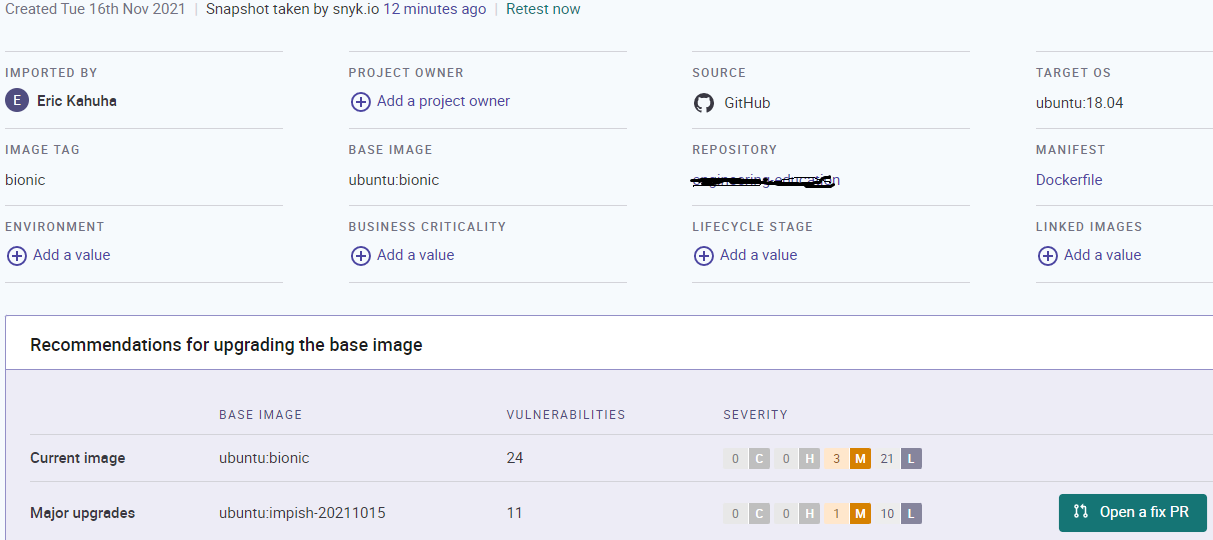
In the past, performing vulnerability scanning required that you build your image and push it to your Git repository. That’s why the Docker scan command is a significant time-saver. It allows you to catch security vulnerabilities before you push any code.
2. Integrate/automate scanning using a CI pipeline
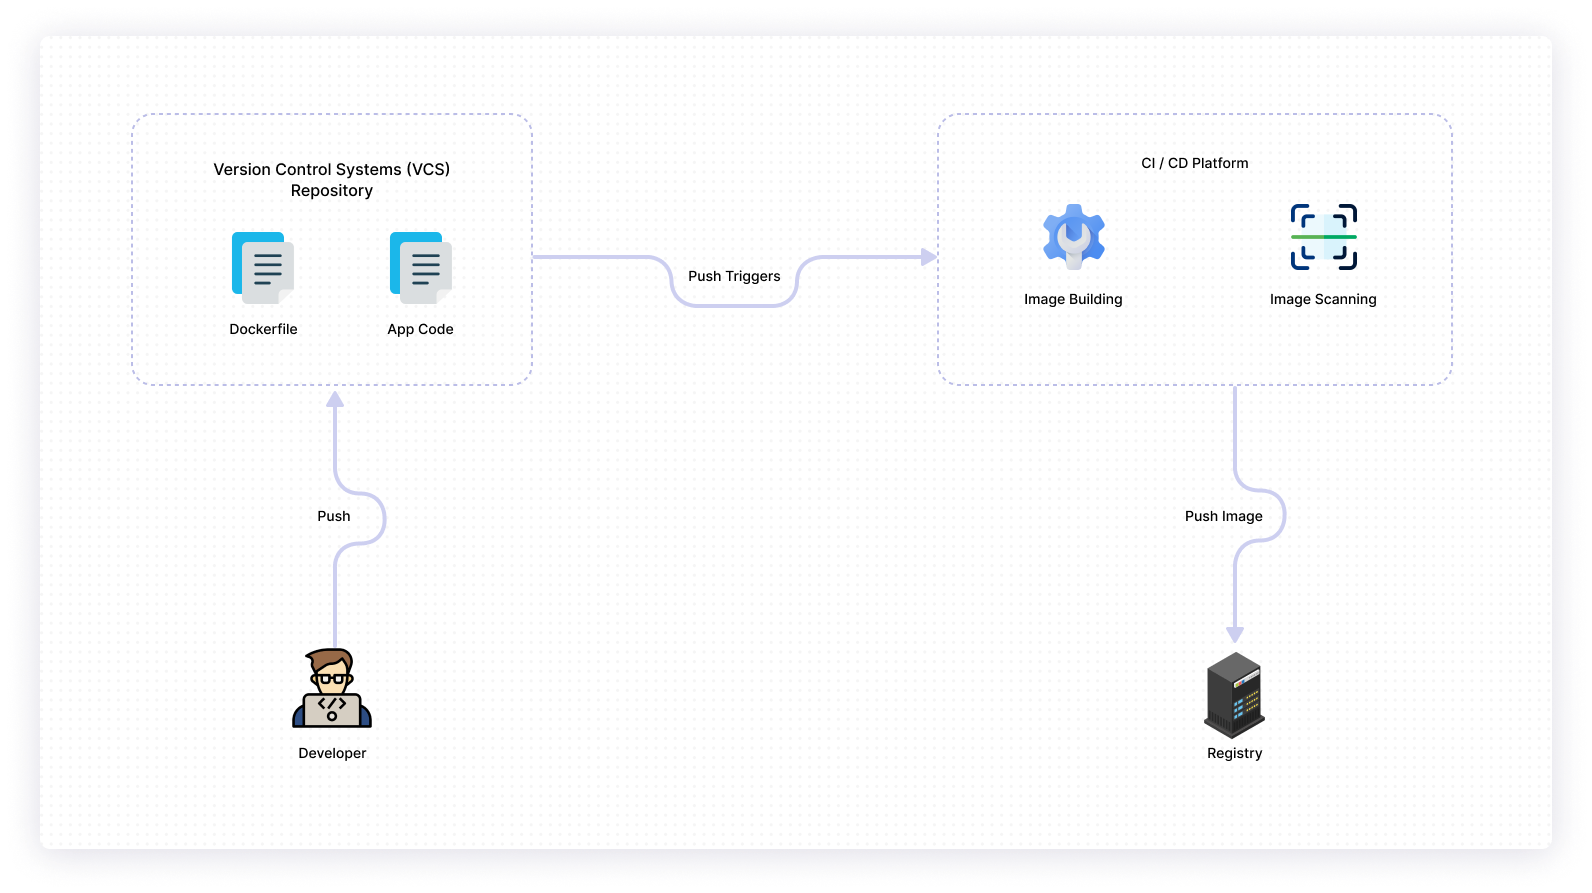
Developers often notice security vulnerabilities in their build when it’s too late. To avoid this, you need to embed scanning into your CI/CD pipeline to address the problem early and ensure a cleaner operating environment.
Scanning early and reporting a failed build directly in the pipeline will help you know why your build failed and how to rectify it.
Ideally, you should integrate security scans into every possible segment of your pipeline. You can automate the process by using a CI pipeline that will help you continuously analyze images that you build.
By automating, you’ll avoid security incidents and save time and effort.
3. Cache scan results
Caching is a Docker feature that helps to iterate image builds more quickly. This should happen during an image build where each layer is cached. The cached layer is only rebuilt if it has changed, or the layer above it has changed since the last build.
Docker cache is your solution to speeding up your builds. Because Docker will reuse the previous build to create subsequent builds, your first build may take a few minutes, but subsequent builds should take only seconds.
For developers, habitually downloading security updates and OS patches is important. To enable such downloads, it’s important to build images without cache occasionally.
4. Scan base images
New container images are typically built off an existing base image. It takes a significant amount of time and resources to scan for vulnerabilities in base images without introducing new susceptibilities.
For this reason, you should focus on base images from third parties. The trustworthiness of the source of your base image and host is important. Look for images from open-source groups and known companies as well as those hosted on reputable registries. In addition, look for the availability of the source code and Dockerfile for all components.
Default installed software also has an influence on the choice of your base image. Start with a minimal base image so that you avoid having to remove packages that you don’t need. Then, install the libraries and tools relevant to your application.
5. use Docker Hub's native scanning
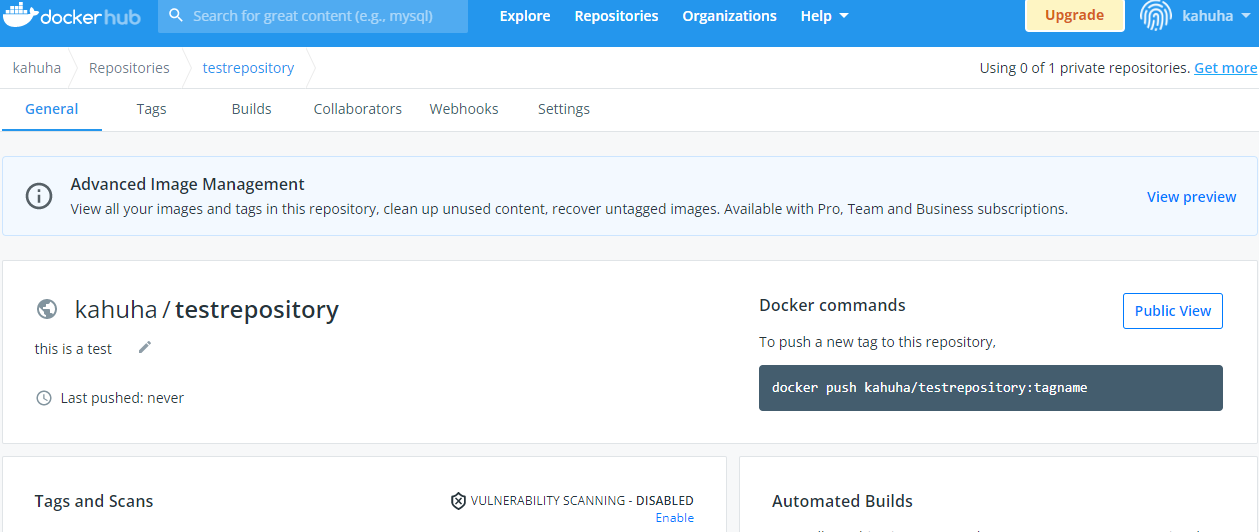
If you’re already hosting images on Docker, you’ll be able to scan images on the specific repositories of your choice.
You have to push an image to Docker Hub in order to trigger scanning. In the scan report, you’ll find the package containing the vulnerability and information on how it was introduced. You’ll also know if later versions fixed the vulnerability.
This method allows you to fix vulnerabilities in your Docker image at an early stage of your build.
6. Scan for secrets
Using a Docker image build is convenient, since it allows you to include essential items such as secrets, password, username, private key, etc., as text in files. However, you may forget to remove these secrets before deploying the image in a production system.
In an experiment, GitGuardian scanned two thousand public images and found that seven percent contained at least one secret. These secrets found their way into container images through unscanned Docker image source code and Docker images based on stacked layers that are susceptible to leaks.
Scanning for secrets will save you from anyone wanting to compromise your deployments, including cybercriminals who routinely scan images for secrets.
7. Choose the right-sized base image
You need to limit what you include in your runtime container to the essentials. Choosing the right size for your base image is your starting point.
Images that are smaller in size and share layers have fewer dependencies and a small attack surface. That is to say, the security surface is reduced, and you require a smaller footprint for your most relevant libraries and dependencies.
Smaller images also demand less memory usage. This is essential for developers working on a laptop because smaller images can be pulled, deployed, or transferred quickly.
8. Use copy to duplicate files
When it comes to duplicating files, it’s hard to determine if you should use the `COPY` or `ADD` command to copy directories. Docker introduced `COPY` to address the shortcomings of the `ADD` instruction when it comes to content duplication.
COPY is the superior choice because it’s only assigned one function that duplicates content in specified locations in their existing format. Unlike ADD, COPY does not extract files. It copies them as they are.
Disclaimer: You can only use COPY for locally stored directories. Use ADD when you need URLs to copy files from external directories into your container.
ADD automatically attracts local archives to the destination directory. Eventually, this can become a recipe for automatically triggered Zip Slip vulnerability and Zip bombs. COPY avoids this, and saves space that additional image layers would have otherwise created.
9. Scan for OS vulnerabilities
A container image consists of a complete operating system, an application, and a runtime. Updated software may be incompatible with the operating system and OSs are updated frequently to prevent this incompatibility. If an image’s OS is breached, there is a high probability that the resulting application will also be breached.
Vulnerability scanning tools should always be used to review the state of your OS. If you identify any issues during the scan, fix them, and your deployment will be more secure.
10. Use multi-stage builds
Multi-stage builds involve organizing the multiple `FROM` instructions in a Dockerfile so that each `FROM` instruction represents a new build stage. Then it can `COPY` artifacts from previous build stages and eliminate intermediate steps like installing dependencies, downloading code, and testing.
If you were to pass through all these steps, you would create additional layers that would affect the size of your final image.
As a developer, multi-stage builds bring you closer to:
- standardizing and simplifying builds
- minimizing the size of the final container
- better organization of Docker files and commands
- improving runtime performance
11. Update frequently
New image updates respond to pertinent security vulnerability disclosures. Older versions of images are susceptible to vulnerabilities and can ultimately make your container app more prone to malicious attacks. It’s vital to use specific tags when making updates.
Because you want to maintain compatibility in your builds, you will need to include a vulnerability scanner in the CI/CD pipeline. Such a scanner will help in fixing vulnerabilities associated with outdated packages before deployment.
12. Confirm that the image is signed
Before using a container image, check that it comes from a trusted source. You can do this by confirming that the image is signed.
While image signing differs for each container platform, a digital signature is standard. As an image builder, you can use a private key to check for the image’s authenticity and verify that the image has not been tampered with.
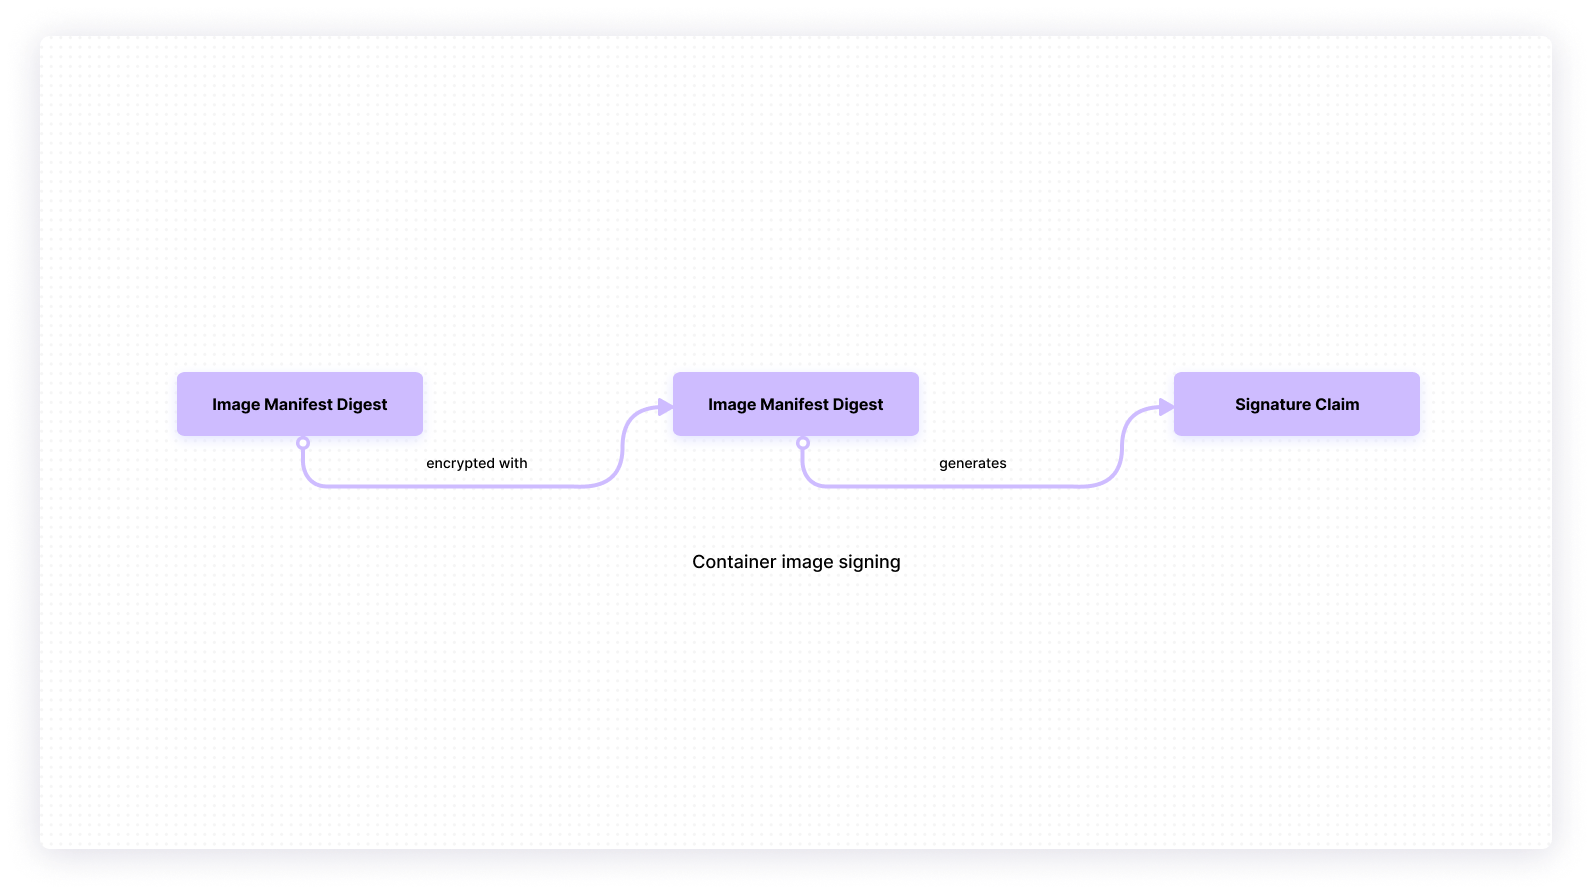
Image signing confirms that downloaded images do not contain a malicious script. It saves you from the potential trouble of executing modified images in your system.
13. Scan images during development and production
Scanning images during development should be a habitual practice. This goes a long way in preventing the introduction of new vulnerabilities when rebuilding or creating images. You can do this by configuring automated scans during your build process. In this way, you’ll ensure that only clean images, free of vulnerabilities, get pushed to the registry and ultimately to the production system.
In addition, continue to scan images even in your production environment. This prevents the introduction of external vulnerabilities into your container images.
Final thoughts
The security of your containers starts with the security of your container image. Container image-scanning best practices like scanning for OS vulnerabilities and integrating scanning into your CI pipeline help ensure your images are safe and not vulnerable to attack. The thirteen best practices discussed in this article help you shift security to the left, ensuring that your containers are secure from the start of the build to the final process.
And remember, container image scanning is not a one-off process. It’s recommended that the practices mentioned above be implemented at continuous checkpoints throughout various stages of your build to ensure the safety of your images. As a DevOps or software engineer, you often choose to run containers from publicly available images. However, you should be prepared for the risks involved. Before you use them, you should scan the images to check for the presence of vulnerabilities. By scanning, you lower the risk of running containers that someone can exploit.
If you're looking to build a dashboard to help monitor your applications, use Airplane. Airplane is the developer platform for building internal tools. With Airplane, you can transform scripts, queries, APIs, and more into powerful workflows and UIs. Airplane offers strong out-of-the-box capabilities, such as audit logs, approval flows, permissions setting, and more.
Sign up for a free account or book a demo and build powerful internal tools within minutes.


